
How to Install a Tile Backsplash That Looks Custom and Clean
You can get a custom, clean-looking tile backsplash by planning carefully, prepping the wall, and using the right tools and materials. Measure and snap level guidelines from a focal point, dry-fit tiles to avoid tiny edge cuts, and pick a grout color and joint width that suit your design. Use proper thin-set, spacers, and a leveling system, then grout, wipe excess promptly, and seal as needed. Keep going to learn step-by-step tips and pro tricks.
How to Install a Tile Backsplash That Looks Custom and Clean
You’ll start by planning the layout, choosing materials, and gathering the right tools so the finished backsplash feels custom.
Expect a few hours of prep, careful tile placement, and precise grout work to keep lines clean.
With patience and the proper technique, you’ll end up with a professional-looking result.
What to expect and the overall process
Before you pick up a trowel, know that installing a tile backsplash is a step-by-step process that mixes prep work, careful layout, and steady installation so the finished result looks custom and clean.
You’ll measure, prep the wall, choose mortar and tile, snap layout lines, set tiles, grout, and seal.
Follow instructions, work steadily, and expect a few hours to a couple days.
Why a Custom, Clean-Looking Backsplash Matters
A custom, clean-looking backsplash boosts your kitchen’s aesthetics and can raise resale value by making the space feel finished and intentional.
It also protects walls from splashes and holds up better over time when installed with quality materials.
Popular ways to get that tailored look include subway, herringbone, large-format, and mosaic tile patterns.
Benefits: aesthetics, resale value, durability
Beauty matters in a kitchen, and a custom, clean-looking tile backsplash makes a visible statement that you’ll notice every time you walk in—drawing the eye, tying together colors and finishes, and turning a utilitarian wall into a focal point.
- Aesthetics: You elevate style and cohesion.
- Resale value: Buyers pay more for polished, durable finishes.
- Durability: Tile resists stains, heat, and moisture, lowering maintenance.
Common styles that achieve a “custom†look (subway, herringbone, large-format, mosaic)
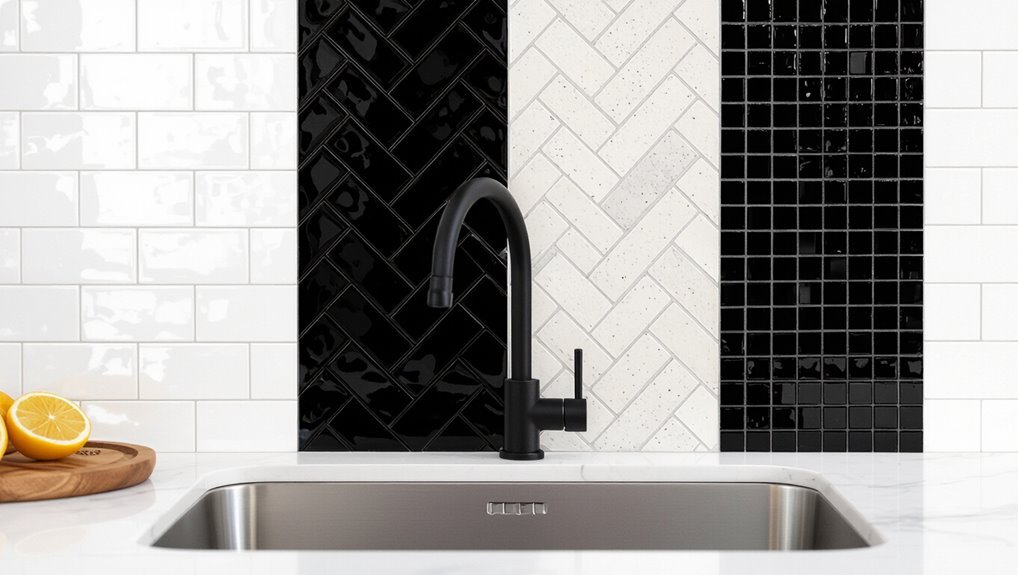
Patterns matter: choosing the right tile layout—subway, herringbone, large-format, or mosaic—lets you create a tailored, clean-lined backsplash that complements your kitchen’s finishes and feels intentionally designed.
Pick subway for timeless simplicity, herringbone for visual interest, large-format for fewer grout lines and a sleek look, or mosaic for texture and focal points; each style helps you achieve a custom, polished result.
Basics: Materials, Tools, and Prep You Need
Before you start, pick the tile and finish that match your style—ceramic, porcelain, glass, or natural stone—and choose appropriate adhesives, grout, sealers, and edge trim.
Gather essential tools like a tape measure, level, tile cutter, trowels, and spacers so you’re ready to work efficiently.
Confirm the wall is properly prepped for tile, whether it’s painted drywall, plaster, or cement board, to guarantee a long-lasting installation.
Tile types and finishes for a custom look (ceramic, porcelain, glass, natural stone)
When you’re choosing tiles for a backsplash, pick the material and finish that match your style, budget, and maintenance needs. Ceramic is affordable and easy to cut; porcelain is durable and low-porosity; glass adds shine but shows grout lines; natural stone offers texture but needs sealing. Compare options:
| Type | Look | Care |
|---|---|---|
| Ceramic | Matte/gloss | Easy |
| Porcelain | Sleek | Low-maintenance |
Adhesives, grout types, sealers, and edge trim options
Although choosing the right tile matters, selecting compatible adhesives, grout, sealers, and edge trim is what makes the installation durable and finished—so gather the specific materials and tools you’ll need first.
Use thin-set mortar matched to tile and substrate, foam or silicone for gaps, sanded or unsanded grout per joint width, a penetrating sealer for porous tiles, and metal or PVC trim for clean, protected edges.
Essential tools checklist (measuring, cutting, leveling, trowels)
Start with a compact set of reliable tools so you can measure, cut, level, and set tile without delays:
- Tape measure, straightedge, pencil, and square for accurate layout.
- Wet tile saw or score-and-snap cutter plus nippers for trims and curves.
- Notched trowel, rubber float, level, spacers, sponge, and a grout bucket for clean setting and finishing.
Surface preparation requirements (painted drywall, plaster, cement board)
1 essential rule: the wall underneath your backsplash must be flat, clean, and sound before you set a single tile.
For painted drywall, scuff, fill holes, and prime glossy surfaces.
For plaster, repair cracks and float any uneven areas.
Use cement board where moisture is likely—fasten, tape, and thinset joints.
Remove loose paint and dust; nothing adheres to a dirty substrate.
Quick Planning and Design Decisions
Measure and map your backsplash area carefully so you can plan layouts, center focal points, and avoid awkward seams.
Pick grout color and joint width to control contrast and the overall look, and order extra tile to cover cuts, mistakes, and pattern matching.
With those decisions set, you’ll save time and get a cleaner, more professional result.
Measure and map your backsplash area (layout planning tips)
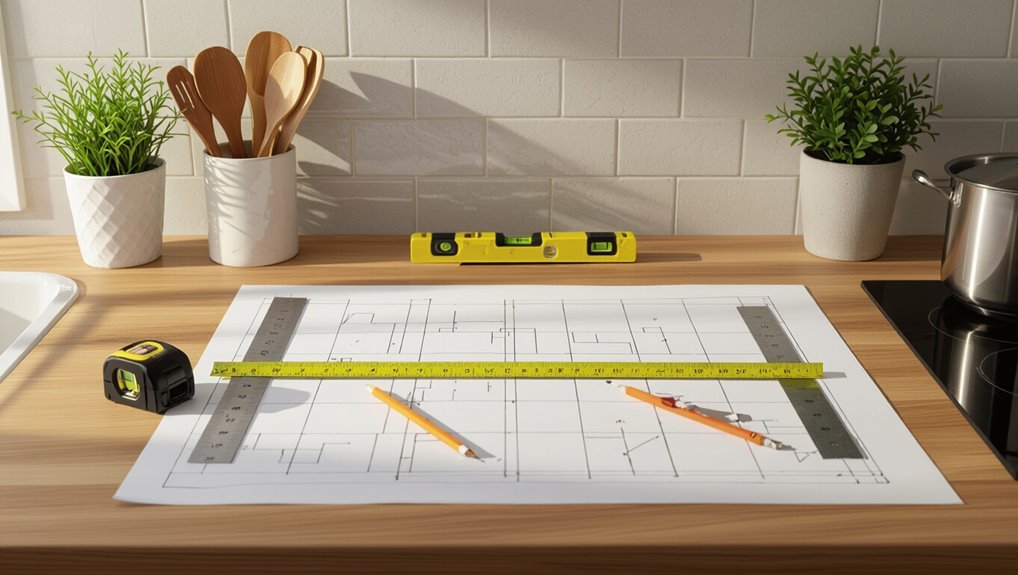
Before you cut or buy tiles, take precise measurements and sketch the wall so you’ll know exactly how the layout will fall.
Mark outlets, windows, cabinets, and seam lines on the drawing. Measure height and length in several spots, calculate tile counts including spacers, and plan centered focal points.
Dry-fit tiles on paper or cardboard to confirm cuts and visual balance before ordering.
Selecting grout color and joint width for a tailored appearance
While picking tiles defines the pattern, your grout color and joint width determine the mood and perceived scale of the installation, so choose them with purpose.
Use matching grout and narrow joints for a seamless, modern look; contrasting grout and wider joints emphasize shape and texture.
Consider maintenance—lighter grout shows stains; darker hides grime.
Test samples in your lighting before finalizing.
Deciding on tile pattern and focal points (centering, seams, trim)
After you’ve picked grout and joint width, plan your tile pattern and focal points so the layout looks intentional.
Center key elements—range, sink, or decorative tile—so seams fall symmetrically. Run horizontal lines level with countertops or cabinets.
Use trim pieces or a border to finish edges and hide cut tiles.
Dry-lay sections to confirm pattern, adjust centering, and maintain consistent seam alignment.
Ordering tile: accounting for cuts, mistakes, and pattern matching
Order a bit more tile than your exact measurements call for so you can cover cuts, breakage, and pattern matching—typically 10–15% extra for straight runs and 15–20% (or more) for diagonal layouts, mosaics, or heavily veined stone.
Buy all tiles from the same dye lot, label boxes, and keep leftovers for repairs.
Account for waste when estimating trim, grout, and adhesive needs.
Step-by-Step Installation Guide
Now you’ll move into the hands-on steps, starting by preparing the wall and protecting nearby surfaces.
Mark reference lines, lay out full tiles dry, then mix and apply adhesive with the correct trowel before setting tiles with consistent spacing and a level.
Finish by cutting tiles to fit around outlets, windows, and counters, using the right tools for clean cuts.
Step 1 Prepare the wall and protect surrounding areas
Start by clearing the workspace and evaluating the wall surface so you know what prep is required; remove outlet covers, loose paint, wallpaper, or old adhesive and fill any holes or gouges with patching compound.
- Protect countertops and appliances with drop cloths and tape.
- Sand and clean the wall until it’s smooth and dust-free.
- Prime porous areas and let everything fully dry before tiling.
Step 2 Mark reference lines and layout full tiles dry
With the wall prepped and dry, you’ll lay out reference lines and dry-fit full tiles to guarantee a balanced, professional look.
Use a level and straightedge to mark a horizontal baseline and vertical plumb line from a focal point.
Dry-fit rows, check grout joint spacing with spacers, and shift layout to avoid tiny edge cuts.
Note placements for outlets and corners.
Step 3 Mix and apply adhesive; correct trowel sizes
Mix the thin-set to a creamy, peanut-butter consistency and apply it thoughtfully with the right trowel so tiles bond solidly and stay level.
Choose a 1/4″ square-notched trowel for small subway or mosaic tiles, 1/2″ for medium tiles, and 3/8″ for many porcelains.
Comb adhesive evenly, back-butter large tiles, and work in small sections to prevent skinning.
Step 4 Set tiles, maintain consistent spacing, use spacers and level

Now that your adhesive is combed and still tacky, press each tile into place using a firm, twisting motion so it seats into the thin-set and aligns with your layout lines.
Maintain consistent spacing with plastic or rubber spacers at every corner, check alignment frequently with a level, and tap tiles gently with a rubber mallet to correct low spots before the adhesive skins over.
Step 5 Cut tiles around outlets, windows, and counters; tips for clean cuts
Step 5 focuses on cutting tiles to fit around outlets, windows, and counters so your backsplash looks professional and sits flush; measure carefully, mark cuts on the tile, and use the proper tool—wet saw for straight cuts, nippers for curves, and a tile hole saw or carbide bit for round openings—to get clean edges without cracking.
Score tiles for snap cuts, chase outlets with a rasp for fit, and always wear eye and hand protection.
Step 6 Allow adhesive to cure; recommended wait times
Once your tiles are set and spacers are removed, let the adhesive cure undisturbed so it reaches full strength; most thinset mortars need 24–48 hours, while mastic can skin over in a few hours but still benefits from 24 hours before grouting.
During curing, avoid bumping, splashing, or applying weight. Keep temperature and humidity within manufacturer recommendations for consistent drying and maximum bond.
Step 7 Grouting: technique for clean joints and avoiding haze
Mix and spread grout with a rubber float, pressing it firmly into the joints and wiping off excess as you go so you get full contact without gaps.
Let grout firm slightly, then use a damp sponge in a diagonal motion to shape joints and remove haze.
Rinse sponge often, change water, and buff dried residue with a microfiber cloth to reveal crisp, clean grout lines.
Step 8 Cleaning, sealing (if needed), and installing trim/transition pieces
Shake off debris and wipe the tiles clean so you can see the grout lines clearly before sealing and fitting trim.
Let grout cure per manufacturer, then remove haze with a damp sponge or grout cleaner.
If using porous tile or high-moisture areas, apply a penetrating sealer.
Fit metal or wood trim, caulk gaps with color-matched silicone, and wipe excess for crisp changes.
Finishing Details That Make It Look Custom
Now that the tile’s up, you’ll want to focus on the small details that make the whole installation read as custom.
Decide where caulk beats grout at seams and corners, pick and finish a grout color for crisp lines, and add trim or metal edge profiles and shelves for a polished look.
Don’t forget precise outlet alignment and matching electrical box covers so everything reads symmetrical.
Caulking vs grout at seams and corners for a seamless finish
When you want a truly seamless look where tile meets cabinets, countertops, or change in plane, choosing caulk over grout at seams and corners is usually the smarter move because caulk flexes with movement and creates a cleaner bead that hides small gaps.
Use paintable silicone or color-matched silicone for durability, run smooth beads, tool for neatness, and avoid rigid grout in movement zones.
Matching grout color and finishing techniques for crisp lines
Because grout ties the whole backsplash together, picking the right color and finish makes a huge difference in achieving crisp, custom-looking lines.
Match grout to dominant tile shade or choose contrasting color intentionally. Use sanded vs unsanded appropriately, mix to manufacturer specs, and test on spare tile.
Tool joints with a consistent bevel or concave profile, wipe haze promptly, and seal for durability.
Installing decorative trim, metal edge profiles, and shelves
Although trim and metal profiles might seem like small details, they’re what turn a good backsplash into a custom-looking installation, so plan their placement and attachment before you set the last tiles.
Choose profiles that match tile thickness, cut them square, and secure with thinset or manufacturer clips.
Install decorative trim and floating shelves level, anchoring into studs for weight, then caulk joints neatly.
Electrical box covers and outlet alignment for symmetry
Plan your outlet layout so covers sit perfectly centered and level with surrounding tiles, since aligned openings make a backsplash read as intentional and professional.
Mark, adjust, and box out locations before tiling. Recess or extend electrical boxes to match tile thickness.
Use decorative or flush-mount cover plates that complement tile lines. Shim and level boxes, then cut tile carefully for tight, symmetrical gaps around every outlet.
Common Mistakes and How to Avoid Them
Before you start, know the usual pitfalls so you can avoid wasted time and a sloppy finish.
Pay attention to your layout to prevent awkward cut tiles, keep grout lines and tile faces even to avoid lippage, use the correct adhesive and substrate for your tile, and clean grout promptly to prevent haze.
With a little planning and patience you’ll sidestep these common errors.
Mistake 1 Poor layout leading to awkward cut tiles; prevention
If you don’t lay out your tiles thoughtfully, you’ll end up with narrow, awkward cuts at visible edges or around outlets that scream “afterthought.”
Plan a balanced layout: find the centerline, dry-fit rows, and shift joints so cut pieces at edges are at least half a tile.
Mark outlet centers, accommodate trim, and adjust starter rows before adhesive sets to avoid obvious, small slivers.
Mistake 2 Inconsistent grout lines and lippage; prevention
Once you’ve nailed the layout, don’t let sloppy spacing and uneven tiles ruin the look—that’s where inconsistent grout lines and lippage show up.
Use consistent spacers, check alignment frequently with a straightedge, and employ tile leveling clips to eliminate height variations.
Remove excess adhesive before it sets, adjust tiles while mortar’s wet, and inspect rows from multiple angles to keep joints uniform.
Mistake 3 Using wrong adhesive or substrate; prevention
Because tile adhesion depends on both the right substrate and the correct mortar, choosing the wrong products can make a beautiful backsplash fail fast.
Check substrate: drywall isn’t suitable behind wet areas—use cement board or waterproof backer.
Match mortar to tile type and substrate (thin-set, modified, epoxy).
Follow manufacturer instructions, mix to proper consistency, and test a small area so tiles bond securely.
Mistake 4 Rushing grout cleanup causing haze; prevention
You’ve picked the right mortar and substrate, but grout needs the same attention—rushing cleanup will leave a stubborn haze that ruins the look and can be hard to remove.
Wipe grout haze with a damp sponge in stages, changing water often. Use a grout haze remover for cured residue.
Work small sections, follow manufacturer timing, and buff with a dry cloth to reveal clean, consistent grout lines.
Best Practices and Pro Tips for a Professional Result
To get a high-end look, plan your patterns and focal points so tiles lead the eye and key pieces sit center-stage.
Use pro tools and techniques—tile leveling systems, a good wet saw, and proper trowel notching—to speed the job and keep edges flawless.
Finish with simple maintenance routines like sealing grout and regular gentle cleaning to keep the backsplash looking new.
Working with patterns and focal points for a high-end look
When aiming for a high-end backsplash, think like a designer: choose patterns and focal points that balance scale, texture, and color to make your layout feel intentional rather than busy.
Pick one focal area—behind the stove or sink—with a contrasting pattern or accent tile.
Repeat motifs sparingly, align grout lines for cohesion, and keep surrounding tiles simple to let the focal point breathe.
Tools and techniques pros use (tile leveling systems, wet saw tips)
Although tile layout and design set the vision, pros rely on specific tools and precise techniques—like tile leveling systems and wet saw practices—to turn that vision into a flawless finish.
Use a quality leveling system to prevent lippage, tighten clips progressively, and plan seams.
For cuts, score sightlines, keep the blade cool with water, make slow steady feeds, and wear PPE to guarantee clean, safe edges.
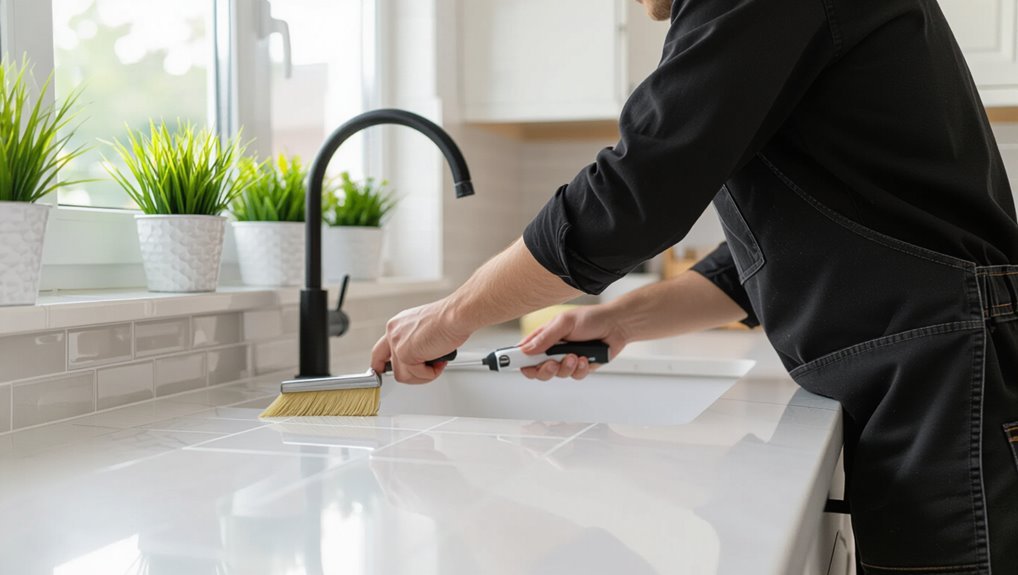
Maintenance tips to keep the backsplash looking new
Good maintenance keeps the craftsmanship you just applied looking sharp for years.
Wipe spills immediately with a mild detergent and soft cloth, avoid abrasive cleaners, and reseal grout annually or when water no longer beads.
Inspect for cracked grout or loose tiles and repair promptly.
Use a grout brush for deep cleaning and ventilate cooking areas to reduce grease buildup.
Cost, Time Estimate, and When to Hire a Pro
Expect materials to be a fraction of the total cost while labor can be the biggest expense, especially for complex patterns.
Plan on a few hours for a small backsplash, a day or two for a medium job, and several days if you’re tiling around outlets, corners, or intricate designs.
If you don’t have the right tools, limited time, or the project involves tricky cuts, plumbing, or structural work, you should hire a pro.
Typical cost breakdown (materials vs labor)
A simple tile backsplash usually splits costs roughly 60/40 between materials and labor, though your exact share can shift based on tile choice and complexity; basic ceramic tiles and standard grout keep material costs low, while glass, stone, or intricate patterns raise the materials line and demand more labor time and skill.
| Item | Typical % | Notes |
|---|---|---|
| Materials | 60% | Tile, grout, adhesive |
| Labor | 40% | Cutting, setting, finishing |
| Extras | Varies | Sealer, trim, removal |
Time estimate by project size and complexity
For a small, straightforward backsplash—think a single run behind a sink using basic ceramic tile—you’ll usually spend a few hours to a day and can often handle it yourself.
Larger areas, intricate patterns, or premium materials add days of labor and typically warrant hiring a pro.
Plan for drying and grout curing—add 24–72 hours.
Complex cuts, mosaic layouts, or substrate prep extend time.
Signs you should hire a professional
If you’re unsure about costs, timing, or the scope of work, hire a pro—especially when the job involves extensive demo, uneven walls, electrical or plumbing moves, or high-end materials that demand precise cuts and finishes.
You should also call a pro if you lack specialized tools, face strict deadlines, want warranty-backed work, or prefer guaranteed waterproofing and flawless grout lines for resale value and long-term durability.
Troubleshooting Common Problems
If you spot uneven tiles or lippage after installation, you’ll need to know how to assess and correct the high spots or replace affected tiles.
For grout that’s cracking or discoloring, you’ll learn quick fixes and how to prevent recurrence with proper mixing, sealing, and movement joints.
And if tiles feel loose or the adhesive’s failed, you’ll get clear steps for removing, re-bonding, or replacing tiles to restore a solid backsplash.
Uneven tiles or lippage after installation remedies
When tiles sit uneven or one edge sticks up more than the rest, you’ll want to act quickly to prevent grout cracking and an obvious lippage line; small fixes can save a whole re-do.
Tap down slightly raised tiles with a rubber mallet and wooden block, remove and re-bed tiles with fresh thinset if needed, or shim adjacent tiles.
Re-check level before grout cures.
Grout cracking or discoloration fixes and prevention
Once you’ve corrected uneven tiles, you’ll want to address grout issues next, since cracked or discolored grout not only looks bad but can let moisture damage the wall behind the backsplash.
Remove loose grout, clean joints, and regrout with a quality sanded or unsanded mix appropriate to joint width.
Seal grout after curing and clean spills promptly to prevent staining and mold.
Loose tiles or adhesion failures repair steps
Start by tapping suspect tiles to locate hollow spots and loose adhesion—you’ll hear a dull thud or a hollow ring where mortar has failed.
Remove loose tiles and old mortar, clean substrate, and check for water damage.
Apply appropriate thinset or mastic, press tiles firmly using spacers, and let cure per manufacturer.
Regrout and seal edges to prevent future failures.
FAQ
You probably have a few quick questions before you start, so let’s answer things like choosing grout color, whether you can tile over existing backsplash or paint, and how long to wait after grouting.
I’ll also cover which tiles are easiest for DIYers and how to remove and prevent grout haze.
Read on for concise, practical answers you can use on your project.
How do I choose the best grout color for my tile?
Wondering which grout color will make your tile look its best? Choose grout to either blend or contrast: matching creates a seamless, larger look; contrasting highlights pattern and grout lines.
Consider tile color, room size, and maintenance—lighter grout shows stains, darker hides them.
Test samples with sealers under real light, then pick the balance between aesthetics and upkeep you prefer.
Can I install tile backsplash over existing backsplash or paint?
Can you tile over an existing backsplash or painted wall? Yes, but prep matters.
Remove loose tiles, glossy paint, or unstable substrate. Clean, sand, and prime smooth surfaces; use a bonding primer or tile adhesive rated for painted walls.
For ceramic or laminate backsplashes, consider thinset with a bonding agent or mechanically fasten cement board.
Always guarantee a flat, sound surface before tiling.
How long before I can use the counter and backsplash area after grouting?
After grouting, wait at least 24 hours before light use and 72 hours for full water resistance, depending on the grout type and conditions.
Don’t place heavy items, scrub, or expose seams to water until fully cured.
Sealers need their own cure time—follow manufacturer directions.
Test a small area gently before regular use, and keep ventilation to speed drying and guarantee a durable, stain-resistant finish.
What tiles are easiest for DIY installers?
If you want an easy tile project, choose large-format, rectified ceramic or porcelain tiles and simple shapes like subway or square tiles—they’re forgiving to cut, align, and grout, and they reduce the number of joints you’ll need to worry about.
Choose glazed finishes for durability, mesh-backed mosaics for fast layout, and peel-and-stick for temporary or rental installs.
Prioritize straight edges and consistent thickness.
How do I clean grout haze and prevent it in the first place?
Wondering how to get that cloudy residue off your new tile? Wipe haze with a damp sponge, then buff with a microfiber cloth.
For stubborn haze, use a grout haze remover or a vinegar-water mix (test first).
To prevent it, clean excess grout before it dries, use a grout float at a 45° angle, and rinse frequently during cleanup.
