
How to Sand a Concrete Floor for Painting, Sealing, or Epoxy
You’ll prep, inspect, and sand the slab so coatings bond and last: clean and degrease, repair cracks, test moisture and pH, then choose a grinder or orbital sander with diamond or resin-bond abrasives. Start coarse (30–40 grit) for coatings, move to mid (60–80), finish with fine (120–150), vacuum between passes and tack-wipe before coating. Use PPE and HEPA dust control. Follow-up tests confirm porosity and cleanliness, and the next sections show detailed steps, tools, and tips.
How to Sand a Concrete Floor for Painting, Sealing, or Epoxy (Quick Answer & Hook)
You’ll need to sand when the concrete is rough, stained, or has existing coatings that’ll prevent paint, sealer, or epoxy from bonding.
Start with a coarse grinder to remove high spots and coatings, then step down to finer abrasives to smooth and profile the surface.
With proper prep—cleaning, grinding, and vacuuming—you’ll create a sound, absorbent surface ready for your chosen finish.
Quick Answer When and why sanding is necessary
When preparing concrete for paint, sealer, or epoxy, sanding becomes necessary whenever the surface is too smooth, contaminated, or uneven for coatings to bond properly.
You need sanding to remove curing compound, paint residues, grease, or surface laitance and to profile smooth slabs so primers and epoxy adhere.
Learn how to sand a concrete floor to guarantee durable, even coating results and prevent peeling.
Snapshot of steps
If the surface needs better adhesion or has contaminants, follow a compact, step-by-step plan so your paint, sealer, or epoxy bonds and lasts.
Clear debris, repair cracks, then grind or sand with coarse grit.
Vacuum and wipe, then etch if needed.
Progress to finer grit, remove dust thoroughly, apply primer or sealer, and finally lay your finish per manufacturer instructions.
Basic Understanding of Concrete Surface Preparation
Before you start sanding, you should know what sanding actually does compared with etching, grinding, or shot blasting: sanding smooths and levels light surface imperfections and removes thin coatings, while grinding or blasting removes heavier material and etching chemically opens pores.
Choose sanding for lightly worn, clean concrete and switch to grinding or acid-etching when you’re dealing with thick paint, adhesives, or heavy surface damage.
Also identify the surface type and contaminants—sealants, paints, adhesives, and oils all affect which preparation method will work best.
What sanding achieves vs. other preparation methods (etching, grinding, shot blasting)
While sanding won’t remove deep coatings or heavy contaminants, it does create a smooth, profile-controlled surface by abrading the top layer of concrete and knocking down minor imperfections.
You’ll use sanding for light profile creation, smoothing, and feathering edges.
Etching chemically opens pores; grinding removes coatings and levels severe irregularities; shot blasting rapidly profiles large areas without chemicals, preserving aggregate.
When to sand vs. when to grind or acid-etch
When you need a light, controlled finish and only minor blemishes to remove, choose sanding; pick grinding when coatings, heavy residues, or significant unevenness demand more aggressive material removal.
Use acid-etching only to open pores for better adhesion on clean, sound concrete or when mechanical methods aren’t available.
You’ll sand for profile refinement, grind for removal and leveling, and etch only for simple porosity.
Types of concrete surfaces and common contaminants (sealants, paint, adhesives, oils)
You’ve just picked the right method for the job; now look at the surface itself, because concrete comes in several forms and each holds different contaminants that affect preparation.
You’ll identify substrate type and common residues, then plan removal.
- Smooth troweled — sealers, paints
- Broom finish — dirt, light oils
- Polished — coatings, adhesives
- Old patchwork — incompatible sealants
Tools, Materials, and Safety Equipment Needed
You’ll need the right sanding and grinding tools—like an orbital sander, floor grinder, diamond cup wheels, or a scarifier—matched to the job’s scale.
Choose abrasive types and a grit progression for concrete, and gather vacuum systems, tack cloths, cleaners, and patching compounds.
Don’t forget proper PPE (respirator, eye and ear protection, gloves) and good ventilation for dust control.
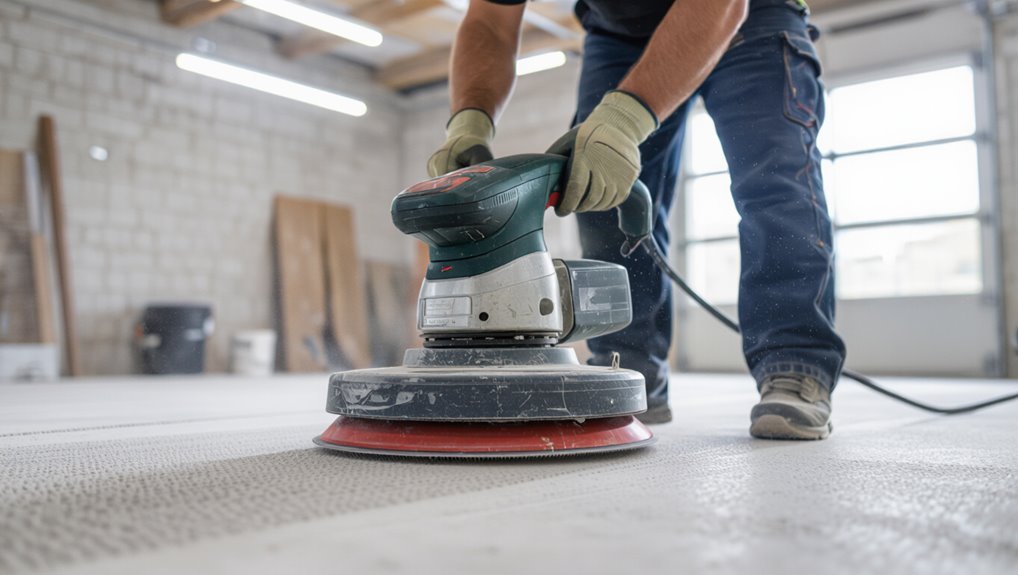
Recommended sanding and grinding tools (orbital sander, floor grinder, diamond cup wheel, scarifier)
A good set of sanding and grinding tools will make the job faster and give a smoother result, so you should pick equipment that matches the floor’s condition and your skill level.
Use an orbital sander for edges and light smoothing, a floor grinder for large areas, diamond cup wheels for heavy grinding, and a scarifier when removing thick coatings or uneven high spots.
Abrasive types and grit progression for concrete
After choosing the right grinder and wheels for the job, pick abrasives and plan your grit progression so you end up with a smooth, durable surface. Use diamond cup, resin-bond discs, and coarse-to-fine sequence: start 30–40 grit to remove coatings, 60–80 mid, finish 120–150 for adhesion. Pace passes, inspect surface, and never skip steps.
| Type | Grit | Feeling |
|---|---|---|
| Diamond cup | 30–40 | Powerful |
| Resin-bond | 60–80 | Controlled |
| Pad/fine | 120–150 | Satisfying |
| Notes | Progression | Confident |
Additional materials (vacuum, tack cloths, cleaners, patching compounds)
One set of auxiliary supplies will make sanding faster and cleaner: a shop vacuum with shrouded hose, tack cloths for final wipe-downs, pH-neutral concrete cleaner for grease and dust, and a quality patching compound for chips and hairline cracks.
Keep extra abrasive discs, mixing tools, a margin trowel, and a bucket. Use tack cloths after vacuuming and patching before priming or coating.
Personal protective equipment and ventilation requirements

Because sanding concrete kicks up a lot of silica-laden dust and produces noise and vibration, you should wear a fitted N95 or P100 respirator, safety goggles, hearing protection, gloves, and knee pads.
Make sure the area is well-ventilated with exhaust fans or open windows and a shop vacuum with a HEPA-rated filter hooked to the sander.
- Respirator fit
- Eye seal
- Hearing dampening
- Dust extraction
Pre-Sanding Inspection and Preparation
Before you start sanding, inspect the slab for cracks, spalling, moisture issues, and loose debris so you can prioritize repairs.
Test moisture vapor transmission and surface pH to confirm coatings will bond, then degrease and sweep or vacuum the floor thoroughly.
Patch holes, fill joints, and level uneven areas so the sanding produces a consistent result.
Inspecting for cracks, spalling, and moisture issues
When you examine the slab closely, look for hairline cracks, larger fissures, spalling (surface flaking), and any signs of moisture like efflorescence or damp patches — these issues will dictate repair methods and whether sanding is advisable.
Mark damaged areas, note depth and extent, and determine if cracks need filling, spalled sections require patching, or moisture must be addressed before you proceed.
Testing moisture vapor transmission and pH for coatings compatibility
After noting cracks, spalling, and damp spots, you should test the slab’s moisture vapor emission rate (MVER) and surface pH to confirm coatings will bond and cure properly.
Use a calcium chloride or ASTM F1869 kit for MVER and a pH strip or probe per ASTM F710.
Compare results to your coating manufacturer’s limits and address excessive moisture or high/low pH before proceeding.
Cleaning steps before sanding (degreasing, removing loose debris)
Start by removing all loose debris and contaminants so your sanding tools work on solid concrete, not dirt or grease. You’ll then degrease, rinse, and dry the surface before sanding.
- Sweep or vacuum loose particles.
- Apply a concrete degreaser to oil spots.
- Scrub and rinse thoroughly.
- Allow full drying time to prevent clogging and poor adhesion.
Repairing damage: patching, filling joints, and leveling
Inspect the floor closely for cracks, spalls, and uneven areas so you know exactly what needs fixing before you sand.
Mark damage, remove loose material, and use a cement patch or epoxy filler for holes.
Fill control joints with flexible joint sealant.
Grind high spots and apply a leveling compound for hollows.
Let repairs cure fully, then re-clean before sanding.
Step-by-Step Sanding Process
Now you’ll move into the sanding phase, starting by setting up containment and dust control so residue stays manageable.
Pick the right grinder and abrasive for your first pass, then follow a consistent pattern with correct speed, overlap, and pressure.
Change grits as the floor smooths and spend extra time on edges, corners, and stubborn stains.
Step 1 Set up the workspace and control dust (containment, negative air, vacuums)
Before you touch a sander, prepare the room so dust stays contained: seal doorways and vents with plastic sheeting and heavy-duty tape, remove or cover all furniture, and lay down walk-off mats to catch tracked grit.
Use negative-air machines, HEPA vacuums, and glove/eye protection.
Follow this checklist:
- Seal openings
- Run negative air
- Use HEPA vacuum
- Wear PPE
Step 2 Choose the right machine and abrasive for initial pass
Pick a machine and abrasive that match the floor condition and your goals: for large, smooth slabs use a ride-on or heavy-duty planetary grinder with 36–60 grit mesh diamonds for aggressive material removal.
While smaller rooms, localized damage, or DIY jobs call for a walk-behind planetary or single-head grinder with 30–50 grit diamonds; select resin or metal-bond diamonds based on hardness, and guarantee compatible vacuum shrouds.
Step 3 Sanding technique and pattern (overlap, speed, pressure)
With the right grinder and diamonds in place, set up a consistent sanding pattern that prevents skips and gouges: work in overlapping passes about 30–50% overlap, move at a steady walking pace, and keep pressure even—let the machine do the work.
Change direction periodically for uniformity, avoid pausing in one spot, and monitor dust and surface feel to adjust speed and pressure.
Step 4 Progressing grits: when and how to change grits
As you move through the sanding process, change diamond grits systematically so each pass removes the scratches left by the previous one and builds a progressively smoother surface.
Start coarse (30–50) to remove imperfections, then step to medium (80–120), finishing with fine (200–400) for a uniform profile.
Change when visible scratch lines disappear; clean between grits and inspect frequently.
Step 5 Focused sanding for problem areas (edges, corners, stains)
Once the main floor is evenly sanded, you’ll tackle edges, corners, and stubborn stains that the big grinder missed.
Use an edging grinder, detail sander, or hand-held diamond pad to reach tight spots. Work slowly with appropriate grit, keep vacuum close to control dust, and spot-treat oil or paint with coarse pads.
Rinse and dry patched areas before proceeding.
Step 6 Final sanding pass and surface profile check (anchor profile for coatings)
Start a final sanding pass to confirm an even surface and create the proper anchor profile for coatings.
Move systematically across the floor with overlapping strokes, keep the grinder flat, and use medium-grit abrasives to achieve uniform texture.
Inspect visually and with a profile gauge or water test.
Address low spots or glaze, then vacuum and wipe before applying primer or coating.
Post-Sanding Cleanup and Surface Testing
After sanding, you’ll thoroughly vacuum and tack-wipe the floor to remove all dust and grit.
Then you’ll run simple surface tests—water drop to check porosity and a tape test to confirm cleanliness and adhesion.
If water beads, tape peels, or residue remains, you’ll re-sand or do targeted prep before sealing.
Thorough vacuuming and tack-wiping
1 clear pass with a high-quality shop vac and a follow-up tack cloth will remove the fine dust that sanding leaves behind.
Work methodically in overlapping passes, vacuuming corners and edges with crevice tools.
After vacuums, wipe the floor with a slightly damp tack cloth or microfiber pad to pick up residual particles.
Let the surface dry completely before any coating or testing.
Final surface tests for cleanliness, porosity, and adhesion (water drop test, tape test)
Once the floor’s dry and dust-free, you’ll run a few simple tests to confirm cleanliness, porosity, and coating adhesion before proceeding.
Sprinkle water in several spots: it should absorb evenly, not bead.
Press clear tape firmly, then peel—no dust or particles should lift.
If tests pass, you’re ready to apply primer or sealer; document results and mark any questionable areas.
When to re-sand or perform additional prep
If your water and tape tests reveal uneven absorption, residual dust, or areas where adhesive didn’t bond, you’ll need to re-sand or spot-prep before coating.
Focus on feathering edges, removing contamination, and opening dense spots with fine-grit sanding.
Clean thoroughly, retest those areas, and only proceed when absorption and adhesion are uniform.
Repeat spot-prep until tests pass.
Preparing for Specific Finishes: Painting, Sealing, Epoxy
Now that the floor’s clean and tested, you’ll tailor sanding to the finish you’re applying.
For paint you’ll want a fine, consistent profile for adhesion; for penetrating sealers you’ll check porosity so the product can soak in; and for epoxy you’ll create a coarser profile, verify moisture limits, and plan a compatible primer.
Follow each finish’s specific prep steps to guarantee proper bonding and longevity.
Paint prep requirements and best sanding profile
When you’re prepping a concrete floor for paint, the right sanding profile and surface cleanliness determine how well the coating will bond and how long it lasts.
Create a uniform, slightly roughened profile—think 60–80 grit equivalent—removing laitance, oils, and loose material.
Vacuum and degrease thoroughly.
Confirm no dust, residues, or curing compounds remain so primers and paint can penetrate and adhere properly.
Sealer prep: porosity and penetration considerations
Because sealers rely on penetrating and filling the concrete’s pores, you should first assess and prepare the slab’s porosity so the product can bond and perform as designed.
Test absorption with a water or solvent drop, note dense versus powdery areas, and sand or etch accordingly.
Remove dust, laitance, and contaminants so the sealer penetrates evenly and cures to its aimed protection.
Epoxy prep: recommended profile, moisture limits, and primer needs
If you’re planning an epoxy coating, start by creating the right surface profile and confirming acceptable moisture levels so the system can bond and cure properly. You’ll diamond grind to CSP 2–3, test RH or MVER, and use a compatible primer when moisture or porosity require it. Choose primer per epoxy tech data for adhesion and vapor tolerance.
| Item | Spec |
|---|---|
| Profile | CSP 2–3 |
| Moisture | RH ≤ 85% / MVER limits |
| Primer | Per epoxy TDS |
| Note | Clean, dust-free surface |
Common Mistakes and How to Avoid Them
Don’t over-sand or leave uneven profiles—check your passes and keep the machine moving to avoid low spots.
Control dust with proper collection or containment so you don’t contaminate the surface, and always test for moisture and pH before finishing.
Use the correct grit progression and machine for the job to get consistent, durable results.
Over-sanding or creating uneven profiles
Start by recognizing that over-sanding or uneven profiling can ruin both the look and function of your concrete floor — it leaves low spots, ridges, and weak surfaces that show up after sealing.
Work methodically, keep the grinder moving, and use consistent pressure and overlapping passes.
Check progress frequently with a straightedge and correct high or low areas before finishing.
Not controlling dust and contaminating the surface
Because sanding kicks up a huge amount of fine dust, failing to control it can quickly contaminate the surface and undermine your finish.
You should use a vacuum-equipped sander, run a shop vac with a HEPA filter, tack-cloth between passes, and seal vents to prevent airborne dust.
Clean thoroughly before coating and don’t skip a final wipe to guarantee adhesion and a smooth result.
Skipping moisture and pH testing
If you skip moisture and pH testing, you risk coating failure, efflorescence, and poor adhesion that can ruin hours of work.
Test moisture with a meter or taped plastic cup, and check pH with strips.
If levels are off, fix them—drying, vapor barriers, or neutralizers—before sanding and coating.
That prevents peeling and costly rework.
Using wrong grit or machine for the job
When you pick the wrong grit or machine, you’ll waste time and can permanently damage the slab’s profile or finish.
Match grit to task: coarse for heavy removal, fine for smoothing. Choose machine type for area and contours. Avoid shortcuts.
- Inspect surface
- Start coarse, progress finer
- Use correct RPM/weight
- Test small area first
Best Practices, Tips, and Time-Saving Strategies
Match your grit progression to the coating you plan to apply so the surface bonds properly and lasts.
For big jobs set up an efficient workflow and rent heavier equipment, while small areas are often faster with handheld tools or a pro for tricky spots—use the checklist to decide DIY vs. hiring help.
After coating, follow simple maintenance routines to keep the finish looking new and extend its life.
Matching grit progression to coating type
Because different coatings demand different surface profiles, you’ll want to pick a grit progression that creates the right texture without wasting time on unnecessary steps.
For paint or sealers, start with 30–40 grit to remove high spots, then 80–100 grit for a uniform key.
For epoxy, use 30–60 grit for profiling, finishing with 80 grit to guarantee adhesion while minimizing swirl marks.
Efficient workflow for large vs. small areas
After picking the right grit progression for your coating, plan the workflow to fit the area size: large floors benefit from a systematic, zone-based approach while small spots are faster with hand tools or a single-pass machine.
For big jobs, stage sanding, dust control, and overlaps to avoid missed strips.
For small areas, use compact discs, work edges first, and finish with a quick vacuum and tack.
Hiring professionals vs. DIY decision checklist
Wondering whether to hire pros or tackle concrete sanding yourself? You’ll weigh budget, schedule, safety, and skill.
Use this checklist to decide quickly:
- Cost vs. value: can pros save time or prevent costly mistakes?
- Time: do you have uninterrupted days to finish properly?
- Safety: are you equipped for dust control and heavy machines?
- Skill: do you confidently handle equipment and surface prep?
Maintenance tips after coating to prolong finish life
If you decide to go DIY or hire pros, protecting that finished surface will keep your investment looking and performing its best.
Sweep and dust daily, use walk-off mats, and clean spills promptly with pH-neutral cleaners.
Avoid harsh chemicals and abrasive tools.
Reapply topcoat as manufacturer recommends, inspect for damage quarterly, and address chips or peeling immediately to prevent larger repairs.
Tools and Materials Comparison Quick Reference
Now you’ll compare machine types—walk-behinds, ride-ons, and hand grinders—so you can pick the right pros, cons, and ideal use case for your job.
You’ll also match abrasive types and grit ranges to the finish you want, from heavy stock removal to a polished sheen.
This quick reference will help you choose tools and consumables that save time and get predictable results.
Machine types compared: pros, cons, and ideal use cases
Because the right grinder can cut hours off the job and improve finish quality, you should pick a machine that matches your floor size, budget, and surface condition. Choose walk-behind for control, planetary for heavy removal, and edge grinders for trims. Match power and dust control to job scope to save time and rework.
| Machine | Strength | Best use |
|---|---|---|
| Walk-behind | Control | Small to medium floors |
| Planetary | Aggressive | Large, rough slabs |
| Edge grinder | Precise | Perimeters, corners |
Abrasive types and grit outcomes
Choosing the right abrasive makes the difference between a quick prep and a long day of rework, so know what each type and grit does before you start. You’ll pick diamond for heavy removal, silicon carbide for smoothing, and finer grits for prep. Match grit to damage: coarse strips, medium evens, fine polishes.
| Type | Result |
|---|---|
| Diamond | Rapid removal |
| Silicon carbide | Smooths |
| Resin-bond | Controlled cut |
| Coarse (16–40) | Strip paint |
| Fine (200+) | Polish surface |
Frequently Asked Questions (FAQ)
You’ll find answers here to common concerns like how fine to sand before painting or epoxy, whether you can sand over old paint or sealer, and if sanding fixes moisture issues.
You’ll also learn practical tips for controlling dust when sanding indoors and how long to wait after sanding before applying a coating.
Use these FAQs to decide the next steps for your project and avoid common mistakes.
How fine should I sand concrete before painting or epoxy?
How smooth should you make the concrete before painting or applying epoxy?
You don’t need glass-smooth—aim for a profile similar to 60–80 grit sandpaper to remove laitance, rough spots, and contaminants. That texture helps primers and epoxy bond.
After sanding, vacuum thoroughly and wipe with a solvent or etcher.
Test adhesion in a small area before full application.
Can I sand concrete over existing paint or sealer?
If your concrete already has paint or a sealer, you can still sand it—but the approach changes.
You’ll need to test adhesion, strip loose coatings, and use coarser diamonds or grinders to remove or profile the surface.
Clean thoroughly afterward, etch if necessary, and repair damage.
Proper prep guarantees new paint, sealer, or epoxy bonds instead of peeling or bubbling.
Is sanding enough to fix moisture problems?
Because sanding only removes surface material, it won’t fix underlying moisture issues in concrete; you’ll still see efflorescence, blistering, or adhesion failure if moisture persists.
Test moisture levels first (plastic sheet or meter). If high, address sources—drainage, vapor barriers, professional remediation—or use moisture-tolerant coatings.
Sanding helps prep the surface but doesn’t replace proper moisture control.
How do I control dust when sanding indoors?
Want to keep your home clean while you sand? Use a dustless sander or one with a HEPA vacuum attachment, seal doors and vents with plastic and tape, and hang a zipper doorway.
Wear a fitted N95 respirator, goggles, and disposable coveralls.
Work in short sessions, empty vacuum filters outdoors, and wipe surfaces with a damp microfiber cloth to capture residual dust.
How long should I wait after sanding before applying coating?
How long should you wait after sanding before applying a coating? You should wait until the concrete is fully clean and dry—typically 24 to 48 hours in normal conditions.
Use a moisture meter or tape test for certainty.
Verify no dust remains by vacuuming and wiping with a tack cloth or solvent recommended by the coating manufacturer before you apply primer or coating.
Visual Aids and Checklist
You’ll get the best results if you follow a simple step-by-step checklist covering preparation → sanding → final checks.
Include clear images: tool close-ups, sanding patterns in action, and before/after surface profiles to show expected results.
Use these visuals alongside the checklist so you can compare progress and confirm each step is done right.
Step-by-step checklist for DIY sanding (preparation → sanding → final checks)
Start by laying out a clear, numbered checklist so you can move through preparation → sanding → final checks without missing steps.
Use this sequence and tick each off as you go:
- Clear area, repair cracks, remove debris.
- Choose grit sequence and dust control.
- Sand systematically, overlap passes, monitor progress.
- Vacuum, wipe, inspect for smoothness and adhesion readiness.
Suggested images to include: tool close-ups, sanding patterns, before/after surface profile
Photos and diagrams make your sanding checklist far easier to follow, so include clear tool close-ups, step-by-step sanding patterns, and before/after surface profiles to show what to expect at each stage.
Capture angles of blades, pad wear, and dust-collection setup. Show overlapping passes, grit progression, and edge work.
Include close-ups of surface texture before and after to confirm adequate profile for paint, sealer, or epoxy.