
How Much Do Heated Bathroom Floors Cost? (Installation + Running Costs)
You can expect to pay roughly $800–$3,500 installed for electric heated bathroom floors and about $2,000–$8,000 for hydronic systems, with upfront electric kit costs from $300–$1,200 and hydronic from $1,500–$10,000. Annual running costs are modest—around $10–$100 depending on use and local energy prices. Costs vary with bathroom size, floor prep, and labor complexity, and you’ll find helpful tips on trimming costs and choosing the right system below.
Quick Answer Typical Total Cost Range for Heated Bathroom Floors
You can expect total installed costs for heated bathroom floors to range roughly from $300–$2,500 for electric systems and $1,500–$6,000+ for hydronic setups, with annual running costs typically $10–$100 depending on use and energy prices.
The biggest factors that shift the price are system type (electric vs. hydronic), bathroom size, floor prep or replacement needs, and labor complexity.
Knowing those variables up front helps you pick the right system for your budget and expected operating cost.
Short summary of installation + running cost ranges
Although installation and energy use vary by system and bathroom size, expect typical total costs for heated bathroom floors to fall between about $800 and $3,500 for an electric mat system and $2,000 to $8,000 for a hydronic (water-based) setup.
Running costs usually range from a few cents to a couple of dollars per day, depending on local electricity or gas rates and how often you run it.
You’ll find answers to how much heated bathroom floors cost vary by system, bathroom size, and usage, but most homeowners pay within those ranges and see modest daily operating expenses.
Cost factors that cause the biggest variation
Because several key variables change both upfront and operating costs, the total you’ll pay for heated bathroom floors can swing widely—from roughly $800 to $8,000 depending on system type, bathroom size, installation complexity, and energy source.
Consider these biggest factors that drive variation:
- System type (electric vs hydronic)
- Bathroom size and layout
- Installation complexity and electrician/plumber labor
What Are Heated Bathroom Floors? Basic Overview
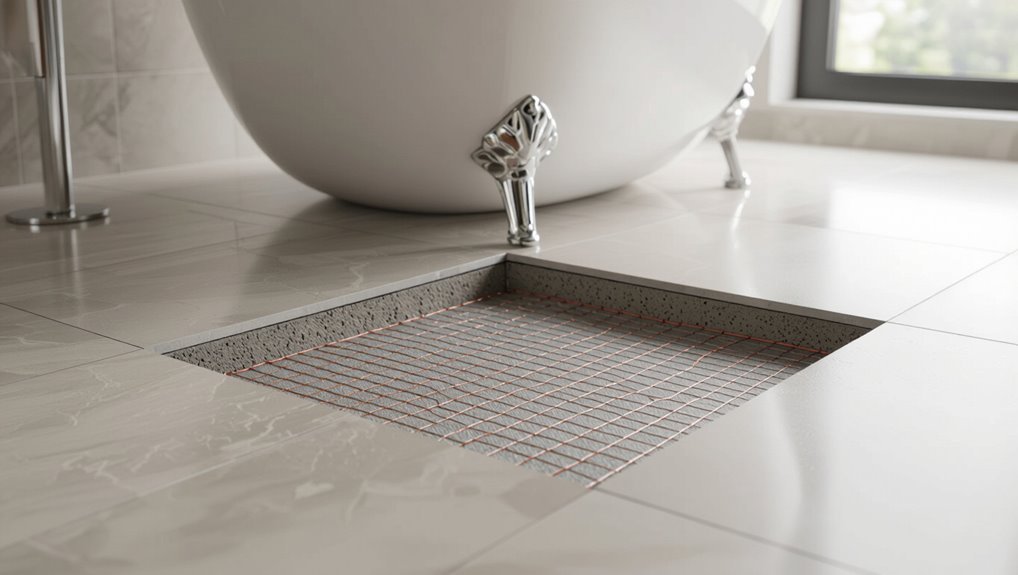
Heated bathroom floors come in two main types: electric systems that use heating cables or mats, and hydronic systems that circulate warm water through tubing.
You’ll typically find electric setups include a thermostat, wiring, and thin mats under tile, while hydronic installs involve a boiler or water heater, tubing, manifolds, and controls.
Knowing these components helps you compare upfront costs and long‑term operation.
Types of systems: electric vs hydronic
When you’re choosing a heated bathroom floor, you’ll pick between two main systems: electric (thin electric mats or cables) and hydronic (water-filled tubing fed by a boiler or pump). You’ll favor electric for simpler, cheaper installs in small spaces and quick responsiveness. Hydronic fits larger areas, lower operating cost long-term, but needs more complex installation.
| Electric | Hydronic |
|---|---|
| Easy install | Better for large areas |
| Higher energy cost | Lower running cost |
| Fast heat | Slower to heat |
| Ideal small rooms | Needs boiler/pump |
Typical components of each system
Although the two systems work differently, both rely on a few core parts that make the floor warm, controllable, and safe.
Electric systems use heating cables or mats, a thermostat, and often a floor sensor and GFCI.
Hydronic setups need tubing, a boiler or water heater, a pump, manifolds, a thermostat, and mixing valves.
You’ll also add insulation and appropriate flooring.
Detailed Installation Costs
You’ll get a clear cost breakdown covering materials, labor, and any extra work like subfloor prep or tile removal.
I’ll compare electric vs. hydronic systems with component prices and step-by-step labor tasks, then show how costs change for new builds, remodels, and retrofits.
Finally, we’ll note how region and contractor choice can raise or lower those estimates.
Breakdown: materials, labor, and additional works
Costs break down into three main categories: materials, labor, and additional works, and knowing what each includes helps you budget accurately. Materials cover mats, insulation, and adhesives. Labor includes tiling and electrician time. Additional works are floor prep and repairs.
| Category | Typical items/costs |
|---|---|
| Materials | Mats, insulation, adhesives |
| Labor | Tiling, electrician |
| Additional | Prep, repairs |
Electric systems component cost and labor steps
When planning the electric system for heated bathroom floors, break the estimate into component costs (heating mats or cables, thermostats, sensors, and connection materials) and the labor steps electricians will take to install, test, and certify the circuit.
You’ll pay for the mat or cable per square foot, a programmable thermostat, sensor probes, junction boxes and wiring.
Labor covers layout, embedding, wiring, testing, and certification.
Hydronic systems component cost and labor steps
If electric systems suit smaller baths, hydronic setups make more sense for larger remodels or whole-house radiant heat because they use heated water circulated through tubing under the floor.
You’ll pay for tubing, manifolds, boiler or boiler upgrade, pump, controls, and insulation.
Labor includes tubing layout, manifold installation, pressure testing, boiler hookup, and floor leveling.
Expect longer install time and higher initial costs.
Costs by installation scenario: new build, remodel, retrofit
1 common way to break down heated-floor pricing is by installation scenario—new build, remodel, or retrofit—because each changes material needs, labor complexity, and timeline.
In a new build you’ll pay less per square foot since contractors work in sequence.
Remodels add demo and substrate repair.
Retrofits cost more for thin-mat systems or raised floors to avoid tearing up existing subflooring and finishes.
Regional and contractor price variations
Costs can still vary widely based on where you live and which contractor you hire, so it helps to compare local quotes rather than rely on national averages.
Labor rates, permit fees, and material availability differ by region.
Get multiple bids, check installers’ experience with heated floors, verify warranties, and ask for itemized estimates so you can spot markups, hidden fees, or scope gaps before committing.
Running Costs and Energy Consumption
You’ll want to know how energy use for heated floors is measured (usually in watts and kilowatt-hours) so you can compare systems.
Electric mats and cables typically show monthly costs of a few dollars to $20–50 depending on thermostat settings, while hydronic setups often run similarly or a bit less if tied into an efficient boiler or heat pump, with annual costs ranging from tens to a few hundred dollars.
Expect seasonal swings—higher use and bills in winter and minimal costs in summer unless you run them year-round.
How energy use is measured for heated floors
Measuring energy use for heated floors means tracking how much electrical or hydronic energy your system draws over time, usually expressed in kilowatt-hours (kWh) for electric mats or pumps and BTUs or kWh for hydronic setups.
Utilities bill you by kWh, so that’s the key figure to watch. You monitor consumption with a thermostat’s runtime, an inline energy meter, or utility bills, and calculate kWh by multiplying power (kW) by hours.
Typical monthly/annual running costs for electric systems
Now that you know how consumption is measured in kWh, you can estimate what electric heated floors will add to your utility bill. Typical systems use 100–300W/m²; monthly cost depends on run hours and local rates. Example:
| Area (m²) | Avg W/m² | Estimated monthly kWh |
|---|---|---|
| 2 | 150 | 9–45 |
| 4 | 150 | 18–90 |
Typical monthly/annual running costs for hydronic systems
Several factors determine how much a hydronic heated floor will add to your bill, but most homes see lower running costs than electric systems for the same area because hydronic systems transfer heat more efficiently and can run on lower-grade heat sources. You’ll typically pay less monthly; boiler fuel or heat-pump efficiency and insulation affect annual totals.
| Feature | Example |
|---|---|
| Fuel type | Natural gas |
| Efficiency | 80–95% |
| Typical monthly | $10–$40 |
| Annual range | $120–$480 |
Seasonal variations and usage patterns
Having looked at typical monthly and annual costs for hydronic systems, you’ll see that actual bills shift a lot over the year depending on weather, occupancy, and how you run the system.
In winter you’ll run floors longer and warmer; shoulder seasons need intermittent use. Lower occupancy cuts runtime.
Smart thermostats, zoning, and timed schedules reduce energy use and smooth seasonal spikes.
Cost Comparison: Electric vs Hydronic vs Alternatives
You’ll want to compare upfront costs, since electric systems are usually cheaper to install while hydronic setups cost more initially.
Over time, running costs shift the balance—hydronic can be more efficient for whole-house heating, but electric mats may be cheaper for a single bathroom.
Also weigh performance and comfort: hydronic offers steady, widespread warmth, whereas electric heats faster but can feel less even.
Upfront cost comparison
Comparing upfront costs means looking beyond sticker prices to what you pay for materials, installation labor, and any required subfloor or electrical upgrades. You’ll find electric mats cheapest to buy and install, hydronic pricier due to boilers and plumbing, and alternatives (radiant panels) vary. Choose based on budget, disruption, and existing systems.
| Type | Typical upfront range |
|---|---|
| Electric | $300–$1,200 |
| Hydronic | $1,500–$10,000 |
| Alternatives | $500–$3,000 |
Long-term running cost comparison
While upfront price matters, your ongoing energy and maintenance bills often decide which heated floor system makes financial sense over time. You’ll weigh electricity rates, gas boiler efficiency, and service costs. Electric mats cost less to install but higher per-hour energy; hydronic saves running costs if tied to efficient boilers. Consider lifespan, repair frequency, and local fuel prices.
| System | Typical energy cost | Maintenance burden |
|---|---|---|
| Electric | High | Low |
| Hydronic | Moderate | Medium |
| Alternatives (air source) | Variable | Medium |
Performance and comfort comparison
After weighing long-term costs and maintenance, you’ll want to compare how each system actually feels day to day: warmth distribution, heat-up time, temperature control, and noise or airflow effects.
You’ll notice differences in responsiveness and evenness.
- Electric: fast heat-up, localized warmth.
- Hydronic: smoother, whole-floor warmth, slower ramp.
- Alternatives: radiator or towel warmer give spotty comfort and airflow.
Step-by-Step Cost Estimation Guide (How to Calculate Your Own)
Start by measuring your bathroom floor and choosing electric or hydronic so you know what you’re estimating.
Then use unit rates to total materials and labor, add expected energy costs based on local rates, and include permits, waterproofing, and a contingency.
Finally, I’ll show example calculations with numbers for small, medium, and large bathrooms so you can plug in your own figures.
Step 1 Measure floor area and select system type
Before you buy anything, measure the floor area you want heated and decide which system—electric mats or hydronic tubing—fits your budget and bathroom layout.
Use a tape measure to get length and width, subtract fixtures, and calculate square footage.
Consider ceiling height, access for plumbing, and whether you need thermostat zoning.
Note compatibility with existing subfloor and tile.
Step 2 Estimate materials and labor using unit rates
Once you’ve measured the area and chosen a system, break the job into line items—materials, labor, and miscellaneous—to build your estimate using unit rates you can verify.
List quantities: mats or cables per sq ft, thermostat, thinset, tile, insulation, and connectors.
Multiply by local unit prices, add labor hours times hourly rates, then include contingency and permit fees for a realistic total.
Step 3 Calculate expected energy use and local rates
Because your installation determines how much power the floor will draw, calculate the expected energy use by combining the heater’s wattage per square foot with the heated area and your local electricity rate.
Multiply wattage × area to get watts, convert to kilowatts, estimate daily hours of operation, then multiply by kWh rate and days per month to project monthly and annual running costs.
Step 4 Add permitting, waterproofing, and contingency
When you tally up final costs, don’t forget permits, waterproofing, and a contingency buffer—these add-ons can materially affect your budget.
Permit fees vary by jurisdiction; check local building department. Proper waterproofing prevents expensive damage and may be required for tile installations.
Add a contingency of 10–20% for unexpected substrate repairs, labor overruns, or code-required upgrades so your project won’t stall financially.
Example calculation with numbers for small/medium/large bathrooms
Now that you’ve factored in permits, waterproofing, and a contingency buffer, let’s run real numbers so you can see how those line items affect total cost. Use this quick example to estimate your project and adjust local rates.
| Size | Installation | Total w/ conting. |
|---|---|---|
| Small (20 sq ft) | $600 | $900 |
| Medium (50 sq ft) | $1,400 | $2,100 |
| Large (100 sq ft) | $3,000 | $4,500 |
Financing, Incentives, and Value
You’ll want to weigh how heated floors affect resale value and typical return on investment for your area.
Check for rebates, tax credits, or utility incentives that apply to your home type and heating system.
If upfront cost is a concern, compare financing options like home-equity, personal loans, or contractor payment plans to find what fits your budget.
Typical return on investment and resale value impact
Although heated floors add an upfront cost, they often deliver a strong perceived value at resale and can be financed or incentivized to ease that initial outlay.
You’ll typically recoup a portion of installation through higher buyer appeal, faster sales, and modest price premiums in upscale markets.
Expect ROI varying widely—commonly 40–70%—depending on local demand, installation quality, and energy efficiency.
Available rebates, tax credits, and energy incentives by scenario
If you plan installations strategically, you can tap a mix of rebates, tax credits, and utility incentives that cut upfront costs for heated floors.
Check federal energy tax credits for efficient electric systems, state/municipal rebates for home upgrades, and utility demand-response or time-of-use incentives.
- Federal credits
- State/local rebates
- Utility programs
Financing and payment options
Having explored rebates, tax credits, and utility incentives, it’s also important to look at how you’ll pay for a heated floor and how financing affects long-term value.
You can pay cash, use a home equity line, personal loan, or contractor financing. Compare interest rates, loan terms, fees, and monthly impact.
Factor incentives and energy savings into payback and choose the lowest total-cost option.
Common Mistakes and Costly Problems to Avoid
Don’t pick a system that doesn’t match your bathroom’s size or construction, because the wrong choice can raise installation and operating costs.
Make sure you include proper insulation or a thermal break and hire skilled installers — skipping either often leads to expensive repairs.
Also run the numbers on ongoing energy use so you don’t underestimate the running costs.
Mistake: Choosing wrong system for your bathroom size or structure
When you pick a heated floor system that doesn’t match your bathroom’s size, layout, or construction, performance and costs suffer—small bathrooms can be overheated by large-capacity systems, while large or oddly shaped spaces may end up with cold spots if the system lacks range or proper zoning.
Assess room dimensions, floor covering, and subfloor type. Choose appropriate wattage, and plan zones or multiple loops to guarantee even heat and efficient operation.
Mistake: Skipping insulation or thermal break
If you skip insulation or a thermal break under your heated bathroom floor, heat will bleed downward into the subfloor and ground instead of warming the room, forcing the system to run longer and cost you more in energy bills.
You should install proper underlayment or rigid insulation to reflect heat upward, shorten run times, and protect joists from moisture-related decay.
Mistake: Poor installation leading to repairs
Because a sloppy installation can hide itself for months, you’ll often only notice problems after they’ve already caused damage and added repair costs.
You should hire qualified installers, verify wiring, sensor placement, and membrane integrity, and insist on proper tile adhesive and grout.
Skimping on skill or inspections leads to cold spots, electrical faults, leaks, and costly tile removal and reinstallation.
Mistake: Underestimating running costs
Though the upfront price may look reasonable, many homeowners underestimate how much a heated bathroom floor will add to their monthly energy bills.
You should calculate realistic running costs based on local electricity rates, thermostat settings, and usage patterns.
Factor in seasonal use and insulation quality.
Otherwise, you’ll face surprise bills or need to cut back on comfort to control costs.
Tips and Best Practices to Reduce Installation and Running Costs
You can cut both installation and running costs by picking the right thermostat and controls and using proper insulation and underlayment.
Use programmable settings and smart usage patterns to heat only when needed, and weigh DIY savings against the risks and skills required so you know when to hire a pro.
The next section will walk through practical choices and quick tips to keep expenses down.
Choosing the right thermostat and controls
When picking a thermostat and controls for heated bathroom floors, focus on precision, ease of use, and scheduling to cut both installation headaches and energy bills.
Choose a programmable or smart thermostat with accurate floor or air sensors, simple presets, and app control.
Look for power compatibility, intuitive wiring, and reliable manufacturer support to avoid costly callbacks and wasted heat.
Insulation and underlayment recommendations
If you want lower installation and operating costs for heated bathroom floors, start with the right insulation and underlayment—these materials cut heat loss, speed warm-up times, and let the system run less often.
Use thin high-R rigid foam or cork under tile, add a thermal break under joists for wood floors, and choose uncoupling mats that improve heat transfer and moisture control.
Smart usage patterns and programmable settings
After tightening heat loss with proper insulation and underlayment, smart usage patterns and programmable settings will let you get more comfort for less energy and shorter warm-up cycles.
Set schedules for peak use, lower temps when away or sleeping, and use occupancy or motion sensors.
Favor gradual setbacks over full shutdowns, enable adaptive learning thermostats, and monitor usage to fine-tune savings.
When to hire a professional vs DIY considerations
Because heated floors touch electrical, plumbing, and structural work, you’ll often save time, money, and headaches by hiring a pro for complex installs, permits, or any job that alters subflooring or wiring.
Tackle DIY only if you’re confident with the tools, local code requirements, and have a clear, documented plan for layout, insulation, and wiring connections.
Hire pros for hookups, inspections, and warranties; DIY to save labor when skills match.
Case Studies / Real-World Examples
You’ll see three real-world examples to help you compare options: a small electric install showing upfront costs and day-to-day performance, a medium hydronic system with its higher installation but lower operating costs, and a head-to-head of retrofit versus new-build outcomes.
Use these cases to weigh installation complexity, budget, and long-term savings for your project.
After each example, you’ll get practical takeaways tailored to typical bathroom sizes and scenarios.
Example A Small bathroom electric install: costs and performance
Someone planning a small bathroom electric heated floor will want a realistic sense of installation costs, energy use, and comfort—so this case study walks through a 5’x8′ tile bathroom using a 120V electric mat, showing material and labor expenses, thermostat choices, expected warm-up times, and estimated monthly electricity costs.
You’ll see ~$300–$600 materials, $200–$500 labor, digital thermostat options, 10–20 minute warm-up, and ~$5–$12/month.
Example B Medium bathroom hydronic install: costs and performance
For a medium bathroom (about 8’×10′) you can expect a hydronic heated-floor install to cost more upfront than an electric mat but deliver lower operating costs and a more even, radiant warmth.
You’ll pay for boiler/tankless hookup, tubing, manifold, and slightly higher labor — often $4,000–$8,000.
Expect efficient, comfortable heat with modest annual fuel costs and longer system lifespan.
Example C Retrofit vs new build comparison
When comparing retrofit installs to new-build integrations, consider how access, floor buildup, and labor differ.
Retrofitting often needs surface-mounting or thin-set systems to avoid ripping up subfloors, while new builds let you embed tubing or wiring during framing for cleaner, cheaper installation.
You’ll pay more for retrofits because of labor, customized mats, and possible leveling; new builds cut material and time, lowering total costs.
Frequently Asked Questions
You probably have a few practical questions about heated floors, like how long they last, what maintenance costs look like, and whether they’ll spike your energy bills.
You’ll also want to know which floor types work, how fast the room warms, and if the system is safe or affects indoor air quality.
Below we’ll answer those common concerns so you can decide with confidence.
How long do heated floors last and what are maintenance costs?
Curious about longevity and upkeep? You can expect electric systems to last 20–35 years and hydronic systems 25–50 years with proper installation.
Routine upkeep is minimal: occasional thermostat checks and surface inspections. Professional servicing for hydronic systems every 5–10 years may cost $100–$300.
Electric systems rarely need repairs; if they do, replacement or spot repairs vary widely by labor and access.
Will heated floors increase my energy bills significantly?
How much your energy bill will change depends on your system type, insulation, thermostat settings, and usage patterns.
Generally, electric systems add modest costs if used briefly; hydronic systems can be more efficient for larger areas.
Use a programmable thermostat, set moderate temperatures, and run floors only when needed to keep increases minimal.
Good insulation reduces runtime and expenses.
Can heated floors be installed under any type of tile or flooring?
Can heated floors go beneath any tile or flooring type?
You can install most electric or hydronic systems under ceramic, porcelain, and natural stone tiles, and many engineered wood or luxury vinyl planks—provided manufacturers approve and subfloor prep is correct.
Solid hardwood, some laminates, and certain adhesives may restrict use.
Always check product compatibility, warranty terms, and local building codes before installation.
How quickly do heated floors warm a bathroom?
Wondering how fast heated floors make your bathroom comfortable? You’ll typically feel warmth within 15–30 minutes for electric systems and 30–60 minutes for hydronic ones, depending on insulation, floor material, and thermostat settings.
Thinner tile and good subfloor insulation speed heating. For preheated schedules or high-output systems, rooms reach comfort faster; expect full stabilization within one to two hours.
Are heated floors safe and do they affect indoor air quality?
Curious about safety and air quality? You’re safe: electric and hydronic radiant floors operate at low surface temperatures, reducing burn risk and dust circulation.
They don’t rely on forced air, so they won’t stir allergens or VOCs. Install per code, use certified components, and maintain underfloor systems properly to guarantee continued safety and neutral indoor-air impact.
