How to Install Tile Floor on Wood Subfloor (Without Cracking or Lifting)
You can install tile over a wood subfloor without cracking or lifting if you make the structure stiff, flat, and dry, and use the right underlayment and mortar. Start by checking joist spacing, deflection, and moisture; sister joists or add plywood if it’s springy. Install an uncoupling membrane or cement backer board, use a flexible thinset with full coverage, plan movement joints, and follow manufacturer specs. Keep going to get step-by-step tips and pro tricks.
Quick Answer Can You Install Tile on a Wood Subfloor Without Cracking or Lifting?
You can install tile over a wood subfloor without cracking or lifting if the structure is stiff, flat, and free of moisture — otherwise replace it first.
Proceed only when joist spacing, subfloor thickness, and deflection meet tile manufacturer specs and you’ll add a proper uncoupling membrane or cement board plus flexible thinset.
If the floor feels springy, has water damage, or fails a deflection test, tear out and rebuild the subfloor before tiling.
Short, direct recommendation and success criteria
If the subfloor is stiff, flat, and properly reinforced, you can install tile over wood without cracking or lifting; otherwise, don’t.
Proceed only if joists are solid, deflection is below L/360, and the surface is planar.
Use proper uncoupling membrane, polymer-modified thinset, and full-bed installation as needed.
Follow manufacturer specs and test adhesion.
That’s how to install tile floor on wood successfully.
When to proceed vs. when to replace the subfloor
Having confirmed the joists are solid, deflection is under L/360, and the surface is planar, decide whether to proceed or replace the subfloor by checking for rot, movement, or excessive flexibility;
proceed only when the structure is stiff, flat, and well-fastened. Otherwise, replace the sheathing and reinforce joists.
If you detect soft spots, persistent bounce, or water damage, replace panels and repair framing before tiling.
Basic Understanding Why Tiles Crack or Lift on Wood Subfloors
You need to understand that wood and tile behave very differently: wood expands, contracts, and flexes with humidity and loads, while tile is rigid and resists movement.
Cracking or lifting usually comes from substrate deflection, improper or failing adhesives, moisture issues, or using the wrong type of wood subfloor.
Knowing whether you have plywood, OSB, or plank sheathing — and its suitability and condition — helps you choose the right prep and prevent failures.
Differences between wood and tile movement (expansion, flex, vibration)
Because wood and tile react so differently to heat, moisture, and load, they move in ways that can work against each other when you install tile over a wood subfloor.
You’ll notice wood expands, contracts, and flexes; tile hardly does.
Wood vibration and deflection create stresses at grout and bonds, so you must accommodate differential movement with proper materials and detailing to prevent stress transfer.
Common failure mechanisms (deflection, inadequate substrate, poor adhesion, moisture)
Four main failure modes cause tiles to crack or lift on wood subfloors: excessive deflection, an inadequate substrate, poor adhesive practices, and moisture intrusion.
You’ll see cracks from floor flexing when joists or underlayment aren’t stiff enough.
Inadequate substrate or gaps let tiles move.
Wrong mortar, skimpy coverage, or improper cures weaken bonds.
Moisture swells or degrades materials, breaking adhesion.
Types of wood subfloors and their suitability (plywood, OSB, planks)
Subfloors come in three common types—plywood, OSB, and plank—and each behaves differently under tile, so you’ll need to match the material to the job.
Plywood is stiff, stable, and preferred. OSB swells with moisture and can be less reliable unless sealed and thick.
Plank floors can move and need firring, overlay, or full replacement for a proper tile substrate.
Materials, Tools, and Products You Need
Before you start cutting or mixing, you’ll want to know which subfloor materials and reinforcement products (plywood, cement backer board, or uncoupling membranes) suit your situation and the tile you’re using.
Gather the right adhesives, mortars, grouts, and any waterproofing membranes, plus the tools and measurement devices you’ll need for accurate layout and solid installation.
Remember that tile type and size affect substrate requirements, so match your prep and products to the tiles you plan to install.
Subfloor materials and reinforcement products (plywood, cement backer board, uncoupling membranes)
When you’re laying tile over wood, choosing the right underlayment—plywood, cement backer board, or an uncoupling membrane—makes the difference between a lasting floor and one that’ll crack or shift.
Use exterior-grade plywood or an additional layer to stiffen joists, install cement backer board for moisture resistance and rigidity, or apply an uncoupling membrane to prevent substrate movement transferring to tile.
Adhesives, mortars, grouts, and waterproofing membranes
You’ll need the right adhesives, mortars, grouts, and waterproofing membranes to make the tile bond, stay flat, and resist moisture—each product serves a specific role: thin-set mortar secures tile to the subfloor or backer board, mastic is for dry, low-moisture walls only, grout fills joints and seals against dirt, and liquid-applied or sheet waterproofing stops water from reaching wood below.
Use polymer-modified thin-set, grout sealer, and compatible membrane systems.
Tools and measurement devices
Get a compact kit of measuring and cutting tools so you can lay tile straight, fit pieces precisely, and avoid costly mistakes.
You’ll need accurate devices and sturdy cutters to score, snap, and trim tiles cleanly. Keep layout tools handy to maintain grout lines and check level.
Essential items include:
- Tape measure
- Carpenter’s square
- Tile cutter
- Notched trowel
- Laser level
Tile types and sizes: impact on substrate requirements
Because tile size and type affect weight, bonding, and movement, you need to match your substrate to the specific tile you’re installing.
Large-format tiles and natural stone demand stiffer, well-braced subfloors and often a cement backer or uncoupling membrane.
Small ceramic or mosaic tiles tolerate more flex but still need flatness and proper thinset.
Choose materials based on tile weight and expected movement.
Assessment How to Inspect Your Existing Wood Subfloor
Before you start tiling, inspect the subfloor’s structure by checking joist spacing, sag, bounce, and deflection against tile limits.
Then examine the surface for flatness, gaps, rot, and measure moisture content so you can address any issues.
Finally, consider the room’s load and use—bathrooms, kitchens, or heavy furniture need extra reinforcement or treatment.
Structural checks: joist spacing, sag, bounce, and deflection limits
When you inspect the subfloor’s structure, focus first on joist spacing and how the floor feels underfoot—too-wide spacing or noticeable sag and bounce are red flags that need fixing before tiling.
Measure joist span and spacing against code or span tables, probe for deflection by walking and using a straightedge, and plan reinforcement (sistering, blocking, or adding joists) to meet tile deflection limits.
Surface checks: flatness, gaps, rot, moisture content measurement
If your joists and framing check out, turn next to the subfloor surface itself: you’ll need to confirm flatness, locate gaps and rot, and measure moisture so the tile system will perform long-term.
Use a straightedge and level for peaks/sags, probe for soft spots, and inspect seams.
Measure moisture with a pin or non‑destructive meter; repair or replace damaged areas before tiling.
Load and use considerations (bathroom, kitchen, heavy furniture)
Because different rooms and furnishings put very different demands on a tile installation, you should assess how the space will be used and what loads the subfloor must carry.
For bathrooms and kitchens expect frequent moisture and concentrated loads from cabinets and appliances.
Reinforce or add underlayment where heavy cabinetry, islands, or cast-iron fixtures will sit, and guarantee joist spacing and fasteners meet load requirements.
Step-by-Step Installation Plan
Now you’ll follow a clear step-by-step installation plan, starting with preparing and reinforcing the subfloor and fixing deflection by sistering joists or adding plywood with proper fastening patterns.
Next, make sure the surface meets flatness and level tolerances before choosing underlayment—cement backer board or an uncoupling membrane.
Finish by applying waterproofing or crack-isolation where needed to protect the tile assembly.
Step 1 Prepare and reinforce the subfloor
Step 1 focuses on making your wood subfloor solid, flat, and properly supported before any tile goes down.
Clear debris, remove loose boards, and repair rot or delamination. Confirm joist spacing and existing plywood meet tile requirements, replace damaged panels, and fasten edges securely.
Sand high spots, fill low areas with appropriate leveling compound, and vacuum thoroughly for a stable, clean surface.
Step 2 Fix deflection: sistering joists, adding plywood layers, fastening patterns
With the subfloor cleaned, repaired, and smoothed, it’s time to eliminate any remaining deflection that could crack tile or grout.
Sister joists where spans sag, fastening new lumber tightly to existing with structural screws.
Add a 1/2″ or 3/4″ plywood layer staggered over seams, glued and screwed per manufacturer pattern.
Space fasteners and leave proper expansion gaps.
Step 3 Ensure flatness and level to industry tolerances
Before you set a single tile, confirm the subfloor meets flatness and level tolerances so your installation won’t crack or look uneven.
Check with a straightedge and level for deflections, humps, or dips beyond industry specs (usually 1/4″ over 10′).
Mark problem areas, sand high spots, fill low spots with appropriate patch, and recheck until the surface is uniformly flat and true.
Step 4 Install underlayment options (cement backer board vs. uncoupling membrane)
Because tile needs a stable, water-resistant base, you’ll choose and install either cement backer board or an uncoupling membrane to protect the wood subfloor and bond the tile properly.
Use backer board screwed and taped with thinset for rigidity and load support.
Choose an uncoupling membrane to isolate movement; lap and thinset it per manufacturer instructions for a flexible, crack-resistant assembly.
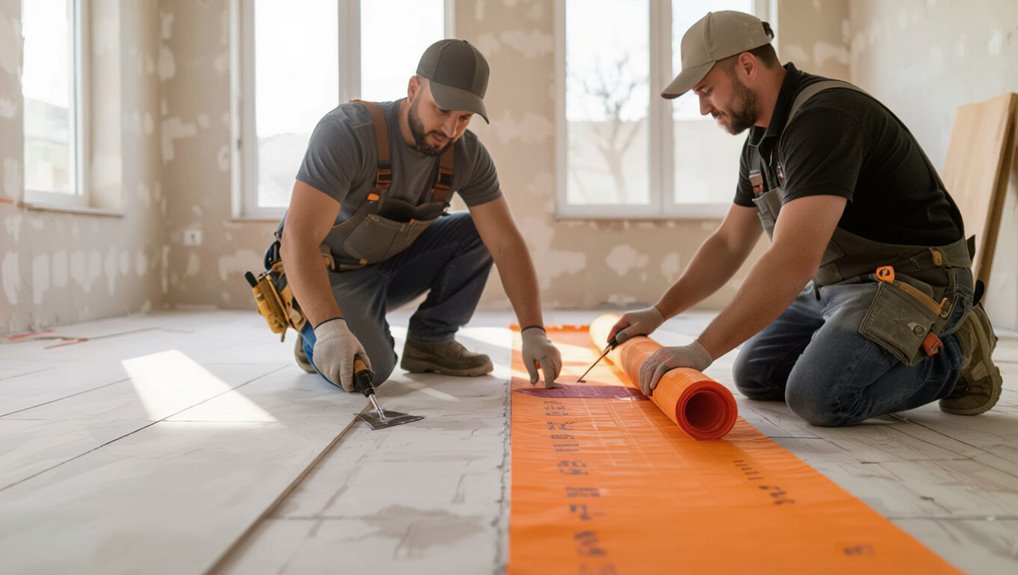
Step 5 Apply waterproofing or crack isolation if needed
If your subfloor or tile area is prone to moisture or you’ve used a substrate that needs extra protection, apply a liquid waterproofing membrane or a crack-isolation membrane now to prevent water damage and tile or grout cracking.
Roll or trowel per manufacturer, cover seams and connections, let cure fully, and seal penetrations.
Verify compatibility with your chosen thinset and tile before proceeding.
Step 6 Choose and apply the correct thinset/mortar for wood substrates
Choose a thinset formulated for use over wood subfloors—typically a polymer-modified, flexible thinset or a pre-mixed latex mortar—and verify it’s rated for your tile type and the specific underlayment you installed.
Mix to manufacturer specs, keep working time in mind, and apply a full-bed or medium-bed technique as recommended.
Butter back large tiles and remove excess to guarantee complete coverage.
Step 7 Lay tile (layout, spacers, notch trowel technique)
Start by dry-fitting a row of tiles to establish your layout and sightlines, working from the room’s focal point and the straightest wall so you’ll end up with full tiles in the most visible areas.
Spread thinset with the correct notch trowel, combing in straight lines.
Press tiles with a slight twisting motion, use spacers for even grout joints, and check alignment and level frequently.
Step 8 Grouting, sealing, and finishing
Begin by letting the installed tiles set for the manufacturer-recommended curing time.
Then remove spacers and clean any dried thinset from the joints so your grout bonds cleanly.
Mix grout to the right consistency, pack joints with a rubber float, wipe haze with a damp sponge, then seal grout if recommended.
Finish edges with caulk where tile meets fixtures or walls for a neat, waterproof result.
Step 9 Post-installation curing, movement joints, and transitions
Allow the installation to cure fully before subjecting the floor to heavy traffic—follow the adhesive and grout manufacturer’s recommended wait times (usually 24–72 hours) so bonds reach full strength.
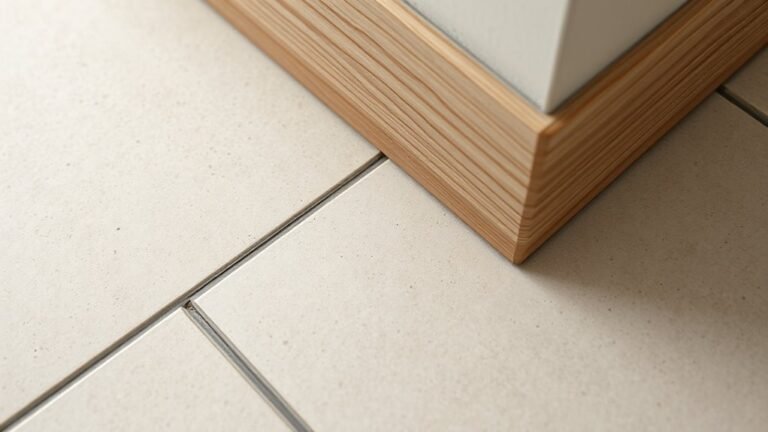
Inspect joints, install movement joints at 20–25′ intervals and where materials change, and use flexible caulk in perimeters.
Install proper connections at doorways and different floor heights to accommodate movement and prevent edge damage.
Comparison of Subfloor Solutions
Now you’ll compare cement backer board, uncoupling membranes, and direct mortar beds to see which suits your project best.
I’ll outline the pros and cons for bathrooms, entryways, and radiant-heat systems so you can pick the most reliable, cost-effective option.
With that info you can match performance needs (moisture, movement, heat) to the right subfloor solution.
Cement backer board vs. uncoupling membrane vs. direct mortar-bed
When you’re choosing between cement backer board, an uncoupling membrane, or a direct mortar bed, think about what each system actually does and how your subfloor behaves. You’ll pick based on movement control, thickness, and installation complexity.
| System | Key trait |
|---|---|
| Backer board | Rigid support |
| Uncoupling membrane | Movement isolation |
| Mortar bed | Full support |
| Choice tip | Match to subfloor movement and skill level |
Pros and cons by project type (bathroom, entryway, radiant heat)
Having weighed backer board, uncoupling membranes, and mortar beds by how they handle movement and support, you’ll next match those traits to specific rooms.
For bathrooms pick waterproofing plus uncoupling or mortar bed for durability; entryways need rigid backer board or mortar for heavy traffic; radiant-heat floors pair best with thin-set over uncoupling or mortar for thermal transfer.
Consider installation skill and cost.
Common Mistakes That Cause Cracking or Lifting
When your tile cracks or lifts, it’s usually because the substrate or installation details weren’t right.
Common culprits are a flexing subfloor or wide joist spacing, skipped or misinstalled underlayment or membrane, wrong mortar or trowel size with poor coverage, ignored movement joints and changes, or installing over wet or rotted wood.
Check each of these before you lay tile to avoid failures down the road.
Insufficient stiffness or joist spacing
If your floor flexes underfoot or the joists are spaced too far apart, the tile and grout will crack or pop loose because they can’t tolerate movement.
You must assess stiffness before tiling: feel for bounce, measure joist spacing, and check subfloor thickness.
Reinforce or sister joists, add blocking, or install a stiffer subfloor to create a rigid platform that prevents future cracking.
Skipping or misinstalling underlayment or membrane
Even with a stiff subfloor, skipping or misinstalling the underlayment or membrane will let movement and moisture wreck your tile work.
You must install a proper uncoupling membrane or cement backerboard per manufacturer instructions, fasten correctly, and seal seams.
Missing or poorly applied layers lets deflection and vapor cause tiles to crack or release.
Don’t shortcut this step; it’s essential.
Using wrong mortar, improper trowel size, or poor coverage
Choosing the wrong mortar, using the incorrect trowel size, or failing to achieve full coverage will quickly undo all your prep work and lead to cracked or loose tiles.
Use a mortar rated for wooden subfloors, match trowel notch to tile size, and back-butter large tiles.
Verify 100% contact—no voids—by combing adhesive and checking with a straightedge before grouting.
Ignoring movement joints and transitions
Proper adhesive coverage won’t stop tiles from cracking if you ignore movement joints and floor changes where materials meet.
You must plan and install control joints at room perimeters, long runs, and shifts to other flooring.
Use flexible caulk or foam backer rods in gaps, and follow manufacturer spacing recommendations so natural expansion and contraction won’t stress the tile or grout.
Installing over wet or rotted wood
If your wood subfloor is wet, soft, or showing rot, don’t install tile over it—you’ll almost certainly get cracking, loose tiles, or full failure as the wood continues to move and decay.
Remove and replace damaged framing or sheathing, dry the structure, and fix leaks.
Use treated or moisture-resistant materials, proper ventilation, and a stable, level subfloor before tiling to guarantee lasting adhesion.
Prevention, Best Practices, and Pro Tips
Before you lay a single tile, confirm your joist spacing and deflection meet tile standards (typically L/360 or better) and plan plywood overlay fastening patterns with the right screws and layout.
Use correct trowel size to achieve proper mortar coverage, map movement joints and thresholds, and choose edge treatments that allow for seasonal movement.
Finally, follow simple maintenance routines—cleaning, grout sealing, and checking joints—to keep the installation lasting longer.
Joist spacing and deflection targets to meet (L/360, etc.)
When joists are spaced too far apart or allowed to deflect beyond industry limits, your tile job will crack and fail.
Aim for stiff framing that meets L/360 for ceramic or porcelain tile (L/480 for stone where specified).
Check span tables, limit joist spacing (commonly 16″ o.c. or closer), minimize live-load deflection, and reinforce long spans or cantilevers to keep total movement within specified limits.
Fastening patterns, screw types, and layout for plywood overlays
A good fastening layout is as important as the plywood itself: use a tight, consistent screw pattern, pick screws designed for subfloor work, and stagger sheet seams so loads transfer across multiple joists.
Space screws 6–8 inches along edges, 8–12 inches in field. Use corrosion-resistant construction screws with countersunk heads, start screws 3/8″–1/2″ from panel edges, and avoid overdriving.
Proper mortar coverage percentages and trowel selection
Although you might be keen to set tiles, don’t skimp on mortar coverage—aim for at least 95% coverage for interior floors and 100% for wet areas or large-format tiles—because inadequate coverage leads to hollow spots, cracking, and bond failure.
Use a notched trowel sized to tile back profile: 3/16″ x 5/32″ for small tiles, 1/2″ for large-format, and back-butter when necessary.
Planning movement joints, thresholds, and edge treatments
Plan movement joints, thresholds, and edge treatments from the start so the tile field can expand, contract, and shift without cracking or looking amateurish.
Mark control and expansion joints at doorways, mid-run changes, and where different substrates meet.
Use flexible sealant or compressible joint filler, metal or acrylic edge trim at perimeters, and adjustable thresholds to allow movement while keeping a clean, finished appearance.
Maintenance tips to prolong tile life on wood subfloors
After you’ve set movement joints and finished edges, keep the system healthy with routine maintenance that prevents common failures on wood subfloors.
Inspect grout and joints quarterly, reseal grout annually, and fix loose tiles immediately.
Control moisture—repair leaks, use mats at entrances, and keep humidity stable.
Avoid harsh cleaners; use pH-neutral products.
Address subfloor movement or squeaks promptly to prevent tile damage.
Estimated Time, Cost, and Difficulty
Expect the timeline to vary: a small bathroom can take a weekend, a full kitchen a few days, and larger or complex jobs a week or more.
Costs range widely—DIY material-only projects might run a few hundred to a couple thousand dollars, while hiring pros can push the total into the thousands once labor is included.
If you’re comfortable with precise measuring, cutting, and subfloor prep you can DIY, but hire a pro for large areas, uneven subfloors, or if you want guaranteed waterproofing and warranty.
Typical time breakdown by project size
A small bathroom or powder room usually takes a weekend—about 1–2 days of hands-on work plus 24–48 hours for thinset and grout to cure.
Whereas a mid-size kitchen or large bathroom can run 2–4 days of labor with additional drying time; whole-house projects often stretch over a week or more, increase material costs, and demand more skill.
So match your schedule, budget, and experience to the project’s scale before you start.
You’ll plan prep, subfloor reinforcement, tile setting, curing, and finishing into that timeline, allocating buffer days for unexpected repairs and inspection.
Rough cost ranges for materials and labor (DIY vs. pro)
Now that you’ve sketched a realistic timeline, you should budget for materials and labor next—costs vary widely based on tile type, substrate work, and whether you hire pros or do it yourself.
Expect DIY material costs around $2–$8 per sq ft (tile, thinset, grout, underlayment) plus tool rental; pro-installed projects typically run $8–$25+ per sq ft including labor and prep.
Skill level and when to hire a professional
If you’ve never tiled over a wood subfloor before, plan on a steep learning curve—this job calls for precise prep, steady hands, and familiarity with tools like a wet saw and notched trowel.
You can tackle small, straightforward rooms if you’re handy and patient. Hire a pro for complex layouts, uneven subfloors, large areas, or if you lack time, confidence, or proper tools.
DIY vs. Hiring a Pro When to Call an Expert
If your subfloor has structural problems or your local code has specific requirements, you’ll want an expert to assess the situation before you start.
Hiring a pro can protect your warranty and guarantee your homeowner’s insurance won’t be voided by improper work.
Ask any tile contractor about their licensing, experience with wood subfloors, and what guarantees and permits they provide.
Structural issues and building-code considerations
Because a tile installation depends on a sound, code-compliant substrate, you’ll want to know when the job is within your skill set and when you should call a pro.
Structural issues like joist sag, excessive deflection, or compromised decking aren’t just annoying—they can cause tile to crack and fail.
Check local codes for subfloor thickness, fastening, and underlayment requirements; hire an engineer or contractor if spans, repairs, or permits are involved.
Warranty and insurance implications
When you tackle a tile job yourself, know that workmanship warranties and your home-insurance coverage can change quickly—manufacturers and insurers often expect professional installation for full protection, and DIY work may void product warranties or leave you liable for future damage.
Check product warranty terms, review your homeowner policy for coverage of installation-related claims, document work, and consider hiring a pro for full warranty and liability protection.
Questions to ask a tile contractor
Wondering whether to tackle the tile yourself or hire a pro?
Ask about their experience with wood subfloors, installation methods, and movement joints.
Request references, proof of insurance, and warranty details.
Get a written estimate outlining materials, timeline, and cleanup.
Ask how they prevent cracking and lifting, and when they’d call for structural or plywood reinforcement.
Frequently Asked Questions
You probably have a few quick questions—like whether you can tile over hardwood or if cement board is always required on wood subfloors.
You’ll also want clear limits on acceptable deflection for ceramic and porcelain, how radiant floor heating works with wood subfloors, and how long mortar and grout need to cure before heavy use.
I’ll answer each one so you can move forward with confidence.
Can you tile over existing hardwood or laminate flooring?
Can you tile over existing hardwood or laminate flooring? You can in some cases, but you must guarantee the surface is level, firmly attached, and free of wax or finish.
Laminate often lacks sufficient rigidity and may need removal. Hardwood can work if securely fastened and sanded.
Always check height clearances, adhesive compatibility, and local building codes before proceeding.
Do I always need cement board under tile on wood floors?
Tiling over existing hardwood or laminate sometimes leads people to ask whether cement board is always required over wood subfloors.
You don’t always need cement board: if the subfloor is stiff, flat, and properly supported, you can use an approved uncoupling membrane or fiber cement underlayment per manufacturer instructions.
For older or flexible floors, install cement board to reduce movement and protect the tile.
How much deflection is acceptable for ceramic and porcelain tile?
When planning a tile installation over wood, you should control deflection because ceramics and porcelain crack if the subfloor bends too much.
The industry guideline is L/360 for ceramic and porcelain over tile: joists and panels must limit deflection to 1/360 of span under live load to prevent cracking.
For mosaics and large formats, aim for stiffer L/480 or follow manufacturer specs.
Can radiant floor heating be used with tile on wood subfloors?
If your subfloor meets the stiffness requirements (L/360 or stiffer for most tiles, L/480 for mosaics/large formats), you can install radiant heating under tile over wood—provided you follow a few extra rules.
Use a decoupling membrane or cement board, secure heating elements per manufacturer, avoid thin-wood assemblies, and maintain proper mortar coverage.
Test systems and control temperatures slowly to prevent thermal stress.
How long should tile mortar and grout cure before heavy use?
You’ll want to wait before subjecting new tile to heavy traffic.
Generally, allow mortar to cure 24–48 hours before light use, but wait at least 72 hours for full setting.
Grout needs 24–72 hours before gentle cleaning; avoid heavy furniture or rolling loads for 7 days to reach adequate strength.
Follow manufacturer instructions and control temperature and humidity for proper curing.