How to Use Laminate Floor Spacers Correctly for a Gap-Free Installation
You’ll keep laminate stable and gap-free by installing spacers to maintain a consistent expansion gap (typically 1/4″–1/2″) between the flooring and any fixed objects. Place plastic wedges or clip-on spacers every 6–8 inches along walls, at row ends and around doorways, and remove them before fitting baseboards. Use longer or linked spacers for long runs, check alignment frequently, and acclimate planks first. Keep going to learn specific spacer types, placement tips, and fixes for common issues.
Quick Answer Do Laminate Floor Spacers Prevent Gaps?
Yes — spacers help prevent gaps by holding a consistent expansion gap between the laminate and walls as you install.
Use spacers at regular intervals (every few boards and along the panel ends) to keep rows aligned and maintain the required gap.
Remove them after the adhesive or locking system sets and cover the gap with trim.
Short direct answer
One simple spacer won’t stop all gaps, but using consistent, correctly sized laminate floor spacers during installation keeps the required expansion gap uniform and greatly reduces the chance of visible gaps forming later.
You’ll still need proper technique, acclimation, and care, but if you follow how to use laminate floor spacers correctly, they’re an effective tool to prevent most gap issues.
One-sentence summary of best practice for spacer use
When you place consistent, correctly sized spacers along walls and at joints before locking boards together, they keep the expansion gap uniform and greatly reduce the chance of gaps appearing later.
Use spacers at every wall, stagger seams, replace damaged spacers, and check spacing frequently as you work so boards stay aligned, expansion room remains accurate, and you avoid future buckling or separation.
Basic Understanding What Laminate Floor Spacers Are and Why They Matter
Laminate floor spacers are small plastic or wedge-shaped pieces you place between the boards and the wall to keep a consistent expansion gap.
You need that gap because laminate expands and contracts with temperature and humidity, and without it you can get buckling or squeaks.
Using the right spacers and keeping the manufacturer’s gap specs is often required to maintain your flooring warranty and best performance.
Definition and common types of spacers
Think of spacers as small, essential tools that keep your floor floating properly by holding a consistent gap between the boards and the wall.
You’ll find rigid plastic wedges, T-shaped spacers for edge consistency, and clip-on or magnetized types for quicker placement. Each type maintains alignment during installation, prevents shifting, and makes trimming easier, so pick one that suits your tools and floor profile.
Why expansion gaps are required for laminate flooring
Because wood-based floors expand and contract with temperature and humidity changes, you need a deliberate gap around the room so the boards can move without buckling or popping loose.
You’ll leave expansion gaps at walls, pipes, and fixed items to prevent stresses. Spacers maintain consistent gap width during installation, ensuring boards float freely and reducing noise, distortion, and joint failure over time.
How spacers relate to flooring warranty and performance
Those expansion gaps you set with spacers do more than prevent buckling — they can determine whether your warranty stays valid and how the floor performs over time.
Follow manufacturer gap specs and document spacing during installation; failure to comply can void warranties.
Proper spacing guarantees movement, reduces edge wear, prevents cupping, and maintains locking-system integrity, preserving appearance and long-term performance.
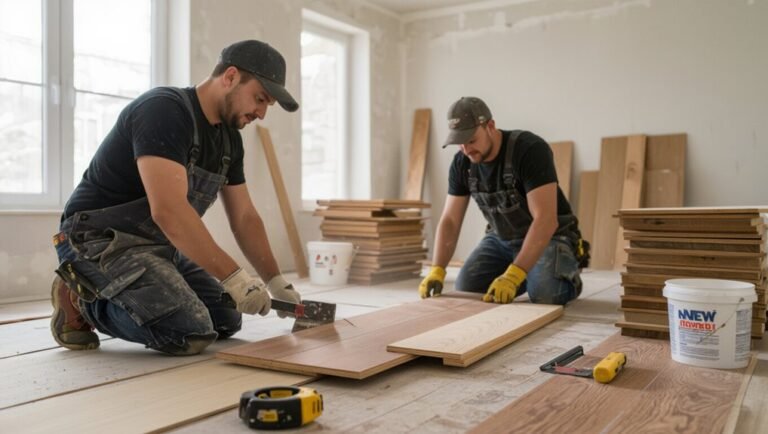
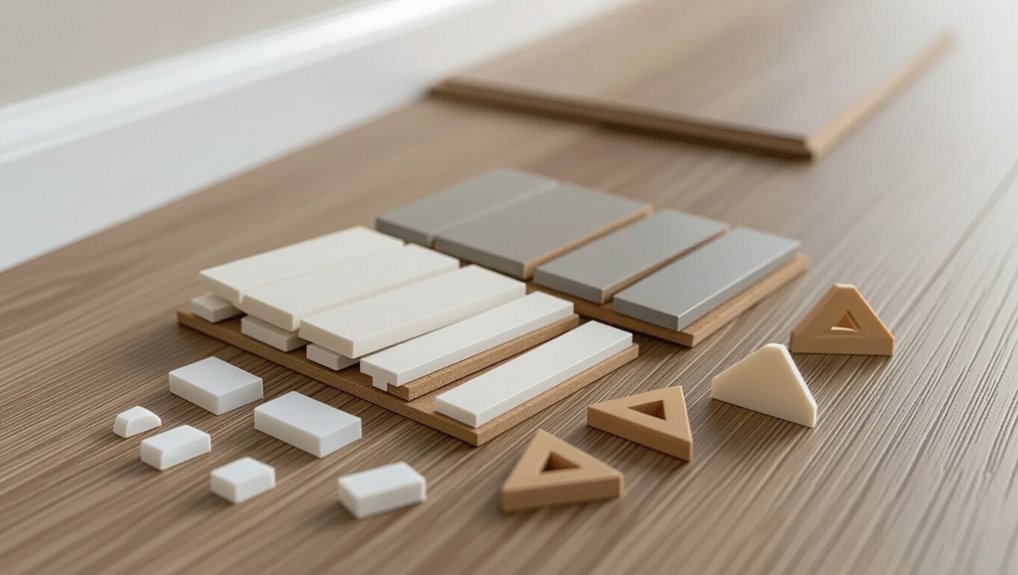
Tools and Materials You Need Before You Start
Before you begin, gather the essential tools—tapping block, pull bar, mallet, measuring tape, and a utility knife—so you won’t stop mid-job.
Choose spacer types that fit your subfloor and room: thicker plastic wedges for uneven concrete, clip-style or adjustable spacers for floating floors and wider gaps in high-humidity rooms.
Also grab safety and prep items like kneepads, work gloves, a broom, and a moisture barrier to protect the floor and yourself.
Essential tools list
Getting the right tools makes installing laminate floor spacers quick and accurate. You’ll need a few basics to work safely and precisely. Use quality items to save time and avoid mistakes.
- Tape measure and carpenter’s pencil
- Rubber mallet and tapping block
- Spacer wedges or plastic spacers
- Utility knife and pull bar
Recommended spacer types by subfloor and room type
Choose spacer types that match your subfloor and the room’s conditions so you get consistent expansion gaps and a stable finish.
| Subfloor | Spacer type |
|---|---|
| Concrete | Plastic wedges |
| Plywood | Foam blocks |
| Tile | Rubber shims |
| Radiant heat | Metal clips |
| Moist areas | Corrosion‑resistant plastic |
Pick spacers rated for load and moisture, and place them every 8–12 inches for even gaps.
Safety and prep materials
You’ll need a few essential safety items and prep materials to keep the job efficient and accident‑free: safety glasses, knee pads, a dust mask or respirator, ear protection, a pry bar, tape measure, spacers (matched to your subfloor), a tapping block and pull bar, a utility knife, and a wet/dry vacuum for cleanup.
Also have underlayment, a straightedge, chalk line, wood or plastic shims, and a broom.
Step-by-Step Guide How to Use Laminate Floor Spacers Correctly
Start by prepping the subfloor and laying out your board pattern so you know where each row will run.
Measure and set the correct expansion gap with a ruler or calculator, then place spacers along walls, corners, and around door frames to lock that gap in.
As you install rows and end joints, keep spacers at every seam and adjust for long runs, changes, and thresholds to maintain consistent gaps.
Step 1 Prepare the subfloor and layout plan
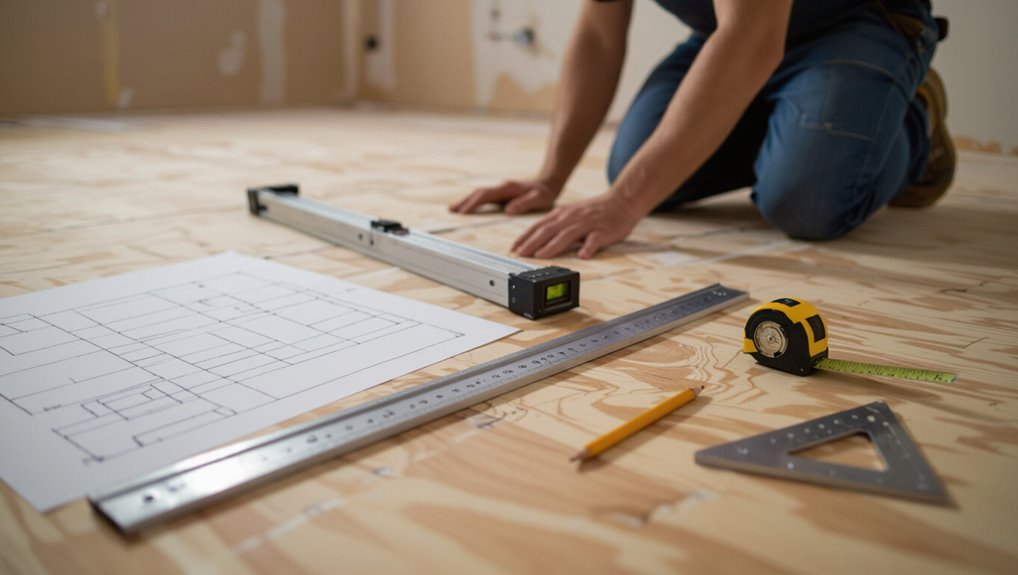
1. You’ll clean, level, and dry the subfloor, removing debris, nails, and high spots. Check for moisture and repair or replace compromised areas.
Lay underlayment per manufacturer instructions, overlapping and taping seams.
Sketch a layout, locate the longest straight run, and mark starter lines. This plan guarantees accurate board alignment and consistent spacer placement during installation.
Step 2 Determine correct expansion gap width (measurements and calculator)
Before laying any boards, determine the exact expansion gap you need so the floor can move without buckling; most manufacturers recommend 1/4″ to 1/2″ at walls for rooms up to about 40 feet, increasing the gap for longer runs or wider planks.
Measure room length and plank width, factor temperature/humidity, then use manufacturer charts or an online calculator to get the precise gap.
Step 3 Placing spacers along walls and fixed objects (corners, door frames)
Place spacers every 6–8 inches along walls and around fixed objects so you maintain the expansion gap you calculated; push each spacer snug against the board edge and the wall or object to hold the gap consistently as you work.
Use longer spacers at corners and door frames, trim spacers where needed, and check alignment frequently to prevent gaps or uneven edges.
Step 4 Using spacers during row installation and end joints
Start each new row by setting spacers at the ends of the boards and at each end joint so the expansion gap stays consistent as you click pieces together.
Tap pieces snugly, maintain spacer alignment at every seam, and check joints stay flush. Remove and reuse spacers as you advance.
At row ends, verify gaps match the wall spacers before trimming last boards for a clean, even finish.
Step 5 Handling long runs, transitions, and thresholds
When you’re working on long runs or approaching doorways and room changes, keep spacers aligned and consistent to preserve the expansion gap and prevent buckling; use longer spacer strips or link short spacers together to maintain a straight edge, and plan for thresholds by leaving the recommended gap where the floor meets trim or metal change strips.
For changes, stagger joints, measure twice, and use proper transition profiles to accommodate movement.
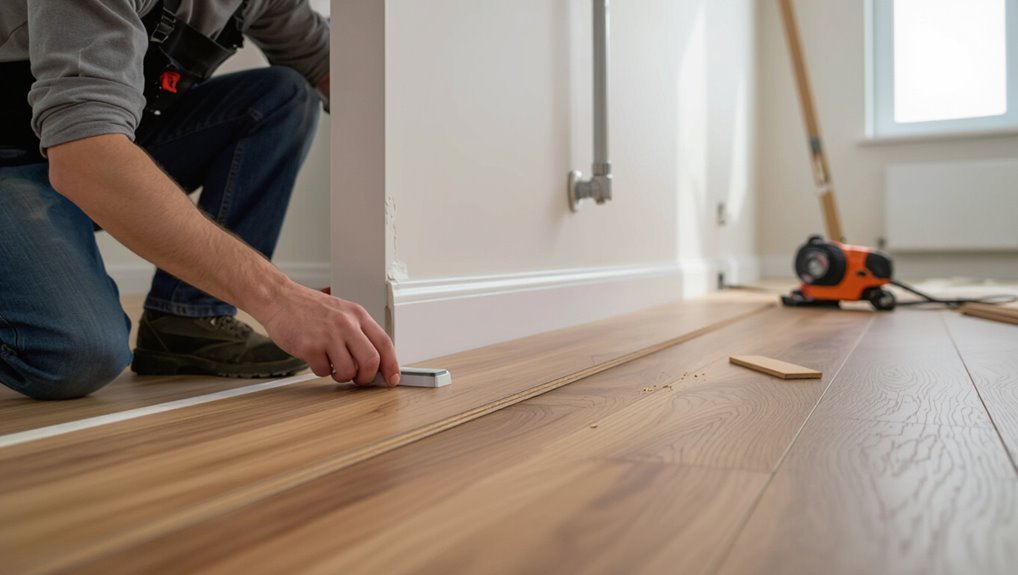
Step 6 Removing spacers and installing trim without closing the gap
6. When the glue’s set or floating rows are stable, remove spacers row by row, keeping the expansion gap intact.
Slide baseboards or quarter-round over the gap without nailing into the flooring—attach trim to the wall or subfloor only.
Use clips or shims to hold trim while you finish.
Seal gaps with flexible caulk where needed, never tighten the floor.
Step 7 Final inspection and adjustments
Once you’ve removed the spacers and installed trim without closing the expansion gap, give the entire floor a thorough final inspection and make any small adjustments needed.
Check seams, changes, and gaps for evenness and movement. Tap loose boards, tighten change strips, and trim undercuts where necessary.
Verify gaps remain consistent around walls and fixtures, then clean debris and enjoy the finished floor.
Common Mistakes and How to Avoid Them
Watch for a few common mistakes that can ruin your laminate installation: inconsistent spacer widths, forgetting spacers at doorways, pipes, or islands, leaving spacers under trim, and ignoring seasonal movement.
I’ll show quick fixes for each so you can correct them before they cause gaps, buckling, or squeaks.
Pay attention to spacing consistency and removal points to keep the floor stable and looking professional.
Mistake: Using inconsistent spacer widths
If you vary spacer widths across the room, you’ll end up with uneven expansion gaps that can cause buckling or visible warping when the floor expands and contracts.
Stay consistent: set a single gap dimension, measure frequently, and use matching spacers.
Check alignment as you work, replace any compressed spacers, and correct deviations immediately so the entire installation moves uniformly with temperature and humidity.
Mistake: Forgetting spacers at doorways, pipes, or island cabinets
Because doorways, pipes, and island cabinets create natural interruptions in your flooring run, forgetting to place spacers at those points can leave gaps that bind or show when the floor expands.
You should set spacers at every junction, around pipe penetrations (cut tight, then spacer), and along island edges.
Measure twice, mark spacer locations, and check clearances during installation to prevent visible gaps or buckling.
Mistake: Leaving spacers in place under trim
When you leave spacers under baseboards or shoe molding, they’ll trap the flooring in place and defeat the expansion gap you worked to create.
That hidden pressure can cause buckling, popping seams, or gaps at the trim later on.
Remove spacers before reinstalling trim, check for tight spots, and use a tapping block to seat planks properly.
Caulk or quarter-round covers any visible gap.
Mistake: Ignoring thermal/seasonal movement
Although laminate looks stable, it expands and contracts with temperature and humidity, and ignoring that movement will cause buckling, gaps, or noisy joints.
You must leave the recommended expansion gap around walls, doorways, and fixed objects, and avoid pinning boards under trim.
Account for seasonal range when planning changes and room layouts so the floor can move freely without stress or visible failures.
Quick fixes for each mistake
To fix common installation mistakes quickly, start by identifying the exact problem—gaps, buckling, loose edges, squeaks, or uneven planks—so you can choose the right repair method.
Then act: tighten, re-seat, or replace affected planks, add spacer adjustments, or use floor-leveling compound as needed.
- Close gaps with tapping block and add spacers
- Relieve buckling by removing rows and re-laying
- Secure loose edges with adhesive or new clips
- Fix squeaks by shimming or tightening joints
Best Practices and Pro Tips for a Gap-Free Installation
To get a truly gap-free laminate floor, you’ll follow spacing guidelines based on plank length and room size.
Choose the right spacer material (wedges for fine tweaks, plastic blocks for consistent gaps), and learn how to handle irregular walls and obstacles.
Pay attention to seasonal humidity and allow expansion where needed.
Use different spacer widths when rooms change size or layout.
If gaps persist or the room is large/complex, don’t hesitate to call a professional.
Spacing recommendations by plank length and room size
1 simple rule makes spacing predictable: match the expansion gap to plank length and room size so the floor can move without buckling.
For short planks in small rooms, use 1/4″–3/8″ gaps. For longer planks or rooms over 20 feet, increase to 3/8″–1/2″.
In very large or irregular spaces, subdivide rooms and maintain consistent gaps at junctions.
Best spacer materials and when to use wedges vs plastic blocks
Now that you’ve matched gap size to plank length and room dimensions, pick spacer materials that keep that gap consistent without damaging the boards.
Use soft plastic blocks for general runs — they’re stable and won’t mar edges. Choose tapered wooden or rubber wedges when you need fine adjustment or pressure near locks.
Replace damaged spacers and reuse clean ones to maintain accuracy.
Tips for working around irregular walls and obstacles
When walls curve, bulge, or bite into your layout, cut each end plank to follow the contour and use scribe-and-trim techniques so the gap stays even; measure twice, transfer the profile, and trim with a jigsaw.
Fit spacers against the curved cut, shim under high spots, and check alignment frequently.
For pipes and door jambs, notch planks precisely and maintain the required expansion gap.
Seasonal and climate considerations
Because laminate expands and contracts with temperature and humidity, you should acclimate the flooring and plan your expansion gaps for the extremes of your climate, not just the conditions the day you install.
Check seasonal high/low humidity and temperature ranges, set spacer gaps to accommodate maximum expected expansion, and recheck gaps after a full seasonal cycle to guarantee joints remain stable and even.
When to call a professional
If you find gaps that won’t settle after a full seasonal cycle or the layout includes awkward cuts, runs longer than the manufacturer’s recommended length, or irregular subfloor levels, bring in a pro.
You should also call a professional if you lack tools, face moisture issues, or need changes and thresholds fitted.
A pro guarantees correct underlayment, moisture mitigation, and warranty-compliant installation.
Comparison: Spacer Types and When to Use Each
You’ll pick spacers based on the job: plastic clip-on spacers are cheap and quick for straight runs, while reusable wedge spacers give you finer control and less waste.
For uneven floors or commercial installs, specialty spacers (adjustable or shims) help maintain consistent gaps and handle heavier traffic.
Weigh the cost versus performance—disposable options save money upfront, but durable spacers often pay off on larger or repeat projects.
Plastic clip-on spacers vs reusable wedge spacers
Two common spacer styles—plastic clip-on and reusable wedge—serve different needs when you install laminate flooring. You’ll prefer clip-ons for fast, consistent gaps and easy removal; choose wedges for adjustable pressure and reusable durability. Use clip-ons on straight runs, wedges near doorways or tight areas.
| Clip-on | Wedge |
|---|---|
| Quick | Adjustable |
| Disposable | Reusable |
| Consistent gap | Flexible use |
| Simple removal | Durable |
Specialty spacers for uneven floors or commercial installs
When you’re dealing with uneven subfloors or a commercial job that demands tighter tolerances, specialty spacers give you control regular clip-ons and wedges can’t match.
Use adjustable metal spacers, ramped junction blocks, and shims to fine-tune gaps, level runs, and maintain consistent expansion joints. They lock settings, resist compression, and speed large installations, so you’ll get a flat, durable finish without constant rechecking.
Cost vs performance trade-offs
Specialty spacers handle tricky floors, but they cost more and aren’t always necessary for simpler jobs.
You’ll weigh durability, precision, and price: plastic wedges are cheap and fine for DIY, clip systems give speed and uniformity at mid-range cost, while aluminum or adjustable spacers offer accuracy for uneven or commercial installs.
Choose based on floor condition, budget, and long-term performance.
Troubleshooting If You Still See Gaps
If you still see gaps after installation, start by diagnosing whether they’re from poor spacing, bowed planks, or subfloor issues so you know what fix is needed.
You can try re-straightening boards, adjusting spacer placement, or replacing affected planks depending on the cause.
Finally, decide whether the gaps are merely cosmetic or indicate a structural problem that needs professional attention.
Diagnosing the cause of persistent gaps
Although you’ve installed spacers, persistent gaps usually point to a specific cause you can identify and fix.
Check for bowed or warped planks, uneven subfloor, incorrect tongue-and-groove engagement, or misaligned rows. Measure expansion gap consistency along walls and around obstacles.
Listen for clicking during installation. Document where gaps concentrate to pinpoint whether materials, installation technique, or subfloor issues are responsible.
Repair options: re-straightening, re-spacing, and replacing planks
Once you’ve pinpointed where gaps keep appearing, you can choose among three practical repairs: re-straightening rows, re-spacing the entire floor, or replacing individual planks.
Re-straightening realigns loosened boards using a pull bar.
Re-spacing fixes expansion issues by resetting spacer gaps.
Replacing planks removes warped or damaged pieces.
Pick the least invasive option first and test a small area before full repair.
When gaps are cosmetic vs structural
When you still see gaps after trying repairs, decide whether they’re just cosmetic or indicate a structural problem before spending more time or money.
Inspect gap width, location, and whether gaps change with humidity or traffic.
Cosmetic gaps are small, stable, and only visible; structural gaps widen, shift, or align along seams or subfloor defects.
Fix cosmetic gaps with trim; address structural issues professionally.
FAQ Common Questions About Laminate Floor Spacers
You probably have a few practical questions about spacers—how wide the expansion gap should be, whether you can leave spacers in under the baseboard, and if you need them for floating vinyl or engineered hardwood.
You’ll also want to know whether spacers will stop gaps from an uneven subfloor and how to handle expansion gaps at doorways or between rooms.
I’ll answer each point so you can finish your floor correctly and avoid future problems.
How wide should the expansion gap be for laminate flooring?
How wide should the expansion gap be for laminate flooring?
You should leave 1/4 inch to 3/8 inch (6–10 mm) around walls and fixed objects for typical rooms.
For large areas over 30 feet in any direction, increase to 1/2 inch (12 mm).
Always follow manufacturer specs and adjust for room size, humidity, and door thresholds to prevent buckling.
Can I leave spacers in permanently under baseboard?
Wondering if you can leave spacers in place under the baseboard?
You can temporarily leave thin plastic spacers during installation, but remove them before fitting the baseboard.
Permanent spacers can trap moisture, compress, or prevent proper baseboard seating.
Instead, remove spacers, slide baseboards down to cover the expansion gap, and use trim or quarter round for a clean, secure finish.
Do I need spacers for floating vinyl or engineered hardwood?
If you left spacers in briefly under the baseboard during installation, remember those concerns apply to other floating floors too: gaps must stay clear for movement.
Yes — floating vinyl and engineered hardwood need spacers to maintain expansion gaps around walls, pipes, and fixed objects.
Use manufacturer-recommended gap widths, remove temporary spacers after fitting trim, and never glue the perimeter unless specified.
Will spacers prevent gaps caused by uneven subfloors?
Although spacers help keep the required expansion gap at walls and around obstacles, they won’t fix gaps that appear because your subfloor is uneven; spacers only maintain perimeter clearance, not floor flatness.
You’ll still need to inspect and correct high or low spots before installing. Use leveling compound, sanding, or plywood underlayment to create a consistent, flat surface so boards sit tight.
How do I handle expansion gaps at doorways and between rooms?
When you run laminate through doorways or from room to room, you’ll need to maintain the expansion gap but can hide it with proper connections and thresholds.
Spacers keep the gap consistent up to the doorway, and connector strips bridge the gap without pinching the floor.
Use spacers along edges, install a floating threshold or T-molding at the joint, and never fasten flooring through the connector.