How to Fix Cracks in a Concrete Garage Floor Before They Spread
You can stop small garage-floor cracks from spreading by first inspecting their size, depth, and signs of movement, then cleaning the crack thoroughly and removing loose material. For hairline cracks use a flexible polyurethane or epoxy sealant; for 1/8″–1/2″ route into a V-groove, apply bonding agent and patching compound; for larger or structural cracks consider epoxy injection or professional help. Cure properly and fix drainage issues to prevent recurrence, and keep going for detailed steps and tips.
How to Fix Cracks in a Concrete Garage Floor Before They Spread
You can often stop small concrete cracks from spreading if you act quickly—seal or fill them as soon as you spot hairline splits to prevent water and freeze-thaw damage.
Tackle minor, non-structural cracks yourself with a patching compound, but call a professional if cracks are wide, growing, or show signs of structural movement.
Quick action and the right choice between DIY and expert help will keep repairs simple and costs down.
Quick Answer Can you stop cracks from spreading and how quickly to act?
If you catch a hairline crack early, you can usually stop it from spreading by sealing and stabilizing the area within days to weeks.
Larger or actively widening cracks need attention immediately to prevent structural damage. Act fast: clean, seal with an appropriate concrete filler, and monitor.
For guidance on how to fix cracks in concrete garage floor, follow product instructions and recheck regularly.
When to DIY vs. call a professional
Catching a crack early and sealing it can often stop further damage, but knowing when to handle repairs yourself and when to call a pro matters.
If cracks are hairline, shallow, or under a few feet, you can clean and fill them with epoxy or concrete caulk.
Call a professional for wide, deep, shifting, or structural cracks, moisture issues, or repeated failures.
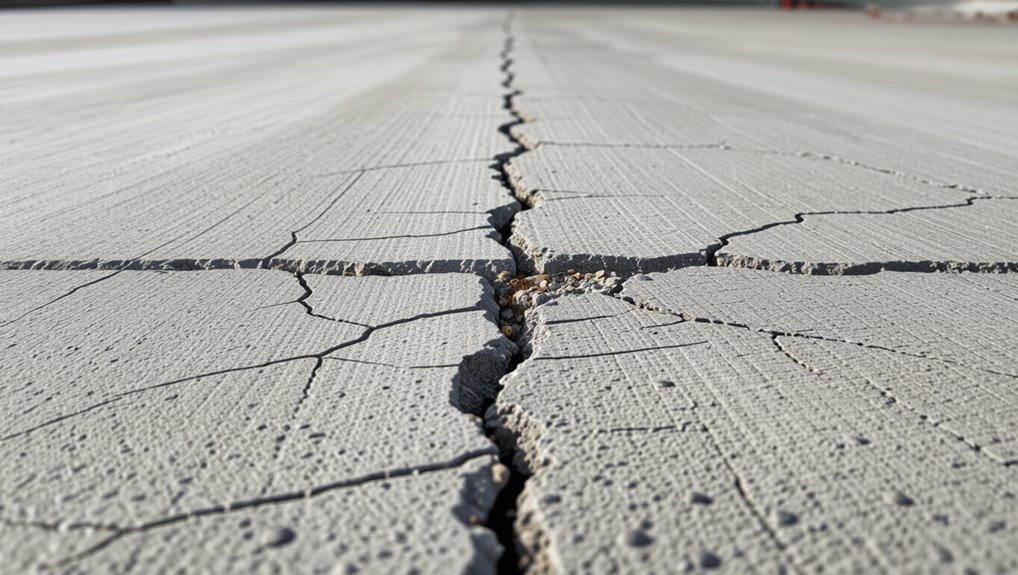
Basic Understanding What Concrete Cracks Mean and Why They Spread
You’ll see several types of garage floor cracks—shrinkage and hairline cracks from curing, settlement and structural cracks from footing or load issues.
They usually start from common causes like soil movement, freeze–thaw cycles, a poor concrete mix, heavy loads, or trapped moisture.
Left unchecked, small cracks can widen and spread as those forces continue and water or freeze action worsens the damage.
Types of garage floor cracks (shrinkage, settlement, hairline, structural)
When you examine cracks in your garage floor, knowing the difference between shrinkage, settlement, hairline, and structural cracks helps you judge their severity and choose the right fix.
Shrinkage cracks are thin, random, and usually cosmetic.
Settlement cracks are wider, stepped, or sloped.
Hairline cracks stay narrow.
Structural cracks are large, widening, or show displacement and need professional repair.
Common causes (soil movement, freeze-thaw, poor mix, heavy loads, moisture)
Several common forces cause garage-floor cracks, and understanding them helps you decide whether a simple patch will do or if you need professional help.
Soil movement and settlement shift foundations, freeze-thaw cycles expand and contract concrete, and a poor mix weakens strength.
Heavy loads create stress fractures, while persistent moisture corrodes reinforcement and weakens the slab, accelerating deterioration.
How cracks progress over time
Because concrete’s strength is finite, tiny hairline cracks often form first and then widen as forces keep acting on them.
You’ll notice edges chip, joints shift, and moisture penetrates, accelerating deterioration. Freeze-thaw cycles, load repetition, and root or soil movement pry cracks open.
If you don’t seal or stabilize them, they’ll interconnect, deepen, and require more invasive repairs over time.
Assessing the Damage Inspecting and Diagnosing Cracks
You’ll need a few simple tools—a flashlight, ruler or crack gauge, tape measure, screwdriver or probe, and a moisture meter—to thoroughly inspect each crack.
Measure width, depth, and length carefully, note jagged or offset edges that suggest structural issues, and watch for hairline surface cracks that are usually non-structural.
If the floor feels damp or staining appears, perform a moisture test with a meter or a plastic-sheet (tape-down) test to confirm whether moisture is driving the problem.
Tools and materials needed for inspection
Grab a few basic tools before you start so you can inspect cracks thoroughly and diagnose their causes: a tape measure, a flashlight, a stiff-bristled brush, a wire probe or screwdriver for checking loose concrete, a chisel and hammer for revealing hidden faults, a concrete crack gauge or calipers for measuring width and movement, a small level for checking slope, and safety gear (glasses, gloves, dust mask).
- Inspect edges and loose material
- Probe joints and wall connections
- Note moisture, staining, and settling indicators
How to measure crack width, depth, and length
Start by measuring each crack’s width, depth, and length so you can prioritize repairs and pick the right materials.
Use a tape measure for length, a ruler or crack gauge for width, and a masonry probe or screwdriver to gauge depth.
Record measurements, note location, and photograph each crack.
Repeat checks after cleaning to verify accuracy before choosing a repair method.
Signs a crack is structural vs. non-structural
When you inspect cracks, focus on patterns and changes over time to tell structural from non‑structural damage.
Look for wide, jagged, or stair-step cracks, displacement, or cracks that run across joints—these suggest structural issues.
Hairline, single straight cracks without movement are usually non‑structural shrinkage.
Note rapid growth, new displacement, or recurring repairs; those need professional evaluation.
When to perform a moisture test and how to do it
After you’ve judged whether a crack looks structural or not, check for moisture before choosing a repair method—water can undermine many fixes and hide ongoing problems.
Do a quick tape test: clean area, stick a plastic sheet sealed at edges, wait 24–48 hours, then look for condensation or darkening.
For accuracy, use a concrete moisture meter and record readings before repairing.
Quick Preparatory Steps Before Repair
Before you start repairs, put on gloves, eye protection, and a dust mask so you stay safe while working.
Clean the crack and surrounding area thoroughly—use a power washer if needed and a degreaser to remove oil and debris.
Gather the right tools and pick a repair product designed for the crack width and floor conditions so you won’t be interrupted midjob.
Safety precautions and personal protective equipment
1 essential step before you touch the concrete is to gear up properly—put on safety glasses, a dust mask or respirator rated for silica, heavy-duty gloves, ear protection, and sturdy boots.
Then confirm ventilation, clear bystanders, and inspect tools. Follow these simple precautions so you stay safe during repair:
- Check respirator fit and filters
- Wear impact-rated eye protection
- Use gloves with good grip and abrasion resistance
Cleaning the crack and surrounding area (power wash, degreasing)
Now that you’re protected and your workspace is set, start by cleaning the crack and at least a 6–12 inch perimeter of the surrounding floor so repair materials will bond properly.
Remove loose debris, oil, and dirt thoroughly. Use a pressure washer, degreaser, and stiff brush as needed to expose clean concrete.
- Pressure-wash at medium pressure
- Apply degreaser, scrub, rinse
- Let fully dry before proceeding
Preparing tools and choosing the right repair product
Gather the right tools and pick a repair product that matches the crack type and your skill level, because the wrong materials or missing gear will ruin the job.
You’ll need a chisel, hammer, wire brush, shop vacuum, caulking gun, trowel, and safety gear.
Choose epoxy for structural cracks, polyurethane for flexible joints, or cementitious patch for surface repairs, and read instructions before starting.
Step-by-Step Crack Repair Methods
Now you’ll learn specific repair steps for each crack type so you can pick the right materials and technique.
Start with hairline and small non-structural cracks (under 1/8″) and move up to medium (1/8″–1/2″) and large or structural cracks (over 1/2″).
I’ll also cover how to handle joint cracks and repair control joints to keep the slab moving properly.
Repairing hairline and small non-structural cracks (under 1/8)
For hairline and other non-structural cracks under 1/8″, you’ll want an epoxy or polyurethane sealant made for concrete.
First clean and fully dry the crack, then apply the filler or sealant according to the product instructions.
Finally smooth the surface and let the repair cure before using the floor.
Materials to use (epoxy, polyurethane sealant)
When you’re fixing hairline or tiny non-structural cracks (under 1/8″), choose a material that’s flexible, bonds well to concrete, and suits the crack width—epoxy and polyurethane are the two best options.
Use epoxy for rigid, deep fills that need strong adhesion; use polyurethane for thin, moving cracks because it stays flexible and resists moisture.
Match product specs to temperature and cure time.
Step 1: Clean and dry
Step 1: Clean and dry the crack thoroughly before any filler goes in — dirt, oil, and moisture will prevent adhesion and cause premature failure.
Remove loose debris with a stiff brush or vacuum, scrape stubborn residue, and degrease stains with a concrete cleaner.
Rinse, then let the area air-dry or use a shop fan until completely dry to guarantee proper bonding later.
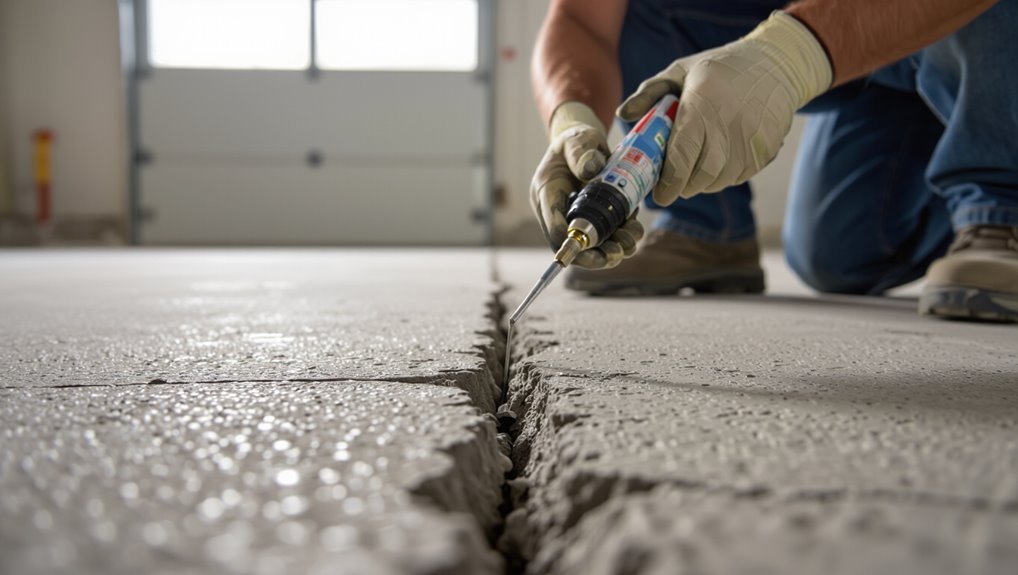
Step 2: Apply filler/sealant
Now that the crack is clean and fully dry, you can fill it to stop water and dirt from getting back in.
Choose a concrete crack sealant or epoxy for hairline cracks; load a caulk gun, insert the nozzle, and run a steady bead along the crack.
Press lightly to guarantee penetration, wipe excess with a rag, and follow manufacturer dry-time instructions before light use.
Step 3: Smooth and cure
After you’ve filled the crack, smooth the sealant so it blends with the surrounding slab and cures evenly.
Use a damp putty knife or trowel to level the material, removing excess and feathering edges.
Keep traffic off the area, protect it from moisture and dust, and follow manufacturer cure times—typically 24–48 hours—before driving or storing heavy items on the repaired surface.
Repairing medium cracks (1/8″ to 1/2″)
For medium cracks between 1/8″ and 1/2″, you’ll want to use a quality concrete patch compound or a vinyl concrete patch designed for floor repairs.
Start by chiseling or routing the crack into a V-groove, apply a bonding agent, then trowel in the patching compound and smooth the surface.
Finish by allowing the repair to cure fully and applying a sealer to protect the patch.
Materials to use (concrete patch compound, vinyl concrete patch)
You’ll need a quality concrete patch compound or a vinyl concrete patch designed for medium cracks (1/8″ to 1/2″), as these products bond well and resist shrinking.
Choose a polymer-modified mix for flexibility and adhesion.
Also get a concrete primer, a caulk-style applicator or trowel, and a stiff brush for cleaning.
Wear gloves, eye protection, and follow manufacturer mixing and cure instructions.
Step 1: Chisel or rout the crack to create a V-groove
Start by chiseling or routing the crack to form a clean V-groove about 1/4″ to 1/2″ deep and slightly wider at the top than the bottom.
Remove loose debris and dust with a wire brush and vacuum.
Keep edges square and consistent so patch material bonds well.
Wear eye and hand protection, work steadily, and clear the area before moving to the next step.
Step 2: Bonding agent application
Once the groove’s clean and dry, apply a concrete bonding agent to the V-groove and surrounding edges so the patch will adhere properly.
Use a brush or low-pressure sprayer, following manufacturer dilution and coverage. Work in thin, even coats and avoid puddling.
Let tackiness develop per directions—usually 10–30 minutes—before proceeding.
Reapply only if surface dries completely and absorption is uneven.
Step 3: Trowel patching compound and finish
Mix the trowel-grade patching compound to a workable, slightly stiff consistency following the manufacturer’s ratios.
Then load your hawk or mixing bucket and press the material firmly into the V-groove with a margin trowel so it bonds and fills completely.
Strike off excess, feather edges to match slab height, and compact to remove voids.
Smooth with a damp sponge or steel trowel for a neat finish.
Step 4: Curing and sealing
After you’ve smoothed and feathered the patch so it sits flush with the slab, let the compound set just enough to hold shape before beginning the cure.
Cover the repair with plastic or damp burlap for 24–48 hours to retain moisture.
Once cured, clean the area, apply a concrete sealer per manufacturer instructions, and allow full cure before vehicle or heavy use.
Repairing large or structural cracks (over 1/2)
For large or structural cracks over 1/2″, you’ll need heavier-duty materials and may have to choose between epoxy injection or structural underpinning depending on movement and load.
First, you’ll secure temporary support and safety, then route and clean the crack and add backer rod if needed.
Finally, you’ll inject epoxy or polyurethane foam, finish the joint, and monitor the repair for settlement or recurring movement.
Materials and when to consider epoxy injection or underpinning
When you’re tackling large or structural cracks (wider than 1/2 inch), you’ll need heavy-duty materials and to know when simple patching won’t cut it:
Use high-strength epoxy injection kits for bonded, load-bearing repairs when cracks are stable and hairline-to-1″ separations need internal bonding.
Consider underpinning, grout, or pier systems when settling, wide openings, or foundation movement causes loss of support—hire a pro.
Step 1: Temporary support and safety
If epoxy injection or underpinning is the route you’ve chosen, the first priority is keeping the structure and yourself safe before any repair work begins.
Shore up sagging slabs with adjustable steel props or temporary cribbing, brace nearby walls, and cordon the area.
Wear PPE, keep bystanders away, and monitor for movement.
Call an engineer if cracks widen or settlement continues.
Step 2: Routing, cleaning, and installing backer rod if needed
Start by enlarging and shaping the crack so repair material can bond—use a masonry grinder or angle grinder with a diamond or carbide blade to route a V- or U-shaped groove about 1/2–3/4 inch wide and deep (deeper for very wide or active cracks).
Remove dust and debris with a wire brush and vacuum, rinse if needed, let dry, then press in closed-cell backer rod to control filler depth.
Step 3: Epoxy injection or polyurethane foam injection process
With the crack routed, cleaned, and backer rod in place, you’re ready to choose between epoxy injection for structural bonding or polyurethane foam for water-sealing and flexible fills.
Install injection ports along the crack, seal the surface with a paste, then inject from the lowest port upward until material flows from the next port.
Remove ports and flush or trim cured material.
Step 4: Post-repair monitoring
After the repair cures, monitor the crack for at least 6–12 months to confirm structural stability and waterproofing performance.
Check monthly for movement, new gaps, staining, or moisture intrusion. Measure gap width and note changes, photograph each inspection, and record dates.
If you spot movement or leaks, contact a structural contractor promptly for evaluation and possible supplemental repairs to prevent recurrence.
Addressing joint cracks and control joint repairs
Next you’ll handle joint cracks and control joints, which often need either replacement or resealing to keep the slab moving as designed.
You’ll choose between flexible sealants that accommodate movement and rigid fillers that provide a hard patch, depending on joint function and traffic.
Follow each joint’s manufacturer guidelines and match the product to the expected movement and loading.
Replacing or resealing control joints
Because control joints guide concrete cracking, you’ll want to replace or reseal them when they’re open, deteriorated, or filled with debris that keeps the slab from moving properly.
Clear debris, remove old filler, and inspect the joint depth. Insert a backer rod if needed, then apply new joint material to the proper profile.
Smooth, cure, and monitor for movement or recurring gaps.
Using flexible sealants vs. rigid fillers
When you’re choosing between flexible sealants and rigid fillers for joint and control-joint repairs, think about movement: flexible sealants accommodate expansion and contraction, while rigid fillers lock the slab in place and can crack if the joint shifts.
You should use flexible sealants for active joints and exterior exposure, and rigid fillers only for stable, nonmoving cracks—apply per manufacturer instructions for best durability.
Preventing Future Cracks Best Practices and Maintenance
To prevent new cracks, you’ll want to control moisture with proper grading, gutters, and a vapor barrier, and manage loads by limiting heavy equipment and using protective mats.
Keep seasonal care in mind—clear drains, repair edges before freeze-thaw cycles, and avoid deicing salts that can damage concrete.
Consider surface treatments like sealers, overlays, or densifiers when the slab is sound to add protection and extend its life.
Moisture control and drainage solutions (grading, gutters, vapor barriers)
If water isn’t directed away from your garage, moist soil and standing water will undermine the slab and lead to recurring cracks. Controlling moisture through proper grading, functioning gutters, and effective vapor barriers stops that cycle before it starts.
You should slope soil away, keep gutters clear, and seal the slab perimeter to limit dampness and hydrostatic pressure.
- Grade soil away from the foundation
- Maintain clean, routed gutters
- Install/repair vapor barriers and perimeter seals
Load management and floor usage recommendations
Because heavy loads and repeated concentrated stresses wear down concrete over time, managing what you put on your garage floor and how you use it matters for preventing future cracks.
Avoid parking oversized vehicles on one spot, spread heavy loads with plywood or rubber mats, rotate storage locations, use shelving for heavy items, and lift rather than drag equipment to reduce localized stress and abrasion.
Seasonal care and freeze-thaw prevention
When temperatures swing and moisture gets into tiny surface pores, your garage slab faces its toughest seasonal challenge: freeze-thaw cycles that expand and contract water inside the concrete, widening hairline cracks into larger failures.
You’ll keep cracks from worsening by clearing drains, directing runoff away, patching small gaps before winter, keeping surfaces clean and dry, and monitoring joints for shifting.
When to apply surface treatments: sealers, overlays, or densifiers
Although the right surface treatment depends on your slab’s condition and usage, choosing between a sealer, overlay, or densifier comes down to purpose: protection, cosmetic repair, or structural consolidation.
You’ll apply a sealer for water and stain resistance on sound concrete, an overlay to hide and level surface defects, and a densifier to harden porous slabs—timing depends on repairs, moisture, and traffic schedules.
Common Mistakes to Avoid
Don’t use the wrong repair product for the crack type — that’ll make the fix fail fast.
Always clean and prep the crack and don’t skip checking for underlying causes like soil movement, drainage problems, or structural issues.
Be patient with curing times and avoid overworking patches or you’ll weaken the repair.
Using the wrong product for the crack type
If you grab a generic patching compound without matching it to the crack type, you’ll end up with a repair that fails fast or looks off.
You should choose epoxy or polyurethane for active, structural cracks and flexible sealants for hairline or freeze-thaw gaps.
Match viscosity and cure time to depth and traffic. Using the wrong product wastes time and weakens the floor.
Skipping proper cleaning and preparation
Picking the right patching material means little if you skip proper cleaning and prep first.
You need to remove dirt, oil, loose concrete, and vegetation with a stiff brush, degreaser, and wire wheel or pressure washer. Clean edges and dry the crack before applying filler so adhesion lasts.
Skipping prep causes poor bonding, early failure, and wasted effort.
Ignoring underlying causes (soil, drainage, structural)
Because surface repairs only treat symptoms, you’ll keep seeing cracks if you don’t address what’s happening beneath the slab.
Check soil settlement, poor compaction, and drainage directing water toward the foundation.
Look for plumbing leaks, downspout issues, or nearby grading problems.
If loads or shifting structure cause movement, consult a pro for stabilization before patching so repairs last instead of recurring.
Rushing curing times or overworking patches
When you rush curing or keep tamping and troweling a patch, you weaken the bond and invite future cracking; concrete needs time and a gentle touch to reach strength.
Let repairs cure per manufacturer instructions, keep them moist if recommended, and avoid heavy traffic for the prescribed period.
Don’t overwork surfaces trying to perfect them — patience prevents weak, hairline failures and costly rework.
Materials, Tools, Cost Estimates and Timeframes
You’ll compare epoxy, polyurethane, and cementitious products to pick the best match for crack width, movement, and moisture.
Gather a basic tool list—chisel, wire brush, vacuum, caulking gun—and consider renting grinders or injection kits for larger jobs.
Finally, you’ll look at typical costs and timeframes tied to crack size/type so you can budget and schedule the repair.
Comparison of common repair materials (epoxy vs. polyurethane vs. cementitious)
Picking the right repair material comes down to matching performance, cost, and the time you can spend on prep and curing. You’ll choose epoxy for strength and adhesion, polyurethane for flexibility and water resistance, or cementitious mixes for bulk fills and low cost. Compare properties below:
| Material | Best use |
|---|---|
| Epoxy | Structural, durable |
| Polyurethane | Flexible, waterproof |
| Cementitious | Large fills, economical |
Typical tool list and rental options
Start by gathering a concise set of materials and tools so you can move efficiently through prep, repair, and cleanup.
Bring a shop vacuum, wire brush, and chisel for cleaning and prepping. Rent a concrete grinder or rotary hammer for larger jobs if needed.
Keep epoxy/urethane cartridges, caulk gun, and safety gear on hand.
- Shop vacuum, wire brush, chisel
- Concrete grinder or rotary hammer
- Caulk gun, cartridges, PPE
Estimated costs and repair duration by crack size/type
Although repair methods overlap, the cost and time you’ll need depend mostly on the crack’s size and type—hairline, structural, or joint—and whether you’re doing a DIY patch or hiring a pro.
Hairline: $5–30, 30–60 minutes with filler.
Small structural: $50–300, a few hours to a day with epoxy.
Large structural/joint: $300–1,500+, one to several days for saw-cut, seal, or slab work.
Real-World Scenarios and Case Examples
You’ll first see a simple DIY hairline repair example showing the step-by-step patch, materials used, and the typical outcome.
Then you’ll review signs that a crack needs professional structural intervention and what a contractor will do to stabilize it.
Finally, you’ll cover long-term maintenance steps you can take to prevent recurrence and extend the repair’s life.
Simple DIY repair case (hairline crack) steps and outcome
Fixing a hairline crack in your garage floor is a quick DIY task you can tackle with minimal tools and a small amount of material.
Clean the crack, blow out dust, and widen slightly with a screwdriver if needed.
Apply concrete crack filler or epoxy, smooth with a putty knife, let cure per instructions, then sweep and reseal the area for protection.
Structural repair case requiring professional intervention signs and solution
When cracks show widening over time, step out of the DIY mindset and call a pro—these changes often signal deeper problems like settling footings, subgrade washout, or hydrostatic pressure that DIY fillers won’t fix.
A contractor will assess structural movement, core-sample or use probes, recommend underpinning, slab jacking, or improved drainage, and perform repairs with engineered materials and permits to guarantee lasting stability.
Long-term maintenance case (preventing recurrence)
Although a professional repair stops immediate movement, you’ll prevent future cracks by addressing the underlying causes and committing to a routine maintenance plan.
Inspect yearly for new hairline lines, settle drainage, and control moisture. Reseal joints, repair minor gaps promptly, and stabilize soil or grading around the slab.
Keep heavy loads distributed, use mats under vehicles, and document changes to catch recurrence early.
FAQ Quick Answers to Common Questions
You’ve got practical questions — like whether filling a crack will stop it from returning, if regular caulk will do the job, and how soon you can drive on the repair.
You’ll also want to know whether sealers actually prevent new cracking and when a crack signals foundation trouble.
Below are quick, clear answers to help you decide what to do next.
Will filling a crack stop it from coming back?
Will filling a crack stop it from coming back? Not always.
Filling addresses the symptom—keeps water, dirt, and pests out and improves appearance—but underlying causes like settlement, freeze‑thaw, or poor slab support can make new or recurring cracks.
You should diagnose causes, repair structural issues, and use appropriate materials.
Regular inspection and maintenance reduce recurrence but don’t guarantee permanent prevention.
Can I use regular caulk to fix garage floor cracks?
Can you use regular caulk to fix garage floor cracks? You can, but don’t expect lasting results.
Regular silicone or acrylic caulk may stick temporarily and hide hairline gaps, but it won’t bond well to concrete or handle vehicle traffic, moisture, and temperature shifts.
Use a concrete-specific filler or epoxy for durable repairs; reserve caulk for quick, low-stress touch-ups only.
How long before I can drive on the repaired area?
If you used a quick-setting caulk for a cosmetic touch-up, don’t expect to drive over it immediately—those products aren’t built for traffic.
For repair mortars or epoxy fillers, wait manufacturers’ recommended cure times: often 24–72 hours for light foot traffic and 3–7 days for vehicle weight.
Cold or damp conditions lengthen curing. Test by pressing; if it feels firm, you can drive cautiously.
Do concrete sealers prevent cracking?
Although sealers can’t stop all cracking, they do help reduce some common causes by keeping moisture, deicing salts, and chemicals out of the concrete’s pores.
You should use a high-quality penetrating or topical sealer after repairs to slow freeze-thaw damage and surface deterioration.
Sealers won’t fix structural issues, so combine them with proper repairs, control joints, and good drainage to minimize new cracks.
When should I worry about foundation damage?
When should you start worrying about foundation damage? You should act if cracks are wider than 1/4 inch, vertical displacement appears, doors or windows stick, or you see recurring moisture, mold, or sagging floors.
Small hairline cracks are normal, but rapid growth, lateral cracks, or visible chunking mean call a structural engineer or foundation contractor for inspection and repair.
Additional Resources
For products, I’ll point you to tried-and-true crack fillers, epoxy kits, and reputable brands so you can compare features and prices.
If the job feels beyond your skills, I’ll show how to find local concrete repair pros, check licenses and insurance, and read reviews.
That way you can pick the right materials or hire someone you trust.
Suggested products and brands to consider
Here are reliable products and brands to contemplate when repairing your garage floor, chosen for ease of use, durability, and value.
You’ll find options for patching, resurfacing, and sealing that suit DIYers and pros alike.
- Quikrete concrete crack sealant and patch
- Sika concrete repair and bonding products
- Rust-Oleum epoxy floor kits for sealing and finishing
How to find and vet concrete repair professionals
Looking for a reliable contractor? You’ll want references, licenses, and clear estimates.
Vet candidates by checking reviews, confirming insurance, and seeing past work. Ask specific questions about methods, materials, and warranties.
Get multiple bids, compare timelines, and insist on written contracts. Trust gut if communication’s poor.
- Check licenses and insurance
- Review past projects and references
- Require written estimates and warranties