How Thick Is a Ceramic Tile? Size Guide for Every Project
Ceramic tile thickness varies by use: wall tiles run about 4–7 mm, standard floor tiles 8–10 mm, heavy‑duty and outdoor tiles 10–12+ mm, and thin options sit around 6–8 mm. Thickness affects durability, installation method, and level changes, so you’ll pick thicker tiles for high traffic or exterior use and thinner ones for backsplashes or showers. You’ll also want to plan for mortar and grout depth, and keep reading to learn practical selection and installation tips.
Quick Answer Typical Ceramic Tile Thickness at a Glance
For a quick look, most ceramic floor tiles run about 8–12 mm thick while wall tiles are usually thinner, around 4–7 mm.
Porcelain, being denser, often comes thicker and more durable than standard ceramic at similar sizes.
Keep these ranges in mind when planning installation or replacements.
Standard thickness ranges for ceramic floor tiles
Most ceramic floor tiles fall into a few common thickness ranges you’ll see at the store: thin porcelain and ceramic tiles are usually 6–8 mm, standard floor tiles run about 8–10 mm, and heavy-duty or commercial-grade tiles can be 10–12 mm or thicker.
When you’re choosing, consider load, subfloor, and grout spacing to decide how thick is a ceramic tile should be for your project.
Standard thickness ranges for ceramic wall tiles
Wall tiles are generally thinner than floor tiles because they don’t need to bear heavy loads, so if you moved from floor options you’ll notice slimmer profiles.
Typically, wall ceramic tiles range from about 3mm to 8mm thick. Mosaic sheets sit around 3–4mm, standard wall tiles 6–8mm, and decorative or large-format panels may approach 10mm for added rigidity and installation ease.
Thickness differences for porcelain vs. ceramic (brief)
You’ll notice porcelain tiles are generally thicker and denser than ceramic ones, because they’re pressed and fired at higher temperatures to make them stronger and less porous.
You’ll typically see porcelain at 8–10 mm for residential floors and up to 20 mm for heavy commercial use, while ceramic floor tiles usually range 6–10 mm and wall tiles 4–8 mm.
What Is Tile Thickness and Why It Matters
Tile thickness is the actual measurement from glaze to back (often different from the nominal size) and it tells you how the tile will perform under weight and wear.
Thicker tiles generally offer greater durability, higher load capacity, and longer life, but they also change how you’ll set them—affecting mortar type, trowel size, and substrate prep.
A simple cross-section showing glaze, body, thickness, and mounting mortar makes these relationships easy to visualize.
Definition of tile thickness and related terms (nominal vs. actual)
When you talk about tile thickness, you’re really referring to two related measurements: the nominal thickness—the rounded or marketed size—and the actual thickness—the precise measurement you’ll get with a caliper.
You should check both for installs, trims, and grout lines to guarantee fit.
- Nominal vs actual: why they differ
- Where to measure actual thickness
- How specs affect ordering decisions
How thickness affects durability, load capacity, and longevity
Because thickness controls how a tile handles stress, it directly affects durability, load capacity, and long-term performance. Thicker tiles resist cracking and edge chipping better under heavy use, while thinner tiles are more vulnerable to point loads and flexing.
You should choose thicker tiles for high-traffic areas and heavy fixtures to extend lifespan, while lighter-duty spaces can use thinner, cost-effective options.
Impact of thickness on installation methods and materials
Having picked thicker tiles for heavy-use areas, you’ll also need to adjust how you install them—thickness changes the adhesives, backerboards, and trowel sizes you should use.
Choose mortar, substrate, and tools to match tile mass; heavier tiles need stronger bonding and flatter substrates.
Consider:
- Larger notched trowel for full coverage
- Cement backerboard or mortar bed
- Higher-strength thinset or epoxy adhesive
cross-section diagram showing tile thickness, body, glaze, and mounting mortar
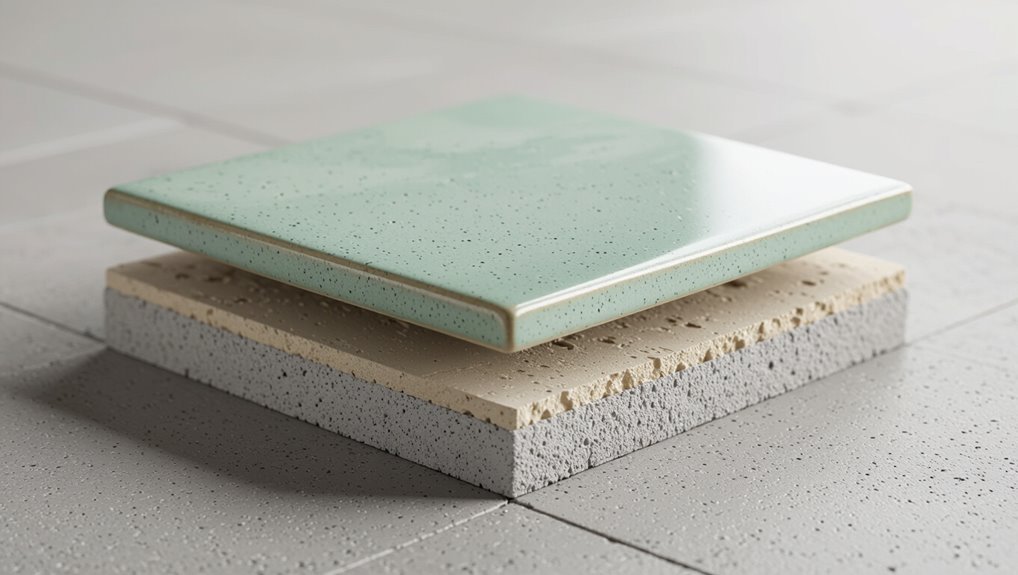
If you cut through a tile and its setting, you’ll see distinct layers that determine performance: the body (or substrate) gives strength and thickness, the glaze provides surface wear and appearance, and the mounting mortar bonds the tile to the substrate and fills any unevenness.
Visualize a cross-section: measure total thickness from glaze top to mortar bottom, note body thickness for load capacity, and guarantee mortar coverage for proper adhesion.
Common Ceramic Tile Thicknesses by Application
You’ll find different ceramic thicknesses suit different jobs, from thin interior wall and backsplash tiles to thicker residential floors and heavy-duty commercial slabs.
For bathrooms and showers you’ll want moderate thickness plus proper waterproofing, while kitchen backsplashes can be very thin or a bit heftier depending on durability and look.
For floors, residential tiles typically run thinner than commercial, which use heavier, thicker options for high-traffic durability.
Interior wall tiles: typical ranges and use cases
Interior wall tiles usually fall between 3/16 inch and 5/16 inch thick, and that range balances ease of installation, weight, and the low-impact wear interior walls face.
You’ll pick thinner tiles for backsplashes and accent walls, and slightly thicker for areas needing durability.
Consider substrate and adhesive compatibility to avoid problems.
- Backsplashes and feature walls
- Kitchen and living areas
- Low-traffic decorative panels
Bathroom and shower walls: recommended thickness and waterproofing considerations
Because bathrooms and showers face constant moisture and occasional impact, you should choose slightly thicker wall tiles—commonly 1/4 inch to 3/8 inch—for better durability and easier waterproofing integration.
Set tiles over a proper backer board or bonded waterproof membrane, use full-coverage thinset, and seal grout lines.
Thicker tiles resist chipping, accommodate slope work, and simplify changes to waterproof assemblies.
Kitchen backsplash tiles: thin vs. thicker options
Moving from wet walls to kitchen backsplashes, you’ll find different demands—less constant moisture but more exposure to splatters, heat, and frequent cleaning—so thinner tiles often work fine.
You’ll choose based on durability, ease of installation, and matching counters or appliances.
Consider these quick pointers:
- Thin (6–8 mm): lightweight, easy cut and install
- Medium (8–10 mm): more impact resistance
- Thicker (>10 mm): heavy-duty, statement looks
Floor tiles for residential use: standard thicknesses
For most homes you’ll find ceramic floor tiles fall into three practical thickness ranges: about 6–8 mm for light-traffic areas and easy installation, 8–10 mm for general living spaces where durability matters, and thicker tiles over 10 mm for high-traffic zones or when you want a substantial, premium feel.
Choose thinner for bedrooms, mid-range for kitchens and hallways, and thicker where impact or longevity is a priority.
Commercial and high-traffic floor tiles: heavier/thicker options
When you’re specifying tiles for commercial or heavy-use floors, manufacturers typically recommend thicker ceramics—often in the 10–20 mm range—because that added mass resists cracking, absorbs impact, and stands up to constant foot traffic and equipment.
You’ll choose tile based on load, expected wear, and maintenance needs.
- Select 10–12 mm for moderate commercial use
- Use 15–20 mm for heavy equipment zones
- Consider porcelain or gauged porcelain for extreme durability
Outdoor and patio tiles: thickness plus frost-resistance factors
Because outdoor tiles face freeze-thaw cycles and constant exposure, you should pick thicker, frost-resistant ceramics that can handle water infiltration and temperature swings.
Aim for 9–12 mm or thicker porcelain-body tiles rated for frost resistance.
Guarantee low water absorption (≤0.5%), textured slip-resistant surfaces, and proper installation with suitable mortar and drainage so tiles won’t crack or delaminate over seasons.
Material and Manufacturing Factors That Influence Thickness
When you compare glazed and unglazed tiles, remember the glaze layer adds measurable thickness and can affect edge profiles.
Manufacturing methods—pressed versus extruded—also change how tightly thickness is controlled, and porcelain’s higher density often lets manufacturers use thinner bodies than standard ceramic.
You’ll also notice larger format tiles tend to be thicker or require reinforcement compared with small tiles to prevent breakage.
Glazed vs. unglazed ceramic and how glaze adds to thickness
Glazed and unglazed ceramic tiles differ not just in appearance but in actual thickness: glazed tiles carry a thin glassy layer fused to the body during firing, and that layer typically adds 0.2–1.0 mm to the finished tile depending on formulation and application method.
You’ll notice differences in wear, slip resistance, and finishing.
- Glaze increases thickness and sheen
- Unglazed stays consistent in profile
- Edge trimming may be required
Pressed vs. extruded tiles: production effects on thickness tolerances
Beyond glaze, the way a tile’s body is formed has a big impact on thickness consistency.
If you choose pressed tiles, hydraulic pressing yields uniform, repeatable thickness with tighter tolerances, ideal for floors and large-format pieces.
Extruded tiles, pushed through dies, can vary more and need trimming; they tolerate slight thickness variation but cost less.
Match method to your leveling needs.
Porcelain vs. ceramic body density and thickness relationship
Because porcelain bodies are denser and less porous than standard ceramic clays, they tend to be made thinner for the same strength and wear resistance, while earthenware and standard ceramic bodies usually require greater thickness to achieve comparable durability.
You’ll choose thickness based on body density, planned use, and firing technique.
- Denser porcelain = thinner, strong
- Softer clays = thicker needed
- Firing affects final density
Tile size and thickness correlation (large format vs. small tiles)
While larger-format tiles let manufacturers get away with slightly thinner bodies due to broader load distribution and fewer grout lines, smaller tiles often need extra thickness or backing to resist edge chipping and substrate flex.
How to Choose the Right Thickness for Your Project
Start by evaluating the installation area and expected traffic so you can pick a thickness that handles the load.
Check your subfloor or wall substrate, match tile thickness to the adhesive, grout, and any leveling requirements, and plan for changes in height and thresholds.
Finally, verify manufacturer specs and PEI ratings to guarantee the tile’s thickness suits the designated use.
Step 1 Assess the installation area and traffic loads
Begin by surveying the room and thinking about how it’ll be used: different areas demand different tile thicknesses based on traffic, furniture weight, and subfloor type.
You’ll match thickness to expected load to prevent cracking and sagging.
Consider these factors:
- Foot traffic intensity (light, medium, heavy)
- Furniture and appliance weight
- Outdoor vs. indoor exposure and wear
Step 2 Check subfloor or wall substrate requirements
Step 2 is to inspect the subfloor or wall substrate so you can match tile thickness to the surface’s strength and stability.
Check material (plywood, cement board, concrete), flatness, deflection limits, moisture and existing coverings.
Thinner tiles suit rigid, stable substrates; thicker tiles help bridge minor irregularities.
Reinforce or replace weak areas before selecting tile thickness to guarantee lasting performance.
Step 3 Match thickness to adhesive, grout, and leveling needs
Now that you’ve confirmed the substrate can support your tile, match tile thickness to the adhesive, grout and any leveling system you’ll use so the assembly performs and looks right.
You’ll choose thin-set or medium-bed mortar, adjust bed depth for large-format slabs, and plan grout joint width to maintain flatness and prevent lippage.
- Check mortar coverage needs
- Account for leveling clips
- Size grout joints accordingly
Step 4 Consider transition heights and threshold treatments
Because tile thickness affects floor-to-floor changes and door clearances, you’ll need to plan threshold details early so doors open freely and adjacent floor surfaces align neatly.
Measure finished heights, pick connections (reducers, T-molds, metal thresholds) that bridge differences, and allow for underlayment and mortar.
Choose durable, slip-resistant thresholds and fastenings that match aesthetics while preventing tripping and water migration.
Step 5 Verify manufacturer specifications and PEI ratings
Before you lock in a tile thickness, check the manufacturer’s specifications and PEI ratings to verify the product suits your traffic and installation conditions.
You’ll confirm wear class, recommended grout/joint width, and suitable subfloor types. Compare datasheets to project demands, and don’t assume thicker always means tougher.
- Confirm PEI class for foot traffic
- Review recommended substrate and mortar
- Note warranty and installation limits
Installation Considerations and Adjustments for Thickness
When you’re installing tiles, you’ll need to match mortar bed or thinset thickness to the tile — and plan for backer boards, underlayment, or mud beds when using very thin or very thick pieces.
Use tile leveling systems and spacers to keep large-format tiles flat and consistent, and prepare for different cutting and handling methods for thicker tiles.
Lay out a typical stack-up (subfloor, underlayment/backer, adhesive, tile, grout) with specific thickness callouts before you start.
Mortar bed and thinset thickness recommendations
If you’re aiming for a durable, level tile installation, choosing the right mortar bed or thinset thickness matters as much as the tile itself.
Match thickness to tile size, substrate and traffic: thicker bed for uneven floors, thinset for flat surfaces and large-format tiles. Adjust for lippage and drainage; follow manufacturer specs and local codes.
- Typical thinset: 1/16″–3/16″
- Mortar bed: 3/4″–1″
- Large tiles may need medium-bed mortar
Use of backer boards, underlayment, and mud beds for thin or thick tiles
One key decision you’ll make is whether to use a backer board, underlayment, or a mud bed to support your tile—each option changes how thin or thick your mortar layer needs to be and how well the floor handles load and movement.
Use cement backer for thin tiles and walls, firm underlayment for slight height control, and mud beds for thick tiles or uneven substrates needing true leveling and strength.
Tile leveling systems and spacers for consistent thickness across large formats
After choosing the appropriate backer, underlayment, or mud bed, you’ll need a reliable method to keep large-format tiles flat and evenly spaced during setting.
Use leveling systems to prevent lippage and consistent spacers to maintain grout lines. Choose quality materials matched to tile thickness and grout width, and follow manufacturer press-and-lock or wedge steps for uniform results.
- Clip-and-cap systems
- Reusable wedges
- Fixed spacers
Cutting and handling tips for thicker tiles
Thicker tiles need tougher handling and sharper tools, so plan cuts and moves accordingly to avoid chips, breaks, and excessive effort.
Use a high-quality wet saw with a diamond blade rated for porcelain or quarry tile, score slowly, and support pieces near the cut.
Wear gloves and eye protection, clamp tiles for precision, and lift rather than drag heavy pieces to protect edges and substrate.
typical installation layers with thickness callouts
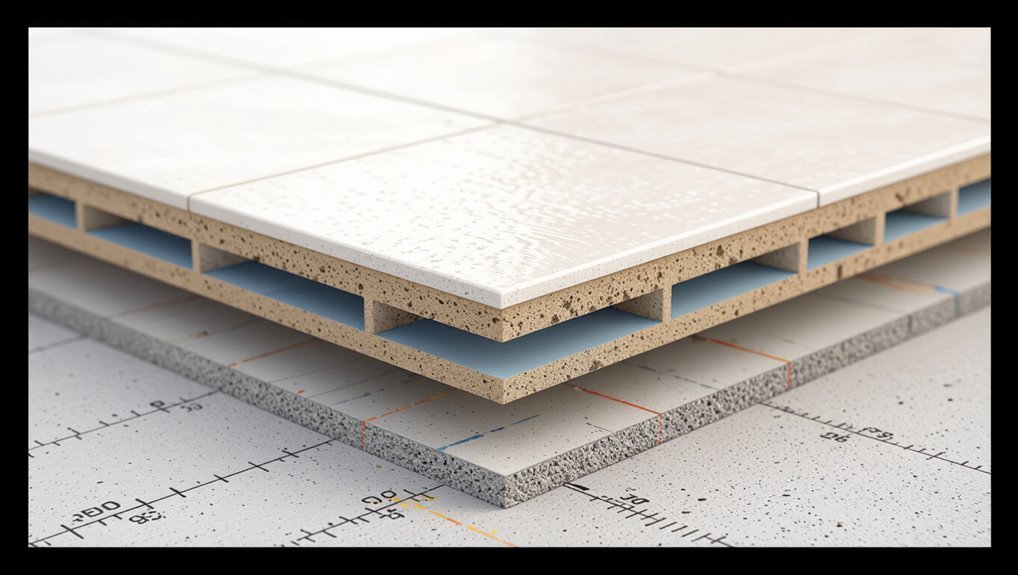
Typical ceramic tile installations stack several thin layers, each with a predictable thickness you should account for when planning changes and substrate adjustments.
You’ll measure and add layer heights to avoid shifts, guarantee proper slope, and meet door clearances.
- Thinset mortar: 1/8″–3/16″ (10–15 mm for medium-bed)
- Tile: 3/16″–3/4″ typical
- Grout: 1/16″–1/8″
Comparison Table Thickness by Tile Type and Typical Uses
Next, you’ll see a compact comparison table that lists typical thickness ranges for ceramic wall, ceramic floor, porcelain floor, large-format, and mosaic tiles.
It’ll show common uses for each type plus key pros and cons tied to their thickness.
Use it to match tile choice and installation needs quickly.
Ceramic wall, ceramic floor, porcelain floor, large format, mosaic: thickness ranges, common uses, pros/cons
When you’re choosing tiles, think about how thickness affects where and how they’ll perform: you’ll pick thinner ceramic wall tiles (5–7mm) for vertical surfaces, midweight ceramic floors (8–10mm) for light traffic, and sturdy porcelain floors (10–20mm) for heavy use. Large format cuts grout lines; mosaics (3–8mm) fit curves. Weigh durability, weight, and installation complexity.
| Tile type | Typical thickness/use |
|---|---|
| Wall | 5–7mm, light duty |
| Floor/Porcelain | 8–20mm, varying traffic |
Common Problems Related to Incorrect Tile Thickness
If you pick the wrong tile thickness, you’ll run into problems like uneven shifts and trip hazards.
Thin tiles can fail to bond properly without enough mortar, and oversized thin tiles on flexible substrates often crack or show lippage.
In showers, incorrect thickness can ruin drainage and slope, causing pooling or leaks.
Uneven transitions and trip hazards
Uneven tile thickness often creates noticeable height differences at doorways and between rooms. That mismatch can turn a simple step into a trip hazard for you and your guests.
You should inspect connections, correct subfloor differences, and use proper trims so walking paths stay safe.
- Check level at door thresholds
- Use connector strips where needed
- Adjust or shim subfloors
Adhesion failures from inadequate mortar coverage
Beyond height differences, mismatched tile thickness can leave gaps between the tile back and the mortar bed that undermine adhesion.
If you don’t get full contact, tiles won’t bond properly, increasing delamination risk. You’ll see hollow sounds, loose tiles, and grout failure.
Use proper mortar thickness, correct trowel notch, and back-buttering for large or uneven tiles to guarantee full coverage.
Cracking or lippage with oversized thin tiles over flexible substrates
When you lay oversized, thin tiles on a flexible substrate, the board can flex under load and the tiles will crack or tilt at the edges (lippage).
You’ll notice stress cracks and uneven joints as movement concentrates at tile corners.
Prevent problems by choosing proper thickness and substrate support.
- Check substrate rigidity
- Use thicker or reinforced tiles
- Follow manufacturer deflection limits
Drainage and slope issues in showers with improper thickness choices
If thin, oversized tiles are prone to cracking or lipping on a flexible substrate, they can also cause problems with shower drainage and slope because you’ll have limited freedom to build or maintain the proper fall toward the drain.
You’ll struggle to create consistent pitch without adding bulky mortar or plywood, risking standing water, grout deterioration, mold, and premature tile failure unless you choose appropriate thickness and substrate support.
Best Practices and Pro Tips to Avoid Thickness-Related Issues
To avoid thickness-related problems, you’ll want to pick underlayment and adhesives that match the tile profile and load requirements.
Plan changes and threshold trims during design, and order samples or mock-ups to confirm how heights line up.
If you hit edge cases, check manufacturer data sheets and talk with experienced installers before committing.
Selecting compatible underlayment and adhesives
Although tile thickness might seem like a minor detail, it directly dictates the underlayment and adhesive choices you’ll need to prevent lippage, uneven floors, or failed bonds.
Match underlayment rigidity and thickness to tile weight, choose thinset mortar rated for tile size, and check manufacturer specs for TCNA recommendations to guarantee proper coverage and cure.
- Use cement backer boards
- Select polymer-modified thinset
- Follow coverage guidelines
Planning transitions and threshold trims early in design
When you plan changes and threshold trims early, you’ll avoid last-minute fixes that try to reconcile differing tile thicknesses and floor heights.
Identify junction locations, measure finished heights, and choose trim profiles that accommodate tile plus grout.
Specify reducers, T-molds, or beveled thresholds in drawings so installers know buildup, adhesive and underlayment requirements.
That prevents gaps, trip hazards, and rework.
Ordering samples and mock-ups to verify fit and height
Order at least a few full-size tile samples and build a quick mock-up on-site so you can confirm how tile thickness, grout and underlayment stack up against adjacent flooring and trims.
You’ll spot height mismatches, trim gaps, and slope issues before installation. Adjust underlayment or grout height, pick compatible trims, and avoid surprises.
- Verify edge alignment
- Test grout color/width
- Check connection feel
Consulting manufacturer data sheets and installers for edge cases
Because tile thickness can vary by production batch and installation scenario, always consult the manufacturer’s data sheet and talk with experienced installers for edge cases you can’t resolve on-site.
They’ll confirm nominal and tolerance figures, recommended grout and adhesive thicknesses, and trim compatibility.
Bring batch numbers and site photos, ask about leveling systems, and document agreed adjustments to avoid surprises during installation and warranty disputes.
Cost and Availability Considerations Tied to Thickness
Thicker or specialty tiles usually cost more and can raise your shipping fees because of extra weight and volume.
If you need very thin or unusually thick profiles, expect limited availability and longer lead times.
Also budget for extra materials like heavier mortars, underlayment, and trim to handle the chosen thickness.
How thickness affects tile price and shipping
When you compare tiles, thickness directly influences both what you’ll pay and how much it costs to get them to your door. Thicker tiles usually cost more per square foot and add weight, raising freight charges and handling fees.
You’ll also face different packaging needs and labor for installation.
- Heavier pallets increase shipping rates
- Denser materials raise unit price
- Special handling adds fees
Availability of specialty thick or thin tiles and lead times
Specialty tiles—whether unusually thick slabs for commercial wear or ultra-thin large-format pieces for modern overlays—aren’t as readily available as standard sizes, and you’ll often face longer lead times and minimum-order requirements.
You’ll need to plan earlier, confirm factory schedules, and expect limited local stock. Custom colors, finishes, or rectified edges can add weeks; ask suppliers for firm delivery dates and alternatives.
Budgeting for extra materials (mortars, underlayment, trim) based on thickness
Because tile thickness changes how you install it, you’ll need to budget not just for the tile itself but for additional mortars, underlayment, and trim that match the profile.
You’ll buy higher-strength thin-set for heavy tiles, thicker underlayment to level floors, and matching trims or reducers to finish edges—plan quantities and price per square foot to avoid surprises.
- Mortar type and coverage
- Underlayment thickness and cost
- Trim/profile matching
FAQ Common Questions About Ceramic Tile Thickness
You probably have specific questions like which thickness to use for a residential bathroom floor and whether thin wall tile works on floors if you back it with cement board.
You’ll also want to know how much thicker commercial tiles are, whether thickness always means greater durability, and how to measure thickness accurately before buying.
Let’s answer those points so you can choose the right tile with confidence.
What thickness ceramic tile should I use for a residential bathroom floor?
For a residential bathroom floor, pick a ceramic tile that’s 3/8 to 1/2 inch thick (about 9–12 mm) to balance durability and ease of installation. Thinner tiles can crack under point loads, while much thicker tiles add weight and cost without meaningful benefit for typical home use.
- Choose porcelain or glazed ceramic for higher wear resistance.
- Match thickness with subfloor and threshold strips.
- Use proper adhesive and grout for moisture resistance.
Can I use thin wall tile on the floor if I back it with a cement board?
Can thin wall tile work on a floor if you back it with cement board? You can, but success depends on tile strength, substrate rigidity, and proper installation.
Use a rated cement board, full-bed thinset, and appropriate grout and movement joints.
Thin tiles still risk cracking under heavy loads or deflection; for high-traffic areas choose thicker or porcelain designed for floors.
How much thicker are commercial tiles compared to residential tiles?
After weighing whether thin wall tiles can be used on floors with cement board, it helps to know how commercial tiles compare in thickness to residential ones.
You’ll usually see commercial tiles 6–12 mm thicker than residential options, often 10–20 mm total. Consider load, traffic, and installation needs.
- Commercial: thicker, built for heavy use
- Residential: lighter, more varied styles
- Choose based on traffic and substrate
Does thicker tile always mean more durable?
While thicker tiles often resist impact and heavy loads better, thickness alone doesn’t guarantee greater durability—you also need to evaluate material quality, glaze, body type (porcelain vs. ceramic), and manufacturing standards.
You should consider density, PEI rating, water absorption, and finish hardness. Proper installation, substrate preparation, and suitable grout also affect longevity, so choose based on overall specs and planned use.
How do I measure tile thickness accurately before purchase?
Knowing that thickness isn’t the only durability factor, you’ll still want to verify a tile’s actual thickness before buying.
Use simple tools and sellers’ specs to confirm measurements so your project fits expectations.
- Carry a digital caliper or micrometer for precise measurement.
- Ask the retailer for manufacturer data sheets or PEI ratings.
- Compare edge profiles and measure multiple tiles for consistency.