How to Polish Concrete Floors: Achieve a Professional Finish at Home
You can polish concrete floors at home by prepping, grinding, densifying, and polishing with staged diamond grits for a durable, glossy finish. Start by clearing and testing the slab for moisture, patch cracks, and strip coatings. Rent or buy a grinder and diamond pads, wear proper PPE, and work from coarse to fine grits, apply a densifier, then finish with high-grit pads and an appropriate sealer. Follow maintenance tips for long life, and keep going to learn practical steps and tool choices.
Can You Polish Concrete Floors at Home?
Yes—you can polish concrete at home, but results vary: a DIY job can give a nice sheen on smooth, well-cured slabs, while professional work yields a mirror finish.
Expect a weekend to several days of work depending on area and prep, with costs ranging from modest for rented tools and pads to higher if you buy equipment or hire pros.
The difficulty is moderate: it’s doable if you’re patient and follow safety and technique steps, but heavy grinding and troubleshooting are best left to experienced contractors.
Short summary of results, time, cost, and difficulty
If you’re tackling this as a DIY project, expect polished concrete to deliver a durable, low-maintenance finish that looks professional when done right.
However, achieving that result depends on time, tools, and your skill level. You’ll see glossy, stain-resistant floors after several days to a week, spend $200–$2,000+, and face moderate to hard labor.
Learn how do you polish concrete floors and plan accordingly.
Basic Understanding What Is Concrete Polishing and Why Do It?
When you polish concrete, you’re mechanically grinding, honing, densifying, and then progressively polishing the surface to create a hard, smooth finish.
You’ll get a floor that’s more durable, low‑maintenance, visually appealing, and often more cost‑effective over time.
Different diamond grits and treatments let you choose from matte to high‑gloss finishes depending on the look and sheen you want.
What concrete polishing actually means (mechanical grinding, honing, densifying, polishing)
Think of concrete polishing as a step-by-step transformation: contractors mechanically grind the surface to remove imperfections, hone it to smooth roughness, apply densifiers to harden and reduce porosity, then polish with progressively finer abrasives to produce the desired sheen.
You’ll control grit progression, work systematically across sections, monitor moisture and dust, and finish when the uniform gloss and texture meet your plan.
Benefits of polished concrete (durability, appearance, maintenance, cost-effectiveness)
Longevity is one of polished concrete’s biggest selling points: by grinding, densifying, and sealing the surface you get a floor that resists wear, stains, and heavy traffic far better than untreated concrete or many floor coverings, so you’ll replace or repair it far less often.
You’ll also enjoy a low-maintenance, dust-free surface that looks professional, reflects light to brighten spaces, and often costs less over its lifetime.
Types of finishes and gloss levels
Polished concrete isn’t a one-size-fits-all look — it comes in a range of finishes and gloss levels you can choose to match use and style, from matte to high-gloss and everything in between.
You’ll pick matte for slip resistance and subdued appearance, satin for balanced sheen, or high-gloss for maximum reflectivity.
Each level affects maintenance, durability, and how light interacts with the space.
Assessing Your Floor Is Your Concrete Suitable for Polishing?
Before you start polishing, you’ll want to inspect the slab for cracks, coatings, stains, and overall strength, and check moisture and pH levels with simple tests.
If the concrete has excessive moisture, active efflorescence, heavy coatings, or structural damage, it may need repairs or professional assessment.
For small, clean, sound slabs you can often DIY, but call a pro when tests or visible issues suggest complex remediation.
Inspecting for cracks, moisture, coatings, stains, and concrete strength
Start by thoroughly inspecting your concrete so you know what you’re dealing with: look for cracks and spalls, test for moisture, identify any coatings or heavy stains, and evaluate the slab’s strength and thickness.
Note hairline versus structural cracks, map patched areas, confirm coatings that need stripping, and mark oil or dye stains.
If the slab’s too thin or weakened, polishing may not be advisable.
Testing moisture and pH levels
How wet is your slab, and is its surface chemistry safe for polishing? You’ll test moisture with a plastic-sheet or calcium chloride kit and check pH with strips or a meter.
Targets: low moisture and neutral pH. If results fail, don’t proceed.
- Plastic-sheet test
- Calcium chloride kit
- pH strips or meter
- Acceptable moisture limits
- Neutral pH target
When to call a professional vs DIY
Wondering whether you should tackle polishing your concrete yourself or call a pro?
Inspect cracks, spalling, moisture, stains and uneven slab thickness. If moisture or severe damage exists, or you need commercial-grade gloss, hire a pro with diagnostic tools and heavy equipment.
DIY if slab is sound, moisture-controlled, minor repairs only, and you’re comfortable renting grinders and following safety protocols.
Tools, Materials, and Safety Gear You Need
You’ll need the right mix of tools and consumables—grinders or planetary polishers, a sequence of diamond pads, a good vacuum, densifiers, sealers, and stain removers—to get a professional finish.
Don’t forget safety gear and proper ventilation: respirators, eye and ear protection, and dust control are essential.
Finally, weigh estimated costs and whether to rent or buy equipment based on project size and frequency.
Essential tools: grinders, planetary polishers, diamond pads, vacuums
A few key tools will make polishing concrete faster, smoother, and safer: grinders and planetary polishers to cut and refine the surface, diamond pads in a range of grits to shape and shine, and a HEPA-rated vacuum to control dust.
- Angle grinder or floor grinder
- Planetary polisher for even results
- Diamond pads (various grits)
- HEPA-rated shop vacuum
- Personal protective gear (respirator, ear protection)
Consumables: diamond grit sequence, densifiers, sealers, stain removers
Getting the right consumables keeps your polished concrete durable and glossy.
You’ll follow a diamond grit sequence from coarse to fine, apply densifier to harden the surface, use appropriate sealer for protection, and keep stain remover on hand for spot cleanup.
Essential items:
- 30–50, 100–200, 400–1500 grit diamond pads
- Lithium or sodium densifier
- Penetrating or topical sealer
- pH-neutral stain remover
- Microfiber polishing pads
Safety equipment and ventilation requirements
Because polishing concrete stirs up dust, vapors, and loud noise, you should equip yourself with proper safety gear and plan ventilation before you start.
Wear PPE, control airflow, and monitor air quality.
Essential items:
- N95 or P100 respirator
- Safety goggles and face shield
- Hearing protection
- Cut-resistant gloves and knee pads
- Portable exhaust fan or HEPA vacuum
Estimated costs and tool rental vs purchase
Decide early whether you’ll rent or buy tools—your choice will shape the project’s budget and logistics. Renting grinders and dust extractors cuts upfront cost; buying helps if you’ll repeat projects. Estimate $100–$300/day to rent, $800–$3,000 to buy pro equipment. Factor consumables, pads, and safety gear.
| Item | Rent/day | Buy price |
|---|---|---|
| Grinder | $120 | $900 |
| Dust extractor | $80 | $700 |
| Pads | $10 | $100 |
Step-by-Step Guide to Polishing Concrete Floors at Home
Now you’ll walk through the practical steps to get a polished concrete floor at home, starting with prepping the area—cleaning, moving furniture, and marking work zones.
You’ll learn how to strip coatings and adhesives, patch cracks and defects, then grind with coarse grits and handle edges.
Finally, you’ll hone with medium grits to eliminate scratches and prepare for polishing.
Step 1 Prepping the area: cleaning, moving furniture, taping, and marking
Start by clearing the room so you can work without obstacles: move furniture, rugs, and decor out or to a protected staging area, then sweep and vacuum the floor thoroughly to remove dust and debris.
- Protect walls and trim with painter’s tape
- Mark electrical outlets and junctions
- Remove loose items and cables
- Check for moisture issues
- Outline work zones for safety and flow
Step 2 Removing coatings, adhesives, and paint (stripping methods)
- You’ll strip coatings, adhesives, and paint before polishing; choose a safe method and protect yourself. Use these options:
- Mechanical grinding with coarse diamonds
- Chemical strippers rated for concrete
- Heat guns for stubborn adhesives
- Shot blasting for heavy industrial coatings
- Solvent-soaked pads for small areas
Work systematically, ventilate, and test a patch to avoid damage.
Step 3 Repairing cracks and surface defects (patching compounds and techniques)
Before polishing, you’ll want to fix any cracks, chips, or surface defects so your floor takes a sheen evenly; small hairline cracks need a different approach than wide gaps or spalls.
Clean debris, widen undercutting slightly for adhesion, then use appropriate patch: epoxy or polymer for structural gaps, cementitious patch for shallow spalls, and flexible filler for hairline cracks.
Follow cure times before sanding.
Step 4 Grinding: coarse grit sequence and edge work
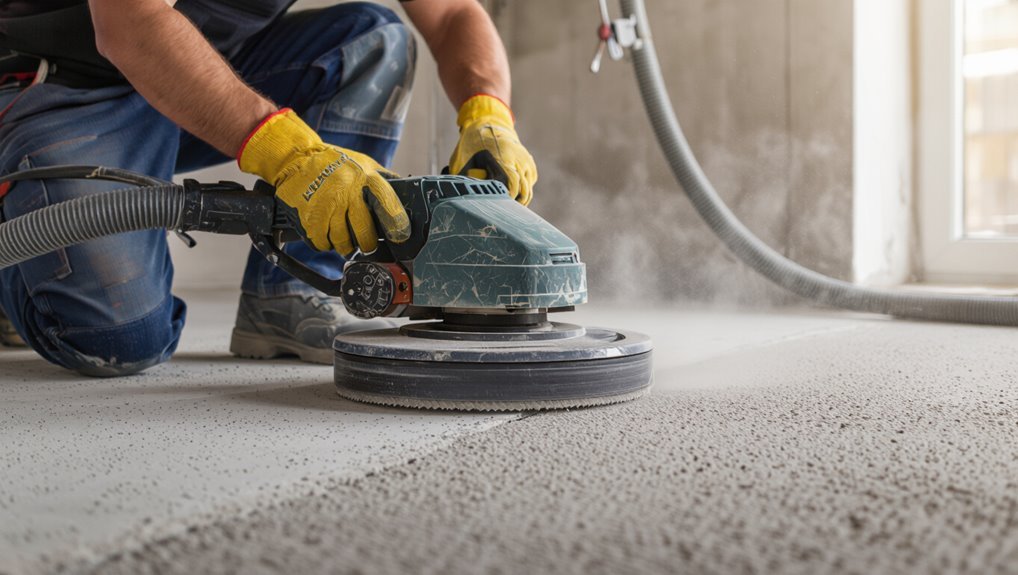
Grab your grinder and work the coarse grit discs over the whole slab, progressing methodically so you remove high spots, glue residues, and surface laitance; this initial pass (usually 30–40 grit) establishes a flat, uniform profile and sets the stage for finer steps.
- Keep consistent overlap
- Control speed and pressure
- Use dust collection
- Tackle edges with an orbital grinder
- Inspect for low spots and regrind
Step 5 Honing: medium grit sequence to remove scratches
With the coarse pass complete and any low spots reworked, it’s time to move to honing with medium grits (typically 80–200) to remove the deep scratches left by the 30–40 grit and begin smoothing the surface.
- Start with 80–100 grit to eliminate heavy scratches
- Progress to 150 grit for visible smoothing
- Finish honing at 200 grit for uniform texture
- Keep steady passes and overlap
- Clean dust between grits
Step 6 Densifying the concrete: products, application timing, and tips
Step 6 is applying a concrete densifier to chemically harden and seal the surface so your honed finish resists dusting and polishes evenly.
Choose sodium or lithium silicate products; lithium absorbs faster and works better with low-porosity mixes.
Apply after cleaning and letting the concrete dry, using a pump sprayer or microfiber mop.
Follow manufacturer dwell times, avoid puddles, and ventilate the area.
Step 7 Polishing: fine grit sequence and achieving desired gloss
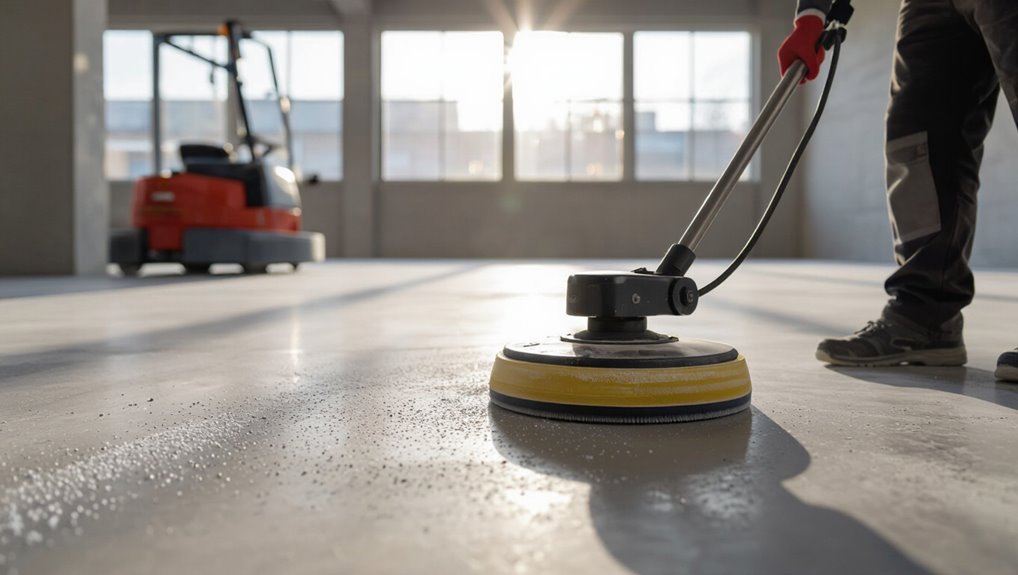
Once you’ve densified and the floor’s dry, it’s time to move through the fine-grit polishing sequence to build shine and clarity; start where your last grit left off and progress methodically—typically 400, 800, 1500, then 3000 grit—so each pass removes the micro-scratches from the previous pad and brings the surface closer to the gloss you want.
Work evenly, overlap passes, clean between grits, and test gloss periodically.
Step 8 Staining or coloring options (acid stain vs water-based dyes)
After you’ve achieved the desired gloss, decide whether to add color—acid stains give variegated, permanent tones by reacting with the concrete, while water‑based dyes deliver consistent, vibrant hues and more control.
Choose acid for natural, mottled effects and deeper, reactive depth; pick water‑based dyes for precise color matching and layering.
Test in an inconspicuous area before full application.
Step 9 Sealing and applying maintenance coatings (type selection and application)
9. Choose a sealer based on use: penetrating silanes/siloxanes for protection without sheen, acrylics for easy application and gloss, or epoxy/urethane for heavy-duty durability.
Clean and dry the floor, apply thin even coats with a roller or sprayer, follow manufacturer flash times, and sand between coats if needed.
Maintain with pH-neutral cleaners to preserve the finish.
Step 10 Final cleanup and curing time before use
With the sealer fully applied, you’ll prepare for final cleanup and the curing period before regular use.
Remove dust and tools, buff lightly to remove haze, and ventilate the area.
Keep traffic off for the manufacturer’s recommended cure time—often 24–72 hours for light use, longer for full strength.
Avoid moisture and heavy loads until the sealer fully hardens.
Common Problems and How to Fix Them
You’ll run into issues like swirls, haze, or uneven gloss and can correct them by regrinding, using finer pads, and proper burnishing.
For persistent stains or discoloration, you’ll need targeted cleaning, poultices, or spot grinding, and if densifier or sealer won’t stick you’ll troubleshoot surface contamination or profile problems and reseal.
If the slab has high moisture or efflorescence, you’ll test moisture levels, address sources, and use appropriate primers or vapor barriers before polishing.
Swirls, haze, or uneven gloss and corrective steps
When swirls, haze, or patchy gloss show up on your polished concrete, they usually point to issues with abrasive selection, machine speed, or inconsistent pressure during the polishing process.
Correct by regrinding with the proper grit progression, slow and steady machine passes, and even pressure.
Clean thoroughly between grits, remove residue, then repolish with finer diamonds and finish pads until gloss evens.
Persistent stains or discoloration solutions
If stubborn stains or discoloration keep showing up on your polished concrete, they usually signal contamination trapped in the surface or uneven removal during grinding.
Tackle them by identifying the stain type, then choose targeted cleaners or deeper mechanical removal. Test a small area first: use pH-neutral cleaner, poultice for oil or rust, or grind to expose clean concrete, then repolish the spot.
Densifier or sealer adhesion failures and remedies
Because densifiers and sealers must bond to a clean, profile-ready surface, adhesion failures usually point to surface contamination, incorrect product selection, or improper application—so you’ll want to diagnose the root cause before patching.
Test adhesion in small areas, remove contaminants with appropriate cleaners, profile or diamond-grind smooth concrete, choose compatible products, reapply per manufacturer instructions, and allow correct cure times.
Dealing with high moisture or efflorescence
Although concrete naturally breathes, high moisture and efflorescence can still ruin a polish job if you don’t address them early; test moisture with a hygrometer or calcium chloride, then fix sources—improve drainage, vapor barriers, or HVAC.
Remove efflorescence with a mild acid rinse, scrubbing, and neutralizing. Dry thoroughly, retest, then proceed with grinding and applying moisture-tolerant densifiers or sealers for lasting results.
Best Practices, Tips, and Time-Saving Strategies
You’ll learn smart grit progression shortcuts that save time without compromising the finish, plus proven edge and corner techniques to get a consistent look.
I’ll also cover a simple maintenance routine—what to do daily, weekly, and yearly—to keep the shine long-term.
Finally, you’ll get eco-friendly product recommendations and safe waste-disposal tips to minimize impact.
Grit progression shortcuts without sacrificing finish
When you need to save time without compromising sheen, smart grit progression shortcuts let you skip unnecessary steps while still achieving a uniform, defect-free finish.
Start with a coarser pad to remove major imperfections, then jump to a mid-range grit to refine scratches. Finish with a high grit polishing pad.
Monitor burn and test small areas to confirm jump sizes won’t leave halos.
Edge and corner finishing techniques
After you’ve handled the main floor with efficient grit jumps, it’s time to tackle edges and corners—areas that reveal polishing quality if ignored.
Use a walk-behind edger with matching diamonds, finish tight spots with a hand-held polisher or pads, and work outward from corners.
Keep consistent pressure, overlap passes, and blend into the main field to avoid visible changes.
Maintenance routine to preserve shine (daily, weekly, yearly)
Routine care keeps a polished concrete floor looking factory-fresh and prevents costly restorations, so set a simple schedule you can stick to:
- Daily: dust-mop to remove grit.
- Weekly: damp-mop with pH-neutral cleaner.
- Monthly: inspect for wear or stains.
- Annually: burnish with high-speed buffer.
- Every 3–5 years: apply a maintenance polish or recoat to restore gloss.
Eco-friendly products and waste disposal tips
Keeping up that maintenance schedule will also make it easier to choose and manage eco-friendly products and waste, so you won’t be scrambling when problems pop up.
Use pH-neutral, biodegradable cleaners and low-VOC sealers.
Rinse spills into designated containment, collect grit with dry methods, and bag used pads separately.
Dispose of slurry and solvents per local hazardous-waste rules to protect drains and soil.
Cost, Timeframe, and When to Hire a Pro
Expect a typical DIY polish to include materials, pad and grinder rentals, and several hours of labor—I’ll break down those costs so you can budget accurately.
You’ll also get time estimates based on room size and floor condition, from small bathrooms to whole basements.
If your slab has major cracks, unevenness, or you want a mirror finish, I’ll explain the signs you should hire a pro and what contractors usually charge and provide.
Typical DIY cost breakdown (materials, rentals, labor hours)
Tackling a DIY concrete polish will typically cost you between a few hundred and a few thousand dollars depending on the size of the area and the level of finish you want.
Expect materials (grits, pads, densifier, sealer) $100–$600, tool rentals (grinder, vac) $50–$200/day, and about 8–40 labor hours depending on prep and finish.
Budget extras for repairs.
Project duration estimates by room size and condition
For a quick reality check, plan projects by both room size and floor condition: a small, sound garage or utility room (under 300 sq ft) can often be polished in a day or two by a competent DIYer, while larger living areas or floors with cracks, stains, or old coatings will add days and sometimes weeks to the schedule.
Expect 1–3 days for 300–700 sq ft, 3–7+ days for 700–1,500+ sq ft, and extra time for extensive prep like crack repair, moisture mitigation, or epoxy removal.
Signs you should hire a professional and what to expect from contractors
If your floor shows large cracks, active moisture, heavy stains, or old coatings that won’t come off, hire a pro—these issues need specialized equipment and expertise to fix right.
Expect contractors to assess costs, timeline, and repairs, then quote. Ask about warranties, prep, and cleanup.
- Cost estimates
- Project timeframe
- Required repairs
- Equipment used
- Warranty and references
Before-and-After Care and Long-Term Maintenance
Right after polishing you’ll need to keep traffic and moisture off the surface for 24–72 hours to let the finish cure properly.
For ongoing care, use pH-neutral cleaners, avoid acidic or abrasive products and harsh scrubbing pads, and mop or autoscrub regularly to prevent grit buildup.
Check the shine and sealer wear annually and plan to re-polish or reapply sealer when gloss fades or stains become hard to remove.
Immediate post-polish care (2472 hours)
Once polishing finishes, you’ll want to treat the first 24–72 hours as the most critical window for protecting the surface—this is when the concrete cures back to full hardness and is most vulnerable to scratches, stains, and premature wear.
Keep traffic minimal, use soft-soled shoes, and avoid moving heavy furniture. Place protective pads under items, block off the area, and ventilate to help final curing.
Ongoing cleaning products and methods to avoid damage
After the initial curing window, you’ll need to switch focus from protection to proper ongoing care so the polish stays intact long-term.
Use gentle cleaners and soft tools; avoid harsh chemicals, waxes, or acidic cleaners. Follow these tips:
- pH-neutral cleaner diluted per label
- microfiber mop or soft pad
- avoid bleach or vinegar
- blot spills promptly
- use non-gumming mats at entries
When to re-polish or reapply sealer
If you track wear patterns and perform minor touch-ups, you’ll know when the floor needs a full re-polish or just a sealer refresh.
Check annually for dull spots, etching, or staining; high-traffic zones may need attention sooner. Reapply sealer when water no longer beads.
Re-polish every 3–7 years depending on traffic and finish depth, and after repairs or deep stains.
Frequently Asked Questions
You probably have a few practical questions before you start, like whether painted or sealed concrete can be polished and how long the finish will last.
You’ll also want to know if polishing makes the floor slippery, whether you can change its color, and if it’s right for basements or damp areas.
Below are clear answers to those common concerns.
Can I polish painted or sealed concrete?
Wondering whether you can polish painted or sealed concrete? You can, but preparation matters: remove paint or coatings, or confirm they’re thin, well-bonded, and compatible with diamond grinding.
Sealed surfaces often need stripping or abrading to expose aggregate and guarantee bonding. Test a small area first.
If coatings won’t come off, consider overlay or refinishing instead of traditional polishing for durable, attractive results.
How long does polished concrete last?
How long will polished concrete last?
With proper preparation, quality products, and routine maintenance, polished concrete can last decades—often 20–40 years or more.
High-traffic areas may need occasional reconditioning or densifier/topcoat refreshes every few years.
You’ll extend lifespan by keeping the surface clean, avoiding harsh chemicals, and promptly repairing chips or deep scratches to maintain appearance and durability.
Will polishing make my floor slippery?
Along with lifespan, many people ask whether polishing will make their floor slippery—especially in homes, garages, or commercial spaces where foot and vehicle traction matter.
Polishing alone smooths the surface and can increase gloss, but it doesn’t inherently create a dangerously slick floor.
You can balance shine and grip by choosing a lower grit finish, adding anti-slip treatments, or using sealers formulated to retain traction.
Can I change the color of existing polished concrete?
Yes—you can change the color of existing polished concrete, but the method you choose will depend on how much color change you want and how deep the existing polish and sealer go.
For minor shifts, use topical stains or dyes compatible with sealers.
For major changes, grind back to expose raw concrete, then apply integral color, stains, or dyes before repolishing and resealing for lasting results.
Is polished concrete suitable for basements or moist environments?
Want a polished concrete floor in your basement or another damp area? You can, but you’ll need proper moisture mitigation.
Test for vapor drive, install a vapor barrier or moisture-tolerant sealer, and choose dense, low-porosity finishes.
Maintain humidity control and monitor for efflorescence or mold.
With these steps, polished concrete performs well in basements and other moist environments.