
How Long Does It Take to Install Pergo Flooring in an Average Room?
You can expect professional Pergo installers to finish a typical 12×12 (144 sq ft) room in about 4–8 hours, while you’ll likely take a day or two if you DIY, depending on skill and tools. Prep—clearing the room, leveling or underlayment, and acclimating planks—adds time, and complex layouts or plumbing cuts will slow you. Plan for trims and 24–48 hours before heavy furniture; keep reading for detailed timelines, tips, and cost trade-offs.
How Long Does It Take to Install Pergo Flooring in an Average Room Quick Answer
For a typical 12×12 (144 sq ft) room, you can expect Pergo installation to take roughly 4–8 hours for a pro and 1–2 days if you’re doing it yourself.
Pros move faster because they’ve got the tools and experience, while DIYers spend more time on layout, cutting, and cleanup.
The job can be shorter with simple layouts and prepped subfloors, or longer if you need underlayment, trim work, or repairs.
Typical time range for an average 12×12 (144 sq ft) room
A typical 12×12 (144 sq ft) room usually takes a homeowner with basic experience about 3–6 hours to install Pergo flooring, while a pro can often finish in 2–4 hours.
Depending on room shape, obstacles, and prep, expect total time including changes and cleanup to range roughly 2–8 hours.
For planning, ask yourself: how long does it take to install Pergo flooring in your space?
Time breakdown by homeowner vs. professional installation
While a homeowner with basic skills can usually lay Pergo in an average room in about 3–6 hours, a professional will typically finish the same job in 2–4 hours.
You’ll spend extra time measuring, cutting, and acclimating planks, while pros work faster with experience and tools.
Expect cleanup and minor adjustments to add time; complex cuts may extend homeowner projects.
When the schedule can be shorter or longer
Because room size, prep work, and your experience all affect timing, the install can be much quicker or take considerably longer than the 3–6 hour homeowner / 2–4 hour pro estimate.
If subfloor repairs, trim removal, door adjustments, or complex layouts are needed, plan extra time.
Conversely, simple rooms, prepped surfaces, and practiced installers speed the job, often finishing sooner than expected.
Basic Understanding What Is Pergo Flooring and Why Installation Time Varies
Pergo includes both laminate and luxury vinyl options, and you’ll want to know which type you’re working with because they install differently.
Installation time hinges on factors like room size, subfloor condition, layout complexity, and necessary acclimation.
The tools and materials you bring—underlayment, spacers, cutting tools, and adhesives—also make a big difference in how fast the job goes.
What “Pergomeans (laminate vs. luxury vinyl variants)
If you’re weighing laminate against luxury vinyl when someone mentions “Pergo,” know they’re talking about a brand that makes both types and that each product behaves differently during installation.
You’ll find laminate clicks together over underlayment and needs edge expansion; luxury vinyl offers glue-down, click-lock, or loose-lay options, often tolerates moisture better, and can require different tools and prep for a proper, lasting fit.
Key factors that influence installation time (room size, subfloor, layout complexity, acclimation)
Knowing the differences between laminate and luxury vinyl helps, but several practical factors will actually determine how long your Pergo installation takes.
Room size scales time directly—bigger rooms take longer.
Subfloor condition matters: uneven or damaged subfloors need prep.
Layout complexity—angles, trim, and changes—adds cuts and fittings.
Acclimation requires waiting for boards to adjust to room humidity and temperature.
Tools and materials that affect speed
Because it’s a click-lock laminate or luxury vinyl system, what you bring to the job—tools, underlayment, adhesives, and quality of the planks—directly speeds or slows installation; get the right saws, spacers, tapping block, pull bar, and a moisture meter, and you’ll breeze through cuts and joins.
But using improvised tools or skipping the proper underlayment will cost you time and rework.
Use quality planks, prematched trim, and 62.
Step-by-Step Installation Timeline Expected Time per Major Phase
Before you start, you’ll want a clear timeline that breaks the job into key phases: pre‑installation prep, subfloor inspection and repairs, acclimation and staging, underlayment and edge prep, and the actual plank‑laying.
For each phase I’ll note typical tasks and realistic time estimates—like how long it takes to clear a room, test and level a subfloor, let planks acclimate, install underlayment, and lay per row or per square foot.
That way you’ll know what to schedule and where delays are most likely.
Pre-installation prep (clear room, remove old flooring, materials delivery)
Start by clearing the room and staging everything you’ll need so the installation can proceed without interruptions: move furniture out or to the center and cover it, disconnect appliances or baseboards as required, and set aside tools and underlayment.
You’ll remove old flooring if needed and accept materials deliveries, verifying quantities and inspecting for damage.
- Remove furniture and fixtures
- Strip old flooring
- Receive and check deliveries
- Organize tools and supplies
Subfloor inspection and repairs (cleaning, leveling, moisture testing)
Once you’ve cleared the room, inspect the subfloor carefully for dirt, loose boards, gaps, and moisture so you can plan any repairs that’ll keep your Pergo flooring flat and stable.
Clean debris, tighten or replace loose boards, level low spots with compound, and perform moisture tests. Address any issues before installation.
- Sweep and vacuum thoroughly
- Fasten or replace damaged boards
- Use leveling compound where needed
- Conduct moisture meter checks
Acclimation of Pergo planks and material staging
Because Pergo planks expand and contract with temperature and humidity, you should let them acclimate in the installation space for the recommended time so they fit and perform correctly.
Typically you’ll open cartons, spread boards flat across the room for 48–72 hours, maintain normal HVAC conditions, and keep them off exterior walls.
Stage tools and trim nearby for efficient workflow.
Underlayment installation and edge preparations
Roll out the underlayment and trim the edges so the floor sits flat and sounds right; this phase usually takes 30–60 minutes for an average room once you’ve got the materials and tools staged.
You’ll tape seams, trim at doorways, and undercut jambs for a snug fit.
Check for wrinkles, level changes, and leave expansion gaps per manufacturer specs.
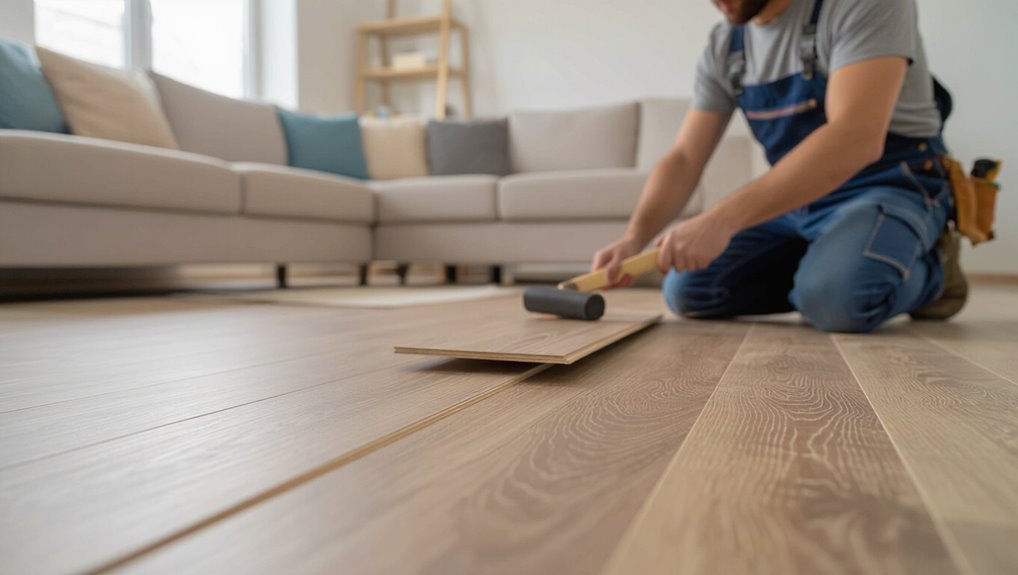
Laying the planks average time per row and per square foot
You’ll usually lay Pergo planks at a steady pace of about 6–12 linear feet per hour (roughly 20–40 sq ft/hour) depending on room complexity and your experience; plan for slower work at the start while you align the first few rows and speed up as you get into a rhythm.
Expect each full row to take 5–15 minutes; calculate roughly 1.5–3 minutes per sq ft once paced.
Cutting, trimming, and fitting around obstacles (doors, vents, cabinets)
Once you’ve settled into a steady laying rhythm, you’ll need to slow down and focus on cutting, trimming, and fitting around doors, vents, and cabinets—these details take the most time per square foot.
Measure openings precisely, scribe planks to uneven walls, cut vent holes and door jambs, and dry-fit before locking.
Expect 30–60 minutes per tricky corner, depending on complexity.
Finishing touches (transitions, trims, baseboards)
After the planks are locked in and cut to fit, tackle changes, trims, and baseboards to give the room a finished look—this stage demands patience and precision.
You’ll install thresholds, scribe and fit quarter-round, attach baseboards, and seal joints for a polished appearance. Expect 1–3 hours depending on room size and complexity.
- Install threshold strips
- Scribe trim cuts
- Nail and caulk baseboards
- Seal visible gaps
Post-installation cleanup and curing time
Wrapping up the job, you’ll spend time cleaning up debris, wiping the floor, and letting the installation settle—this phase both finishes the look and protects your investment.
Remove spacers, vacuum gaps, and wipe with a damp cloth.
Allow adhesives (if used) to cure per manufacturer instructions—usually 24–48 hours.
Avoid heavy traffic, furniture, and rugs for 48–72 hours to guarantee proper settling.
Time Estimates by Room Type and Complexity
For a small bedroom or office under 100 sq ft you’re usually looking at a few hours to half a day.
An average living room or master bedroom (100–300 sq ft) will typically take a full day.
Large open-plan or L-shaped spaces can stretch to a day and a half or more because of extra cutting and changes.
Kitchens and bathrooms often add time for waterproofing and careful sealing, so plan for extra prep and up to a full extra day.
Small bedroom or office (under 100 sq ft) estimate
A small bedroom or office under 100 sq ft typically takes 3–5 hours to install Pergo flooring when the subfloor is flat and you’ve prepped the room; that estimate covers laying the planks, tapping seams, and trimming around doorways and closets.
You’ll finish faster if layouts are simple, cuts are minimal, and you work with an extra set of hands; complex cuts or uneven thresholds add time.
Average living room or master bedroom (100300 sq ft) estimate
If your living room or master bedroom falls between 100 and 300 sq ft, expect the Pergo installation to take roughly 6–10 hours under normal conditions; that covers laying planks, tapping seams, and trimming around doorways and closets.
You’ll prep subfloor, acclimate boards, and cut perimeter pieces.
Two installers will finish faster; DIYers should allow extra time for measurements and clean-up.
Large open-plan spaces and L-shaped rooms estimate
Open, irregular layouts demand more time than standard rooms, so plan on 12–20 hours for large open-plan areas or L-shaped spaces under normal conditions; that covers laying planks, managing multiple changes in elevation, and fitting around HVAC vents and architectural features.
You’ll work longer when sightlines require continuous seams, door thresholds need shifts, or subfloor flattening and long plank runs increase cutting and alignment time.
Kitchens and bathrooms (waterproofing considerations) estimate
Because kitchens and bathrooms face moisture and traffic, expect more prep and installation time than in dry rooms: plan roughly 8–14 hours for a standard kitchen and 6–10 hours for a typical bathroom when using Pergo waterproof or water-resistant systems.
You’ll need extra time for subfloor checks, changes, threshold fitting, and perimeter sealing. Allow contingency for plumbing fixtures and tight cuts.
Comparison DIY vs. Professional Installation Time and Cost Trade-offs
You can often install Pergo yourself in a weekend if you’re working with a partner, while a solo installer should expect more time; pros can finish many jobs in a day but complex layouts may take multiple days. Faster professional scheduling usually raises the price, so weigh labor speed against your budget and timeline. Compare typical timelines and cost trade-offs below to decide which route fits you best.
| Scenario | Typical Time/Cost |
|---|---|
| DIY — single installer | Longer time, lower cost |
| DIY — two people | Shorter time, minimal extra cost |
| Pro — one-day crew | Fast, higher cost |
| Pro — multi-day job | Slower, highest cost |
Typical timeline for DIY (single installer vs. two people)
When tackling a Pergo install yourself, expect a big difference in pace between working solo and teaming up with one other person: a single DIYer typically moves slower because they handle layout, cutting, and lifting alone, while two people can split tasks and finish much faster.
Alone, plan 6–10 hours for an average room; with two, you’ll often finish in 3–5 hours, depending on prep.
Typical timeline for professional crew (one-day vs. multi-day jobs)
A professional crew can usually knock out a standard Pergo installation far faster than a DIYer: for a single average-sized room with good subfloor prep, expect a one-day job (4–8 crew hours) from arrival to cleanup.
While larger spaces, tricky layouts, or needed repairs commonly turn it into a multi-day project as installers let adhesives cure, acclimate planks, or tackle changes and stairs.
You’ll benefit from coordinated crews, tools, and faster troubleshooting.
Cost implications of faster professional scheduling
Faster scheduling from a professional crew doesn’t just save time on the calendar—it changes the cost equation.
You’ll pay more per hour for rapid availability, but you’ll avoid extended living disruption, temporary accommodations, and prolonged tool rentals.
Compare the premium against your time value, potential income loss, and DIY risk of mistakes.
Often, quicker pro scheduling pays off when you value convenience and certainty.
Common Problems That Cause Delays and How to Handle Them
Before you start laying Pergo, watch for common hold-ups like uneven or damaged subfloors, moisture or humidity problems, and unexpected layout obstacles such as thresholds, stairs, or irregular walls.
Test subfloors and moisture levels, order extra material in advance, and allow proper acclimation so you can fix issues—sanding, leveling compounds, moisture barriers, or trimming as needed—without losing time.
If you hit surprises, pause and address them methodically rather than rushing the install and creating bigger problems.
Uneven or damaged subfloors detection and fixes
Noticing dips, squeaks, or soft spots in your subfloor? You should inspect for loose or rotten plywood, joist damage, or missing screws.
Small dips can be sanded or leveled with self-leveling compound; replace rotted panels and reinforce joists for structural issues.
Tighten or add fasteners to stop squeaks. Allow repairs to cure before laying Pergo to avoid future gaps or failures.
Moisture or humidity issues testing and remediation
After fixing dips and squeaks, check for moisture issues that can wreck a Pergo installation if you skip them.
Use a moisture meter and perform RH or calcium chloride tests per manufacturer specs. If readings exceed limits, stop work.
Remediate with proper drying, vapor barriers, or moisture mitigation systems.
Re-test before proceeding to avoid swelling, cupping, or warranty voids.
Unexpected layout obstacles (thresholds, stairs, irregular walls)
When you start laying Pergo, you’ll often run into thresholds, stair noses, or oddly angled walls that force you to pause and rethink the plan; these obstacles can add hours or days if you don’t address them right away.
Measure carefully, cut pieces for clean changes, install reducers or stair nosing, scribe and trim for irregular walls, and test-fit before gluing to avoid rework.
Material shortages or acclimation oversights
Because Pergo planks need time to acclimate and you’ll often underestimate quantity, material shortages or skipped acclimation are two fast ways to halt a job; plan for extra boxes and a 48–72 hour acclimation period in the space so boards match humidity and you’ve got spares for cuts and mistakes.
Check measurements twice, order 10% overage, and don’t start until humidity and temperature are stable.
Best Practices to Speed Up Installation Without Sacrificing Quality
Start with a simple pre-install checklist so you’ve got measurements, underlayment, and materials sorted before the crew arrives.
Clear the room, pack furniture away, guarantee easy access, and stabilize temperature and humidity to speed work and prevent issues.
Keep a recommended tool kit on hand and know which situations—like uneven subfloors or complex layouts—are worth hiring pros for.
Pre-install checklist for homeowners
If you want the Pergo installation to go smoothly and fast, prepare a concise checklist before installers arrive:
- Confirm installer arrival time and contact details.
- Clear access paths and brief neighbors or housemates.
- Secure pets and valuable items away from work areas.
- Have payment, warranty paperwork, and measurements ready for quick verification.
How to prepare the room for faster work (packing, access, temp/humidity control)
When you clear the room and control the environment before installers arrive, they’ll move faster and make fewer mistakes.
Remove furniture, curtains, and fragile items; pack small belongings and label boxes.
Guarantee clear pathways from doors and the truck, open access points, and tape down rugs.
Set temperature to 60–80°F and maintain 40–60% humidity for 48 hours before and during installation.
Recommended tool kit and materials to have on hand
Have a compact, well-organized kit ready so you can work quickly without cutting corners: essentials include a quality tapping block, pull bar, spacers, rubber mallet, utility knife with fresh blades, chalk line, measuring tape, carpenter’s square, and a jigsaw or circular saw with a fine-tooth laminate blade.
Also keep knee pads and safety glasses.
Additionally, keep extra planks, adhesive (if required), wood filler, and a vacuum.
When to hire pros for complex jobs
Because some Pergo installations involve tricky layouts, structural issues, or moisture challenges, you should call a pro when the job could compromise the floor’s performance or your warranty.
Hire pros for uneven subfloors, extensive leveling, stair installations, radiant heat systems, or persistent moisture.
Pros save time, guarantee proper underlayment and acclimation, and preserve warranties—worth it for complex or high-traffic spaces.
Practical Case Studies and Time Examples
You’ll get a clearer sense of timing from three real-world examples: a step-by-step DIY in a 10×12 bedroom, a pro two-person crew tackling an open-plan living-dining area, and a kitchen job that includes extra subfloor moisture remediation.
For each case you’ll see task-by-task times, total hours, and where delays typically show up.
Use these examples to compare expectations and plan your own timeline.
Case 1: DIY install in a 10×12 bedroom step-by-step timing
For this DIY case study, imagine you’re replacing the floor in a 10×12 bedroom and want a realistic breakdown of how long each step will take so you can plan a weekend project.
Remove trim and old floor: 1–2 hours.
Prep subfloor and underlayment: 1–2 hours.
Lay Pergo planks (including cuts): 3–5 hours.
Refit trim and clean up: 1–2 hours.
Total: 6–11 hours.
Case 2: Professional two-person crew in an open-plan living-dining area
When two experienced installers arrive with the right tools, they can cover much more ground than a solo DIYer and finish an open-plan living-dining area efficiently.
Expect their workflow to be methodical and paced for consistency rather than speed alone. You’ll see faster tear-out, precise layout, and simultaneous cutting and fitting.
Typical install time: 4–8 hours for 300–500 sq ft, plus minor trim and cleanup.
Case 3: Kitchen install with extra subfloor moisture remediation
3 common surprises in kitchen installs are subfloor moisture issues that need remediation before you can lay Pergo, and they add both steps and time to the job.
You’ll need testing, drying or vapor barrier installation, and possibly replacing damaged plywood. Expect remediation to add 2–6 hours for a small kitchen, plus extra curing time.
Plan for inspection and schedule adjustments accordingly.
Cost vs. Time: How Timeline Affects Price and Scheduling
If you need the Pergo installed on short notice or over a weekend, expect higher labor rates and possible rush fees.
You can often cut costs by scheduling during regular weekday hours or booking several rooms at once to keep crews efficient.
Plan around your busiest days to minimize downtime and ask installers about off-peak discounts.
How rush jobs or weekend installs alter pricing
Because scheduling affects labor availability and urgency, rush jobs or weekend installs usually cost more than standard weekday work.
If you need a fast turnaround or nonstandard hours, expect higher hourly rates, overtime premiums, or expedited scheduling fees.
Communicate deadlines early, weigh the premium against your need, and get written quotes outlining extra charges so you won’t face surprises.
Scheduling tips to minimize downtime and cost
Rush or weekend installs often push up costs, so planning your schedule can save both time and money.
Pick midweek slots, combine rooms to reduce repeat mobilization, and book installers during off-peak seasons.
Clear rooms beforehand, confirm measurements, and bundle purchases to avoid rush orders.
Communicate deadlines and flexibility so contractors can optimize routes and minimize labor premiums.
Tools and Materials Checklist by Stage (to prevent delays)
Before you start, make a checklist so you’ve got the right tools at each stage and won’t stop mid-job.
You’ll need prep and demolition gear, installation and cutting tools, plus finishing and cleanup supplies. Being organized saves time and lets you finish the Pergo install smoothly.
- Pry bar, floor scraper, and moisture meter (prep/demolition)
- Tape measure, chalk line, saws, and spacers (installation/cutting)
- Tapping block, pull bar, and mallet (installation/fitting)
- Vacuum, tack cloths, and threshold strips (finishing/cleanup)
Prep and demolition tools
1 essential step before you lay Pergo is assembling the right prep and demolition tools so you won’t stall mid-job; have pry bars, a hammer, a circular saw or multi-tool, knee pads, utility knife, tape measure, chalk line, pry bar, shop vacuum, and plenty of trash bags ready.
Remove baseboards, rip old flooring, inspect subfloor, clear nails and adhesive, and vacuum debris for a flat, clean surface.
Installation and cutting tools
With the subfloor cleaned and cleared, gather the installation and cutting tools you’ll use during the actual lay: a miter saw or circular saw with a fine-tooth laminate blade for rip and cross cuts, a jigsaw or oscillating multi-tool for notches and pipe cutouts, a tapping block and pull bar to lock planks tight, spacers for expansion gaps, a rubber mallet, a carpenter’s square, and extra blades and sandpaper for fine adjustments.
Keep a measuring tape, pencil, chalk line, knee pads, and clamps nearby to maintain accuracy and speed; replace blades as they dull to avoid tear-out and delays.
Finishing and cleanup tools
Finish strong by assembling the specific tools and materials you’ll need for cleanup and final touches so you don’t stall at the end:
microfiber mop, damp cloths, mild floor cleaner, touch-up markers or putty for scratches, threshold strips, quarter-round, finishing nails, caulk, painter’s tape, vacuum, shop broom, and a rubber mallet.
Have disposal bags and a soft-bristled brush handy for final dusting.
Frequently Asked Questions
You’ll want quick answers to common timing questions before you start.
We’ll cover how long Pergo should acclimate, whether you can install over existing flooring, ideal installer numbers for a 200 sq ft room, furniture removal and its impact on scheduling, and when the room’s usable after installation.
Read on for clear, practical guidance.
How long should Pergo acclimate before installation?
Because Pergo flooring reacts to temperature and humidity, you should let it acclimate before installation to prevent gaps, buckling, or cupping.
Typically, you’ll let boards sit in the room for 48 to 72 hours unopened. Maintain normal living conditions—stable temperature and humidity—during that period.
Longer acclimation may help in extreme climates or with subfloor moisture concerns.
Can Pergo be installed over existing flooring to save time?
Wondering if you can lay Pergo over your old floor to cut installation time? You can, often—over clean, level, and dry surfaces like vinyl, tile, or well-adhered hardwood.
Remove loose tiles, trim high spots, and confirm underlayment compatibility. Skipping removal saves time but inspect for moisture or damage first; fixing subfloor issues later costs more in effort and results.
How many installers are ideal for a 200 sq ft room?
How many installers do you need for a 200 sq ft room?
For a straightforward Pergo install, two installers are ideal: one lays panels and clicks seams while the other measures, trims, and maintains pace.
Two people cut overall time, improve accuracy, and handle heavy lifting safely.
A single pro can do it but will take longer; three rarely speeds simple rooms enough to justify extra cost.
Will furniture need to be removed and how does that affect time?
If you’re replacing flooring, most furniture should be removed so installers can work efficiently and avoid damage; leaving only very heavy or built-in pieces can save time but usually adds complexity.
You should clear the room or at least move small items out. Movers or installers can handle removals for a fee, which increases labor time.
Plan ahead to avoid delays.
How soon can the room be used after installation?
Once installers finish laying Pergo, you can usually walk on the floor right away, but you’ll want to wait before moving heavy furniture back in or replacing rugs.
Give the planks 24–48 hours to settle and adhesives (if used) to cure. Avoid dragging furniture; use sliders.
If seams and connections look stable after a day or two, you can resume normal use, including rugs.