How to Install Molding on the Floor: Trim Like a Pro in One Weekend
You can install floor molding like a pro in a weekend by planning, measuring, and gathering the right tools—molding, miter or coping saw, nails or adhesive, caulk, and a nailer. Prep walls and floors, remove old trim, then cut, test-fit, and fasten pieces to studs every 12–16 inches. Use scarf joints for long runs, caulk gaps, and fill nail holes for a smooth finish. Follow the step-by-step process below to complete the job efficiently and confidently.
How to Install Molding on the Floor: and Project Overview
You can often install floor molding in a weekend if your room’s layout is simple and you have basic carpentry skills.
Before you start, outline the project scope, estimate the time and cost, and match the job to your skill level so you don’t run into surprises.
Gather a short tools-and-materials checklist up front—molding, saw, nails, caulk, and adhesive—to keep the work moving efficiently.
Can You Install Floor Molding in One Weekend?
Curious whether you can finish floor molding over a single weekend? You can, if you plan, gather tools, and know how to install molding on the floor efficiently.
Tackle one room, prep surfaces, measure and cut accurately, and use proper adhesives or nails.
Work steadily, avoid distractions, and finish with caulking and paint touch-ups for a polished result.
Project Scope, Time Estimate, Skill Level, and Cost Range
After planning a weekend install and lining up tools, move on to scope, timing, skill, and cost so you know what to expect before you start.
Decide room count, molding type, and complexity (straight runs vs. many corners). Expect 4–12 hours per room, basic carpentry skills, and one helper for faster work.
Budget $2–8 per linear foot plus fasteners and finish.
Tools and Materials At-a-Glance
Tools and materials checklist: gather blades, adhesives, fasteners, and safety gear before you start so the job flows smoothly.
You’ll also need measuring tools, a saw, caulk, and filler. Pick molding, finish, and fastener types that match your floor and skill level.
Keep everything organized and within reach to work efficiently and safely.
- Measuring, cutting, and sanding tools
- Adhesives, nails, and caulk
- Safety gear and finishing supplies
Basic Understanding What Floor Molding Is and Why It Matters
You’ll meet several types of floor molding—baseboard, shoe molding, quarter round, and base cap—each serving different looks and joints.
They don’t just finish a room; moldings cover gaps, protect walls from kicks and vacuuming, and enhance aesthetics.
Choose the right material and profile—wood, MDF, or PVC, prefinished or primed—to match durability and paint or stain plans.
Types of Floor Molding (Baseboard, Shoe Molding, Quarter Round, Base Cap)
Think of floor molding as the finishing touch that hides gaps, protects walls, and ties a room’s look together.
You’ll choose styles based on profile and purpose: baseboard anchors the wall, shoe molding covers floor gaps, quarter round softens the joint, and base cap adds decorative detail.
Pick matching materials and proportions for a cohesive finish.
- Baseboard
- Shoe molding
- Quarter round
Functions: Aesthetics, Gap Coverage, Protection
Although it’s often seen as a small detail, floor molding does three practical jobs: it enhances your room’s look by framing floors and tying trim styles together; it conceals gaps between flooring and walls for a finished appearance; and it protects walls from kicks, vacuum bumps, and moisture.
Choosing the right profile and installation guarantees these benefits last.
Materials and Profiles: Wood, MDF, PVC, Prefinished vs. Primed
Material choice and profile shape determine how your floor molding looks, performs, and fits your budget.
You’ll pick wood for warmth and refinishing, MDF for affordability and paint-ready smoothness, PVC for moisture resistance, and prefinished pieces to save time.
Choose primed if you want custom paint.
Profile—cove, ogee, or quarter-round—affects style and how well it hides gaps.
Planning Your Molding Installation (Preparation)
Before you cut or buy anything, measure the room carefully to calculate linear feet and add a waste allowance for corners and mistakes.
Pick a profile and height that compliments your ceiling and furniture, and match the trim material and color to your flooring and existing molding.
Finally, inspect walls and floors for gaps, bowed sections, or uneven spots so you can plan shimming, sanding, or repair before installation.
Measuring the Room: How to Calculate Linear Feet and Allowance for Waste
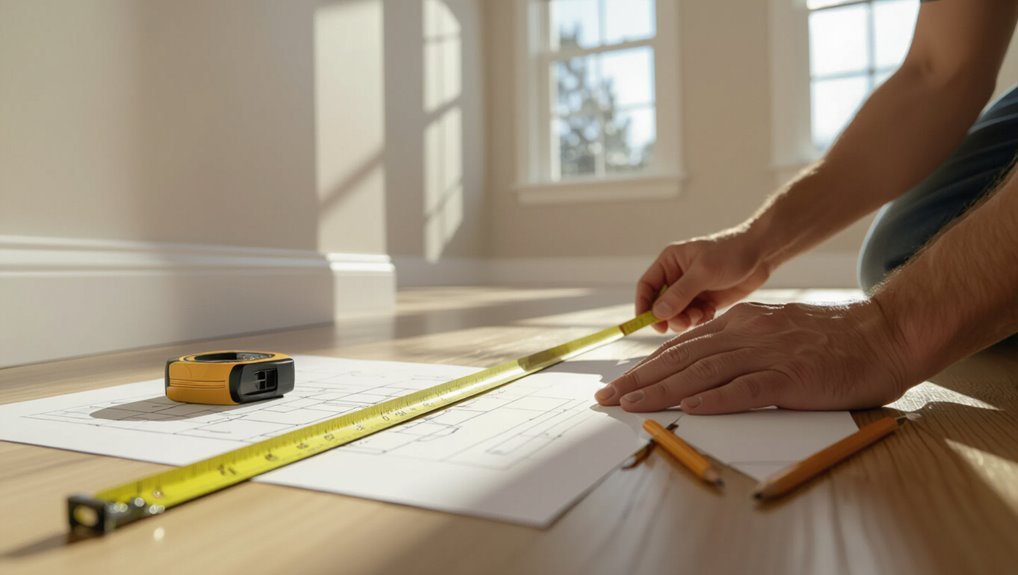
When you measure each wall and doorway, record the exact lengths so you can add them to get the total linear feet of molding you’ll need.
Add 10–15% extra for waste, miter cuts, and mistakes. Round up to the nearest full board length.
Note inside/outside corners and door casings separately so you order accurate quantities and minimize returns.
Choosing the Right Profile and Height for Your Room
Now that you’ve measured and added extra for waste, pick a molding profile and height that matches both the room’s scale and your home’s style.
Consider ceiling height, furniture scale, and architectural character to guide choices. Use these examples to visualize:
- Low 2–3” shoe for minimalist, low ceilings.
- 4–6” colonial or ogee for medium rooms.
- 7–9” tall base for grand, high-ceiling spaces.
Purchasing Tips: Matching Trim to Flooring and Existing Trim
Color and profile matter—match your new baseboard to the flooring tone and the existing trim’s height and detailing so the room reads as a unified whole.
Measure lengths and order a bit extra for mistakes and angled cuts.
Pick compatible materials and finish (paintable, stained, or prefinished).
Bring a photo or sample to the store to guarantee color and scale coordinate before buying.
Inspecting Walls and Floors: Dealing with Irregularities
Before you cut or nail anything, walk the room and pinpoint gaps, bowed walls, uneven floors, and warped baseplates so you know exactly where the molding will need adjustment.
Measure low spots and high edges, mark trouble areas, and decide whether to shim, scribe, or cope.
Plan compound cuts for corners and allow extra trim for sanding, fitting, and paint touch-ups.
Step-by-Step Installation Guide
Now you’ll follow a clear sequence that starts with removing old trim and prepping surfaces.
You’ll learn how to measure and cut straight pieces, choose miter or coping for corners, test-fit and mark studs, then secure the molding with the right nails or adhesive and spacing.
Keep each step controlled and check fits as you go so the final installation sits flush and secure.
Step 1 Remove Old Trim and Prepare Surfaces
Start by removing the old baseboard and any remaining nails or adhesive so you have a clean, level surface to work with; wear gloves and eye protection, pry gently with a flat bar, and cut caulk with a utility knife to avoid damaging the wall or floor.
Clean, sand, and vacuum surfaces. Check for rot or unevenness; repair as needed.
- Remove nails
- Scrape adhesive
- Patch gaps
Step 2 Cut Molding to Length: Tools and Techniques for Straight Cuts
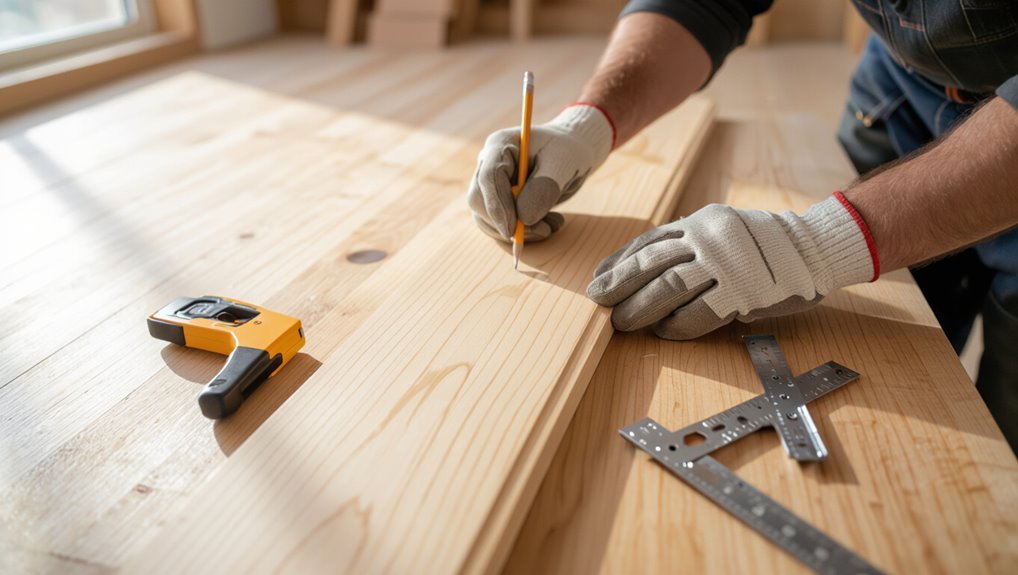
Once you’ve prepped the wall and floor, measure each run of molding carefully and mark cut lines so your joints meet tight; use a tape measure, pencil, and a square to transfer exact lengths and allow for any corner or end treatments.
Use a miter saw or hand saw on a stable workbench, clamp stock, cut slowly to the line, and sand any rough edges for a snug fit.
Step 3 Inside and Outside Corner Cuts: Miter vs. Coping Methods

Because corners determine how seamless your molding looks, you’ll need to choose between mitering and coping before you cut.
For outside corners, miter a 45° angle on matching pieces for clean joins.
For inside corners, cope one piece to fit the profile against a square-cut jamb, giving tighter seams that tolerate wall irregularities.
Use a coping saw and test-fit carefully.
Step 4 Test-Fit Pieces and Mark Studs
Dry-fit each molding piece along the wall to check joints and reveal any gaps. Then mark stud locations through the molding so you know where to nail.
Walk the run, shim where needed, and note high spots. Use a pencil and tape to record studs and seams so installation stays straight and secure.
- Align seams and corners.
- Mark studs every 16″–24″.
- Note gap areas.
Step 5 Fastening the Molding: Nails, Adhesive, and Proper Spacing
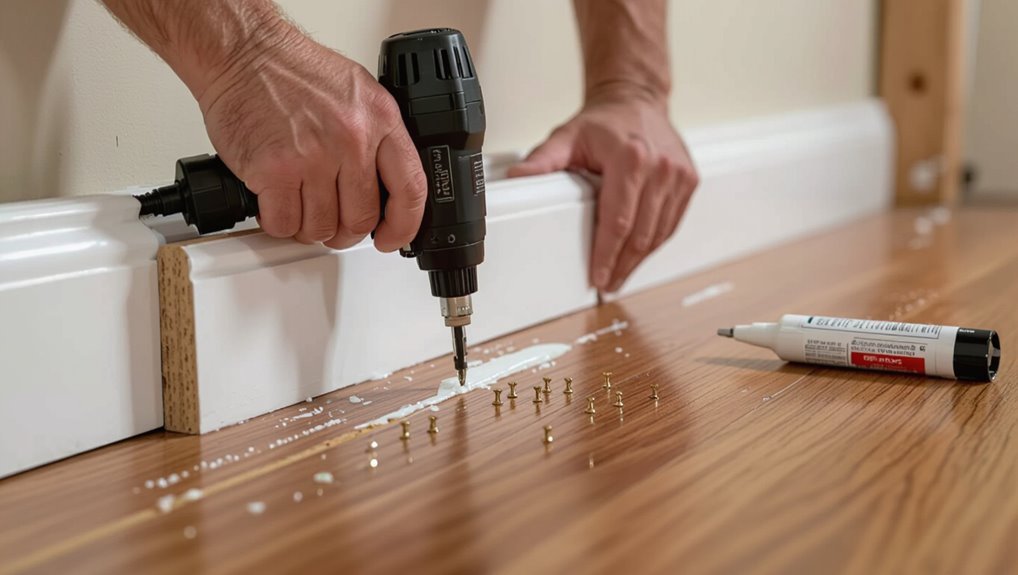
With studs and seams marked and high spots noted, you’re ready to fasten the molding firmly to the wall and floor.
Use a pneumatic or manual finish nailer, driving nails into studs every 12–16 inches and into the floor plate at ends.
Apply construction adhesive sparingly for hollow sections.
Countersink nails, fill holes, and check alignment as you go for a seamless, secure fit.
Step 6 Joining Seam Lines and Long Runs: Scarf Joints and Butt Joints
1 clear, well-planned joint can make a long run of molding look like a single continuous piece.
Use scarf joints for visible runs—cut opposing 45° or 30° angles, glue, and clamp for a seamless match.
For end-to-end against returns, use tight butt joints with backing blocks and adhesive.
Sand and align profiles before fastening so seams stay invisible and strong.
Step 7 Filling Gaps and Nail Holes: Caulk, Wood Filler, and Sanding
Finish gaps and nail holes carefully to make your molding look factory-fresh.
Use paintable caulk for seams where trim meets wall or floor, smoothing with a damp finger.
Fill nail holes and small defects with wood filler, let dry, then sand flush with fine-grit paper.
Clean dust before any finish.
Inspect joints, re-caulk or re-fill where necessary for seamless results.
Step 8 Painting and Finishing: Best Practices for Smooth Results
Once your caulking and filler are dry and sanded, you’re ready to paint and finish the trim; proper prep and the right products will give you a smooth, professional look.
Prime bare wood, dust thoroughly, and use a high-quality brush or foam applicator.
Apply two thin coats of paint, sanding lightly between coats with fine grit.
Seal with clear polyurethane for durability and easy cleaning.
Special Situations and Adjustments
You’ll run into a few tricky spots like baseboard heaters, radiators, electrical outlets, door casings, and staircases that need special cuts and clearances.
For uneven or sloped floors you’ll have to scribe, shim, or use flexible trim to get a tight fit.
Decide whether to add shoe molding or quarter round—or use taller baseboards—based on appearance and how much gap you need to cover.
Installing Over Baseboard Heaters, Radiators, and Electrical Outlets
When working around baseboard heaters, radiators, and electrical outlets, plan precise cuts and clearances so molding fits neatly without blocking heat flow or access to controls; measure twice, mark once, and use notch cuts or trim returns to blend gaps while keeping safety and code requirements in mind.
Cut clearance for vents, leave expansion gaps near heat sources, and use outlet rings or spacer blocks so covers remain accessible.
Working Around Door Casings and Staircases
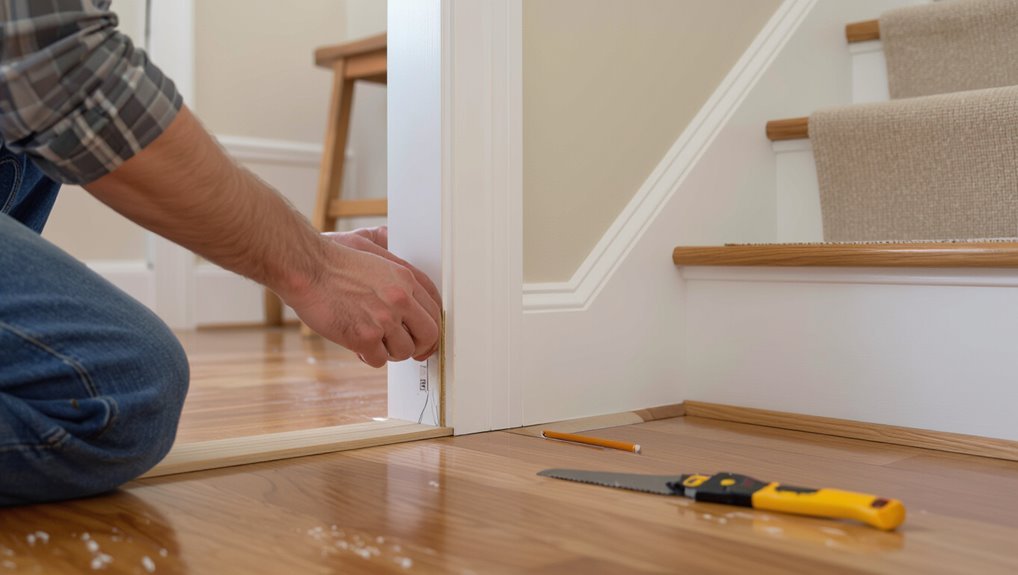
If your molding runs into door casings or up alongside a staircase, plan cuts and reveal adjustments so profiles line up and connections look intentional. Measure heights and offsets at multiple points, mark exact cut lines, and test-fit pieces before final nailing or gluing.
Trim returns, cope joints, and scribe where needed. Use short filler pieces for irregular gaps, then sand and caulk for a seamless finish.
Installing Molding on Uneven Floors or Sloped Surfaces
Because floors rarely stay perfectly flat, you’ll need to adapt your cuts and attachment methods to match every high and low spot so the molding sits tight and looks professional.
Shim behind molding where gaps appear, scribe bottoms to follow slopes, and use flexible caulk for small voids.
Fasten with longer nails into studs or adhesive where needed, checking fit frequently and trimming progressively for a snug finish.
Adding Shoe Molding or Quarter Round vs. Taller Baseboards
After scribing and shimming to follow uneven floors, you’ll often decide whether to add shoe molding or quarter round to hide gaps or instead use taller baseboards to cover variations.
Each choice affects appearance, installation time, and how much floor irregularity you must correct. Shoe/quarter round is quick and subtle; taller baseboards mask larger gaps but need more material, careful layout, and trim coordination.
Tools, Materials, and Cost Comparison
Before you start cutting and nailing, gather the right tools—like a coping saw for fine joints, a miter saw for angled cuts, a nail gun for fastening, and a pry bar and caulk gun for removal and finishing.
Compare materials too: MDF is cheap and paintable but less durable, hardwood lasts longer and costs more, and PVC resists moisture but varies in price and paintability.
Finally, weigh rent vs. buy—rent big-ticket tools if this is a one-off project, buy if you’ll use them regularly.
Tool List with Purpose (Coping Saw, Miter Saw, Nail Gun, Pry Bar, Caulk Gun)
You’ll need five essential tools to install floor molding properly: a coping saw for tight inside corners, a miter saw for precise angle cuts, a nail gun to fasten trim quickly, a pry bar for removing old trim and adjusting fit, and a caulk gun to seal seams and fill gaps.
| Tool | Purpose |
|---|---|
| Coping saw | Shape profiles |
| Miter saw | Angle cuts |
| Nail gun | Fastening |
Material Comparison: MDF vs. Hardwood vs. PVC (Durability, Price, Paintability)
Choosing the right molding material affects the look, longevity, and cost of your project, so compare MDF, hardwood, and PVC on durability, price, and paintability before you buy. You’ll pick MDF for low cost and smooth paint finish, hardwood for durability and stain, and PVC for moisture resistance and easy maintenance.
| Material | Key trait |
|---|---|
| MDF | Cheap, paintable |
| Hardwood | Durable, stainable |
| PVC | Water-resistant |
| Summary | Match use to room need |
When to Rent vs. Buy Tools
Having picked the right molding material, you’ll next decide whether to rent or buy the tools needed to install it.
Consider frequency, budget, and storage: renting saves money for one-off jobs, buying pays off for regular use, and cheap tools can ruin finish.
Choose quality for critical cuts, rent specialty gear, and buy basics you’ll reuse.
- Rent specialty tools
- Buy core tools
- Weigh cost vs. use
Common Mistakes and How to Avoid Them
Don’t rush the job: poor measurements and sloppy cuts are the main causes of gaps and mismatched joints, so measure twice and cut once.
Use proper fasteners and countersinking to prevent pops, prep and caulk surfaces before painting, and pick a trim profile that fits the room’s scale.
If something’s off, simple fixes—re-cut a piece, add a small shim, or re-caulk—usually solve the problem quickly.
Mistake 1 Cutting Corners on Measurement and Cutting
If you rush measurements or eyeball cuts to save time, you’ll end up with gaps, tight joints, or wasted trim that forces rework.
Measure twice, mark clearly, and cut with the correct bevel and miter angles. Use a reliable miter saw, test-fit pieces, and label each section.
Precision saves material and time; slow, deliberate cuts give professional seams and clean connections.
Mistake 2 Improper Fastening Leading to Pops and Gaps
When you skip proper fastening technique, nails and staples can work loose over time and cause visible pops, gaps, or even split trim; using the right fastener type, spacing, and placement prevents these failures.
Drive finishing nails into studs or use a pneumatic brad nailer for lightweight molding, countersink slightly, and space fasteners every 12–16 inches.
Check for movement and re-secure immediately.
Mistake 3 Skipping Surface Preparation and Caulking
3 simple steps—clean, sand, and caulk—will keep your molding looking seamless and prevent long-term gaps.
You should remove dust, old paint, and loose debris, sand rough spots for a tight fit, and apply paintable caulk along seams and nail holes.
Smooth caulk with a wet finger, let it cure, then paint for a flawless, lasting finish.
Mistake 4 Using the Wrong Trim Profile for the Room
You’ve prepped the surfaces and sealed the seams; now think about the style of trim you pick.
Don’t force an ornate, tall profile into a minimalist, low-ceiling room—it’ll overwhelm scale and sightlines.
Match trim height and detail to ceiling height, room size, and architectural style.
Test a sample against the wall and walk the space before buying full lengths.
Quick Fixes for Common Installation Problems
Although even careful installers hit snags, most common problems have quick, reliable fixes you can handle with basic tools.
- Gaps at corners: scribe and sand for tight fit, then fill with caulk.
- Uneven base: shim behind molding and nail through at studs.
- Nail pops: remove, re-drill pilot hole, use longer finish nails and wood glue.
Tips, Best Practices, and Time-Saving Tricks
You can finish a whole room in a weekend by staging materials, using a miter saw jig, and working in sections.
Clamp pieces, mark reference lines, and make test cuts to guarantee tight joints, then use careful painting or matched stains to hide seams.
Finally, seal and clean regularly so your molding stays looking new with minimal upkeep.
Speed Techniques for a One-Weekend Finish
A weekend’s worth of focused work and the right techniques can get your floor molding installed without weekend-long headaches.
Plan sections, pre-cut common angles, and group identical pieces. Use a finish nailer with set depth, keep adhesive handy for tricky spots, and move systematically room-to-room.
Stay organized with labeled stacks, quick cleanups, and short, timed work blocks to maintain momentum.
Precision Tips: Clamping, Reference Marks, and Test Cuts
After you’ve knocked out the big sections with quick cuts and grouped pieces, shift focus to the small accuracy moves that stop rework.
Clamp scrap blocks to hold profiles tight while you test fits, mark reference lines on the back of each piece, and make trial cuts on offcuts.
Verify miters and coping before final nailing to avoid gaps and wasted pieces.
Finishing Tips: Seamless Painting and Matching Stains
When seams and color variations are the last things standing between your trim and a polished room, prep and matching save you time and touch-ups; sand lightly, fill gaps with paintable caulk, and wipe dust before priming so paint lays smoothly.
Match stain by testing on scrap, blend with feathered brushstrokes, use glazing for tricky spots, and apply two thin coats for durable, even coverage.
Maintenance Advice to Keep Molding Looking New
Now that your seams are smooth and stains match, keep moldings looking fresh with a few simple routines and quick fixes.
Dust weekly with a microfiber cloth, wipe scuffs with a mild detergent, and touch up nicks using matching stain or paint pens.
Check caulk annually, tighten loose fasteners, and protect high-traffic areas with chair pads or quarter-round guards to prevent damage.
Material and Design Alternatives (When Not to Use Traditional Molding)
If your space calls for a cleaner, more modern look, consider alternatives like shadow gaps, flush trim, or integrated trim systems that hide the joint between wall and floor.
You’ll also want to weigh prefinished trim, which saves time and guarantees a consistent finish, against field-finished pieces that let you match stain or paint on site.
Think about the trade-offs in installation complexity, cost, and final appearance before skipping traditional molding.
Modern Alternatives: Shadow Gaps, Flush Trim, and Integrated Trim Systems
Contemporary interiors often call for cleaner lines than traditional baseboard molding provides, so consider shadow gaps, flush trim, or integrated trim systems as streamlined options that hide joins without adding visual bulk.
- Shadow gaps: a thin reveal between wall and floor for a floating look.
- Flush trim: seamless connection, paint-matched for minimal sightlines.
- Integrated systems: built-in channels for wiring and expansion, sleek and practical.
Pros and Cons of Prefinished vs. Field-Finished Trim
When you’re weighing prefinished versus field-finished trim, think about how much control you want over color, finish, and installation timing. Prefinished saves time and has consistent factory finishes; field-finished lets you match walls and touch up seams. Choose based on schedule, budget, and skill.
| Option | Time | Finish Control |
|---|---|---|
| Prefinished | Low | Limited |
| Field-finished | High | Complete |
Project Checklist and Weekend Timeline
Before you start, make a pre-project checklist for the 24–48 hours prior so you’ve got materials, tools, and measurements ready.
Plan Day 1 for demolition, measuring, and major cuts so walls and stock are prepped.
Reserve Day 2 for installation, filling gaps, and final touches to finish cleanly.
Pre-Project Checklist (2448 Hours Before)
If you’re planning to install floor molding this weekend, start the prep 102 days ahead so you’ve got time to order materials, schedule trades, and handle unexpected delays.
Inspect room dimensions, pick molding profile and finish, confirm delivery lead times, and reserve tools.
Arrange electrician or flooring pros if needed, set a buffer for shipping, and budget for extras and contingencies.
Day 1 Timeline: Demolition, Measuring, and Major Cuts
Start Day 1 by clearing the room and removing old baseboards, trim, and any flooring that conflicts with the new molding so you’ve got a clean, safe workspace; then measure wall lengths, note corner types and floor changes, and mark high spots or gaps that will affect molding fit before making your major cuts.
- Demo and haul debris.
- Measure, label, sketch.
- Cut long runs, test-fit pieces.
Day 2 Timeline: Installation, Filling, and Finishing Touches
Once you’ve got your pieces labeled and test-fit, Day 2 focuses on installing the molding, sealing gaps, and adding the finishing touches that make the job look professional.
You’ll nail or glue sections, caulk joints, and prep for paint. Work methodically, clean as you go, and check alignment frequently.
- Secure molding
- Fill gaps and nail holes
- Sand and finish
FAQ Common Questions About Installing Floor Molding
You probably have a few quick questions before you start—like how tall baseboards should be in modern homes and whether you can install new molding over existing ones.
You’ll also want to know if coping beats mitering for inside corners, how to hide gaps between the floor and molding, and whether you must nail into studs.
Keep reading and I’ll answer each of these common concerns with simple, practical guidance.
How high should baseboards be for modern homes?
Most modern homes use baseboards between 3 and 5 inches tall, a range that balances clean, contemporary lines with practical protection for walls; choose taller boards (5–7 inches) in rooms with higher ceilings or to make a stronger design statement.
Pick a height that matches ceiling scale and trim style, then keep consistent throughout open areas for a cohesive, professional look.
Can I install molding over existing baseboards?
Wondering whether you can install new molding over existing baseboards? Yes — you can, if the old boards are flat, securely attached, and not considerably thicker than the new trim.
Remove loose paint, fill gaps, and sand imperfections. Use construction adhesive and finish nails for a strong bond.
Check door clearances and electrical outlets before final installation to avoid issues.
Is coping better than mitering for inside corners?
Prefer coping when you want tighter, longer-lasting inside corners. You’ll cut one piece square, then cope the profile on the mating piece to fit snugly over it.
Coping hides small wall irregularities and lets the joint stay tight as wood contracts. Mitering’s quicker for beginners, but coping gives a cleaner, more professional result you’ll appreciate over time.
How do I hide gaps between floor and molding?
If you spot gaps between the floor and molding, you can hide them quickly with a few simple fixes: caulk for small, hairline spaces; flexible trim sealant for gaps up to about 1/4 inch; and quarter-round or shoe molding when the gap’s larger or uneven.
Clean the gap, apply sealant or install trim, then paint or stain to match for a seamless finish.
Do I need to nail into studs when installing baseboards?
Because baseboards primarily hide gaps and protect walls rather than support loads, you don’t have to hit studs every time; instead, drive finishing nails into the wall studs when you can and use a nailer or long finish nails into the drywall and adhesive where studs aren’t available to secure the molding evenly.
Aim for nails every 12–16 inches, reinforce corners, and fill holes for a clean finish.
Final Inspection and Handover
Now that the molding is in place and dry, walk the room with a simple checklist to confirm straight lines, firm fastenings, and a consistent finish.
If you spot gaps, loose pieces, or finish flaws, touch them up after the adhesive or paint has fully cured.
Don’t forget to note seasonal movement allowances so the homeowner knows what to expect and how to handle future adjustments.
How to Inspect Your Work: Checklist for Straightness, Secure Fastening, and Finish
One final walk-through will catch small issues before you call the job done: check that each molding runs straight against the wall, fasteners are flush and secure, joints and corners are tight, and the finish is even with no gaps or excess caulk.
Walk the room slowly, press edges to confirm adhesion, tap fastener heads, inspect seams from multiple angles, and note anything needing correction.
Touch-Up Steps After Drying and Seasonal Movement Considerations
After your walk-through and corrections, give the molding time to fully cure before doing final touch-ups.
Paint and caulk can change appearance slightly as they dry, and seasonal humidity shifts may later open tiny gaps.
Wait 24–72 hours, then inspect joints, re-caulk where needed, and touch up paint.
Address movement seasonally.
- Check for tiny gaps.
- Re-caulk sparingly.
- Spot-paint seams.