
What Is Vinyl Flooring? Everything You Need to Know Before Buying
Vinyl flooring is a synthetic, PVC-based floor that mimics wood or tile while staying water-resistant and budget-friendly. You’ll get options like sheet, plank (LVP), or tile (LVT), plus core types like SPC and WPC for extra rigidity. It’s easy to maintain and install—click-lock, glue-down, or loose-lay—but can dent, fade, and sometimes off-gas VOCs. Choose thicker wear layers and test subfloors for moisture. Keep going to learn practical selection, installation, and care tips.
What Is Vinyl Flooring? and Key Takeaways
Vinyl flooring is a synthetic floor covering made of PVC layers that mimic wood or tile while offering water resistance.
You’ll get quick pros and cons: it’s affordable and durable but can vary in quality and may not add as much resale value as natural materials.
Consider vinyl if you want low-maintenance, moisture-resistant floors on a budget—expect typical prices from budget to high-end and lifespans roughly 5–25 years depending on type and care.
Vinyl flooring defined
Flooring made from synthetic materials offers a durable, water-resistant alternative to wood and tile, and that’s fundamentally what vinyl flooring is: a manufactured floor covering composed of multiple layers—typically a wear layer, a printed design layer, a core, and a backing—crafted from polyvinyl chloride (PVC) and additives.
When you ask what’s a vinyl floor, know it’s versatile, low-maintenance, and comes in sheets, tiles, or planks.
One-line pros and cons summary
When you want a quick read on whether it fits your space, think: highly durable and water-resistant with budget-friendly installation—yet can dent, fade in direct sun, and may off-gas VOCs.
- You’ll get easy maintenance and wide style choices.
- You can install it yourself or hire pro help affordably.
- You should avoid prolonged sun exposure to prevent fading.
- Consider low-VOC or certified products if indoor air quality matters.
Who should consider vinyl flooring?
Looking for a durable, budget-friendly floor that handles moisture and everyday wear? You should consider vinyl if you want low maintenance, easy installation, and versatile styles.
It’s great for renters, busy families, DIYers, and budget-conscious remodelers.
- Renters needing temporary, attractive flooring
- Families with kids or pets
- DIY installers wanting simple layouts
- Remodelers on a tight budget
Typical price ranges and lifespan at a glance
Expect to pay anywhere from about $1 to $7 per square foot for vinyl flooring materials, with installation adding $1 to $5 more depending on type and labor; click-and-lock planks and peel-and-stick tiles sit at the lower end, while luxury vinyl plank (LVP) and commercial-grade options cost more. You’ll get 5–30 years depending on wear, maintenance, and quality.
| Type | Lifespan |
|---|---|
| Peel-and-stick | 5–10 yrs |
| Click-lock | 7–15 yrs |
| LVP (residential) | 15–25 yrs |
| Commercial LVT | 20–30 yrs |
Basic Understanding Types and How Vinyl Flooring Works
You’ll learn how different vinyl types—LVP vs LVT, sheet vinyl vs VCT—fit specific rooms and budgets.
I’ll explain construction layers like the wear layer, vinyl core, and backing so you know what affects durability and maintenance.
You’ll also see how core technologies (WPC, SPC, homogeneous vinyl) change performance and installation options.
Luxury Vinyl Plank (LVP) vs Luxury Vinyl Tile (LVT)
Although both LVP and LVT share the same core materials and waterproof performance, they differ in shape, installation options, and the way they mimic real materials—LVP comes in long, narrow planks that imitate hardwood, while LVT is cut into square or rectangular tiles that better replicate stone or ceramic. You’ll choose LVP for wood looks and easier floating installs; pick LVT for grout realism and tile patterns.
| Feature | LVP | LVT |
|---|---|---|
| Shape | Planks | Tiles |
| Best mimic | Hardwood | Stone/ceramic |
| Installation | Floating, glue | Glue, grout options |
Sheet vinyl vs vinyl composite tile (VCT) when each is used
Sheet vinyl and vinyl composite tile (VCT) serve different needs: sheet vinyl comes as continuous, flexible rolls that give a seamless, water-resistant surface ideal for bathrooms and kitchens, while VCT is durable, individual tiles—made from ground limestone and PVC—that hold up to heavy commercial traffic and are commonly used in schools, retail, and institutional settings.
You’ll pick sheet for moisture and easy cleaning, VCT for longevity and repairability.
Construction layers explained: wear layer, vinyl core, backing
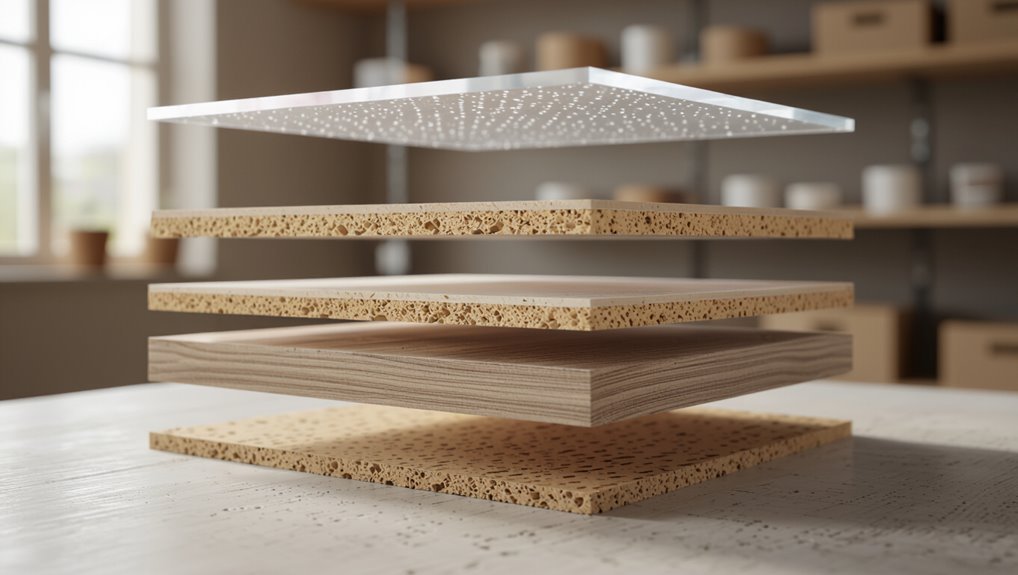
Now that you’ve compared sheet vinyl and VCT by use, it helps to look inside a vinyl plank or sheet to understand why they perform differently.
The top wear layer resists scratches and stains; a printed vinyl layer provides color and pattern; the vinyl core gives stability and some cushioning; the backing adds moisture protection and keeps planks flat during installation.
Core technologies: WPC, SPC, homogeneous vinyl differences and benefits
Because the core determines how a vinyl plank performs, you should know the basic types—WPC, SPC, and homogeneous vinyl—and what each gives you in durability, comfort, and installation.
WPC (wood-plastic composite) offers warmth and cushioning.
SPC (stone-plastic composite) gives rigid stability and impact resistance.
Homogeneous vinyl is a single-layer, highly durable option for heavy commercial use and easy maintenance.
Advantages and Disadvantages of Vinyl Flooring
You’ll find vinyl offers clear perks like strong durability, good water resistance, low cost, and a comfortable feel underfoot.
But it can scratch, emit VOCs, and be sensitive to heat, so you’ll need to weigh those trade-offs.
Also consider environmental and health factors such as indoor emissions and limited recyclability when deciding.
Major advantages (durability, water resistance, cost, comfort)
Vinyl flooring offers several clear advantages that make it a popular choice for homes and businesses: it’s highly durable, resists water, costs less than many alternatives, and feels comfortable underfoot.
You’ll appreciate how vinyl performs in busy areas and wet rooms.
Benefits include:
- Long-lasting wear layers for high traffic
- Waterproof options for kitchens and baths
- Lower material and installation costs
- Softer, warmer underfoot feel
Common disadvantages (scratching, VOCs, heat sensitivity)
While durable and affordable, vinyl flooring does have downsides you should consider: it can scratch, emit VOCs, and react poorly to heat.
- Scratches show on wear layers; furniture needs pads.
- VOCs can cause odors and irritation when new.
- Intense heat can warp or discolor planks.
- Repairing large areas is often difficult, so plan for replacement rather than spot fixes.
Environmental and health considerations (emissions, recyclability)
Because vinyl’s chemistry and lifecycle affect indoor air and the planet, you should weigh both short- and long-term impacts before choosing it for your home.
Vinyl can emit VOCs initially and during heat exposure, so ventilate and pick low‑VOC products.
Recycling exists but is limited; many vinyl floors end up in landfill.
Consider durable alternatives, reuse options, and manufacturers’ take‑back programs to reduce harm.
How to Choose the Right Vinyl Flooring
Start by defining the room’s purpose and conditions so you know the moisture, traffic, and performance needs.
Then pick the vinyl type and core, wear-layer thickness, and finish to match durability requirements, and decide on an installation method—click-lock, glue-down, or loose lay.
Finally, choose aesthetics like plank size, grout lines, texture, and color to suit your style and the room’s scale.
Step 1 Define the room and use-case requirements
Before you pick a vinyl plank or sheet, define exactly how the room will be used and what performance you need so you can match the product to real-world demands.
Consider traffic, moisture, comfort, and style to narrow choices quickly.
- Daily foot traffic level
- Likelihood of spills or humidity
- Need for cushioning or sound control
- Desired aesthetic and maintenance effort
Step 2 Select type and core based on moisture and traffic
Now pick the vinyl type and core that match your room’s moisture and traffic so performance isn’t left to chance.
Choose waterproof rigid cores (WPC/SPC) for basements, kitchens, or high-humidity spaces. Flexible vinyl works for low-moisture, low-traffic rooms.
For busy households or commercial areas, favor denser, impact-resistant cores.
Match installation method—click, glue, or loose-lay—to subfloor and usage.
Step 3 Choose wear layer thickness and finish for durability
Pick a wear layer and finish that match how you’ll use the room—thicker wear layers (20–30 mil or more) resist scratches and heavy foot traffic, while thinner ones suit low-use areas. Choose matte or textured finishes to hide scuffs; glossy finishes show wear. Match wear layer to warranty and traffic.
| Wear Layer | Best For |
|---|---|
| 20–30+ mil | High traffic |
| 12–20 mil | Moderate use |
| <12 mil | Low use |
Step 4 Consider installation method: click-lock, glue-down, loose lay
When choosing vinyl, consider how you’ll install it because the method affects cost, durability, and whether you’ll need a pro.
Click-lock planks snap together for quick, floating installs you can DIY.
Glue-down sheets or tiles bond permanently, improving stability in high-traffic areas but often require a contractor.
Loose-lay relies on weight and friction—easy to replace but best on smooth, flat subfloors.
Step 5 Aesthetics: plank size, grout lines, texture, color trends

A room’s look comes down to details like plank width, grout lines, texture, and color, so think about the visual effect you want before buying.
Choose wider planks for a modern, spacious feel; narrow for traditional charm.
Decide on grout visibility for tile looks.
Pick texture to hide wear and slip.
Follow current color trends only if they match your style.
Step 6 Budgeting: upfront cost vs long-term value
Although it’s tempting to focus only on the sticker price, you’ll get a better outcome by weighing upfront cost against long-term value—consider material quality, expected lifespan, installation expenses, and maintenance needs to see which option truly saves you money over time.
| Option | Upfront | Lifetime cost |
|---|---|---|
| Budget vinyl | Low | Medium |
| Mid-range | Medium | Low |
| Luxury | High | Variable |
| Pro install | High | Often lowest |
Installation Overview Options, Steps, and Timeline
You’ll need to decide whether to tackle installation yourself or hire a pro, weighing cost, skill level, and guarantees.
Before any work starts, check subfloor flatness and moisture—these tests and prep can make or break the job.
I’ll walk you through step-by-step procedures for click-lock LVP, glue-down and sheet vinyl, plus a realistic timeline and common causes of delay.
DIY vs professional installation: pros, cons, cost differences
When weighing DIY against professional vinyl installation, consider your budget, skill level, and time:
DIY saves labor costs but demands careful prep and tooling, while pros bring speed, warranty coverage, and cleaner results for a higher price.
If you’re handy, expect lower material-plus-tool expenses and longer installation time.
Hiring pros raises cost but shortens timeline, guarantees fit, and minimizes mistakes.
Pre-installation prep: subfloor requirements and moisture testing
Preparation matters: before laying vinyl, inspect and prep the subfloor so it’s flat, clean, dry, and structurally sound.
You’ll test moisture, repair damage, and guarantee levelness to prevent problems. Follow these steps:
- Measure moisture with a meter or do a test
- Repair cracks, squeaks, and loose boards
- Level high or low spots
- Clean and vacuum thoroughly before installation
Typical installation steps for click-lock LVP (Step 1Step 8)
With the subfloor prepped and moisture checked, you can move on to laying click-lock LVP, which typically follows an eight-step sequence from acclimation to final trims.
You’ll work methodically, snapping planks together and staggering seams for stability.
Typical steps include:
- Acclimate and lay underlayment
- Plan layout and cut starter row
- Click panels together across the room
- Install trims and clean up
Typical installation steps for glue-down and sheet vinyl
1 clear choice for durable, low-profile floors is glue-down or sheet vinyl, and installing them follows a predictable sequence you’ll want to follow closely.
- Prepare and level the subfloor, remove old flooring.
- Cut sheet or planks to fit, dry-fit pieces.
- Spread adhesive evenly, lay material smoothly, roll to remove bubbles.
- Trim edges, install connectors, allow adhesive to set before light use.
Expected timeline and common delays
Now that you’ve got the basic installation steps for glue-down and sheet vinyl, you’ll want a realistic timeline so you can plan around each phase.
Typical installs take one to three days for small to medium rooms; larger jobs can span several days.
Allow extra time for subfloor prep, acclimation, adhesive cure, and unexpected delays like moisture issues or late material delivery.
Maintenance, Cleaning, and Repair
Keep your vinyl looking its best with simple daily and weekly cleaning routines, plus occasional deep-cleaning using manufacturer-recommended products.
I’ll walk you through step-by-step fixes for scratches, dents, and seam issues, and explain when a patch, refinishing, or full replacement makes more sense.
Daily and weekly cleaning routines
Although vinyl’s durability cuts down on deep cleaning, you should still stick to simple daily and weekly routines to keep floors looking their best.
You’ll prevent grit damage and stains by doing small tasks regularly:
- Sweep or vacuum high-traffic areas daily.
- Spot-wipe spills immediately with a damp cloth.
- Damp-mop weekly with plain water or mild cleaner.
- Use door mats and felt pads to reduce wear.
Deep cleaning methods and recommended products
When grout lines or stubborn grime persist despite your weekly routine, you’ll need a targeted deep-clean that loosens residue without harming the vinyl’s wear layer; mix a mild pH-neutral cleaner with warm water, scrub gently with a soft-bristle brush or microfiber pad, rinse thoroughly, and dry.
For tough spots, use a dedicated vinyl cleaner or a diluted vinegar solution sparingly—avoid abrasive pads and harsh chemicals.
Repairing scratches, dents, and seam issues step-by-step
If scratches, dents, or loose seams show up, you can often fix them yourself with a few simple tools and the right materials; start by evaluating the damage so you know whether to repair, replace a plank, or call a pro.
- Clean area, assess depth
- Fill shallow scratches with colored filler
- Use heat and rollers to flatten dents
- Reseal or glue seams, clamp until set
When to refinish, patch, or replace
Curious whether to refinish, patch, or replace your vinyl floor?
If damage is superficial—light scratches or dullness—you can refinish with a vinyl-safe sealer.
Use patches for localized gouges or tears matching plank color and pattern.
Replace when large areas buckle, seams separate, or wear layer’s gone.
Consider age, subfloor issues, and cost: replacement often pays off long-term.
Cost Breakdown and Value Comparison
Now let’s look at what you’ll actually pay: material, labor, and accessories like underlayment and trim.
You’ll compare vinyl’s upfront costs and maintenance to hardwood, laminate, and tile to see where it saves or costs more over time.
Finally, we’ll cover long-term ROI and how each choice can affect your home’s resale value.
Breakdown of material, labor, and accessory costs
You’ll find vinyl flooring costs break down into three main buckets—materials, labor, and accessories—and understanding what each covers helps you compare value, not just price. Materials vary by plank type and quality. Labor depends on complexity and prep. Accessories include underlayment, trim, and adhesives; factor them into bids to avoid surprises.
| Item | Typical cost drivers |
|---|---|
| Materials | quality, thickness |
| Labor | prep, layout |
| Accessories | trim, adhesive |
Vinyl vs hardwood, laminate, tile: cost-benefit comparison
How do vinyl, hardwood, laminate, and tile stack up when you weigh upfront costs against long-term value? You’ll find vinyl offers low upfront cost, water resistance, and easy maintenance; hardwood gives timeless appeal but higher cost; laminate is budget-friendly with decent looks; tile is durable but pricier to install.
| Type | Avg Cost | Key Benefit |
|---|---|---|
| Vinyl | $2–6/sq ft | Waterproof |
| Hardwood | $6–15/sq ft | Longevity |
| Laminate | $1–5/sq ft | Low cost |
| Tile | $3–10/sq ft | Durability |
Long-term ROI and resale impact
Although upfront price matters, the real measure is how flooring affects long-term return on investment and buyer perception; choose vinyl and you’ll often get strong ROI due to durability, low maintenance, and broad style appeal.
It won’t match premium hardwood’s cachet, but well-chosen luxury vinyl can boost resale, reduce turnover costs, and satisfy buyers seeking modern, practical finishes.
Common Mistakes and How to Avoid Them
Don’t skip subfloor prep or moisture tests—you’ll pay for it later with buckling and mold.
Pick a wear layer suited to your traffic, acclimate planks before installation, and use the correct adhesives and cleaners to protect the floor.
Before you buy or install, run through a short preventive checklist covering prep, materials, acclimation, and maintenance.
Mistake 1 Skipping subfloor prep and moisture tests
1 mistake that ruins many vinyl installs is skipping subfloor prep and moisture tests.
You’ll get buckling, adhesive failure, or mold if you ignore uneven surfaces and hidden dampness. Always clean, level, and repair the subfloor, then use a reliable moisture meter or conduct manufacturer-recommended tests.
Address any issues before laying vinyl to guarantee a durable, warranty-compliant installation.
Mistake 2 Choosing too-thin wear layer for high-traffic areas
When you pick vinyl with a wear layer that’s too thin for busy rooms, the surface will show scratches, dents, and wear far sooner than you’d expect.
Choose thicker wear layers (20–30 mil or more) for hallways, kitchens, and entryways. It’ll resist abrasion, stains, and daily foot traffic longer.
Skimping saves money now but costs you in premature replacement.
Mistake 3 Improper acclimation before installation
If you install vinyl before it’s had time to acclimate to your home’s temperature and humidity, you’ll likely face gaps, buckling, or seams that don’t stay tight.
Let the planks sit flat in the room for 48–72 hours, unopened.
Maintain target room conditions during and after installation.
Measure and follow manufacturer acclimation guidelines to prevent warping, uneven seams, and costly repairs.
Mistake 4 Using wrong adhesives or cleaners
Many homeowners underestimate how much damage the wrong adhesive or cleaner can cause, and you’ll pay for that mistake in stains, lifted seams, or a ruined finish.
Always use products the manufacturer recommends, test cleaners on a hidden spot, and avoid harsh solvents or oil-based adhesives.
Wrong choices can void warranties and shorten flooring life, so follow labels and consult pros when unsure.
Preventive checklist before buying and installing
Because a few simple checks can prevent costly mistakes, you should run through a concise pre-purchase and pre-install checklist before ordering vinyl flooring.
Confirm subfloor condition, room humidity, and product compatibility. Measure precisely and order extra. Ask about warranties and maintenance.
- Check subfloor flatness and cleanliness
- Verify moisture levels
- Confirm adhesive/type compatibility
- Order 5–10% extra for cuts and waste
Best Practices and Professional Tips
To keep your vinyl looking great for years, follow maintenance routines, pick qualified installers, and understand warranty fine print.
Look for eco labels and certifications when choosing materials, and ask installers about sustainable options.
Finally, coordinate your vinyl’s color and texture with room lighting and decor to get the best visual result.
Tips for maximizing longevity and appearance
When you follow a few straightforward habits—regular cleaning, prompt spill response, and proper furniture protection—you’ll keep vinyl floors looking new for years.
These best practices cut wear, prevent stains, and preserve finish integrity so your investment pays off.
- Use soft broom or vacuum without beater bar.
- Wipe spills immediately with mild cleaner.
- Use felt pads under legs.
- Place mats at entrances.
Choosing installers and reading warranties
How do you pick the right installer and make sure your warranty actually protects your floor?
Verify installer credentials, ask for references and recent job photos, and confirm they follow manufacturer installation guidelines.
Read the warranty for coverage limits, duration, transferability, and required maintenance.
Get all promises written, keep receipts, and insist on a clear punch list before final payment to avoid disputes.
Eco-friendly choices and certification labels to look for
After you’ve confirmed installers and warranty details, consider the environmental impact of your vinyl selection and installation; choosing low-emission products and certified materials protects indoor air quality and long-term value.
Look for FloorScore, GREENGUARD, or SCS labels, and seek phthalate-free, recycled-content, and responsibly sourced backing.
Ask suppliers for EPDs and VOC test results so you can compare real environmental performance.
Styling tips: coordinating vinyl with decor and lighting
Want your vinyl to feel like it was chosen for the room, not just the budget?
Pick tones that echo your furniture and wall colors, use contrasting grout or trim for definition, and balance patterns with solid textiles.
Test samples under your lighting—natural and artificial—to confirm warmth or coolness.
Add area rugs and reflective accents to unify texture and enhance brightness.
Real-World Scenarios and Recommendations
When choosing vinyl for bathrooms and kitchens, you’ll want options that resist water and stand up to spills.
For basements or high-humidity areas, pick waterproof, dimensionally stable products like SPC or waterproof WPC.
If you’re outfitting rentals or high-traffic commercial spaces, go with durable, scratch-resistant commercial-grade vinyl or thick wear layers for long-term performance.
Best vinyl options for bathrooms and kitchens
Because bathrooms and kitchens face constant moisture, spills, and heavy foot traffic, you’ll want a vinyl floor that balances water resistance, durability, and ease of maintenance.
Choose waterproof luxury vinyl plank (LVP) or tile (LVT) with a strong wear layer and embossed texture for slip resistance.
Opt for click-lock or welded seams for moisture protection, and pick reputable warranties for peace of mind.
Best vinyl options for basements and high humidity spaces
Bathrooms and kitchens share some demands with basements—moisture resistance and durability—but basements and high-humidity areas add challenges like standing water, vapor drive, and cooler subfloors that affect installation and material choice.
Choose waterproof luxury vinyl plank or tile with embossed surface, an attached waterproof core (WPC or SPC), and a robust wear layer.
Install over a leveled, moisture-tested subfloor with proper perimeter expansion.
Best vinyl options for rentals and high-traffic commercial areas
If you need flooring that stands up to constant use and quick tenant turnover, pick commercial-grade vinyl with a thick wear layer and a rigid waterproof core (SPC or WPC) for stability and easy maintenance.
Choose high-PEI ratings, anti-slip textures, and UV-stable finishes.
Opt for loose-lay or glue-down installation for durability and fast replacement, and prioritize stain resistance and warranty coverage.
Frequently Asked Questions (FAQ)
You probably have quick questions about vinyl—like whether it’s waterproof or just water-resistant, how long it lasts, and if you can install it over existing floors.
You’ll also want to know whether vinyl adds value to your home and if it’s safe for pets and compatible with underfloor heating.
Below are clear answers to each of these common concerns.
Is vinyl flooring waterproof or water-resistant?
Wondering whether vinyl flooring can handle spills and humidity?
Vinyl comes in waterproof and water-resistant types. Luxury vinyl plank and tile with a waterproof core tolerate spills, bathrooms, and basements well.
Sheet vinyl is water-resistant but seams matter. Click-lock or glue-down installations affect water performance.
Always follow manufacturer guidelines and guarantee proper subfloor prep and seam sealing for best protection.
How long does vinyl flooring last?
How long will vinyl flooring last in your home? Expect 10–25 years depending on quality, wear layer thickness, and foot traffic.
Luxury vinyl with a thicker wear layer and proper maintenance often reaches two decades; thinner sheets may show wear sooner.
You’ll extend lifespan by cleaning gently, avoiding sharp objects, using rugs in high-traffic areas, and repairing damage promptly.
Can vinyl flooring be installed over existing floors?
Can vinyl flooring go over your existing floors? Yes — often. You can install luxury vinyl planks or sheets over level, clean, dry surfaces like tile, vinyl, or hardwood.
Remove loose trim, repair high spots, and guarantee subfloor stability. Avoid installing over water-damaged, soft, or uneven floors.
Always follow manufacturer guidelines and consider a thin underlayment or professional assessment for best results.
Will vinyl flooring increase home value?
Curious whether vinyl flooring boosts your home’s resale value? It can, but mainly by improving aesthetic appeal, durability, and perceived maintenance ease compared with worn surfaces.
Choose high-quality, realistic styles and professional installation to maximize buyer interest.
Vinyl rarely adds significant appraised value alone, but it can speed sale and justify a modest price premium when it fits neighborhood expectations and complements overall upgrades.
Are vinyl floors safe for pets and underfloor heating?
Wondering if vinyl flooring works with pets or underfloor heating? Yes — durable, scratch-resistant luxury vinyl handles pet traffic well, and waterproof options resist accidents.
For underfloor heating, choose vinyl rated for radiant heat and follow manufacturer temperature limits (usually ≤27°C/80°F). Verify proper installation over a stable, level substrate to prevent damage.
Maintain regular cleaning and trim pet nails.