How to Fix a Chip in Ceramic Tile So the Repair Is Nearly Invisible
You can make a chip in ceramic tile nearly invisible by cleaning the area well, securing any loose fragments, and filling the void with a color-matched epoxy or porcelain filler in thin layers, shaping each layer to match the tile contour as it cures. Sand smooth with progressively finer grits, remove dust, and apply a finish that matches the surrounding sheen. Followed carefully, the repair blends in—and if you want detailed steps, materials, and pro tips, there’s more to learn.
How to Fix a Chip in Ceramic Tile So the Repair Is Nearly Invisible
You can often make a small chip in ceramic tile nearly invisible by matching color and texture and using the right filler and glaze.
Decide whether to repair or replace based on the chip’s size, location, and whether structural integrity or pattern continuity is affected.
I’ll walk you through simple techniques for an invisible touch-up and explain when replacement is the better option.
Can a chipped ceramic tile be made invisible?
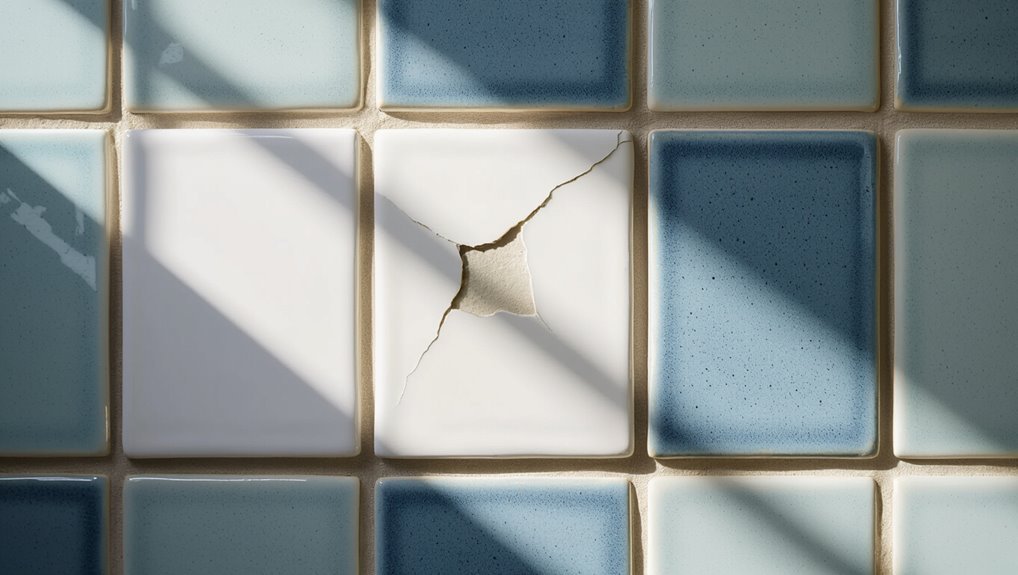
Although a chip on a ceramic tile can be tough to hide completely, you can make repairs nearly invisible with the right materials and careful technique.
You’ll match color, texture, and sheen, use epoxy or filler, sand and feather edges, then blend paint or glaze.
Follow steps for how to fix a chip in ceramic tile, work slowly, and inspect under good light.
When to repair vs replace a chipped tile
When deciding whether to repair or replace a chipped tile, weigh the chip’s size, location, and the tile’s condition to choose the most effective approach.
If the chip’s small and stable, you can repair; if it’s large, structural, or in a focal area, replace.
- Small surface chips: repair
- Cracks or loose tiles: replace
- Matching finish: consider replace
- High-traffic spots: replace
- Budget constraints: repair
Understanding Ceramic Tile Chips
Chips usually happen when something hard strikes the tile or when weight concentrates on a weak spot, so you’ll want to check the cause before you start repairs.
Chips range from minor surface nicks to broken edges and deep punctures, and each level of damage needs a different fix.
Also keep in mind that glaze, color, and pattern can hide or highlight a repair, so matching materials and texture matters for a nearly invisible result.
What causes chips in ceramic tile
If you drop something heavy or hit a tile edge with a hard object, the glaze and body can crack or break away, leaving a chip.
You’ll also cause chips by dropping sharp items, dragging heavy appliances, or striking tiles during installation.
Temperature shifts, subfloor movement, and improper adhesive can weaken tiles over time, making them more prone to impact damage and flaking.
Types of chips and damage severity (surface, edge, puncture)
Those impact forces and underlying weaknesses produce different kinds of damage you’ll want to recognize before repairing. You’ll see surface chips (glaze nicked), edge chips (corner or rim missing), and punctures (deep core loss). Identify severity to choose materials and steps.
| Type | Depth | Repair approach |
|---|---|---|
| Surface | Shallow | Fill/paint |
| Edge | Medium | Build/reshape |
How tile glaze, color, and pattern affect visibility of repairs
Because glaze, color, and pattern determine how light and the eye read the tile surface, they’ll largely decide how noticeable a repair is and what techniques will blend best.
You’ll match sheen first—gloss needs glossy fillers, matte needs duller finishes.
Use color-matched pigments and tiny stippling for patterns or speckles.
High-contrast or variegated tiles hide flaws best; uniform colors show repairs.
Tools and Materials You Need
You’ll need a few basic tools—cleaning supplies, mixing sticks and trays, shaping tools, and sanding pads—to prep and finish the repair.
For materials, choose between epoxy or porcelain filler plus colorants, grout for larger repairs, and a sealer to protect the patch.
Pick products that match your tile’s finish and hardness so the repair blends and wears like the original.
Essential tools list (cleaning, mixing, shaping, sanding)
Before you start repairing the chip, gather a small set of essential tools for cleaning, mixing, shaping, and sanding so the job goes smoothly and looks professional.
You’ll need items that let you clean debris, mix filler, sculpt the repair, and finish flush with the tile.
- Isopropyl alcohol and cotton swabs
- Small mixing cups and spatula
- Precision applicator tips
- Needle files and sculpting picks
- Fine-grit sanding pads
Materials options: epoxy, porcelain filler, colorants, grout, sealer
When you’re choosing materials for a chip repair, pick products that match the tile’s composition and finish so the patch blends and lasts.
Use epoxy or porcelain filler for structure, tint with colorants, finish edges with grout, and protect with sealer. Select compatible brands and cure times.
- Epoxy two-part
- Porcelain repair filler
- Pigment colorants
- Matching grout
- Clear sealer
How to choose products to match tile finish and hardness
Although matching a tile’s finish and hardness can seem picky, picking the right repair products makes the patch nearly invisible and durable.
Inspect glaze sheen and scratch with a fingernail to gauge hardness. Choose epoxy or porcelain filler rated for similar Mohs resistance; pick matte, satin, or glossy tintable compounds.
Test color and sheen on scrap, cure fully, then sand and seal to blend.
Preparation Steps Before Repair
Before you start, put on gloves and eye protection and clear the area so you’ve got good light and space to work.
Clean the chip with a soft brush and mild cleaner, then inspect for loose fragments or hairline cracks that need removing.
If grout or tile pieces are unstable around the chip, carefully remove them so the repair material can bond properly.
Safety precautions and workspace setup
Start by clearing and organizing your work area so you have room to move and easy access to tools and materials.
Wear gloves and eye protection, guarantee good ventilation, and keep children and pets away.
Lay down a drop cloth and have a trash bin handy.
- Gloves
- Safety glasses
- Mask/ventilation
- Drop cloth
- Bright task light
How to clean and inspect the chip for loose fragments {step-by-step}
When you’ve set up your workspace, begin by removing any loose fragments and dust from the chip so the repair will bond properly; use a soft brush or a vacuum with a crevice tool to lift away grit.
Then wipe the area with a damp cloth and let it dry.
Inspect edges with good light and a magnifier, tapping gently to check for hidden looseness.
When to remove surrounding grout or tile fragments
If the chip extends under the grout line or you find hairline cracks radiating into adjacent tiles as you inspect, you’ll need to remove the surrounding grout or any loose tile fragments so the repair material can bond and the finish will match.
Carefully rake out damaged grout with a grout saw, chip away unstable glaze with a carbide scraper, then vacuum and wipe clean before repair.
Step-by-Step Repair Process (Primary Method: Epoxy/Porcelain Filler)
Start by cleaning and drying the chip completely so any dust or moisture won’t interfere with adhesion.
If there are deep voids or loose fragments, secure or fill them first.
Then mix the epoxy or porcelain filler and match the color to your tile.
Apply the filler in thin layers, shape it to the tile’s contour, and sand smooth to blend the edges.
Step 1 Clean and dry the chip thoroughly
Clear away loose debris and make the chipped area completely dry before you apply any filler.
Use a soft brush or compressed air to remove dust, then wipe with a lint-free cloth.
Clean edges with isopropyl alcohol to remove grease or residues, and let it evaporate fully.
Confirm no moisture remains; a hairdryer on low helps.
A dry, clean surface guarantees proper adhesion.
Step 2 Fill deep voids and anchor loose fragments
Work methodically to fill deep voids and secure any loose fragments before you apply the final filler.
Use a thin epoxy or cyanoacrylate to tack fragments, pressing them into correct alignment.
Pack deeper gaps with a coarse paste or layered epoxy, letting each layer cure.
Remove excess while tacky, sand lightly once hard, and guarantee a stable, flush substrate for the finish layer.
Step 3 Mix epoxy/filler and custom color-matching techniques
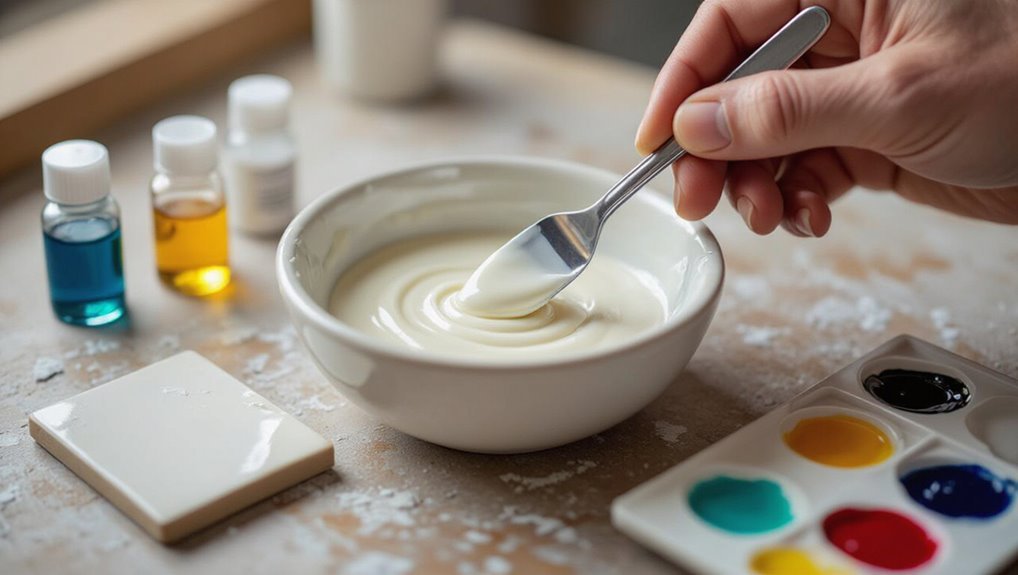
Now you’ll mix the epoxy or porcelain filler and fine-tune the color so the repair blends with the tile.
Measure and mix small batches per manufacturer directions. Add powdered pigments, acrylic paints, or tinting pastes sparingly, stirring to match gloss and hue.
Test on scrap, adjust warmth/coolness, and note ratios.
Work quickly—epoxy sets fast—so prepare tools and color swatches beforehand.
Step 4 Apply filler in layers and shape to match tile contours
With your color matched and tools ready, start building the repair in thin layers so the filler settles without shrinking or sagging.
Apply a thin bead, press it into the chip, and smooth the surface following the tile’s curve.
Let each layer partially set per product instructions before adding the next.
Use a small sculpting tool to recreate ridges and angles accurately.
Step 5 Sanding and smoothing to blend edges
After the filler has cured to the manufacturer’s recommended hardness, begin sanding to blend the repair into the surrounding tile surface.
Use progressively finer grits—start 120–220, finish 400–600—keeping the sanding flat to preserve contours.
Work wet if recommended, check frequently, and feather edges until the patch melds smoothly.
Remove dust with a damp cloth and inspect under good light before moving to the next step.
Step 6 Apply finish (glaze look, satin, or gloss) and seal
Choose a finish that matches your tile—glaze-look, satin, or high gloss—then apply it carefully to restore the surface sheen and protect the repair.
Use a fine brush or small foam applicator for even coverage, feathering into surrounding glaze. Apply thin coats, allow recommended dry time between layers, and finish with a compatible sealant to guard against moisture and wear without altering color or sheen.
Step 7 Final cleaning and inspection
When the repair layers are fully cured, give the area a final clean and close inspection to guarantee the patch blends smoothly and the finish is uniform.
Wipe with a lint-free cloth and mild cleaner, then dry.
Check for texture, color match, and seam visibility under varied light angles.
Touch up minor flaws with thin filler or polish, then let it set before regular use.
Alternative Repair Methods
If the epoxy method feels like overkill, you can try porcelain touch-up kits or color-matching markers for small, surface chips where the glaze is intact.
For tiny nicks in grout lines or edges, a bit of grout or paintable caulk can be an easy, inexpensive fix.
If the chip is large, structural, or in a visible area you care about, call a professional restorer to assess and repair it properly.
Using porcelain touch-up kits and markers when they work best
Although they won’t match a perfect factory finish, porcelain touch-up kits and markers give you a quick, low-cost way to hide small chips and scratches on glazed ceramic or porcelain tile.
You’ll want these for shallow chips, fine edge damage, or tiny surface glaze losses. Match color, test on a hidden spot, apply thin layers, and seal if recommended for durability.
Using grout or caulk for very small chips
For hairline nicks and pin-sized chips you can’t justify a full repair, grout or silicone caulk offers a quick, inexpensive fix that blends in with the surrounding tiles.
Clean and dry the area, pick a color-matched grout or paintable silicone, apply sparingly with a toothpick, smooth flush, and wipe excess.
Let cure fully before sealing or light use.
Professional restoration and when to hire a pro
When a chip’s size, location, or underlying damage goes beyond a DIY fix, you’ll want a professional to assess the tile and substrate so the repair looks seamless and lasts.
You’ll benefit from expertise, proper materials, and color matching to restore appearance and strength.
Consider these pro services:
- Full resurfacing
- Color-matched epoxy fill
- Tile replacement with grout blending
- Substrate repair
- Sealing and polishing
Color Matching and Finishing Techniques
You’ll start by mixing tiny amounts of pigment into your filler until the hue and any tonal variations match the tile and pattern.
Pay attention to sheen—matte or gloss can be adjusted with clear coats or additives so the repair reads like the surrounding surface.
Finally, feather the repair into grout lines and any texture so the patch blends seamlessly and won’t catch the eye.
How to mix pigments to match tile color and pattern
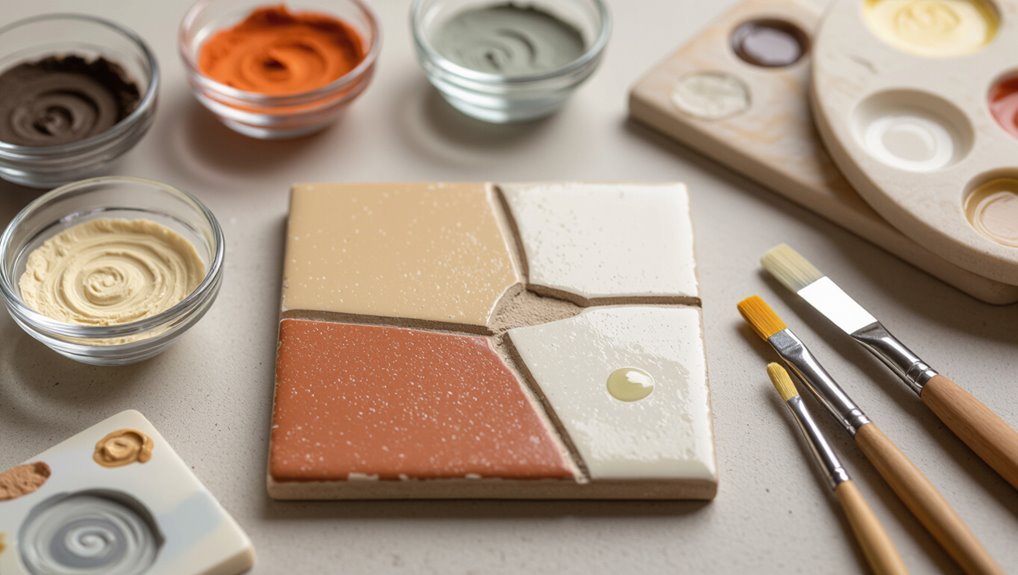
Although matching a tile’s color and pattern takes patience, you can achieve seamless results by building your pigments gradually and testing frequently.
Start with tiny amounts of universal ceramic pigments or artist acrylics, mix into epoxy or filler, and compare under room and natural light.
Layer translucent glazes to replicate depth, adjust hue with tiny complementary tints, and document ratios for consistency.
Achieving the right sheen: matte vs gloss tips
1 key decision after matching color is choosing the sheen, because matte and gloss finishes change how your repair reads against surrounding tiles.
You’ll test small patches: matte hides texture and minor mismatches, gloss reflects light and highlights imperfections.
Match the tile’s existing finish, feather edges into the original glaze, and cure fully before evaluating—adjust gloss with thin clear coats if needed.
Blending repairs into grout lines and textured surfaces
Once you’ve matched color and sheen, focus on how the repair meets grout lines and textured surfaces so the patch disappears at a glance.
Use a fine tool to recess filler slightly where grout meets tile, then tint grout to match.
For textured tiles, press texture stamps or dab with a sponge before curing.
Feather edges and clean excess for a seamless finish.
Common Mistakes and How to Avoid Them
Don’t overfill the chip or you’ll end up with visible bulges that won’t blend with the tile.
Make sure the repair matches both color and sheen, and sand carefully so you don’t damage the surrounding glaze.
Finally, don’t skip sealing—use the correct sealant to protect the repair and avoid discoloration.
Overfilling and visible bulges
If you pile filler above the tile surface, it’ll dry into an obvious bulge that draws the eye and can chip away quicker than the surrounding glaze.
To avoid this, press filler flush, remove excess with a damp tool, and slightly recess the repair so you can sand and feather it to match the tile profile.
Cure fully before final sanding and sealing.
Mismatched color or sheen
After you’ve sanded and sealed a repaired chip so it sits flush, the next issue you’ll notice is whether the patch blends with the surrounding tile.
Match color by mixing pigments into the filler, testing on scrap until hue and opacity align.
Adjust sheen with a tiny bit of gloss or matte finish.
Work in thin layers and compare under room lighting.
Improper sanding that damages surrounding glaze
When you sand a chip too aggressively or use the wrong grit, you can easily abrade the surrounding glaze and leave visible dull spots or scratches.
So take steps to protect the intact finish. Mask the area with low-tack tape, limit sanding to the filler only, start with fine grits (400+), and check progress often.
Stop as soon as edges blend.
Skipping sealing or using wrong sealant
Because the filler and repaired edges stay porous, skipping a seal coat or using the wrong sealant lets moisture, dirt, and cleaners stain or lift the repair.
You should choose a compatible, waterproof sealant—preferably a clear, non-yellowing tile sealer or epoxy varnish—apply thin even coats, and cure fully.
Test on a scrap first to verify adhesion and appearance.
Preventing Future Chips and Maintenance Tips
To prevent future chips, use protective mats, furniture bumpers, and lift heavy items instead of dragging them across tile.
Inspect and clean your floors regularly so you can spot and repair small chips before they spread.
Re-seal tiled surfaces according to the manufacturer’s recommendations or when grout looks worn to keep moisture and damage out.
Protective mats, bumpers, and handling heavy items
If you want to keep chips from happening again, start by placing protective mats and bumpers under and around heavy items — they absorb impact, distribute weight, and stop edges from knocking the glaze loose.
Use felt pads, rubber mats, corner bumpers, dollies for moving, and lift instead of drag.
Maintain clear paths and test stability before returning items.
- Felt pads
- Rubber mats
- Corner bumpers
- Moving dollies
- Lift, don’t drag
Routine cleaning and inspection to catch small chips early
Spot-clean and inspect your ceramic tile at least once a week so small chips and loose grout don’t turn into bigger problems.
Wipe spills, check grout lines and edges, and tap suspect tiles to detect hollowness.
Catching damage early lets you repair chips, reattach loose pieces, or touch up grout before moisture or dirt worsens the issue and makes repairs harder.
When to re-seal tiled surfaces
When grout or the tile surface starts to look dull, stained, or repels water less effectively, it’s time to contemplate re-sealing—doing so restores protection against moisture and impacts that can lead to chips.
Check seals annually in high-traffic or wet areas, sooner if you notice discoloration or water absorption.
Clean thoroughly, let dry, then apply a quality penetrating sealer per manufacturer instructions.
Cost, Time, and Durability Expectations
Expect to spend a few dollars to $30 on DIY materials and about 30–90 minutes per chip, depending on prep and drying time.
A well-done repair can last years, but longevity depends on traffic, adhesive quality, and how well you match glaze and sealant.
I’ll cover realistic cost ranges, time estimates, and tips to maximize how long your repair holds up.
Estimated DIY costs and time per repair
Repairing a small chip in ceramic tile will usually cost you under $30 in materials and take about 30–60 minutes for a single repair, while larger chips or multiple tiles can raise both time and expense. You’ll need basic tools, filler, and touch-up paint; expect modest cleanup time and possible extra minutes for color matching.
| Item | Typical Cost | Typical Time |
|---|---|---|
| Filler & paint | $10–$20 | 20–40 min |
| Tools | $5–$15 | 5–10 min |
| Multiple chips | $20–$60+ | 60–180 min |
How long repairs typically last and factors affecting longevity
A well-done chip repair can last anywhere from a few years to decades depending on materials, technique, and traffic—so you’ll want to weigh cost and time against expected durability.
Lifespan hinges on filler quality, match accuracy, sealing, and surface wear. High-traffic areas shorten life; proper curing and occasional resealing extend it.
Plan touch-ups if tiles see heavy use or moisture.
Frequently Asked Questions
You probably have specific questions about repairing chips—like whether glazed and unglazed tiles need different approaches, if heat or water will harm the fix, or whether patterned tiles can be made to look seamless.
You’ll also want to know how long before you can walk on or clean the repaired area and whether eco-friendly or low-VOC repair products exist.
Below are clear, practical answers to those common concerns.
Can I repair a chip on glazed vs unglazed ceramic?
Wondering if a chip on glazed and unglazed ceramic tiles can be fixed the same way? You can repair both, but methods differ.
Glazed tiles need color-matched filler and careful polishing to blend with the shiny surface.
Unglazed tiles absorb filler and benefit from textured touch-ups that match matte finishes.
Test on a hidden spot, then apply thin layers for best results.
Will heat or water damage the repair?
Although heat and water won’t always ruin a tile repair, they can weaken some fillers and finishes over time if you don’t choose the right materials and cure them properly.
Use waterproof, heat-resistant epoxy or ceramic filler for areas near ovens, sinks, or showers.
Seal with a compatible clear coat and follow full cure times.
Regular sealing prevents moisture ingress and extends durability.
Can a repair be completely invisible on patterned tiles?
Heat and moisture considerations aside, matching a patterned tile is a different challenge: sometimes a repair can be nearly invisible, but rarely perfect.
You can blend color, grain and gloss with fine pigments, thin glazes and careful layering, but intricate repeats and aging are hard to replicate.
Aim for seamless edges; accept slight variance unless you replace the whole tile for absolute match.
How long before I can walk on or clean the repaired tile?
You can usually walk on a repaired ceramic tile after the adhesive or filler has cured, but the exact wait depends on the product: most epoxies and resins set enough for light foot traffic in 24 hours and reach full strength in 72 hours to a week.
Wait longer before heavy use, and avoid wet cleaning for at least 24 hours; follow manufacturer cure and cleanup guidelines.
Are there eco-friendly or low-VOC repair options?
Wondering if you can repair tile without harsh fumes? You can. Use water-based epoxies, low-VOC ceramic fillers, or natural shellac alternatives.
They cure cleanly, emit minimal odor, and bond well for small chips. Check labels for VOC ratings and certifications like GreenGuard.
Test color match on a scrap piece, and follow manufacturer drying times for best, eco-friendly results.