How to Install a Tile Shower From Scratch: A Complete DIY Breakdown
You can build a durable tile shower from scratch if you’ve got basic carpentry skills, patience, and the right tools. Start by planning layout, permits, and drainage slope, then demo down to sound framing. Choose a pan method, install a proper drain, set backer board, and apply waterproofing (sheet or liquid) before tiling. Use a wet saw, notched trowel, and proper grout/sealant; test watertightness first. Continue for step-by-step methods, timelines, and tips.
Can You Install a Tile Shower From Scratch?
You can install a tile shower from scratch if you have basic carpentry skills, patience, and a few weekends to spare, but expect costs for materials and tools to add up.
Simpler projects like a tiled surround or replacing a shower pan are more DIY-friendly, while full builds with waterproofing, plumbing reroutes, or complex tile patterns usually call for a pro.
If you’re unsure about waterproofing, structural changes, or local code requirements, hire a licensed contractor to avoid costly mistakes.
Short summary of feasibility, time, cost, and skill level
Although tackling a tile shower from scratch demands planning and care, it’s a realistic DIY for a determined homeowner with basic carpentry and tiling experience.
You’ll ask: how do you install a tile shower? Expect 2–7 days for a simple stall, $500–$2,500 in materials, and moderate skill.
Plan for waterproofing, precise cuts, grout work, and patience to get professional results.
When to hire a pro vs. DIY
If your project is a small refresh—replacing tile or regrouting a simple stall—you can probably handle it yourself with patience and the right tools;
but for full tear-outs, complex pan slopes, or any plumbing and waterproofing you’re not confident about, hire a pro.
Assess your skills, time, and budget.
DIY saves money if you follow instructions; otherwise, pros prevent costly mistakes.
Basic Understanding What a Tile Shower Is and Why Choose It
A tile shower is made of a drain and pan, a sturdy substrate, waterproofing, tile, and grout, and you’ll want to understand how each part works together.
You’ll weigh pros like durability, style, and easy repairs against cons such as cost, installation time, and maintenance.
Finally, you’ll choose a design and substrate—curbless, curb, alcove, or corner—based on accessibility, slope, and the look you want.
Components of a tile shower (pan, substrate, waterproofing, tile, grout)
Think of a tile shower as a layered system where each component—pan, substrate, waterproofing, tile, and grout—has a specific job to keep water controlled and the finish durable.
You’ll install a sloped pan to drain, durable substrate for support, a continuous waterproof layer, tile for wear and style, and grout to seal joints.
Each layer must be properly detailed and tied together.
Pros and cons of tile showers
Having each layer properly installed gives you a durable, waterproofed shower, but you’ll want to weigh the benefits and trade-offs of choosing tile.
You’ll get endless style options, longevity, and easy spot repairs, yet expect higher upfront cost, more labor, grout maintenance, and potential cold underfoot.
Tile suits value and customization, but consider time, skill, and maintenance before committing.
Types of shower designs and substrates (curbless, curb, alcove, corner)
When you pick a tile shower layout, you’re choosing how water moves, how the space feels, and what substrate will support it; curbless, curb, alcove, and corner designs each solve those needs differently.
You’ll choose curbless for accessibility with sloped mortar beds and waterproof membranes, curb for containment on a pan, alcove for three-wall installs, and corner for compact footprints using custom substrates.
Tools, Materials, and Budget Checklist
Before you start cutting tile, make a checklist of essential tools—wet saw, notched trowel, level, drill, spacers, and safety gear—so you won’t stop mid-job.
List materials by task: choose between a pan liner or pre-sloped base, pick cement/backer board, a waterproof membrane, tile, thinset, grout, and the proper drain.
Finally, set an estimated budget with ranges and note cost drivers like tile type, waterproofing method, and whether you’ll hire labor.
Essential tools (wet saw, trowel, level, drill, etc.)
You’ll need a compact set of reliable tools to get your tile shower installed cleanly and efficiently.
Gather these essentials before you start:
- Wet saw (or tile cutter) for accurate cuts.
- Notched trowel, grout float, and margin trowel for setting and finishing.
- Carpenter’s level and laser level for true alignment.
- Drill with mixing paddle, spacers, and appropriate bits for prep.
Materials by task (pan liner vs. pre-sloped base, backer board vs. cement board, waterproof membrane, tile, thinset, grout, drain)
Now that you’ve got your toolset ready, it’s time to match materials to each task so nothing gets improvised on the fly.
You’ll choose between pan liner or pre-sloped base, cement or fiber backer board, liquid or sheet waterproofing, and compatible drain kits.
Prioritize tile, thinset, grout, and sealant suited to wet areas.
- Pan base
- Backer board
- Waterproofing
- Tile/set/grout
Estimated budget ranges and cost drivers
Budgeting a tile shower comes down to tools, materials, and a few key choices that drive costs, and you’ll want a clear checklist so nothing surprises you. Plan for $300–$2,500 depending on tile, waterproofing, and tools; factor labor if not DIY. Use this quick budget checklist:
| Item | Low | High |
|---|---|---|
| Tile & grout | $100 | $1,000 |
| Waterproofing | $50 | $400 |
| Tools & misc | $150 | $1,100 |
Permits, Codes, and Planning Before You Start
Before you cut any tile, check local codes and pull any required plumbing permits so your work passes inspection.
Measure carefully and plan the layout, slope to the drain, and exact drain placement to guarantee proper drainage.
Choose tile size and pattern that fit the dimensions and slope without excessive cuts or uneven grout lines.
Local code considerations and plumbing permits
Because local building codes and permit requirements vary widely, you should check your municipality’s rules before tearing out any drywall or plumbing—most jurisdictions require permits for altering shower drains, rerouting water lines, or changing ventilation.
Contact your building department, confirm permit scope, fees, inspections, and required trade qualifications.
Keep approved plans on site, schedule inspections early, and don’t start concealed work without sign-off.
Measuring, planning layout, and slope requirements
With permits confirmed and inspections scheduled, you’ll next measure the space and plan the tile layout so work meets code and performs properly.
Measure floor slope, confirm 1/4″ per foot minimum to drain, and calculate substrate thickness.
Map tile field to minimize cuts and guarantee proper centering.
Note curb heights, waterproofing overlaps, and clearances for fixtures before cutting or purchasing materials.
Selecting tile size, pattern, and drain placement
While you’re choosing tile size, pattern, and drain placement, prioritize water management, code compliance, and aesthetic balance so the shower performs well and looks intentional.
Pick smaller tiles for curved or sloped floors to improve grip and drainage, larger tiles for straight walls to reduce grout.
Center drains under the showerhead or offset for linear drains; always confirm local code, slope, and waterproofing requirements.
Step-by-Step Installation Guide
You’ll start by stripping the old fixtures and prepping the subfloor so the space’s dimensions and framing are sound.
Next you’ll handle the plumbing rough-in and choose a shower pan method—mortar pan, preformed pan, or linear-drain system—before installing the drain.
Finally you’ll fasten backer board, apply a waterproofing membrane (liquid or sheet), and properly flash all seams and penetrations.
Step 1 Demolition and site prep
Step 1: Demolition and site prep sets the foundation for a successful tile shower, so clear the work area, turn off water and power, and remove fixtures, drywall, and old tile down to the studs or substrate.
Inspect framing for rot or mold, remove damaged lumber, and clean debris. Protect adjacent spaces with plastic, and measure dimensions to confirm square, plumb walls before continuing.
Step 2 Plumbing rough-in and drain installation
With the demolition done and framing confirmed square and dry, it’s time to run the plumbing rough-in and set the drain so your shower will drain properly and connect to the house lines.
Locate supply lines and valve positions, mark stud locations, and stub hot/cold lines to valve depth.
Install the shower drain assembly, slope waste piping correctly, test for leaks and secure vents.
Step 3 Building or installing the shower pan (options: mortar pan, preformed pan, linear drain)
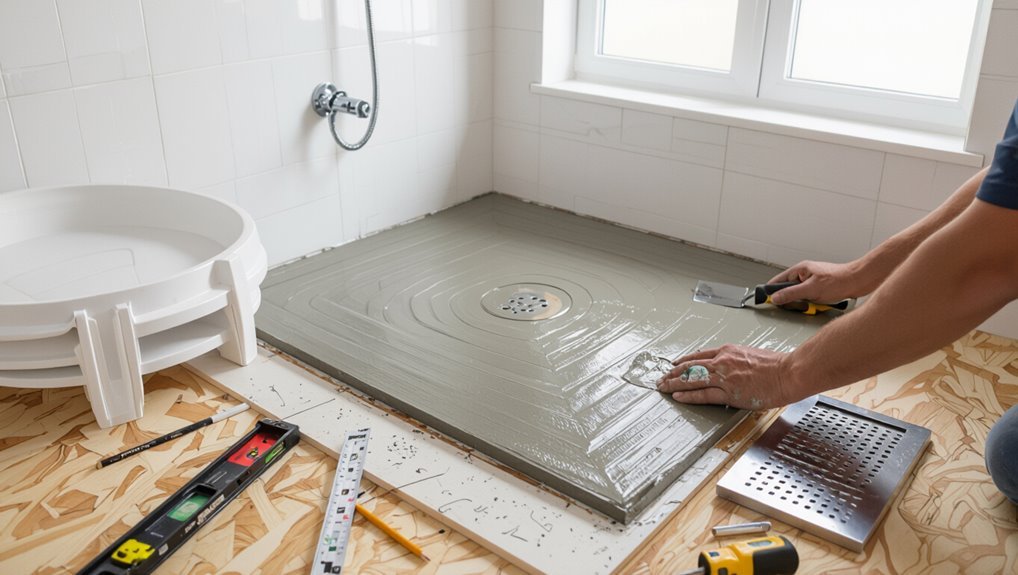
Before you lay any tile, decide which shower pan type suits your space and skill level—traditional mortar (mud) pans give custom slopes, preformed pans speed installation, and linear drains offer modern drainage and flexible tile patterns.
Each requires different substrate prep, waterproofing, and slope techniques you’ll need to follow precisely.
For mortar pans, build a sand/cement deck with proper slope.
Fit preformed pans per manufacturer instructions.
Install linear drains to spec and test for watertightness.
Step 4 Installing backer board or water-resistant drywall
4 key choices determine your wall substrate: cement backer board, fiber-cement board, or water-resistant (green or purple) drywall. Your choice dictates fasteners, seam treatment, and waterproofing methods.
Measure, cut, and fit panels snugly over studs, fastening per manufacturer specs. Tape and thinset or seam compound all joints, stagger seams, and seal edges at pan, curb, and corners so tile has a stable, moisture-resistant base.
Step 5 Applying waterproofing membrane (liquid vs. sheet) and flashing
Start by choosing the waterproofing method that best fits your shower build—liquid-applied membranes offer seamless coverage over irregular surfaces, while sheet membranes provide a factory-made barrier and faster cure times.
Clean and prime surfaces, apply membrane per manufacturer directions, seal seams and corners with compatible tape or fabric, and install flashing at curb, niche, and drain.
Test for continuity before tiling.
Step 6 Layout and dry-fitting tiles
With your waterproofing fully cured and tested, you can move on to laying out and dry-fitting the tiles to guarantee pattern, cuts, and grout joints work with the space.
Measure and snap reference lines, arrange full tiles first, and balance edges for symmetry.
Dry-fit trim, niches, and floor tiles. Mark needed cuts, note grout spacing, and adjust layout before applying adhesive.
Step 7 Cutting tiles and installing tile with thinset
Cut tiles carefully and set them with thinset so each piece fits snugly and the joints stay consistent.
Mix thinset to manufacturer specs, spread with a notched trowel, and butter large tiles’ backs if needed.
Press tiles firmly, use spacers, and check alignment and level frequently.
Cut around fixtures with a wet saw or tile nippers, smoothing edges before setting.
Step 8 Grouting, sealing, and cleaning
Finish the job by grouting, sealing, and cleaning to lock in your work and protect the shower from water and stains.
Mix grout to a creamy consistency, pack joints with a rubber float, and wipe haze with a damp sponge.
After full cure, apply a penetrating sealer to grout and porous tile.
Clean all surfaces, remove residue, and let everything dry before use.
Step 9 Installing fixtures, glass, and finishing trim
Now you’ll install the final hardware and glass that make the shower functional and finished: mount the valve trim and showerhead, set the handheld and slide bar, hang glass panels or doors, and attach any corner or threshold trim.
Check alignments, use supplied anchors and gaskets, apply silicone to seams, tighten fasteners to spec, and test water flow and diverter operation before moving on.
Step 10 Final inspection and curing time checklist
Before you call the job complete, run through a focused final inspection and set clear curing-time expectations so everything performs as planned.
Check grout joints for voids, guarantee tile alignment and caulk beads are neat, verify fixtures don’t leak, and confirm drainage flows properly.
Note curing windows: grout 24–72 hours, silicone 24–48 hours, full water use after 7 days unless manufacturer states otherwise.
Common Problems and How to Fix Them
You’ll run into a few common issues—like leaks, poor slope, loose or cracked tiles, and mold—and you’ll want to spot the cause fast.
I’ll show how to trace leaks, correct drainage or lippage problems, reattach or replace damaged tiles, and improve ventilation to stop mildew.
With a few targeted fixes you’ll keep the shower watertight and functional for years.
Leaks and how to diagnose their source
If water’s appearing where it shouldn’t, don’t assume the tile or grout is at fault — most leaks come from hidden plumbing or drain connections.
Check visible fixtures, tighten fittings, and run isolated tests: turn on the shower with the drain plugged, then inspect below for seepage.
Remove access panels, dye-test joints, and monitor to pinpoint the source before tearing out tiles.
Slope and drainage issues (standing water solutions)
When water pools on your shower floor, it’s usually because the slope toward the drain is too shallow, uneven, or interrupted by a poor mortar bed or tile layout.
You can confirm this by watching how water flows after a rinse and by checking for flat spots with a straightedge.
Fixes include grinding and re-sloping the mortar bed, reinstalling a pre-sloped drain liner, or adding a tapered mortar patch to direct flow.
Tile lippage, cracking, or loose tiles remedies
Tackle tile lippage, cracking, and loose tiles quickly to prevent bigger problems like water intrusion and further damage.
For lippage, remove affected tiles, level substrate, use spacers and proper thinset; replace tiles.
For cracks, remove and replace cracked tiles and inspect substrate movement.
For loose tiles, lift, clean old adhesive, reapply thinset or epoxy, and guarantee proper curing before grouting.
Mold, mildew, and ventilation fixes
Because showers stay damp, mold and mildew can show up fast and spread behind tiles or in grout, so you should act quickly to remove growth, fix moisture sources, and improve ventilation to prevent recurrence.
Scrub affected grout with a bleach or hydrogen peroxide solution, regrout or replace damaged tiles, seal grout, add or upgrade an exhaust fan, and run it during and after showers to keep surfaces dry.
Best Practices, Tips, and Time-Saving Strategies
When planning your tile shower, focus on waterproofing redundancies and durable details so the work lasts without rework.
Choose tiles for easy maintenance and good slip resistance, sequence tasks to let adhesives and sealants cure while you prep other areas, and multitask smartly to save time.
Consider pre-made waterproof systems for speed and reliability, but go custom when layout or drainage needs demand it.
Waterproofing redundancies and long-term durability tips
If you want your tile shower to stay watertight for decades, build in multiple layers of protection and choose durable materials that complement one another.
Use a bonded waterproof membrane over a sloped mortar bed, seal all fastener penetrations, and apply waterproofing tape at seams.
Choose corrosion-resistant fixtures, stainless drains, and quality grout plus regular resealing to prevent failures and simplify future repairs.
Tile selection tips for maintenance and safety (slip resistance)
Although it’s tempting to pick tiles based only on color and pattern, you should prioritize maintenance and slip resistance to keep the shower safe and low‑effort over time.
Choose textured or matte finishes with a recommended COF (0.42+ for wet areas). Favor larger groutless tiles where appropriate. Pick stain‑resistant glazed ceramics or porcelain, and avoid high‑polish stones that get slippery when wet.
Efficient sequencing and multi-tasking suggestions
Because timing matters on a multi‑step job, plan tasks so waiting times overlap — start waterproofing and curing processes early, run tile layout and cuts while thinset sets in other areas, and have grout mixed just as you’re finishing tile so you don’t lose work time.
Sequence inspections, cleanup, and tool prep between stages, and batch-cut tiles, gather materials, and pre-mix small mortar portions for smoother flow.
When to use pre-made systems vs. custom build
When you want predictable waterproofing, faster installation, and fewer on-site decisions, choose a pre-made shower system; go custom when you need unique dimensions, specialized drains, or a fully tailored look that off-the-shelf kits can’t accommodate.
Pre-made kits save time, reduce mistakes, and suit standard layouts.
Build custom if you prioritize design flexibility, complex slopes, or high-end finishes—and budget extra time and skill.
Materials and Method Comparison
You’ll need to weigh different pans—mortarpan, preformed pan, or pre-sloped tray—based on skill level, budget, and leak-proofing needs.
Compare wall substrates like cement board, foam backer, and greenboard for water resistance and long-term durability.
Also decide between liquid and sheet membranes by balancing ease of application, seam coverage, and repairability.
Mortar pan vs. preformed pan vs. pre-sloped tray
Choosing the right shower base comes down to three common options—built-up mortar pans, preformed acrylic or fiberglass pans, and pre-sloped foam trays—and each has distinct trade-offs in cost, installation complexity, durability, and waterproofing performance. You’ll choose based on skill, budget, and site constraints.
| Type | Pros | Cons |
|---|---|---|
| Mortar pan | Custom slope, durable | Labor, cure time |
| Preformed pan | Quick, inexpensive | Limited sizes |
| Pre-sloped tray | Lightweight, consistent slope | Needs cladding |
Cement board vs. foam backer vs. greenboard (water-resistance comparison)
Although all three backer options are meant for wet areas, they differ sharply in how they resist moisture and how you should use them. You’ll pick cement board for durability and wet zones, foam backer for lightweight, fully waterproof builds, and avoid greenboard where direct water contact occurs.
| Material | Water Resistance | Best Use |
|---|---|---|
| Cement board | High (needs sealing) | Shower walls |
| Foam backer | Very high (integral) | Wet walls, niches |
| Greenboard | Low | Dry areas only |
Liquid membrane vs. sheet membrane (pros/cons)
When you’re deciding between liquid and sheet membranes, focus on how each handles seams, application, and long-term performance.
Liquid membranes conform to irregular shapes, seal tightly at penetrations, and are easier for DIYs, but require even coats and cure time.
Sheet membranes offer consistent thickness and immediate coverage, need proper seam treatment, and resist punctures—installation skill and substrate prep determine success.
Estimated Project Timeline and Labor Breakdown
You’ll want a clear timeline that breaks the job into major steps—demolition, plumbing and framing, membrane and backer board, tile layout and installation, grouting, and finishing—and assigns realistic hours or days to each.
Expect common delays around waterproofing cures, tile layout revisions, and waiting for materials or inspections, and plan buffer time for those.
I’ll point out where DIYers usually stall and give tips to keep the schedule on track.
Time estimates for each major step (demolition to finish)
Before you begin demolition, set realistic time blocks for each major step so you can schedule helpers and avoid surprises; most DIY tile shower projects take 3–7 days of active work spread over 1–2 weeks to allow for drying and inspections.
Plan roughly: demo 4–8 hours, framing/plumbing 1–2 days, waterproofing 4–8 hours, tile layout/setting 1–2 days, grout 4–8 hours, curing/cleanup 24–48 hours.
Where most DIYers get delayed and how to avoid it
Although surprising, most delays come down to a few predictable issues, and knowing them lets you keep the schedule moving.
You’ll stall for materials arriving late, unclear waterproofing steps, slow adhesive cures, and unexpected framing or plumbing fixes.
Prevent delays by ordering supplies early, following manufacturer cure times, inspecting behind walls before tiling, and booking inspections or subcontractors in advance.
Checklist Before You Call It Done
Before you call the job finished, run a final walk-through checking plumbing, drainage, grout, sealant, and ventilation for leaks or missed spots.
Make sure water flows properly and that grout and sealant are cured and intact.
Then review a simple maintenance schedule for the first 6–12 months so you catch grout or sealant issues early.
Final walk-through checklist (plumbing, drainage, grout, sealant, ventilation)
One final run-through will catch the small issues that turn into big headaches: check fixtures and drains for leaks, confirm grout lines are full and sealed, verify the shower pan and trap are draining quickly, and guarantee ventilation is working to prevent moisture buildup.
- Test all fixtures for steady pressure and no leaks.
- Run long drain tests for clear flow.
- Inspect grout/sealant for voids; touch up.
- Confirm exhaust fan cycles and vents clear.
Maintenance checklist for first 612 months
With the final walk-through complete, you’ll want a short, practical maintenance plan for the first 6–12 months to catch settling issues and protect your work.
Inspect grout and caulk monthly, touch up hairline cracks, re-seal grout at three months if recommended, monitor for leaks around fixtures, guarantee proper ventilation to prevent mold, and address any loose tiles immediately to avoid bigger repairs.
FAQ
You’ll probably have a few common questions before you start, like how long a DIY install takes and whether you can tile over existing tile.
You’ll also want clear answers on preventing leaks, choosing a slip-resistant, durable floor tile, and whether a pro is needed for a linear drain.
Keep these FAQs in mind as you finish up so you don’t run into surprises.
How long does a tile shower installation take for a DIYer?
How long will a DIY tile shower take?
Expect 3–10 days for basic work: demolition, framing or waterproofing, tile layout and installation, grout, and cleanup.
Allow extra time for curing and adhesive set—often 24–72 hours between steps.
Complex designs, niche installs, or learning curves can push the timeline to 2–3 weeks.
Plan conservatively and schedule inspections if needed.
Can I install tile over existing tile in a shower?
Yes — you can tile over existing shower tile in some cases, but it’s only advisable if the old tile is sound, well bonded, and free of cracks, mold, or significant water damage.
You’ll need to thoroughly clean, sand or etch glazed surfaces, use a high-bond thinset or adhesive, and guarantee proper waterproofing at changes and fixtures before tiling to promote adhesion and durability.
How do I prevent leaks behind the tile?
Because water finds tiny gaps, preventing leaks behind tile starts with creating a continuous, well-sealed waterproof system rather than relying on the tile and grout alone.
Use a bonded waterproof membrane or liquid-applied membrane over the shower pan and walls, seal seams and penetrations with reinforced tape, flash fixtures, slope the floor to the drain, and test with a water-tightness test before tiling.
What tiles are best for a shower floor for grip and durability?
Safety and longevity matter most when picking shower-floor tile, so choose materials that combine good slip resistance, toughness, and ease of maintenance.
Porcelain and unglazed ceramic tiles perform well—dense, low-porosity, and rated for frost/wet areas.
Choose smaller tiles or textured surfaces for better grip and more grout lines to reduce slipping.
Avoid highly polished stone; seal natural stone regularly for durability.
Do I need a professional to install a linear drain?
Wondering whether you need a pro to install a linear drain? You can tackle it if you’re comfortable with plumbing, waterproofing, and precise slope work.
Mistakes cause leaks and costly repairs, so hire a pro if you lack experience, tools, or local code knowledge.
For first-timers, get a consultation or hire a licensed plumber to guarantee proper drainage and warranty compliance.
Suggested Further Reading and Resources
For more detailed specs, check manufacturer guides and local code resources so you’re following the right installation requirements.
Watch step-by-step video tutorials to see techniques and common fixes in action.
If you want product suggestions, I’ll point you to recommended waterproofing, mortar, and tile options and where to buy them.
Manufacturer guides, code resources, and video tutorials
Manufacturer guides, local building codes, and quality video tutorials give you the practical, step-by-step information you’ll need to install a tile shower correctly.
Use them to confirm specs, clearances, and waterproofing methods. Verify local code for vents and backflow. Watch licensed pro demos for tricky details.
- Manufacturer installation manuals
- Local building code sites
- Certified training videos
- Community forum threads
Recommended products and where to buy
A handful of reliable products will make your tile shower durable and waterproof: waterproofing membranes (liquid or sheet), cement backerboard or foam tile board, a bonded mortar, grout rated for wet areas, a linear or center drain, and proper fixtures and sealants.
Buy quality brands at big-box stores or specialty dealers. Check manufacturer sites for specs.
- Membrane (Schluter, LATICRETE)
- Backerboard
- Mortar & grout
- Drain & fixtures