How to Lay Carpet on a Concrete Floor: A Simple DIY Guide
You can lay carpet on concrete if you control moisture, prep the slab, and pick the right materials. Test the concrete for dampness, repair cracks, then install a vapor barrier or moisture-resistant underlayment. Choose low-pile, synthetic carpet and concrete-grade adhesive or use padding and tack strips for a stretch installation. Cut carefully, seam with tape and a seaming iron, and roll or stretch for smoothness. Keep it dry and ventilated, and continue to learn how to avoid common problems and guarantee a lasting result.
Can You Lay Carpet on a Concrete Floor?
Yes—you can lay carpet on concrete, but success depends on moisture control, surface prep, and choosing the right underlayment.
You’ll need to test for dampness, patch and level cracks, and decide between direct glue-down, tackless installation with a pad, or floating options.
Addressing these key factors up front prevents problems like mold, premature wear, and uneven seams.
Short summary of feasibility and key considerations
Although concrete might seem too hard or cold for carpet, you can definitely install carpet over it if you address a few key issues first.
You’ll need moisture testing, a vapor barrier or underlay, proper adhesive or tackless trim, and leveling.
Learn how do you lay carpet on a concrete floor step-by-step, plan for seams, and guarantee adequate drying to prevent mold and odor.
Basic Understanding What You Need to Know Before Starting
Before you start, you’ll need to understand how different subfloors affect carpet choice and installation.
Pick carpets suited for concrete, plan for moisture control with vapor barriers or mats, and know why those protections matter.
Finally, gather the right tools and materials—tape measure, knee kicker, seam roller, adhesive or tack strips, and moisture test kit—so you’re ready to work.
Why different subfloors matter
Because the floor beneath your carpet affects everything from comfort to longevity, you need to know what kind of subfloor you’re working with before you start.
Different subfloors — concrete, plywood, or suspended systems — influence moisture control, padding choice, and installation method.
Knowing the substrate helps you prevent mold, uneven wear, and poor adhesion, so plan preparations and materials accordingly.
Types of carpet suitable for concrete
Now that you know how the subfloor affects moisture, padding, and installation, pick carpet types that perform well on concrete.
Choose low-pile, loop or commercial-grade carpets for durability and easier cleaning. Nylon and olefin resist stains and moisture better than delicate fibers.
Avoid thick, plush carpets that trap moisture and compress padding; instead, select stable, synthetic options suited to concrete’s firmness.
Moisture, vapor barriers, and why they matter
When you’re laying carpet on concrete, controlling moisture is the first thing to get right: Concrete can wick water, causing mold, adhesive failure, and padding breakdown.
You’ll test for moisture before installation and use an appropriate vapor barrier or moisture-resistant underlayment if levels are high.
Proper moisture control preserves carpet lifespan, prevents odors, and protects indoor air quality, so don’t skip this step.
Tools and materials overview
Before you start, gather the right tools and materials so the job goes smoothly and safely: you’ll need basics for prep, installation, and finishing.
Visualize these essentials:
- Heavy-duty utility knife and straightedge
- Knee kicker, power stretcher, and seam roller
- Moisture barrier, carpet pad, and adhesive/tack strips
With these, you’ll be ready to measure, secure, and finish carpet on concrete confidently.
Preparation Assessing and Preparing Your Concrete Floor
Before you lay carpet on concrete, you’ll need to inspect the slab for cracks, low spots, and signs of moisture and check levelness.
Use a plastic sheet test or a moisture meter to confirm dampness, then repair cracks and fill low areas so the surface is smooth.
Finally, clean thoroughly and apply a primer or sealer as recommended before installing any underlayment or carpet.
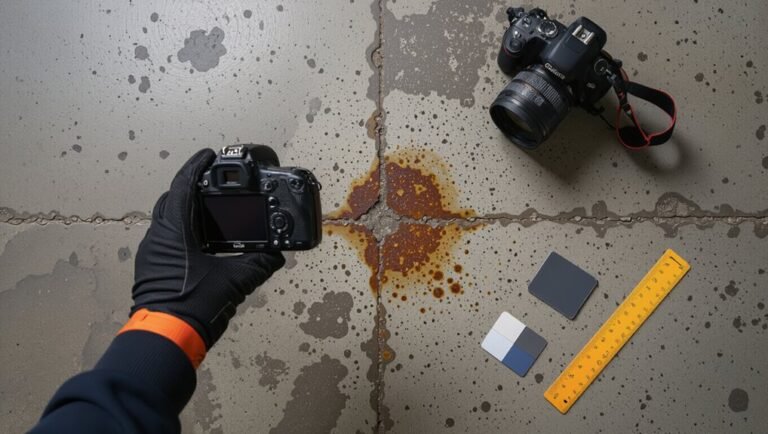
Inspecting the concrete for cracks, levelness, and moisture
Start by closely inspecting the concrete for cracks, uneven spots, and signs of moisture, since these issues determine what prep work you’ll need before laying carpet.
Walk the room, mark hairline and wider cracks, note low or high areas with a straightedge, and look for discoloration or efflorescence.
Document findings so you can plan repairs, leveling, and sealing before installation.
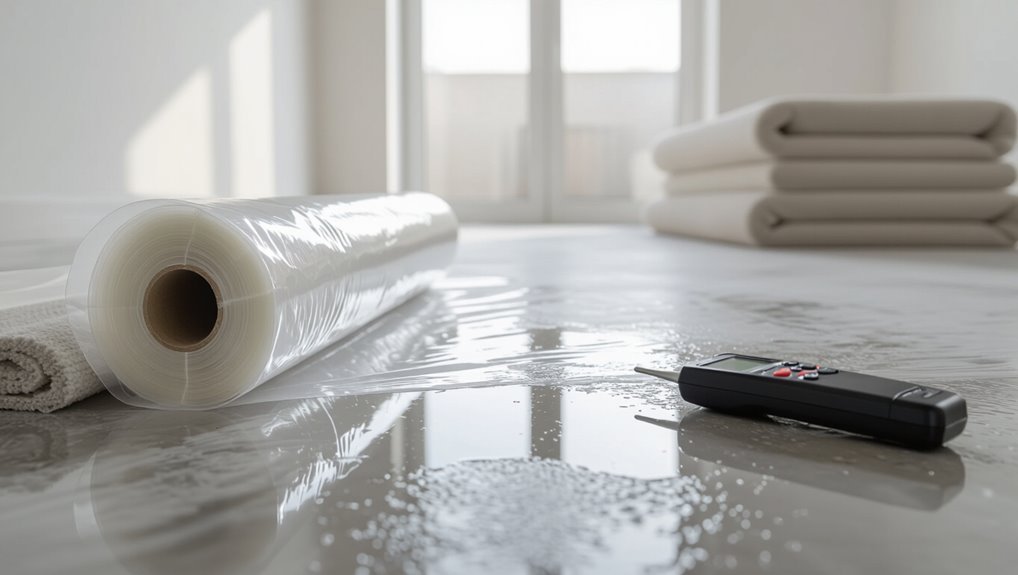
Moisture testing methods (plastic sheet test, moisture meter)
You’ll need to verify concrete moisture levels before carpeting to avoid mold, adhesive failure, or padding damage.
Use the plastic sheet test: tape a 2×2 ft clear sheet, wait 24–48 hours, look for condensation or darkening.
Also use a moisture meter for spot readings across the room to confirm consistency.
- taped plastic sheet sweating
- handheld meter display
- uneven wet patches
Repairing cracks and leveling low spots
When cracks or low spots mar your concrete, fix them now so your carpet lays flat and adhesives bond properly.
Chip out loose material, sweep debris, and widen hairline cracks slightly. Fill with appropriate concrete patch or epoxy, tamping and smoothing to match surrounding level.
For depressions, use a self-leveling compound per manufacturer directions. Let cures fully before proceeding.
Cleaning and priming the surface
Before you lay adhesive or padding, clean and prime the concrete so the carpet will stick and stay flat.
Sweep and vacuum thoroughly, then degrease with a concrete cleaner or trisodium phosphate solution. Rinse and let dry.
Apply a concrete primer or bonding agent per manufacturer instructions, using a roller for even coverage.
Allow full cure before proceeding to adhesive or underlay installation.
Step-by-Step Installation Process
Now you’ll walk through the actual installation, starting with choosing the right carpet, padding, and adhesive method for your concrete.
You’ll install any moisture barrier or underlayment, measure and plan seam layout, then cut carpet and padding to fit.
Finally, you’ll apply the glue-down adhesive using proper techniques and allow the recommended drying time.
Step 1 Choosing carpet, padding, and adhesive method
1 key decision you’ll make is the type of carpet, padding, and adhesive that suit your concrete subfloor and household needs.
Choose low-profile, dense carpet for durability; select closed-cell or rubber padding to resist moisture and provide support.
Pick a concrete-compatible adhesive—pressure-sensitive or full-spread—based on carpet type and room traffic.
Confirm adhesive’s cure time and VOC levels before buying.
Step 2 Installing a moisture barrier or underlayment
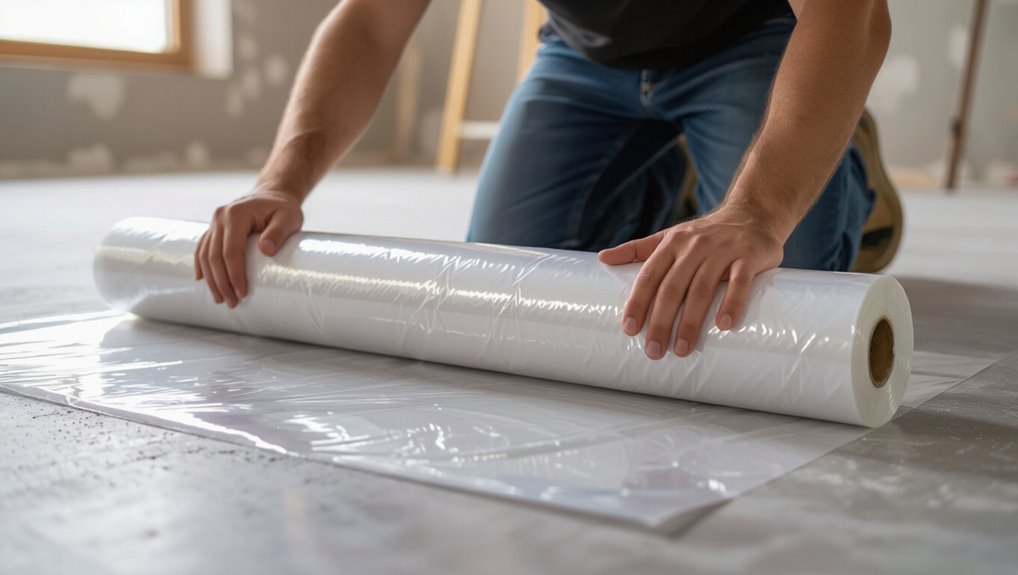
A proper moisture barrier or underlayment protects your carpet and padding from concrete dampness and evens out minor surface imperfections, so install it carefully and follow the product instructions.
Clean and dry the slab, roll out the barrier with overlap per manufacturer guidance, tape seams, trim edges, and secure underlayment with adhesive or staples as recommended.
Allow adhesive to set before proceeding.
Step 3 Measuring and planning seam layout
Before cutting or laying any carpet, measure the room carefully and plan your seam layout so seams fall in low-traffic areas and run with the room’s longest dimension.
Mark seam lines, note doorways, and measure for pattern matching. Visualize seams with simple sketches and measurements.
- seam running along long wall
- seams away from doors
- pattern repeats aligned
Step 4 Cutting carpet and padding to fit
Now you’ll cut the carpet and padding to the room’s layout, using your measurements and seam plan as a guide so pieces fit snugly without excess bulk.
Mark pieces on the backing, allowing trim allowances at seams. Use a straightedge and utility knife for clean cuts; change blades often.
Cut padding slightly smaller than carpet edges to prevent visible bulging and guarantee smooth seams.
Step 5 Applying adhesive (glue-down) techniques and drying times
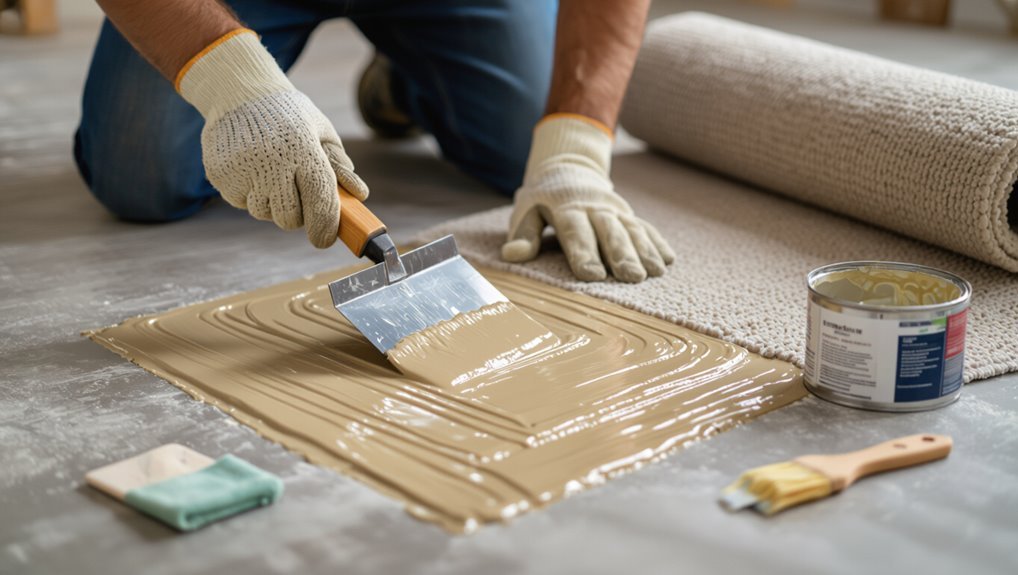
With the carpet and padding trimmed to fit, you’ll move on to applying adhesive for a secure glue-down installation.
Choose a concrete-grade carpet adhesive, follow manufacturer trowel size recommendations, and spread evenly in workable sections.
Press carpet into adhesive, roll with a 100–150 lb roller, and allow the recommended 24–48 hours curing time before light foot traffic or furniture placement.
Step 6 Stretching and securing carpet (if using stretch-in method with tack strips)
Set the carpet on the padding, hook it onto the tack strips along one wall, and use a knee kicker to position the pile so the seams and edges align exactly where you want them.
Work toward the opposite wall with a power stretcher, anchoring the carpet on the strips as you go.
Trim excess along walls, tuck edges with a stair tool, and check for smoothness.
Step 7 Seaming two carpet pieces (seam tape and seaming iron)
Position the two carpet pieces so their pile runs in the same direction and the ends meet with about 1/8 inch of gap over the center of the seam tape; you’ll heat the tape with a seaming iron, press the carpet edges together, and roll the seam to bond them securely.
Heat slowly, slide the iron along the tape, butt edges tightly, then use a seam roller to flatten and set the join.
Step 8 Trimming, finishing edges, and reinstalling trim or thresholds
Finish the carpet by trimming excess, tucking edges, and reinstalling any trim or thresholds so the installation looks tight and professional.
Use a sharp carpet knife to trim along gaps, fold edges into tack strips or under moldings, and secure with adhesive or finishing nails as needed.
Reattach baseboards or connector strips, check for smooth connections, and remove visible glue or fibers for a clean result.
Step 9 Post-installation care and curing time
After the adhesive’s applied and edges are trimmed, give the carpet time to cure and avoid heavy traffic for at least 24–48 hours so seams settle and glue bonds fully.
During this time, keep the area dry, maintain moderate temperature, and limit weight.
Inspect seams and edges afterward, re-roll any bubbles, and wait 72 hours before placing heavy furniture to guarantee a durable, even bond.
Comparison of Installation Methods
You’ll weigh glue-down, double-stick, and stretch-in methods to see which suits your concrete subfloor and traffic needs.
Consider how each affects installation time, durability, and moisture management.
Also decide if adding padding on concrete will improve comfort without trapping moisture or compromising adhesive performance.
Glue-down vs. double-stick vs. stretch-in on concrete
When you’re choosing between glue-down, double-stick, and stretch-in installations on concrete, think about long-term performance, moisture conditions, and how much prep and skill each method requires. Glue-down bonds directly; double-stick uses adhesive plus pad; stretch-in needs tack strips. Match method to moisture, traffic, and your experience.
| Method | Moisture Tolerance | Skill Needed |
|---|---|---|
| Glue-down | Low | Medium |
| Double-stick | Moderate | Medium |
Pros and cons of using carpet padding on concrete
If you’re weighing whether to add padding under carpet on concrete, balance comfort and insulation gains against moisture and installation challenges.
Padding boosts softness, noise reduction, and thermal feel, but can trap moisture, promote mold, and complicate glue-down installs.
Use moisture barriers or specialized closed-cell pads for damp basements.
For high-moisture areas, skip padding or choose impermeable options to protect flooring.
Common Problems and How to Fix Them
You’ll run into a few common issues when laying carpet on concrete, and knowing how to spot them early saves time and money.
Watch for peeling edges or delamination, wrinkling and buckling, mold or persistent moisture, and uneven seams or visible joins.
I’ll explain what causes each problem and the straightforward fixes you can use.
Peeling edges or delamination
Loose corners and curling seams are the telltale signs of peeling edges or delamination, a problem that happens when the carpet backing loses adhesion to the concrete or padding.
Inspect affected areas, peel back and clean concrete, apply recommended adhesive, press backing firmly, and roll with a carpet roller.
Replace severely delaminated sections or consult a pro if widespread damage exists.
Wrinkling and buckling
When carpet develops wrinkles or buckles, it not only looks sloppy but creates trip hazards and wears unevenly; you’ll want to tackle the issue promptly.
Check for loose tack strips, inadequate stretching, or humidity changes.
Re-stretch with a power stretcher, secure or replace tack strips, and trim excess backing.
After repairs, vacuum and monitor for recurrence to guarantee a flat, safe surface.
Mold, mildew, and persistent moisture issues
Wrinkles and buckles can signal larger problems, including trapped moisture that leads to mold and mildew on concrete-installed carpet.
If you spot musty odors or dark spots, pull back carpet, inspect padding and concrete, and use a moisture meter.
Dry the slab, replace contaminated padding, treat with an antimicrobial, and install a proper vapor barrier or breathable underlayment to prevent recurrence.
Uneven seams and visible joins
Although you stretched and tucked the carpet, uneven seams and visible joins can still show up where two pieces meet, drawing the eye and trapping dirt.
Trim edges square, use a seaming tape and iron to bond pieces, and press seams with a seam roller.
If gaps persist, add seam sealer and re-stretch the area to align pile and hide the join.
Best Practices and Pro Tips
Before you start, take preventive steps like moisture testing, thorough cleaning, and using a suitable underlayment so the job doesn’t fail later.
Follow tips for long-lasting adhesion and appearance—use the right adhesive, allow proper curing time, and trim and seam carefully.
If the room has complex layout, moisture issues, or you’re unsure about adhesives, call a pro instead of risking costly mistakes.
Preventive steps before installation
To guarantee a smooth, long-lasting carpet installation on concrete, take a few preventive steps that address moisture, surface prep, and layout planning up front.
Test concrete moisture with a meter or plastic-sheet test, repair cracks and level low spots, vacuum and degrease thoroughly, and plan seam placement and traffic patterns.
Allow concrete to fully cure and acclimate carpet before proceeding.
Tips for long-lasting adhesion and appearance
When you want your carpet to look and perform its best for years, focus on adhesive choice, proper trowel technique, and tight seam work from the start.
Use a moisture-resistant, carpet-specific adhesive, follow open time guidelines, and apply even pressure with the correct trowel.
Trim seams precisely, roll with a weighted roller, allow full cure, and maintain humidity to prevent peeling or puckering.
When to hire a professional vs. DIY
Even with the right adhesive and careful trowel work, some jobs are better left to pros while others you can handle yourself.
Hire a pro for moisture mitigation, radiant-heat systems, complex layouts, stairs, or large commercial spaces.
DIY smaller, dry rooms with simple cuts and seams if you’re handy.
Be realistic about time, tools, and warranty requirements before deciding.
Cost, Time, and Materials Checklist
Before you start, you’ll want a clear cost breakdown—materials, tools, and any optional pro labor—so you can budget accurately.
Estimate the time you’ll need based on room size (small bedroom vs. large living area) to schedule the job.
Finally, run through a concise materials checklist to make sure you have everything on hand before you begin.
Estimated cost breakdown (materials, tools, optional professional labor)
1 clear budget makes carpet installation on concrete less stressful: you’ll typically pay for carpet and padding, adhesive or tackless strips, seam tape and tools, and—if you choose—professional installation. Plan per-room costs, tool rentals, and optional labor. Use this quick estimate:
| Item | Low | High |
|---|---|---|
| Carpet & pad | $100 | $800 |
| Adhesives/tools | $20 | $150 |
| Pro labor | $200 | $1,000 |
Typical time required by room size
Now that you’ve mapped out costs and gathered materials, estimate how long each room will take so you can schedule work and any helpers.
Small rooms (8×10) take 3–5 hours; medium (12×14) take 6–9 hours; large or irregular rooms may need a full day.
Consider prep, cutting, and trimming.
- quick prep and sweeping
- measuring and cutting
- tucking and trimming
Final materials checklist before starting
Gather a clear checklist of materials, tools, and estimated costs so you won’t stop mid-job to hunt for something or rework budgeted time.
You’ll confirm quantities, rent or buy tools, and schedule time. Estimate costs, allow buffer, and mark delivery dates.
Check room dimensions and subfloor prep needs.
- Carpet, padding, adhesive
- Knee kicker, seam roller, cutter
- Moisture test kit, trowel, tape measure
Frequently Asked Questions (FAQ)
You’ll find answers here to common concerns like laying carpet on cold or damp concrete, using a pad, and when you can move furniture back in.
You’ll also learn how to remove old adhesive and the best steps to prevent mold under carpet on concrete.
If you have another question, mention it and I’ll address it specifically.
Can I lay carpet directly over a cold or damp concrete slab?
If your concrete slab feels cold or shows any signs of dampness, don’t lay carpet directly on it—moisture can ruin the carpet backing and promote mold.
You should test for dampness, fix leaks, and allow the slab to fully dry.
Use a vapor barrier or moisture mitigation system before installation, and guarantee proper ventilation to prevent recurring issues and protect your new flooring.
Do I need to use a pad on concrete floors?
While you can lay carpet directly on concrete, you should almost always use a pad: it cushions the floor, improves comfort and insulation, protects the carpet backing, and extends the carpet’s life by reducing wear.
Choose a moisture-resistant, closed-cell or rubber pad for concrete to prevent mildew and compression. Proper padding also evens minor subfloor imperfections and enhances sound reduction.
How long before I can place furniture on newly installed carpet?
How soon can you put furniture back on new carpet?
Wait at least 24–48 hours for adhesive or seam glue to cure and for tackless strips and seams to settle.
If you used only double-stick tape or breathable installation methods, you can often replace lightweight furniture sooner.
Use furniture pads or glides to prevent indentations, and avoid dragging heavy pieces for several days.
Can I remove old adhesive or carpet residue from concrete?
You can remove old adhesive and carpet residue from concrete, but it takes some effort and the right tools.
Scrape loose material with a floor scraper, then apply a commercial adhesive remover or a diluted solvent per label instructions.
Use a stiff brush or grinder with a diamond cup wheel for stubborn spots.
Rinse thoroughly and allow full drying before any new installation.
What is the best way to prevent mold under carpet on concrete?
Because concrete can trap moisture, the best way to prevent mold under carpet is to control that moisture and add a proper barrier: test and fix leaks, use a dehumidifier, guarantee good ventilation, and apply a vapor barrier or waterproof membrane over the slab.
Install quality underlay with antimicrobial properties and maintain indoor humidity below 60%.
Inspect periodically and dry spills immediately.