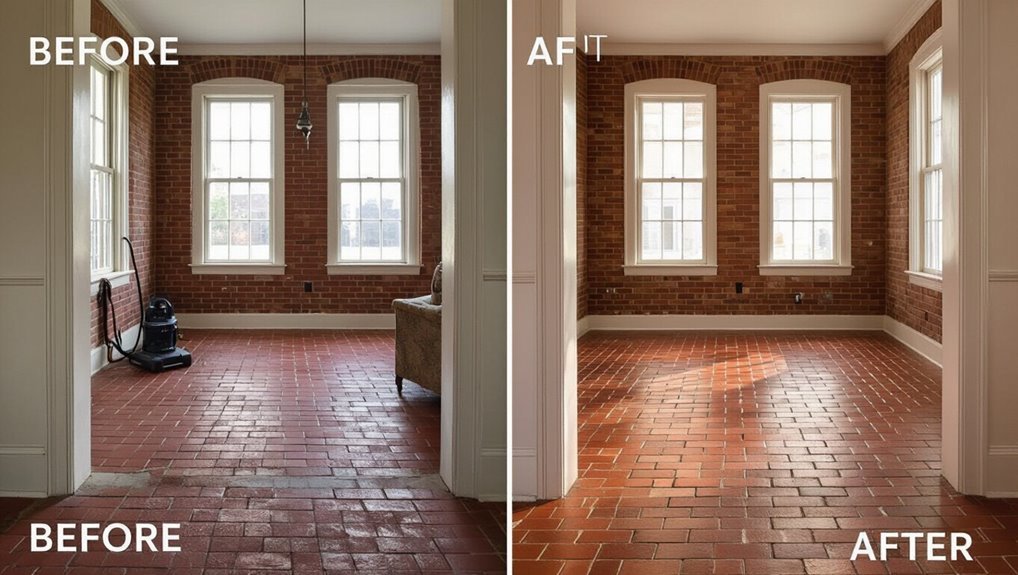
How to Clean Brick Floors and Restore Their Rustic Charm
You can revive brick floors by sweeping or vacuuming grit, mopping with warm water and a few drops of pH‑neutral soap, then rinsing and drying thoroughly to avoid mortar damage. Tackle stains with absorbents, degreasers, or targeted removers, scrub efflorescence with a stiff brush or diluted vinegar, and improve drainage. Finish with a breathable sealer to deepen color and protect the surface. Keep following for step‑by‑step methods, stain fixes, and maintenance tips.
How to Clean Brick Floors and Restore Their Rustic Charm Quick Answer
For a quick, safe refresh, sweep and mop with warm water and a mild pH-neutral cleaner to lift dirt without harming the brick.
If stains, efflorescence, or loose mortar won’t come out with gentle methods, call a professional mason or restoration specialist.
They’ll know when to use stronger cleaners or repairs to restore the rustic charm without causing damage.
One-sentence summary of the easiest safe cleaning method
When you want a quick, safe refresh for brick floors, sweep or vacuum loose dirt.
Mop with warm water mixed with a few drops of pH-neutral dish soap, then rinse with clean water and let the floor air-dry.
For a one-sentence summary: to answer how do you clean brick floors, use gentle sweeping, mild soapy mopping, careful rinsing, and thorough air-drying.
When to call a professional
If that quick sweep-and-mop routine doesn’t remove deep stains, efflorescence, heavy grime, or mortar discoloration, you’ll want to call a pro.
You should hire one when you face:
- Structural issues or loose bricks needing repointing.
- Persistent staining after DIY treatments.
- Historic or sealed brick that requires specialized cleaning to avoid damage.
A pro protects value and finishes efficiently.
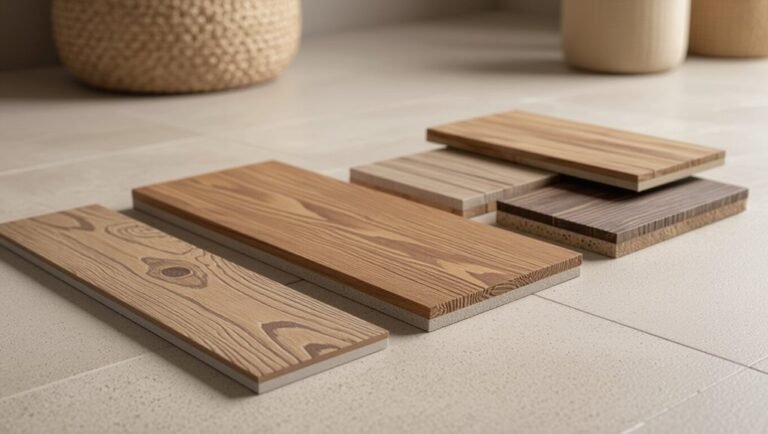
Understanding Brick Floors: Types, Finish, and Common Issues
To clean brick floors effectively, you’ll first want to know what kind of brick you’re dealing with—clay, concrete, or reclaimed—since each absorbs and wears differently.
Check whether the surface is sealed or unsealed, because porosity determines which cleaners and sealers are safe to use.
Also watch for common issues like stains, efflorescence, crumbling mortar, and general wear so you can choose the right repair and maintenance steps.
Types of brick flooring (clay, concrete, reclaimed)
Although brick floors share a common look, they come in distinct types—clay, concrete, and reclaimed—each with specific characteristics, durability, and maintenance needs you should know before cleaning or finishing.
- Clay: traditional, porous, durable; needs gentle cleaners and periodic repairs.
- Concrete: uniform, dense, less absorbent; tolerates stronger cleaners.
- Reclaimed: varied thickness, historic wear; inspect for cracks and mortar issues before treatment.
Surface finishes and porosity: sealed vs. unsealed bricks
Knowing the type of brick you’re working with helps you decide how to finish and protect it, because surface treatments change how the brick looks and how it handles moisture and stains.
You’ll choose sealers to block pores, reduce dusting, and deepen color, or leave bricks unsealed to preserve breathability and a matte, rustic feel.
Match finish to use and climate.
Common problems: staining, efflorescence, mortar decay, wear
Troubleshooting brick floors starts with spotting the most frequent issues—stains, efflorescence, crumbling mortar, and general wear—and understanding what causes each one.
You’ll treat oil, rust, and organic stains with degreasers or poultices; remove efflorescence with dry brushing and mild acids; repoint mortar where it’s lost strength; and address surface wear by sealing, replacing damaged bricks, or using protective mats to prevent further abrasion.
Safety, Tools, and Materials You’ll Need
Before you start, make sure you’ve got basic PPE—gloves, eye protection, and good ventilation if you’re using cleaners.
You’ll also want essential tools like a broom, stiff scrub brushes, a mop, and a wet vacuum, plus recommended cleaners or simple homemade solutions (baking soda and mild detergent work well).
Avoid acidic or abrasive cleaners on most brick and test any product in a small area first.
Personal protective equipment and ventilation
Because brick dust and cleaning chemicals can irritate your skin, eyes, and lungs, you’ll want to gear up before you start: gloves, safety goggles, a dust mask or respirator rated for particulates and chemical vapors, and sturdy shoes are essential, and long sleeves help protect your arms.
Open windows, run fans, and use cross-ventilation; avoid confined spaces and take breaks to breathe fresh air.
Essential tools (brooms, scrub brushes, mop, wet vacuum)
You’ll need a few reliable tools to clean brick floors effectively: a stiff-bristled broom for dry debris, a nylon or natural-fiber scrub brush for grout and textured surfaces, a mop and bucket for rinse cycles, and a wet vacuum to extract dirty water and speed drying.
- Sweep, then scrub grout lines.
- Mop with clean water until clear.
- Use wet vacuum to remove residue and speed drying.
Recommended cleaning products and homemade solutions
Now that the surface is free of grit and you’ve loosened grime from grout, pick cleaning agents that match your brick’s finish and your home’s safety needs.
Choose mild pH-neutral cleaners, diluted vinegar solutions for sealed brick, or oxygen bleach for stubborn stains. Test first.
Use:
- pH-neutral floor cleaner
- 1:10 white vinegar solution
- Oxygen bleach (per label)
When to avoid acidic or abrasive cleaners
If your brick is unsealed, soft, or old, avoid acidic or abrasive cleaners since they can etch, discolor, or wear down the surface and mortar; instead pick pH-neutral options and test in an inconspicuous spot first.
Use mild detergent, warm water, and a soft-bristle brush for routine cleaning.
Reserve stronger cleaners for sealed, durable brick and follow manufacturer instructions and safety gear recommendations.
Step-by-Step Cleaning Process
Start by clearing the area, sweeping thoroughly, and testing a small patch so you know how the brick will react.
You’ll begin with dry debris removal, then move to routine cleaning with mild soap and water, and use hot water and degreasers for deep grime.
Finish by treating any efflorescence or mineral deposits with the appropriate cleaner.
Prep: clear area, test a small patch, sweep thoroughly
Clear the room so you can see the whole floor and move freely, then test a small, inconspicuous patch with your chosen cleaner to make sure it won’t damage or discolor the brick.
Remove furniture and rugs, note stains or fragile areas, and mark them.
Sweep thoroughly with a stiff-bristle broom or vacuum to lift grit and dust so wet cleaning won’t grind particles into the surface.
Step 1 Dry cleaning and debris removal
1. You’ll remove loose grit before any wet work. Follow this simple dry-clean routine:
- Sweep with a stiff broom, pushing debris into a dustpan.
- Vacuum crevices with a brush attachment to lift fine dust and sand.
- Use a stiff-bristled brush or scraper for stubborn chunks, then re-sweep to collect loosened particles.
Step 2 Basic mild cleaning for routine maintenance (soap and water)
With loose grit removed, it’s time to give the brick a gentle wash using mild soap and water to lift surface grime without harming the mortar or brick face.
Mix a few drops of pH-neutral cleaner in warm water, mop or scrub with a soft-bristle brush, rinse thoroughly, and blot excess moisture.
Let the floor air-dry before light foot traffic.
Step 3 Deep cleaning for stubborn dirt and grease (degreasers, hot water)
Tackle stubborn dirt and grease by using a targeted deep-cleaning approach: choose a degreaser formulated for masonry, mix it with hot water according to the label, apply it to a small test area, and let it dwell briefly before agitating with a stiff nylon brush and rinsing thoroughly.
- Scrub grout and textured areas firmly.
- Rinse with hot water until residue’s gone.
- Repeat spot-treatment if needed, then dry.
Step 4 Removing efflorescence and mineral deposits
After you’ve removed grease and rinsed away cleaning solutions, check the brick for white, powdery stains—efflorescence—and hardened mineral buildup near doorways, drains, or areas with water exposure.
- Scrub deposits with a stiff brush and water, working small sections.
- Apply a diluted vinegar solution (1:1) or a commercial efflorescence remover; rinse promptly.
- Dry thoroughly and improve drainage to prevent recurrence; repeat if needed.
Step 5 Tackling mold and mildew safely
If mold or mildew has taken hold in damp areas, don’t ignore it—address it promptly to protect the brick and your health.
Wear gloves, eye protection, and a mask. Test a small area with a diluted bleach solution or commercial mold remover.
Scrub with a stiff brush, rinse lightly, and repeat spots as needed.
Dry thoroughly and improve ventilation to prevent recurrence.
Step 6 Rinsing and drying to prevent water damage
Because brick soaks up water and mortar can weaken when left wet, you should rinse thoroughly and dry quickly to prevent damage.
Use clean water with a gentle spray, working from one end to the exit so runoff carries dirt away.
Blot puddles with absorbent towels, then use fans or a wet/dry vacuum to speed drying.
Check tiles for damp spots until fully dry.
Step 7 Post-clean inspection and minor repairs (repointing mortar)
When the floor’s dry, take a careful walkover to spot loose mortar, hairline cracks, or missing joints so you can tackle small repairs before they worsen.
Use a pointing trowel to remove deteriorated mortar, brush debris, and dampen joints slightly.
Mix matching mortar, press it firmly, tool the joints to match texture, and let cure.
Reinspect for any missed spots.
Restoring Rustic Charm: Stain Removal, Color Enhancement, and Sealing
Now you’ll tackle stubborn stains—oil, wine, rust, and paint—and learn which cleaners and methods work best for each.
You’ll also see simple techniques to enhance color and texture, like oxide washes and brick enhancers, and how to choose a breathable or non-breathable sealer based on your floor’s needs.
Finally, you’ll get straightforward steps for applying enhancers and sealers so the brick stays beautiful and protected.
Removing common stains (oil, wine, rust, paint)
Although brick’s texture and porousness give it character, they also trap spills like oil, wine, rust, and paint—so tackling stains quickly and with the right approach is key.
Use appropriate cleaners and gentle scrubbing.
Steps:
- Oil: apply absorbent powder, brush, degreaser, rinse.
- Wine: blot, dilute with water, mild detergent.
- Rust/paint: rust remover or paint stripper, test first, rinse thoroughly.
Techniques to enhance color and texture (oxide washes, brick enhancers)
If you want to deepen color or bring out a brick’s grain, targeted treatments like oxide washes and brick enhancers deliver fast, noticeable results.
You’ll test a small area, mix per label, apply evenly, then buff or rinse as instructed. Results vary by brick type and porosity; repeat lightly for intensity.
- Test first
- Apply evenly
- Seal after curing
Choosing the right sealer: breathable vs. non-breathable
Think of sealing as the final decision that determines how your restored brick will look and perform: breathable sealers let moisture escape and preserve a matte, natural finish, while non-breathable (film-forming) sealers lock surfaces down and boost sheen but can trap moisture. Choose based on moisture risk and desired look.
| Type | Finish | Moisture |
|---|---|---|
| Breathable | Matte | Passes |
| Non-breathable | Glossy | Traps |
How to apply sealer or brick enhancer
Start by testing a small, inconspicuous area so you can confirm compatibility and the look you want before sealing the whole floor.
Clean and dry the brick thoroughly.
Apply enhancer or sealer with a low-pressure sprayer or roller, working in small sections and following grain.
Wipe pooled product, allow proper cure time per manufacturer, then recoat if needed for consistent protection and sheen.
Comparison: Cleaning Methods, Products, and When to Use Them
You’ll weigh homemade solutions against commercial cleaners by matching dirt level, sensitivity of the brick, and cost.
Mechanical methods like pressure washing or rotary scrubbing can speed up heavy cleaning but risk etching or loosening mortar if used improperly.
Call a professional when stains, structural damage, or historic value require specialist care.
Homemade solutions vs. commercial cleaners
While homemade solutions often cost less and use gentler ingredients like vinegar, baking soda, and mild dish soap, commercial cleaners deliver stronger stain removal and may be formulated specifically for sealed or unsealed brick; you’ll choose based on the soil type, brick finish, and how much risk you’re willing to take with harsh chemicals.
| Option | Best for |
|---|---|
| DIY | Light grime, delicate finishes |
| Commercial | Oil stains, heavy buildup |
Mechanical methods (pressure washing, rotary scrubbing) pros and cons
Because mechanical methods use force rather than chemicals, they’re the go-to when brick floors need deep cleaning fast. Pressure washing blasts away embedded dirt and grime, while rotary scrubbing lets you control abrasion on stubborn spots.
You’ll remove heavy buildup quickly, but beware surface damage, mortar erosion, and oversaturation. Use lower pressure, test a hidden area, and pair with appropriate brushes and drainage.
When professional cleaning or restoration is recommended
Mechanical methods handle heavy dirt fast, but they can also reveal problems that need more than routine cleaning.
If mortar crumbles, bricks spall, significant efflorescence returns, or stains resist safe DIY cleaners, call a professional.
They’ll assess structural issues, match mortar, use appropriate restoration chemicals, and prevent damage from improper pressure or acids.
Don’t delay—timely pros save time and cost.
Common Mistakes and How to Avoid Them
Don’t use cleaners or pressure levels that strip or pock the brick — they’ll cause immediate damage.
Don’t seal over dirt or wet mortar, and don’t over-seal surfaces that need breathability.
Check and repair mortar early, because ignored joints lead to bigger structural and moisture problems down the road.
Using the wrong cleaner or high-pressure washers that damage brick
If you use the wrong cleaner or blast brick with a high-pressure washer, you’ll strip away the surface, erode mortar, and leave permanent damage that’s costly to repair.
Choose pH-neutral cleaners, test a small area, and use low-pressure rinsing or a soft-bristled brush.
Protect joints with gentle spot cleaning, avoid acidic or bleach-based products, and rinse thoroughly to prevent residue buildup.
Over-sealing or sealing unprepared surfaces
Along with using the right cleaner and gentle rinsing, how you finish a brick floor matters just as much: sealing too soon or applying sealant over dirty, damp, or deteriorated surfaces traps moisture and debris, leading to peeling, staining, or accelerated mortar failure.
Wait until bricks are fully dry and clean, remove efflorescence, and test a small area to verify adhesion before sealing.
Ignoring mortar damage and long-term consequences
When you neglect cracked or crumbling mortar, small issues quickly become expensive problems: water infiltration widens gaps, freezes and thaws break bricks, and structural weakness can spread across the floor.
Inspect joints regularly, repoint failing mortar before damage spreads, and use compatible mortar mixes.
You’ll save money and preserve appearance by addressing mortar issues promptly instead of waiting for visible collapse.
Maintenance Plan and Best Practices to Preserve Rustic Look
Keep a simple cleaning schedule with quick daily sweeps and weekly mops so dirt and grit don’t wear the brick down.
Prep seasonal tasks—like sealing before wet months and winterizing outdoor brick—to prevent moisture damage.
Use preventive steps (mats, felt pads, prompt stain treatment) to protect against stains, salt, and heavy traffic.
Regular cleaning schedule and quick daily/weekly tasks
A simple, consistent routine makes it easy to preserve your brick floor’s rustic character without much effort. You’ll keep dirt down and finishes healthy by doing short, regular tasks.
- Sweep daily to remove grit and prevent scratches.
- Mop weekly with a pH-neutral cleaner, avoiding excess water.
- Spot-clean spills immediately and reapply sealer as needed for protection.
Seasonal care and winterizing brick floors
Because temperature swings and moisture can accelerate wear, you should adjust care routines each season to protect your brick floors and preserve their rustic look.
In fall, sweep debris, inspect mortar, and apply a breathable sealer.
In winter, use noncorrosive deicers, wipe salt promptly, and place mats at entrances.
In spring, check for frost damage and reapply sealer as needed.
Preventive measures for stains, moisture, and heavy wear
When you set a routine—and stick to it—you’ll cut down stains, moisture problems, and wear before they start; include regular sweeping, prompt spill cleanup, seasonal resealing, and protective mats or pads in high-traffic zones to preserve the brick’s rustic look.
Inspect grout yearly, remove mold with a mild detergent, avoid harsh deicers, use breathable sealers, rotate furnishings, and address cracks immediately to prevent deeper damage.
Tools, Product Recommendations, and Cost Estimates
You’ll want a few reliable tools—stiff-bristled brushes, a mop, a wet/dry vacuum, and gentle cleaners from brands like Simple Green or Black Diamond—to tackle most brick floor jobs.
Expect DIY costs of $20–$150 for supplies versus $300–$1,500+ for professional restoration depending on area and damage.
If bricks are crumbling, mortar is failing, or stains won’t budge, it’s worth hiring a pro to avoid costly mistakes.
Recommended tools and brands for DIY homeowners
Before you start, gather a few reliable tools and cleaners so the job goes faster and lasts longer.
You’ll need quality basics and trusted brands:
- Stiff-bristle broom, Shop-Vac or vacuum with hard-floor attachment.
- pH-neutral brick cleaner (Zep or Simple Green) and a bucket.
- Nylon scrub brush, microfiber mop, and breathable sealer (Aqua Mix).
Estimated cost ranges for DIY vs. professional restoration
With your tools and cleaners ready, it’s time to compare what you’ll spend doing the work yourself versus hiring a pro. DIY often costs $50–$400 for cleaners, sealers, and tools; pros range $400–$2,500 depending on scope. Choose mid-range products for balance; hire for complex repairs.
| Item | Typical Cost |
|---|---|
| Cleaners | $10–$50 |
| Sealers | $20–$150 |
| Tools | $20–$200 |
| Pro labor | $400–$2500 |
When investment in professional restoration pays off
If your brick floor shows deep staining, loose mortar, widespread efflorescence, structural cracking, or you’re planning a high-traffic retrofit, hiring a professional usually pays off because they bring specialized tools, tested products, and experienced judgment that prevent costly mistakes.
Professionals use diamond grinders, steam cleaners, masonry mortars, and breathable sealers; expect $500–$5,000 depending on scope, with warranties and safer results.
Real-Life Scenarios and Case Examples
You’ll walk through a step-by-step cleanup for an unsealed reclaimed brick floor, from sweeping and gentle scrubbing to neutralizing and resealing.
You’ll also get a clear plan for restoring a sealed indoor brick floor with deep stains, including safe stripper options and stain-specific treatments.
Finally, you’ll learn practical before-and-after tips for rented properties and historic homes so you protect finishes and comply with rules.
Scenario: cleaning an unsealed reclaimed brick floor (step sequence)
Start by sweeping and dry-mopping the unsealed reclaimed brick to remove loose grit and dust.
Then work through a wet-cleaning sequence that moves from least to most intensive so you don’t drive dirt deeper into pores.
Test a small area, mop with a pH-neutral cleaner, rinse thoroughly, spot-treat stubborn grime with a soft brush and diluted trisodium phosphate, then air-dry fully.
Scenario: restoring a sealed indoor brick floor with deep stains
When restoring a sealed indoor brick floor with deep stains, begin by evaluating the seal type and stain origin so you can choose products that won’t damage the finish.
Test a mild, pH-neutral cleaner in an inconspicuous area. Use solvent-based stain removers only if compatible.
Rinse thoroughly, dry, and reapply a compatible sealer if needed.
Call a pro for persistent stains.
Before-and-after tips for rented properties and historic homes
Whether you’re prepping a rented apartment for a deposit return or restoring a historic home for preservation, plan each step so you protect the building’s character and your wallet.
Inspect finishes, document condition with photos, test cleaners in inconspicuous spots, use gentle, pH-neutral products, and avoid harsh scrubbing.
Get landlord or conservator approval before sealing or staining, and keep receipts for reimbursements.
FAQ Common Questions About Cleaning and Restoring Brick Floors
You probably have a few practical questions about maintaining and restoring brick floors, like how often to reseal them and whether a pressure washer is safe indoors.
You’ll also want to know which stain removers are gentle on old brick, how to remove efflorescence without harm, and whether sealing will alter the floor’s appearance.
Let’s answer those common concerns so you can protect and restore your brick with confidence.
How often should I seal my brick floor?
How often you should seal your brick floor depends on the type of sealant used, foot traffic, and exposure to moisture or sunlight.
Generally, reseal every one to three years for high-traffic or outdoor-exposed floors; every three to five years for indoor, low-traffic areas.
Test by sprinkling water—if it soaks in, it’s time.
Clean and dry before resealing for best adhesion.
Can I use a pressure washer on indoor brick flooring?
If your brick floor shows water beading after the sprinkle test, you may think a pressure washer will speed things up—but indoor use carries risks.
Don’t. High pressure can erode mortar, loosen tiles, force water into subflooring, and create mold.
Instead use low-pressure rinses, soft brushes, and controlled wet-cleaning.
If you’re unsure, consult a pro before introducing heavy equipment indoors.
What’s the safest stain remover for old brick?
While gentle cleaners and patience usually do the trick, choosing the safest stain remover for old brick comes down to matching the product to the stain and the brick’s finish.
Use pH-neutral masonry cleaners for general grime, diluted trisodium phosphate for oily spots, and enzyme-based cleaners for organic stains.
Always test a small area, rinse thoroughly, and avoid harsh acids or abrasives that strip finishes.
How do I remove efflorescence without damaging bricks?
Wondering how to get rid of that white, powdery residue without harming the brick? Start by dry-brushing loose salt with a stiff brush, then vacuum.
Mix a mild muriatic solution (follow label dilution) or use white vinegar for light cases; test a hidden spot first. Rinse thoroughly, allow full drying to stop recurrence, and address moisture sources to prevent return.
Will sealing brick floors change their appearance?
After removing efflorescence and ensuring your bricks are dry, you might be wondering how sealing will affect their look.
Sealer can deepen color, add sheen, and slightly darken tones. Choose matte, satin, or gloss finishes to control shine.
Test a small area first — you’ll see the change immediately. Proper breathable sealers preserve texture without trapping moisture.