
How to Install a Bathtub on a Concrete Floor Step by Step
You can install a bathtub on a concrete floor by cutting a drain opening, setting a level mortar bed, and connecting a watertight drain and overflow assembly. Check local codes, measure the space, and choose the right tub type. Prep the slab, adjust plumbing rough‑in, dry‑fit the tub, then set, level, secure to walls, and seal edges with proper waterproofing. Test for leaks and cure the mortar; keep going for step‑by‑step tips, troubleshooting, and cost guidance.
How to Install a Bathtub on a Concrete Floor Quick Answer and Overview
Yes—you can install a bathtub on a concrete floor, but it usually means cutting or forming a drain, setting a mortar bed or frame, and ensuring proper waterproofing and connections.
For a handy homeowner with basic plumbing and masonry skills, it’s a doable weekend-to-week project; hire a pro if you lack tools, local code knowledge, or if the job involves complex plumbing or structural changes.
Expect a skilled DIY to spend 1–3 days and $300–$1,500 for materials (professionals typically charge $800–$4,000+ depending on labor and complexity).
One-paragraph quick answer: Is it feasible and what it involves
Installing a bathtub on a concrete floor is definitely feasible, but it usually means cutting a drain opening, setting a proper mortar bed or bath flange, and ensuring the drain and plumbing line up and seal correctly.
You’ll learn how to install a bathtub on concrete floor by measuring drain placement, routing or extending piping, securing the tub to the subfloor, and testing for watertight seals.
When to hire a professional vs. DIY
Now that you know the basic steps—cutting a drain opening, bedding the tub, and aligning the plumbing—you’ll want to decide whether to tackle the job yourself or hire a pro.
Do it yourself if you’re comfortable with concrete cutting, plumbing alignment, and precise leveling.
Hire a professional for complex drain relocations, structural concerns, waterproofing uncertainty, or if local code permits and inspections are required.
Estimated time, cost range, and required skill level
Expect the job to take a weekend for a straightforward swap (16–24 hours of hands-on work) but plan for 2–4 days if you need to cut concrete, adjust framing, or wait for sealants to cure.
Typical DIY cost ranges $300–$1,200 for materials and tools; professional installs run $1,200–$4,500 depending on labor, teardown, and plumbing.
Moderate carpentry and plumbing skills are required.
Basic Understanding Types of Bathtubs and Concrete Floor Considerations
Before you start, you’ll want to match the bathtub type—alcove, freestanding, drop-in, or undermount—to what your concrete floor and bathroom layout can support.
Check the slab for level, moisture, load-bearing capacity, and easy access to the drain location.
Also confirm local code and permit requirements so your installation meets regulations.
Common bathtub types for concrete floors (alcove, freestanding, drop-in, undermount)
When you’re choosing a bathtub for a concrete-floor installation, you’ll want to match the tub style to the room layout, plumbing location, and how much structural work you’re willing to do.
You’ll pick alcove for tight spaces, freestanding for visual impact, or drop-in/undermount where a deck suits. Consider access for drains and fastening to concrete.
- Alcove: space-efficient, needs wall support
- Freestanding: minimal anchoring, taller clearances
- Drop-in/Undermount: deck-built, precise leveling
Properties of concrete floors that affect installation (level, moisture, load-bearing, drain access)
Choosing the right tub shape is only part of the job—you also have to reckon with the concrete floor beneath it, because its condition will dictate how you set and support the fixture.
Check levelness and fix high/low spots, test moisture and install a barrier if needed, verify load-bearing capacity for filled weight, and guarantee drain location and access lines up with the tub’s outlet.
Local code and permit considerations
1 key step you can’t skip is checking local codes and permit requirements for installing a bathtub on concrete—rules vary by municipality and can affect drain location, venting, seismic/bracing needs, and whether you need an inspection or licensed installer.
Contact your building department, get required permits, confirm setback and waterproofing standards, and verify inspector timing.
Noncompliance can force costly corrections or halt work.
Tools, Materials, and Safety Preparations
Before you start, gather the right tools and equipment—wrenches, a drill, masonry bit, level, trowel, and anything else specific to your tub model.
Check a materials checklist (tub, drain assembly, mortar, flange, backing, sealants) and put on PPE while shutting off plumbing and electricity as needed.
Clear and protect the work area, guarantee good ventilation, and mark where finishes need covering.
Required tools and equipment
Because a solid installation depends on the right gear, you’ll want to gather specific tools, materials, and safety items before you start work:
- Heavy-duty drill, masonry bits, hammer, chisel, adjustable wrench, level, tape measure, tub jack or lifting straps.
- Protective gear: gloves, safety glasses, dust mask, knee pads, ear protection.
- Shop vacuum, buckets, utility knife, caulk gun, straightedge, marker.
Materials and parts checklist (tub, drain assembly, mortar, flange, backing, sealants)
Now that you’ve got the right tools and safety gear lined up, collect the specific materials and parts you’ll need to set the tub on a concrete floor:
You’ll need the bathtub, a compatible drain assembly and flange, polymer-modified mortar for a solid bed, backer board or shims to level, waterproof sealant, and appropriate fasteners and trim.
- Tub and drain
- Mortar, backing, flange
- Sealants, fasteners
Safety gear and precautions (electrical, plumbing shut-off, PPE)
When you’re ready to set the tub, cut the circuit to any nearby outlets and switches and shut off the water at the main or local valves so you don’t risk electrical shock or a sudden flood.
Wear safety glasses, gloves, a dust mask, and steel-toe boots.
Use a GFCI tester, keep a flashlight handy, and have a wrench and bucket ready for unexpected leaks.
Site preparation: clearing, protecting finishes, ventilation
Start by clearing the work area of furniture, rugs, and loose debris so you’ve got unobstructed access to the tub location and safe room to maneuver; cover remaining fixtures, walls, and floors with drop cloths or rosin paper and tape seams to protect finishes.
Open windows or run an exhaust fan to guarantee good ventilation while you cut, mix mortar, or use solvents. Remove trim, label parts, store fasteners, and keep a trash bin nearby.
Pre-Installation Inspection and Measurements
Before you set the tub in place, measure the tub and room so you know clearance, doorway fit, and access paths.
Locate the drain and plumbing rough‑in, check the concrete for level and flatness (mark any high or low spots), and plan how you’ll correct them.
Finally, do a mock placement and dry‑fit to confirm measurements and alignment before final work.
Measuring tub and room dimensions: clearances, doorways, and access
Measure carefully: check tub dimensions against room clearances, door and hallway widths, and the route from delivery to installation so you don’t encounter surprises.
Then: measure ceiling height, alcove width, and distance to fixtures.
Note threshold, stair turns, elevator limits, and where a tub will pivot.
Mark clearances for surrounding panels and access for installers to guarantee smooth placement and final fit.
Locating and assessing the existing drain and plumbing rough-in
Once you’ve confirmed the tub will fit, locate the existing drain and rough-in to guarantee the plumbing lines up with the new unit’s outlet and overflow.
Expose floor area, remove flooring if needed, and measure center-to-wall and center-to-side distances.
Check drain height, cleanout access, and nearby supply locations.
Note pipe materials, slope, and any visible leaks or corrosion for repair planning.
Checking concrete level and flatness; identifying high/low spots
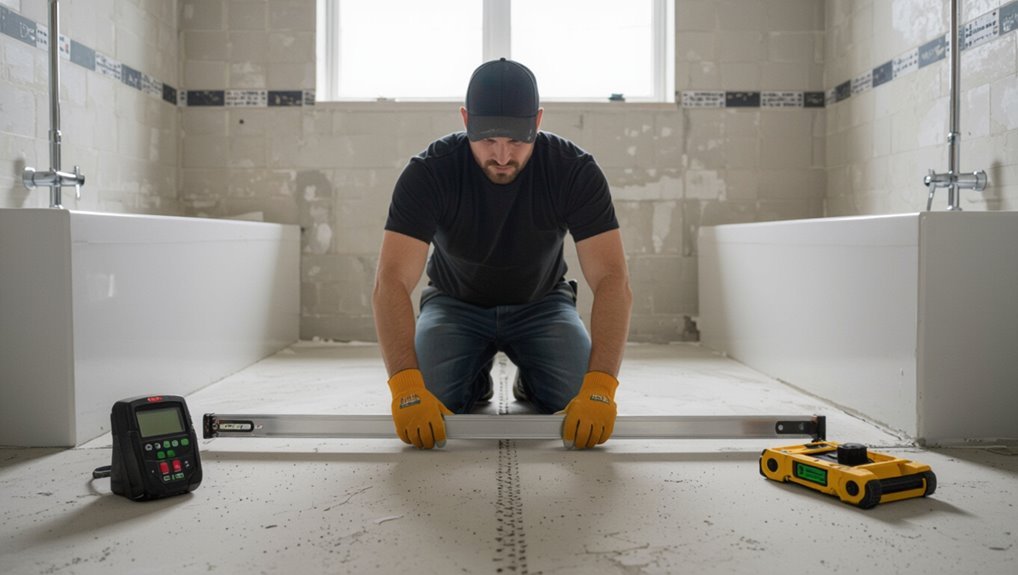
With the rough-in located and any visible plumbing issues noted, turn your attention to the concrete slab beneath the tub area to confirm it’s level and flat.
Use a long level or laser to check across multiple axes. Mark high spots and depressions. Measure deviations; anything over 1/8″ across 2 feet needs correction.
Note locations for grinding, filling, or shimming.
Preparing a mock placement and dry-fit
Before you commit to any final adjustments, set the tub in place to verify fit and clearances: lift it onto the slab (get help for heavy models), align it with the drain and wall studs, and check that the flange, overflow, and access panels line up with the rough-in.
Mark reference lines, confirm level front-to-back and side-to-side, then remove the tub and note any adjustments needed.
Step-by-Step Installation Process
Now you’ll follow a clear, ordered installation process that walks you from removing the old tub to setting the new one in place.
Start by preparing and repairing the concrete—patching, grinding, or using a self-leveling compound—then handle any drain or plumbing adjustments.
Finish by installing a mortar bed or cradle and carefully setting, shimming, and leveling the bathtub.
Step 1 Remove old tub and prepare the concrete floor
Start by shutting off the water and disconnecting the supply lines so you won’t have leaks while you work.
Remove trim, drain and disconnect the old tub, then cut anchor screws and pry it out carefully.
Clean debris, scrape old caulk and adhesive, and vacuum dust.
Inspect the concrete for loose debris or oil stains, and mark plumbing locations for the new tub.
Step 2 Repairing and leveling concrete substrate (patching, grinding, self-leveling compound)
A solid, level concrete substrate is essential for a stable bathtub installation, so you’ll need to repair damage and correct low spots before setting the tub.
Remove loose concrete, clean dust, and grind high areas. Fill cracks and voids with a bonding epoxy or patching mortar.
Use a polymer-modified self-leveling compound for depressed zones, follow cure times, and verify flatness with a straightedge.
Step 3 Adjusting or relocating floor drain and plumbing rough-in
Step 3 focuses on adjusting or relocating the floor drain and plumbing rough-in so the tub sits level and the waste lines align correctly.
You’ll verify existing drain placement, mark the new location, and plan whether to modify the trap, vent, or supply runs before cutting into the slab.
Confirm slope, measure trap arm length, shut off water, expose concrete, cut carefully, and install new drain flange and piping to code.
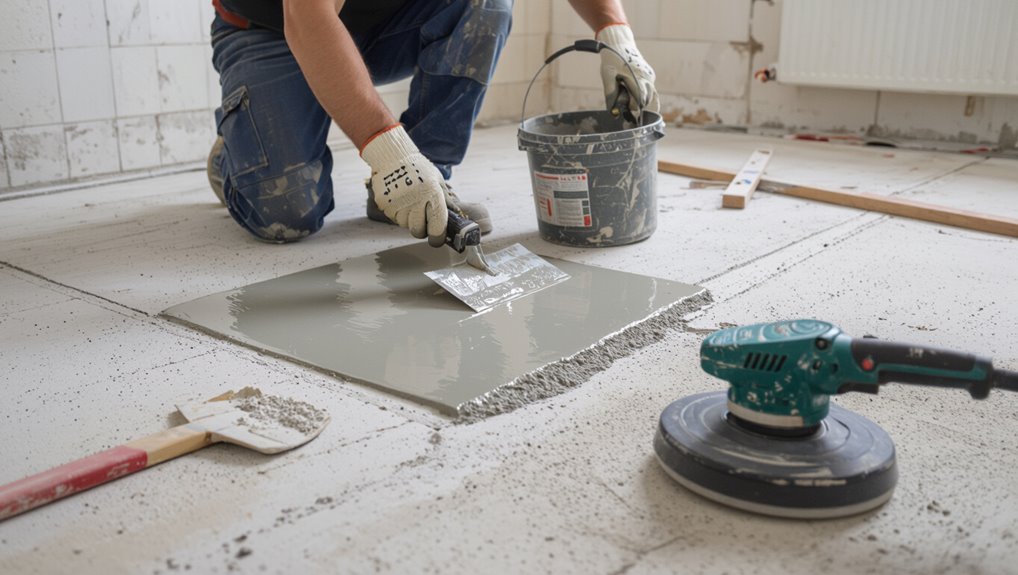
Step 4 Installing a mortar bed or tub cradle (mixing, setting depth, curing)
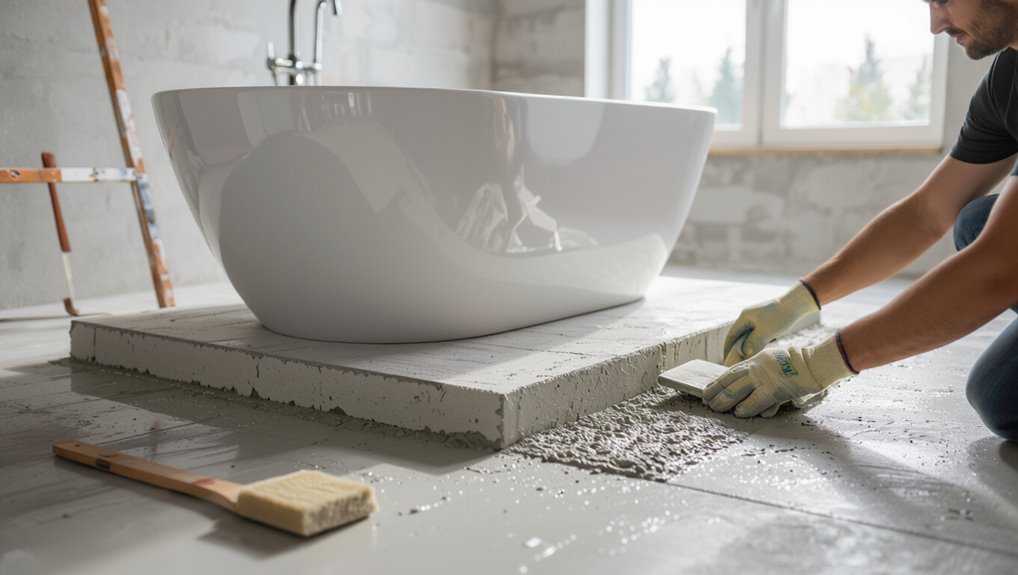
With the drain and rough-in positioned, you’ll set the tub on a stable mortar bed or prefabricated cradle to prevent flexing and guarantee long-term support.
Mix deck mud to a peanut-butter consistency, spread evenly to the manufacturer’s recommended depth, and form a uniform bearing beneath the tub.
Let cure per product instructions—usually 24–48 hours—before proceeding to final placement and plumbing connections.
Step 5 Setting the bathtub into position (alignment, shimming, checking level)
Set the tub into place carefully, aligning the drain over the waste flange and seating the base fully into the cured mortar or cradle.
Have a helper support the tub while you check side-to-side and front-to-back alignment.
Use stainless shims at the toe and rim where needed, taping them in place, then verify level at multiple points and adjust until the tub sits stable and true.
Step 6 Connecting the drain and overflow assembly; leak testing
Now connect the drain and overflow assemblies so water has a clear, watertight path out of the tub.
Fit the overflow plate, gasket, and tailpiece, then install the drain flange and rubber gasket.
Tighten connections hand‑tight plus a quarter turn with tools.
Fill the tub, inspect for leaks around joints and traps, and dry-test with dye or tissue to confirm watertight seals.
Step 7 Securing the tub to the wall and floor per manufacturer instructions
Secure the tub to the wall and floor following the manufacturer’s template and fastening schedule to guarantee a stable, long-lasting installation.
Align the tub precisely, check level front-to-back and side-to-side, then mark anchor locations.
Use specified screws or clips into studs or concrete anchors, torque to recommended depths, and avoid overdriving.
Recheck stability and make minor adjustments before proceeding to finishes.
Step 8 Waterproofing and sealing edges (flashing, backer board, waterproof membrane)

Because water damage starts at tiny gaps, you should waterproof and seal all tub edges before finishing the walls.
Install cement backer board tight to the flange, apply flashing tape over seams, and bed a waterproof membrane up the wall 2–3 inches above the tub rim.
Seal corners and flange with compatible sealant, press membrane firmly, and check for continuous coverage and adhesion.
Step 9 Finishing surrounding walls and floors (tile, trim, caulk)
With the edges sealed and membrane firmly in place, you can move on to finishing the walls and floors around the tub.
Install backer-board or cement board, set tile with thinset, and grout once cured.
Fit trim and threshold pieces for a clean connection.
Apply silicone caulk where tile meets tub and trim, tooling joints smooth for a watertight, neat finish.
Step 10 Final inspection, cleanup, and testing water flow and drains
Inspect the entire installation carefully before you call the job done: check caulk seams, tile joints, and trim for gaps or defects, confirm the pan and membrane are seated properly, and make sure all fasteners are tight.
Run water, test hot and cold, fill and drain the tub while watching for leaks and proper drainage.
Clean debris, remove protective coverings, and touch up seals.
Troubleshooting Common Installation Problems
If your tub rocks or sits unevenly, you’ll want to check and shim the base or rebuild the mortar bed to get a solid, level support.
Tighten or replace gaskets and seals to stop leaks at the drain or overflow, and correct the waste-line pitch or clear blockages to fix slow draining.
For cracked mortar or settling, remove the damaged material and repack or relevel the bed so the tub rests on a stable, continuous surface.
Dealing with an uneven tub or rocking
Although a rocking tub might seem minor at first, it can lead to leaks, cracked tiles, or damaged fixtures if you don’t stabilize it promptly.
Check which corner or edge lifts, support the tub with adjustable shims or a plywood cradle, and tighten mounting feet.
Use non-compressible shims and construction adhesive where needed, then recheck level and movement before finishing.
Resolving leaks at the drain or overflow
When you notice water pooling around the drain or seeping from the overflow, act quickly to stop further damage and pinpoint the source; most leaks come from loose fittings, degraded gaskets, or improper sealing.
Tighten drain flange and overflow screws, replace worn rubber gaskets, and reapply plumber’s putty or silicone where needed.
Test after repairs and inspect connections beneath the tub for hidden seepage.
Addressing slow drains or improperly pitched waste lines
Because a slow drain or a waste line that doesn’t slope correctly can quickly turn a new tub into a maintenance headache, you should tackle these issues early to avoid backups and leaks.
Check for clogs, venting problems, and improper pitch (minimum 1/4″ per foot).
Clean or replace trap and pipe sections, regrade or shim the line, and test flow before finalizing the install.
Fixes for cracked mortar bed or settling issues
Spot cracks or sinking early to prevent bigger problems later: a cracked mortar bed or a settling tub can let water pool, damage finishes, and loosen the tub.
If you see movement, drain and remove trim, chip out loose mortar, and replace with properly mixed deck mud.
Re-seat the tub on a level bed, shim if needed, cure fully, then re-caulk and test for stability.
Mistakes to Avoid and Code/Manufacturer Compliance
Don’t skip the basics: poor leveling, weak support, or a bad seal will cause leaks, cracks, and expensive repairs.
Follow the manufacturer’s installation instructions exactly and avoid actions that void the warranty, like altering drain fittings or using unapproved adhesives.
Also make sure your work meets local plumbing and building codes—permit and clearance mistakes can force costly rework.
Common DIY mistakes (poor leveling, insufficient support, improper seal)
When you rush through leveling, skimp on under-support, or cut corners on the seal, the tub will show the consequences quickly—uneven drains, cracked enamel, leaks into the slab, and voided warranties.
You should check level repeatedly, pack solid mortar or use a manufacturer-approved support system, and apply a continuous, waterproof seal around fixtures and edges.
Test for stability and leaks before finishing.
Manufacturer requirements and warranty-voiding actions
Because manufacturers set specific installation steps to protect performance and warranties, you should follow their instructions and local codes exactly.
Read the manual, keep receipts, and use approved materials and mounting methods.
Don’t alter structural parts, use unapproved adhesives, or modify drains or overflow assemblies.
Deviations can void warranty; document compliance and consult the manufacturer before changes to preserve coverage.
Plumbing and building code pitfalls to watch for
Following manufacturer instructions and documenting compliance also helps you meet plumbing and building codes, but there are specific mistakes that commonly trip up installations on concrete floors.
Don’t ignore local code for trap primer, venting, or slope; avoid cutting structural concrete without permits; use approved anchors, sealants, and drain assemblies; keep electrical wiring clear; and keep records to prove compliance if inspected.
Best Practices, Tips, and Efficiency Hacks
When you install a tub on concrete, use straps and suction cups to handle and position it safely without straining yourself.
Sequence tasks—prep the drain and flange, check level, then secure and seal—to save time and avoid rework.
Choose durable waterproof materials and run water, load, and leak tests before finishing to catch problems early.
Tips for easier handling and positioning (use of straps, suction cups)
If you want to move and place a heavy bathtub without straining your back, use lifting straps and suction cups to gain secure, balanced control of the load.
Loop straps under the tub, adjust for even weight, and lift with partners.
Attach suction cups to smooth surfaces for one-person fine adjustments.
Keep grips clean, wear gloves, and communicate each move to prevent slips and bumps.
Time-saving sequencing and prep strategies
Because a smart sequence and a bit of prep cut hours off the job, plan tasks so each step sets up the next: clear the work area, dry-fit the tub and drain, mark anchor points, and pre-cut plumbing hookups.
Gather tools, lay out materials in order of use, and schedule adhesive and sealant application last. Work in stages to avoid rework and downtime.
Selecting materials for durability and waterproofing
Choose materials that stand up to water, weight, and time: pick a tub with a solid acrylic or cast-iron core, use a PVC or ABS drain and trap, and select cement backer board plus a polymer-modified thinset for surrounding tile.
Add waterproof membrane over the backer, use corrosion-resistant fasteners, marine-grade sealant at joints, and choose grout with water repellant additives for long-term protection.
When and how to test before finishing (water, load, leak tests)
Before you finish the tub surround and floor, run a series of quick tests—water, load, and leak checks—to catch problems now when fixes are cheap and accessible.
Fill the tub, inspect drains and overflow for slow drainage or visible leaks.
Sit or press around edges to check support and movement.
Recheck caulking and fittings after 24 hours; repair any seepage before finishing.
Materials and Cost Comparison
You’ll want a clear cost breakdown showing materials, labor, and any permit fees so you can budget the job accurately.
Compare installation methods—mortar bed, foam cradle, and manufacturer supports—for upfront material costs, long-term performance, and labor intensity.
That comparison will help you pick the most cost-effective and durable option for your project.
Cost breakdown: materials vs. labor vs. permits
Breaking down the costs helps you see where your money goes: materials, labor, and permits each play a distinct role in the final bill. You’ll budget for tub, plumbing, and sealants; labor varies by complexity; permits add fixed fees. Prioritize quality where failure is costly.
| Category | Typical Cost |
|---|---|
| Materials | $200–$1,200 |
| Labor | $300–$1,000 |
| Permits | $50–$300 |
Comparison of mortar bed vs. foam cradle vs. manufacturer supports
When choosing how to set your tub on a concrete floor, weigh mortar beds, foam cradles, and manufacturer supports side-by-side for performance, ease of installation, and cost. You’ll pick mortar for durability, foam for speed and insulation, or manufacturer supports for warranty compliance.
| Option | Pros | Cons |
|---|---|---|
| Mortar | Durable | Labor/time |
| Foam | Quick/light | Cost/material |
Frequently Asked Questions
You’ll find answers here to common installation questions like whether you can set a tub directly on concrete or need a mortar bed, how to relocate a drain through slab, and whether freestanding tubs require special anchors.
You’ll also learn recommended cure times for mortar or leveling compound before use and which signs—cracks, movement, or leaks—show the job didn’t hold up.
If you’re unsure about any step, ask so you don’t end up with a costly fix later.
Can you install a bathtub directly on concrete without a mortar bed?
Can you set a bathtub directly on concrete without a mortar bed? You can, but it’s generally not recommended.
Direct contact risks rocking, uneven support, and long-term stress on the tub.
Use manufacturer guidelines—some modern tubs allow pads or foam supports.
For durability and a solid feel, a proper mortar bed or approved support system is the safer choice.
How do you change the drain location on a concrete floor?
Moving a tub drain on a concrete floor is trickier than on a wood subfloor, but you can do it with the right plan and tools.
You’ll core-drill a new hole, install a concrete-approved drain assembly or create a recessed pocket for piping, slope and seal connections, then plug and patch the old opening with hydraulic cement and a matching finish.
Test for leaks thoroughly.
Will a freestanding tub need special anchoring on concrete?
How much anchoring a freestanding tub needs on concrete depends on the tub’s design and your local code, but in most cases you’ll need some form of secure attachment or non-slip restraint to prevent shifting during use or seismic events.
You should bolt brackets to concrete, use adhesive pads or a perimeter bead of construction adhesive, and follow manufacturer instructions and code for secure installation.
How long should mortar or leveling compound cure before use?
Before you put weight on a newly set mortar or leveling compound, let it cure to achieve full strength — typically 24 to 72 hours for light use and 7 days (or longer) for full bathtub support depending on the product and conditions.
Check the manufacturer’s cure time, maintain recommended temperature and humidity, and avoid disturbing the bed.
If in doubt, wait longer to guarantee proper bonding.
What signs indicate the installation failed after weeks/months?
If you start seeing any of the following issues weeks or months after installation, the bathtub bed likely failed:
tub rocks or shifts when you sit, drains gurgle or slow, cracks appear in tile or grout, caulk separates, gaps form under the rim, floor squeaks, or you notice new leaks or water stains.
Address failure promptly to prevent structural or water damage.
Visual Resources and Checklists
You can download a step-by-step installation checklist to keep tasks, measurements, and materials organized as you work.
Use key photos and diagrams that correspond to each checklist step so you can quickly confirm proper layout, drain alignment, and anchor placement.
Keep the checklist and images handy on your phone or a printed sheet for quick reference during the install.
Step-by-step installation checklist for download
Get a clear, printable checklist that walks you through each installation step so you won’t miss critical tasks like floor leveling, drain alignment, anchoring, and waterproofing.
Use the downloadable PDF at the job start, check off items as you go, and keep tools and materials staged nearby for efficiency.
- Pre-install prep and measurements
- Drain and mortar bed steps
- Final sealing, testing, and cleanup
Key photos and diagrams to reference during each step
Now that you’ve got the checklist and staged your tools, pair each step with clear visuals so you can verify measurements, drain alignment, mortar contours, and sealant placement as you work.
Photograph reference angles: level across rim, underside showing support, drain/hardware close-up, mortar bed profile, and final caulk seams.
Label images, note dimensions, and keep prints or digital files handy during installation.