How to Install 12×12 Ceiling Tiles for a Clean, Professional Finish
You can get a clean, professional finish installing 12×12 ceiling tiles by planning a centered layout, prepping the ceiling, and choosing either direct-bond adhesive or a suspended grid. Measure and snap chalk lines, dry-fit tiles, cut perimeter pieces for snug fits, and apply adhesive or install a grid and lay tiles from the center outward. Work patiently, clean excess adhesive immediately, and finish seams with trim or caulk; keep going for detailed tips, tools, and troubleshooting.
Quick Answer Can You Install 12×12 Ceiling Tiles for a Clean, Professional Finish?
Yes — you can install 12×12 ceiling tiles for a clean, professional finish by measuring and marking a grid, cutting tiles to fit, and securing them with adhesive or a drop ceiling grid.
Expect a few hours for a small room, modest material costs, and a beginner-friendly difficulty if you’re comfortable with basic tools.
With careful layout and neat cuts, you’ll get a uniform, finished look that masks imperfections and improves acoustics.
Short summary of process and expected results
You can install 12×12 ceiling tiles yourself and get a clean, professional finish by preparing the surface, accurately measuring and cutting tiles, and using the right adhesive or grid system for your ceiling type.
Follow clear steps on how to install 12×12 ceiling tiles: prep, layout, cut, adhere or drop into grid, and trim edges.
Expect straight lines, even coverage, and a refreshed ceiling.
Time, cost, and difficulty at a glance
Although the exact time, cost, and difficulty vary with room size and ceiling condition, most homeowners can install 12×12 ceiling tiles themselves and achieve a professional look with basic tools and one weekend of work for an average-sized room. You’ll spend moderate effort, a few dozen dollars to a few hundred, and need basic carpentry skills.
| Time | Cost |
|---|---|
| 1 weekend | $30–$300 |
| Moderate effort | Basic skills |
Basic Understanding What Are 12×12 Ceiling Tiles and Why Choose Them?
12×12 ceiling tiles come in materials like mineral fiber, PVC, metal, and polystyrene with options for textured, acoustic, or purely decorative finishes, so you’ll pick a type based on function and look.
You’ll weigh pros and cons—smaller tiles are easier to handle and fit irregular layouts but mean more seams than larger panels and can require more cutting.
Think about common uses (drop ceilings, basements, retail) and style choices to match acoustics, durability, and the room’s aesthetic.
Types of 12×12 ceiling tiles (material, texture, acoustic vs decorative)
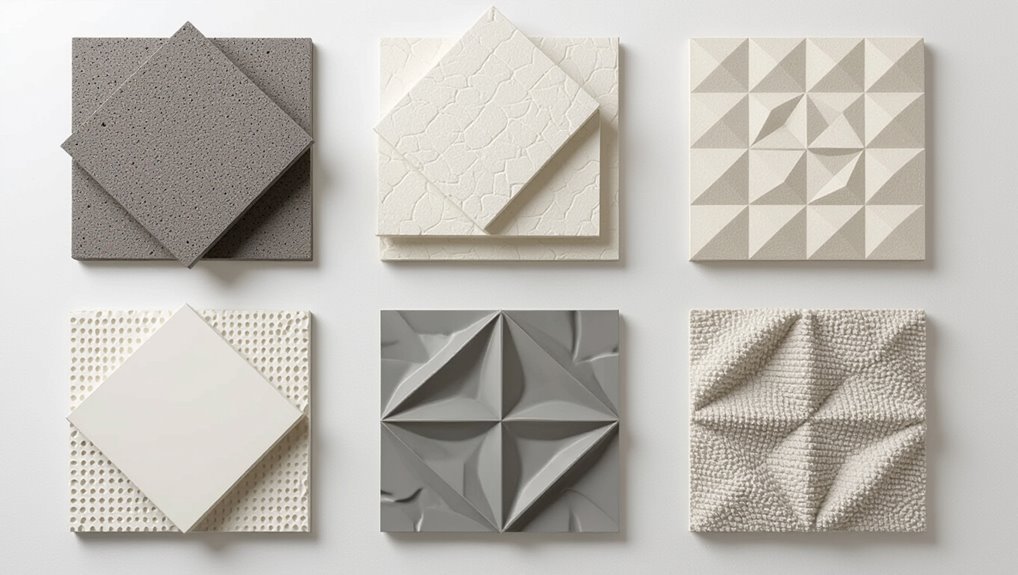
Pick tiles by material, texture, and purpose to match your room’s look and performance needs.
You’ll choose lightweight polystyrene or durable mineral fiber, smooth or embossed finishes, and acoustic panels that absorb sound versus decorative tiles that hide imperfections.
Match choice to humidity, maintenance, and noise control so installation and longevity meet expectations.
- Materials: polystyrene, PVC, mineral fiber
- Textures: smooth, embossed, patterned
- Purpose: acoustic vs decorative
Pros and cons compared with other tile sizes and ceiling systems
When you’re weighing 12×12 ceiling tiles against larger or smaller tiles and alternative systems, consider how their size affects layout, waste, and appearance: smaller 12-inch modules give you finer pattern control and easier fits around fixtures but can take longer to install in large areas and show more seams than 24×24 or acoustic grid panels.
| Benefit | Trade-off |
|---|---|
| Precise fits | More seams |
| Lower waste on cuts | Slower install |
| Better pattern control | More handling |
| Flexible repairs | Less continuous surface |
Common uses and style considerations
You’ll find 12-inch ceiling tiles work well in a range of spaces—from small bathrooms and kitchens to retail displays and cozy offices—because their modest size makes them easy to handle, cut, and fit around lights or vents.
You’ll choose patterns, textures, and colors to match style—modern, traditional, or industrial—and pick acoustical or moisture-resistant options for function.
Tools, Materials, and Preparations
Before you start, gather a simple checklist of tools and supplies—measuring tape, utility knife, straightedge, adhesive or mastic, replacement tiles, and a few extras.
Consider tile and adhesive options based on your ceiling type and room conditions so you can pick the right fit and bond.
Put on safety gear and clear the work area, marking existing fixtures and preparing surfaces for a clean, safe install.
Required tools and supplies checklist

Although it’s tempting to rush in, gathering the right tools, materials, and a few prep items up front will make installing ceiling tiles faster and neater; you’ll need a tape measure, level, utility knife, straightedge, adhesive or grid components, tiles, safety gear (glasses and mask), and basic cleanup supplies.
- Measure and mark layout lines
- Cut and dry-fit tiles before bonding
- Keep adhesive, rags, and a bucket handy
Tile and adhesive options how to choose
Picking the right ceiling tiles and adhesive sets the tone for the whole job, so consider substrate, room conditions, and desired look before you buy. Choose moisture-resistant tiles for bathrooms, lightweight foam for easy handling, and high-strength adhesive for heavier panels. Match adhesive to tile material and substrate.
| Tile Type | Best Adhesive |
|---|---|
| Foam | Acrylic |
| Mineral | Construction |
| PVC | Solvent-based |
Safety gear and site preparation steps
Once you’ve chosen your tiles and adhesive, gear up and prepare the work area so you can install safely and efficiently.
Put on safety glasses, a dust mask, ear protection, gloves, and non-slip shoes.
Clear furniture and cover floors with drop cloths.
Confirm good lighting, ventilation, and a sturdy ladder.
Keep tools, spare tiles, and adhesive within arm’s reach for smooth, safe workflow.
Assessing and Preparing the Ceiling Surface
Start by inspecting the existing ceiling for damage, level, and framing so you know what needs repair before you begin.
Measure and map a layout for 12×12 tiles to establish center lines and cut locations.
Repair or replace damaged substrate, prime as needed, and address any moisture issues to guarantee a stable, long-lasting surface.
Inspecting the existing ceiling for damage, level, and framing
Before you begin installing tiles, thoroughly inspect the existing ceiling for damage, level, and framing so you’ll know exactly what repairs or adjustments are needed.
Check for water stains, sagging, cracks, mold, and loose drywall. Use a level or laser to spot uneven areas.
Verify joist spacing and secure loose framing. Note repairs, replace damaged sections, and guarantee a stable, dry surface.
Measuring and mapping layout for 12×12 tiles
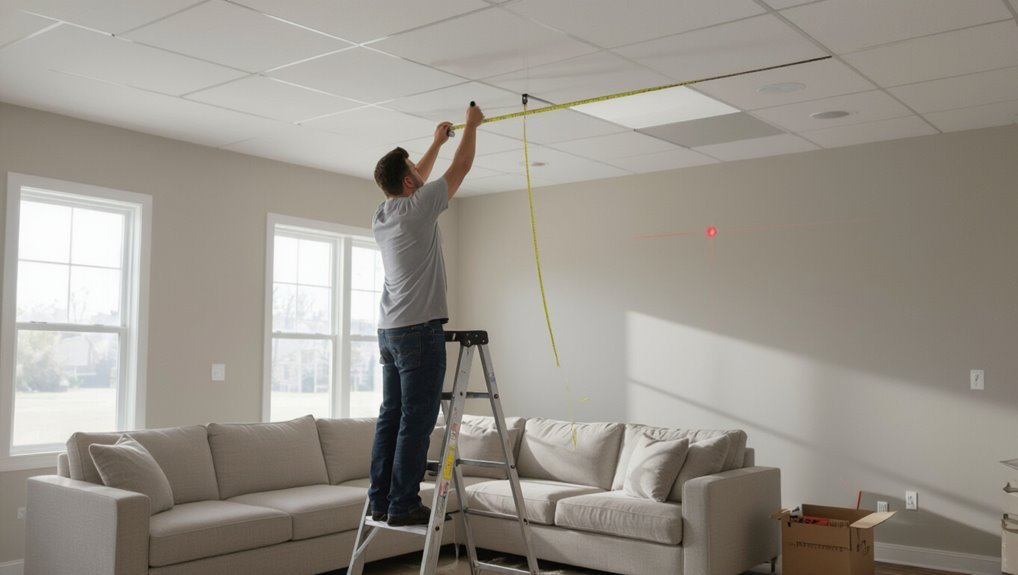
After you’ve repaired and leveled the ceiling, you’ll measure and map out where each 12×12 tile will go so cuts and seams fall neatly and symmetry is preserved.
Start by finding and marking the room center, snap perpendicular chalk lines, and dry-fit tiles along edges.
Measure partial tiles at perimeter, note cut sizes, and plan junctions around fixtures to minimize visible small pieces.
Substrate repair, priming, and moisture considerations
When the ceiling’s substrate shows cracks, stains, or soft spots, you’ll want to assess and repair those issues so tiles adhere and look uniform.
Patch loose drywall or plaster, remove flaking texture, sand rough areas, and replace any water-damaged sections.
Prime bare or repaired areas with a stain-blocking primer, let it cure, and address humidity or leaks before installing tiles to prevent future failures.
Direct Answer Step-by-Step Installation Process
Start by planning your tile layout and marking straight guidelines so everything lines up.
Cut and fit perimeter tiles and around fixtures, then choose adhesive or a suspended grid and install it.
Set each tile, keep alignment as you press or secure them, and finish with caulk, trim, and any paintable seams.
Step 1: Plan the layout and mark guidelines

1. You’ll start by measuring the ceiling’s centerlines: find midpoints of opposite walls and snap chalk lines crossing at the room’s center.
Dry-fit a few tiles along those lines to confirm layout and symmetry. Mark rows and reference lines with a pencil or chalk so tiles align neatly.
Account for light fixtures and vents later.
Step 2: Cut and fit perimeter tiles and obstacles (lights, vents)
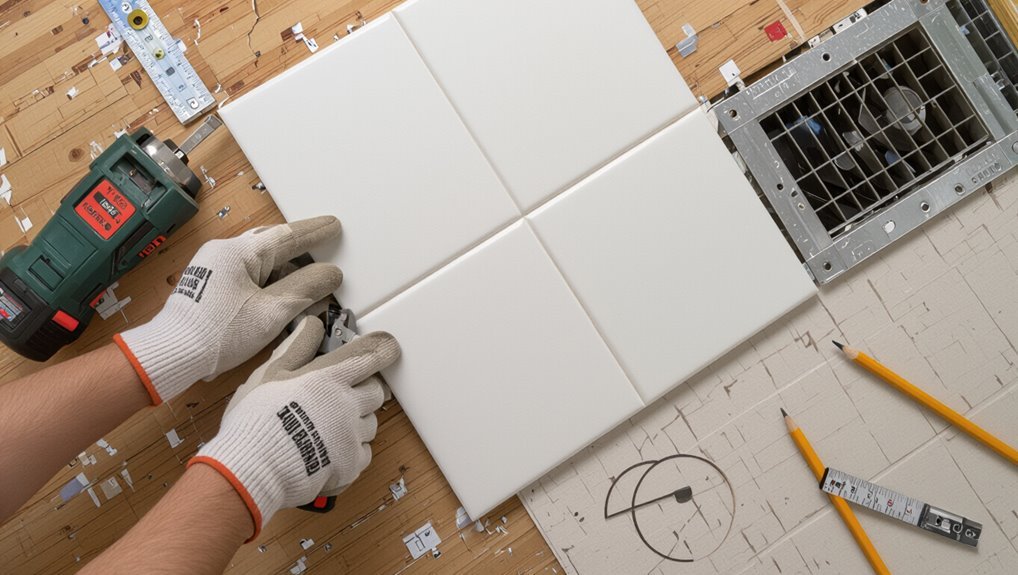
Cut perimeter tiles to fit snugly against walls and around fixtures before setting the full-field tiles, so your room looks finished and sits flush.
Measure each edge and mark cuts, allowing for trim thickness. Cut tiles with a utility knife or shears, test-fit around lights and vents, notch openings precisely, and label pieces.
File rough edges and dry-fit before final placement.
Step 3: Apply adhesive or install grid system (adhesive vs suspended)
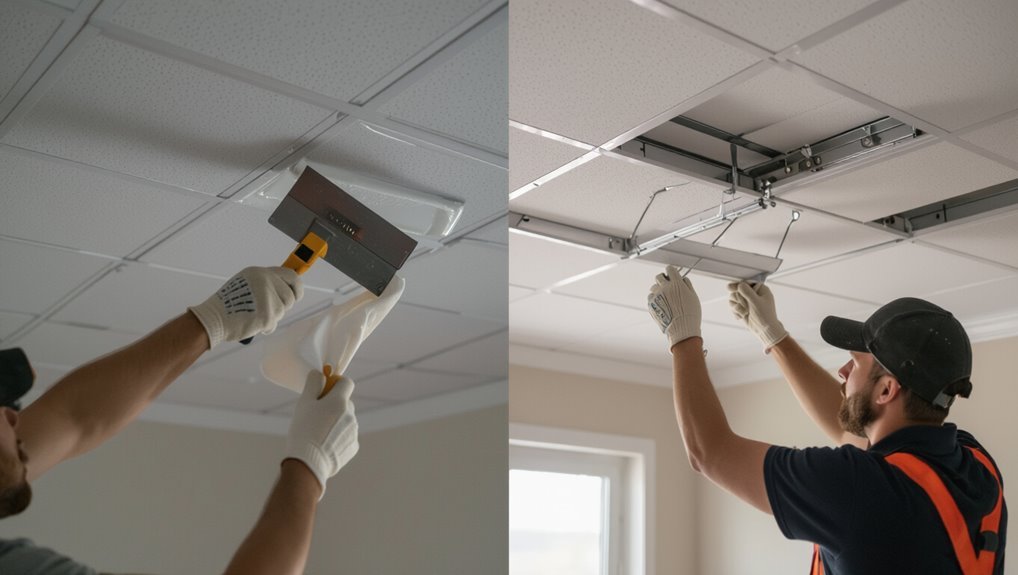
Decide whether you’ll use adhesive or a suspended grid, because each method needs different prep and tools: adhesive (direct-bond) works on clean, dry ceilings and gives a seamless look, while a suspended grid requires perimeter trim, hangers, and accurate leveling but allows easy access to above-ceiling systems.
For adhesive, apply manufacturer’s beads and press tiles; for suspended, install grid, level mains, and secure hangers.
Step 4: Set tiles, maintain alignment, and press/secure properly
With your adhesive in place or the grid leveled and secured, start setting tiles from the center or a focal wall and work outward so cut pieces land at the room edges.
Press each tile firmly into the adhesive or snap into the grid, checking alignment with a straightedge.
Maintain consistent gaps, tap edges to seat tiles, and clean excess adhesive immediately.
Step 5: Finishing touches caulking, trims, and paintable seams
Once the tiles are set and aligned, finish seams and edges by caulking gaps, installing trim, and touching up paint so the ceiling looks seamless and professional.
Run a paintable acrylic caulk along joints, smooth with a wet finger, and install L- or J-channel trim where needed.
Prime any exposed edges, then paint to match tiles for a clean, finished appearance.
Installation Variations and Special Scenarios
You’ll choose different methods depending on whether you’re fitting tiles into a suspended grid or bonding them directly to drywall.
You’ll also need specific cuts and clearances to work safely around fixtures, recessed lights, and HVAC vents.
If your ceiling is textured or uneven, you’ll learn how to prep or shim surfaces so tiles sit flat and look professional.
Installing on a suspended grid vs directly to drywall
When choosing between a suspended grid and direct-to-drywall installation, consider how the ceiling will be accessed, the condition of the existing surface, and the look you want; a suspended grid offers easy tile replacement and built-in access for wiring and pipes, while direct application to drywall gives a cleaner, low-profile finish but makes future access and repairs harder.
| Option | Best for |
|---|---|
| Suspended grid | Access, utilities |
| Direct to drywall | Sleek look, low profile |
| Cost | Grid slightly higher |
| Repairability | Grid easier |
Working around fixtures, recessed lights, and HVAC vents
Because fixtures and vents interrupt the ceiling plane, you’ll need to plan cuts and supports carefully so tiles fit cleanly and stay secure.
Measure openings precisely, mark tiles, and cut with a sharp utility or rotary tool.
Use drywall rings, plaster collars, or vent adapters to finish edges.
Secure tiles around fixtures with adhesive or small fasteners, keeping clearances for heat and airflow.
Installing over textured surfaces or uneven ceilings
After fitting tiles around lights and vents, you may find the ceiling surface itself won’t cooperate—textured popcorn, heavy stipple, or uneven plaster can prevent tiles from sitting flat or the grid from aligning.
You can remove texture, apply a leveling skim coat, or install furring strips to create a flat substrate.
Choose methods based on cost, time, and whether you rent or own.
Common Mistakes and How to Avoid Them
Don’t skimp on measuring and layout planning—mistakes here lead to uneven tiles and wasted material.
Make sure you use the correct adhesive and prep the surface fully, and cut precisely around fixtures to avoid gaps or weak seals.
Also account for humidity and temperature so tiles won’t warp after installation.
Mis-measuring and poor layout planning
When you rush measurements or skip laying out a grid, you’ll end up with uneven cuts, mismatched seams, and a ceiling that looks off-center; take the time to measure accurately, mark a chalk line, and plan tile placement so you get balanced edges and minimal waste.
Double-check room dimensions, snap perpendicular reference lines, dry-fit tiles, and adjust your layout to center feature areas before cutting.
Using wrong adhesive or insufficient preparation
If you pick the wrong adhesive or skip proper surface prep, tiles won’t stick or will sag over time, leaving you with gaps, stains, or a ceiling that needs redoing.
Always clean, dry, and repair the substrate, choose an adhesive rated for your tile material and humidity, and follow manufacturer open-time and cure instructions.
Test a corner before full installation.
Inadequate cutting around fixtures causing gaps or weak seals
After you’ve secured tiles with the right adhesive and prep, pay close attention to cuts around lights, vents, and pipes—poorly cut openings are a common cause of visible gaps and weak seals.
Measure twice, mark carefully, and use a sharp utility knife or hole saw. Trim slowly for a snug fit, dry-fit before adhesive, and seal edges with appropriate caulk or gasket to prevent drafts.
Ignoring humidity/temperature issues leading to warping
Because ceiling tiles respond to moisture and temperature shifts, ignoring your room’s climate can quickly lead to curling, sagging, or gaps that ruin the finished look.
You should acclimate tiles 48 hours, control humidity between 30–50%, and avoid installing during HVAC cycles.
Use moisture-resistant tiles in damp areas, add ventilation, and leave small expansion gaps so tiles stay flat and aligned.
Best Practices and Pro Tips for a Professional Finish
You’ll get a pro finish by keeping grout and caulk lines consistent and seams tight.
Match patterns and textures as you work, use the right tools and cutting techniques for clean edges, and check fits before you secure tiles.
After installation, follow simple maintenance—regular dusting and prompt sealant touch-ups—to keep the ceiling looking new.
Achieving consistent grout/caulking lines and seams
Get clean, straight grout and caulk lines by preparing your surfaces, choosing the right materials, and using steady, practiced technique.
Clean joints, remove dust, and verify edges are dry. Use painter’s tape for crisp edges, a consistent bead size, and a quality silicone or acrylic caulk suited for ceilings.
Smooth with a damp finger or tool, remove tape before skin forms.
Matching patterns and textures across tiles

When matching patterns and textures across ceiling tiles, plan your layout so repeating motifs and reliefs line up at sightlines and light sources. Rotate tiles consistently, preview a dry run, and mark orientation on backs.
Stagger patterned seams to avoid obvious repeats, blend cut pieces into less visible areas, and adjust placement to keep shadows and highlights flowing uniformly for a cohesive, professional look.
Tools and techniques for clean cuts and tight fits
Although precise cuts start with the right tools, technique makes the difference between a sloppy job and a seamless ceiling.
Use a sharp utility knife, metal straightedge, and fine-tooth saw for unfamiliar cuts. Score and snap foam or vinyl tiles; cut drywall-backed tiles slowly to avoid chipping.
Dry-fit pieces, trim incrementally, and shim edges for uniform gaps before final placement.
Maintenance tips to keep tiles looking new
Because ceiling tiles sit out of sight, you mightn’t notice dirt or damage until it’s obvious—but a little regular care keeps them looking new and prevents costly replacements.
Wipe tiles monthly with a soft cloth or vacuum with a brush attachment. Spot-clean stains with mild detergent and water.
Replace warped or stained tiles promptly. Check for leaks and fix them to avoid mold and discoloration.
Cost, Time Estimates, and When to Hire a Pro
You’ll compare DIY material costs and what contractors typically charge so you can weigh savings against professional labor.
Estimate how long the job will take based on room size and tile complexity to plan your weekend or schedule.
If the ceiling has structural issues, awkward access, or you want a flawless finish, hire a contractor.
Breakdowns: DIY vs professional labor costs
When weighing whether to tackle ceiling tiles yourself or hire a pro, focus on cost, time, and the complexity of the job—these determine whether DIY saves you money or just stress. You’ll compare materials, tool rental, and potential mistakes against pros’ hourly rates and warranties to decide.
| Option | Typical Cost | Notes |
|---|---|---|
| DIY | Low–moderate | Save labor, risk errors |
| Pro | Moderate–high | Faster, guaranteed |
| Hybrid | Moderate | You assist, reduce cost |
Project time estimates by room size and complexity
If your room is small and straightforward, you can expect to finish removing old tiles and installing new ones in a day or a weekend.
Larger or more complex spaces—high ceilings, intricate patterns, or electrical and HVAC obstacles—stretch the timeline to several days or more.
Plan prep, cleanup, and drying time: small rooms 6–12 hours, medium 1–2 days, large or complex 3–5+ days.
Signs you should hire a contractor
Several clear signs mean it’s time to hire a contractor: major water damage, uneven or sagging ceilings, extensive tile replacement across large areas, complicated electrical or HVAC work, or simply not having the time or confidence to handle the job safely.
Contractors give written cost and time estimates, handle permits and hidden issues, and guarantee code-compliant, efficient work so you avoid costly mistakes.
Troubleshooting Common Problems
You’ll run into a few common issues—gaps, sagging, or tiles that pop loose—and each has a straightforward fix like tightening grid clips, adding adhesive, or trimming for a better fit.
For stains, mold, or water damage you’ll need to identify and stop the moisture source, treat or replace affected tiles, and consider a mildew-resistant finish.
If one tile needs replacing, you’ll want to remove and swap it carefully so you don’t disturb the surrounding tiles.
Gaps, sagging, or tiles popping loose causes and fixes
When tiles shift, sag, or pop loose it usually points to problems with the grid, the tiles themselves, or the environment; knowing the likely causes lets you target the right fix quickly.
Check for loose or misaligned suspension wires, warped or oversized tiles, and inadequate support at edges.
Re-tension grid, trim or replace distorted tiles, add clips or adhesive points, and control humidity.
Staining, mold, or water damage remediation
Loose or damaged tiles can let moisture and dirt collect, but staining, mold, and water damage bring different risks and need different fixes.
First, stop the leak and dry the area thoroughly.
Clean stains with appropriate cleaners; use a mold-killing solution and protective gear.
Replace tiles that’re warped or crumbling.
After repairs, prime and repaint with mildew-resistant paint to prevent recurrence.
Replacing single tiles without disturbing the rest
If a single ceiling tile’s cracked, stained, or sagging, you can swap it out without disturbing the surrounding grid by removing only the damaged piece and installing a matching replacement.
Press up slightly, tilt and slide the old tile out. Measure and trim the new tile for a snug fit, then slide it into place and level it with adjacent tiles.
FAQ Common Questions About 12×12 Ceiling Tile Installation
You’ll find quick answers here to cutting tiles cleanly, installing over textured ceilings, and whether 12×12 tiles work in bathrooms and kitchens.
I’ll also cover matching replacements later and simple maintenance to keep your ceiling looking professional.
Read on and you’ll get practical tips for each common question.
How do I cut 12×12 tiles cleanly and accurately?
Cutting 12×12 ceiling tiles cleanly comes down to the right tools, steady support, and a careful measuring routine.
Measure and mark cut lines with a pencil and straightedge. Use a sharp utility knife for foam or vinyl tiles, scoring multiple times.
For hard or thick tiles, use a fine-tooth hand saw or jigsaw with a fine blade. Support tiles on a flat surface while cutting.
Can I install 12×12 tiles over existing popcorn or textured ceilings?
Wondering whether you can install 12×12 tiles over a popcorn or textured ceiling? You can, but prep matters.
Remove loose texture, clean surface, and level major bumps. Use adhesive-rated tiles or furring strips to create a smooth substrate.
Test adhesion in a small area first. If texture contains asbestos or is unstable, hire a pro for safe removal before tiling.
Are 12×12 ceiling tiles suitable for bathrooms and kitchens?
Generally, yes—12×12 ceiling tiles can work well in bathrooms and kitchens if you choose the right material and install them correctly.
Pick moisture- and mold-resistant tiles like PVC, vinyl, or treated mineral fiber.
Guarantee proper ventilation, use corrosion-resistant adhesive or grid, seal edges, and avoid direct shower spray.
With correct substrate prep and maintenance, they’ll hold up and look professional.
How do I match tiles if I need to replace damaged ones later?
How will you match replacement tiles later?
Keep leftover tiles from the original batch and note the manufacturer, pattern name, and paint code. Photograph the ceiling and measure grout lines or spacing.
If originals aren’t available, search for close matches using samples or supplier swatches, or order full cartons to guarantee consistency.
Test a single tile in-place before committing to larger replacements.
What maintenance is required to keep tiles looking professional?
If you want your 12×12 ceiling tiles to look professional long-term, keep a simple maintenance routine: dust or vacuum them monthly, spot-clean stains promptly with a mild detergent and soft cloth, and check for moisture, mold, or sagging every few months.
Replace stained or damaged tiles quickly, repair leaks, and repaint or reseal tiles as needed to maintain uniform color and prevent deterioration.
Quick Checklist Before You Start
Before you begin, make one final measurement sweep and confirm you’ve got all materials and any required permits.
Lay out a simple day-of timeline so you know when inspections, cuts, and cleanup should happen.
Keep a short list of key checkpoints—starter row alignment, adhesive or grid readiness, and final trim—so you don’t miss anything.
Final measurement, materials, and permit checklist
1 quick sweep through measurements, materials, and permits will save you time and money once you start installing ceiling tiles.
Check final room dimensions, note obstacles, and confirm tile counts.
Verify adhesive, grid, and trim are on hand. Confirm local permit needs and document approvals.
- Measure twice, order once
- Gather all materials and extras
- Confirm permits and timelines
Day-of-installation timeline and key checkpoints
When you arrive on installation day, run a quick walkthrough to confirm measurements, layout, and that all materials—tiles, adhesive, grid, trim, and tools—are staged and accessible.
Note any last-minute obstacles like vents or light fixtures so you can adjust the sequence.
Then follow this quick timeline and checkpoints to stay efficient and accurate:
- Start perimeter cuts, mark reference lines, test-fit tiles.
- Install main field tiles, maintain alignment, trim as needed.
- Finish edges, reinstall fixtures, inspect seams and clean up.