How to Replace Carpet With Laminate Flooring Step by Step
You can swap carpet for laminate in a weekend by removing carpet, padding, and tack strips, then repairing and leveling the subfloor. Lay a moisture barrier or underlayment, acclimate planks 48 hours, and snap a chalk line to start. Click or glue rows together, staggering end joints 8–12 inches, trim around obstacles, and finish with connections and baseboards. Clean and inspect the floor, and if you keep going you’ll find detailed tips, tool lists, and troubleshooting steps.
How to Replace Carpet with Laminate Flooring Quick Answer and Overview
You can expect a DIY laminate install to take a weekend or two, cost a few hundred to a couple thousand dollars depending on room size and materials, and follow basic steps: remove carpet, prep subfloor, lay underlayment, and click the planks together.
This guide’s for homeowners and handy renters who want a durable, low-maintenance update and aren’t afraid to do some measuring and cutting.
Follow these steps and you’ll have a finished floor that looks professional and lasts for years.
Quick answer: Time, cost, and basic steps summary
Typically, replacing carpet with laminate takes a weekend for an average room — plan on 6–12 hours of active work plus drying/settling time.
You’ll spend $1–5 per sq ft for materials, $50–200 for tools, or more for pro installation.
Basic steps: remove carpet, prep subfloor, install underlayment, click-lock laminate, trim and finish.
Ask how do I replace carpet with laminate flooring?
Who this guide is for and expected results
This guide is for homeowners, renters with landlord approval, and handy DIYers who want a durable, budget-friendly upgrade that transforms carpeted rooms into low-maintenance living spaces.
You’ll get clear steps, tool lists, and time estimates so you can plan weekends.
Expect a cleaner look, easier cleaning, and improved durability; savings depend on room size and whether you handle installation yourself.
Understanding the Project What You Need to Know Before Starting
Before you start, you’ll want to weigh why you’re replacing carpet—its pros and cons—and pick a laminate type that fits each room’s wear and moisture needs.
Check your subfloor for level, dryness, and any repairs, and gather the right tools, materials, and safety gear.
Finally, have a realistic time and cost estimate and know when the job is worth hiring a pro.
Why replace carpet with laminate? Benefits and drawbacks
If you’re weighing a flooring change, swapping carpet for laminate can give rooms a cleaner look, easier upkeep, and better durability for busy households; but you’ll also want to contemplate factors like sound, comfort, and moisture sensitivity before you start.
Laminate resists stains, lasts longer, and suits allergy-prone homes, yet it’s harder underfoot, can amplify noise, and may warp with water—so weigh pros and cons.
Types of laminate flooring and suitability for different rooms
You’ve weighed the pros and cons of carpet versus laminate, so next you’ll want to match the right type of laminate to each room’s needs.
Choose AC-rated planks: AC3 for living areas, AC4–AC5 for high-traffic or commercial-like spaces.
Water-resistant or SPC/core waterproof options suit kitchens, bathrooms, and basements.
Pick durable finishes for pets and kids; consider style and underlayment for comfort.
Subfloor requirements: what laminate needs vs. carpet
A solid, flat subfloor is the foundation for a successful laminate installation, and it has different demands than carpet does.
You’ll need a clean, level, rigid surface—no soft spots, loose boards, or high deviations over 3/16 inch per 6 feet.
Laminate needs moisture control and consistent thickness; carpet tolerances and padding won’t provide the stability or vapor barrier laminate requires.
Tools, materials, and safety gear checklist
Before you start ripping up carpet, gather the right tools, materials, and safety gear so the job goes smoothly and safely: you’ll need a laminate cutter or saw, tapping block and pull bar, spacers, underlayment, tape, and moisture barrier, plus adhesive or joining strips where required; materials should match your room size with 5–10% extra for cuts and waste.
- pry bar
- utility knife
- tape measure
- safety glasses
- knee pads
Estimated time, cost breakdown, and when to hire a pro
Expect to spend roughly one weekend for a single room if you’re working steady—about 6–12 hours for demolition and prep, plus 4–8 hours for laying laminate and trim—though larger or more complex rooms can take 2–3 days. Budget $2–6 per sq ft for materials, $1–3 for underlayment, $1–5 labor if pro. Hire a pro for uneven subfloors.
| Item | Low | High |
|---|---|---|
| Materials | $2/sq ft | $6/sq ft |
| Underlayment | $1/sq ft | $3/sq ft |
| Labor | $0 | $5/sq ft |
| Contingency | 5% | 15% |
Prep Work Assessing and Preparing the Room
Before you start, inspect the carpet and subfloor for damage or uneven spots that’ll affect installation.
Move out furniture and fixtures, remove baseboards, and map where changes, thresholds, vents, and stairs will need trim or adapters.
Finally, test for moisture and level any low areas so the laminate lays flat and lasts.
Inspecting the existing carpet installation and subfloor condition
Start by examining the carpet and subfloor closely so you know what you’re dealing with: check seams, tack strips, and padding for damage or mold.
Press for soft spots, uneven areas, or rot. Note changes, thresholds, and moisture stains.
Measure subfloor flatness and mark low or high spots. Document repairs or replacement needs before you remove anything.
Removing furniture, fixtures, and baseboards
With your inspection notes in hand, clear the room so you can work freely and protect your belongings: move furniture to another room or to the center and cover it with drop cloths.
Unplug and remove lamps, curtain rods, and any wall-mounted fixtures, and take down electronics and loose shelving.
Remove baseboards gently with a pry bar, label pieces for reinstallation, and store trim and hardware safely.
Determining transitions and thresholds (doorways, stairs, vents)
One clear plan for handling changes and thresholds will save you time and prevent costly mistakes.
Inspect doorways, stair edges, and vent locations to decide junction type: T-molding, reducer, or threshold. Measure heights and widths, note direction of opening, and allow expansion gaps.
Mark spots for undercutting doorjambs and plan vent relocation or grill adjustments before installing the underlayment.
Moisture testing and leveling the subfloor
Before you lay a single plank, test for moisture and level the subfloor so your laminate lasts and locks correctly.
Use a moisture meter across the room and check concrete or plywood; patch wet spots, fix leaks, and allow drying.
Sand high spots, fill low areas with self-leveler, and recheck flatness. Aim for under 3/16″ variance over 10 feet before installing.
Step-by-Step Installation Process
Now you’ll follow a clear, step-by-step installation process to move from bare subfloor to the first row of laminate.
Start by removing the carpet, padding, tack strips, and any adhesive, then clean and repair the subfloor with patching, sanding, or leveling compound as needed.
Next install the appropriate underlayment or moisture barrier, acclimate and lay out the planks (staggering and planning expansion gaps), and cut and lay the first row using a straight reference line.
Step 1 Remove carpet, padding, tack strips, and adhesive
Start by clearing the room and opening windows for ventilation; removing carpet, padding, tack strips, and adhesive is the first hands-on task.
Cut carpet into manageable strips, pull it up from one corner, and roll sections for disposal.
Pry up tack strips with a pry bar, remove staples, and scrape remaining adhesive with a floor scraper.
Dispose responsibly and vacuum thoroughly.
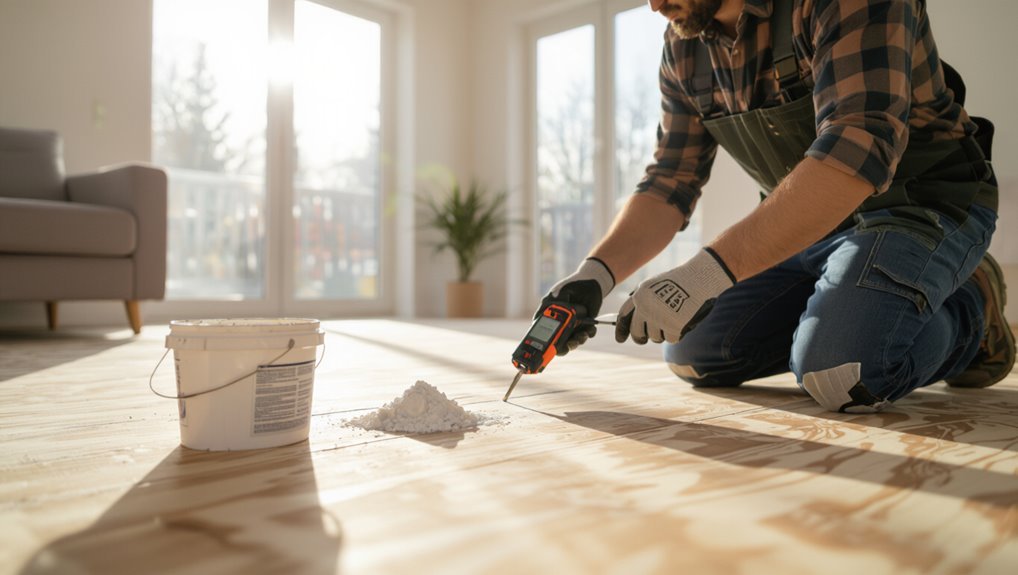
Step 2 Clean and repair subfloor (patching, sanding, leveling compound)
Check the subfloor for damage, dirt, and uneven spots so you can fix problems that would telegraph through your new laminate; patch holes or gouges with a floor patch, sand high spots, and apply a leveling compound to any low areas until the surface is flat and clean.
Remove debris, vacuum thoroughly, let patches cure, and recheck for flatness before proceeding.
Step 3 Install underlayment or moisture barrier (types and placement)
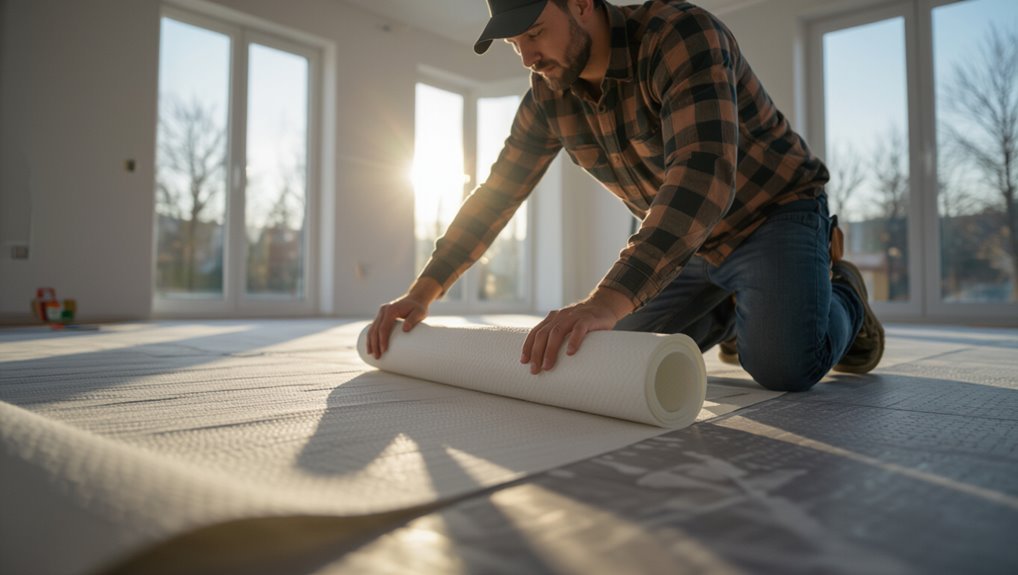
Before you lay any planks, choose and install the right underlayment or moisture barrier for your subfloor and laminate type; this thin layer cushions the floor, reduces sound, and protects against moisture that can warp laminate.
Roll out foam, cork, or rubber underlayment for floating floors, or use a polyethylene vapor barrier on concrete.
Butt seams, tape edges, and trim to fit.
Step 4 Acclimate laminate planks and plan layout (staggering, expansion gap)
Although the room may look ready, let your laminate planks acclimate in the installation space for at least 48 hours so they’ll expand or contract to local temperature and humidity; then unpack and stack them flat.
Measure room width, plan staggered end joints at least 8–12 inches apart, and mark a continuous expansion gap (typically 1/4–1/2 inch) around perimeters and obstacles before you cut or lay.
Step 5 Cut and lay the first row; establish straight reference line
Start by snapping a straight reference line across the room to guide the first row. Then cut the edge planks so their tongues face the wall and the face edges form a neat, uniform line.
You’ll want the final plank in the row to be at least 8–12 inches long, so rip the starter plank accordingly.
Place spacers for expansion, align each plank to the line, and fasten or join as specified.
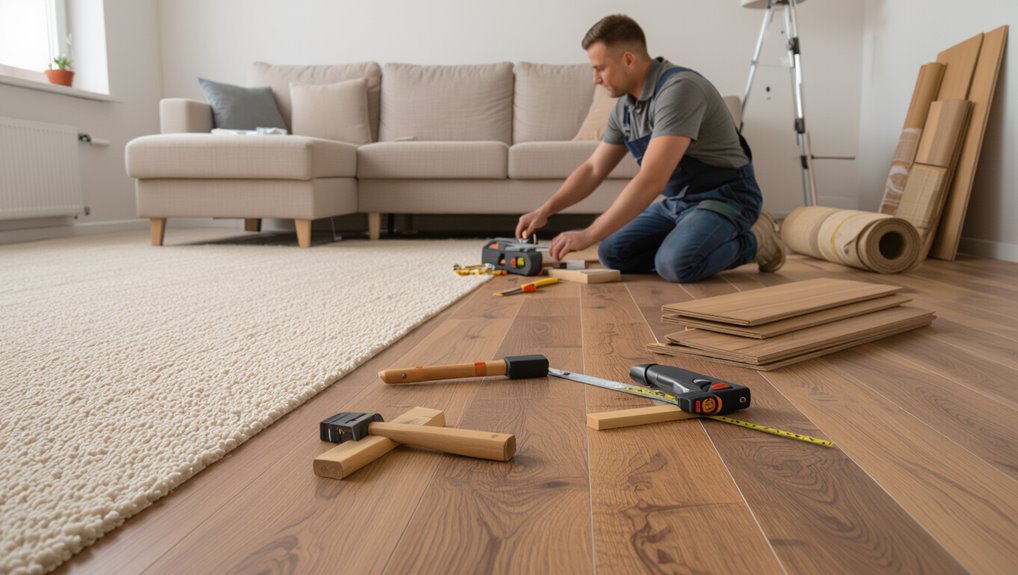
Step 6 Click, lock, or glue subsequent rows; tips for tight seams
Once your starter row is secure, you’ll work across the floor row by row, clicking, locking, or gluing each plank into place and tapping joints tight so seams stay invisible and flush.
Stagger end joints at least 8–12 inches. Use a rubber mallet and pull bar for snug fits. Trim slightly if needed for expansion gaps. Wipe excess glue immediately.
Step 7 Fit around obstacles: vents, door jambs, built-ins
7 key cuts will make the job look professional: measure each obstacle, transfer the shape to the plank, then cut and dry-fit before final installation.
For vents, trace and notch with a jigsaw; for door jambs, undercut the jamb so planks slide beneath; for built-ins, scribe the profile and trim with a coping saw.
Dry-fit, adjust gaps, then secure.
Step 8 Install transitions, thresholds, and reattach or replace baseboards
Now you’ll finish the room by installing changes, thresholds, and reattaching or replacing baseboards so the edges look tidy and the floor performs correctly.
Measure junctions where laminate meets other surfaces, cut and secure threshold strips, and use appropriate profiles for doorways.
Reinstall or replace baseboards, leaving the recommended expansion gap covered.
Caulk, touch up paint, and fasten trim securely for a professional finish.
Step 9 Final cleanup and inspection; allow settling time
After you finish installing trim and thresholds, clean the room thoroughly and inspect every seam, junction, and plank for gaps, scratches, or loose pieces.
Then let the floor settle undisturbed for the manufacturer’s recommended time.
Remove dust, adhesive residue, and tool marks.
Tighten any loose pieces, replace damaged planks, and verify connections.
Avoid heavy traffic or furniture for the settling period.
Comparison and Choosing Materials
Now that you’ve removed the carpet and seen the install steps, it’s time to pick the right floor: compare laminate, engineered hardwood, and vinyl plank for durability, moisture resistance, and budget.
Consider underlayment options—foam for basic cushioning, cork for sound control, and waterproof underlay where moisture might be an issue.
Finally, choose laminate with high AC wear ratings and durable finishes if the room gets heavy foot traffic.
Laminate vs. engineered hardwood vs. vinyl plank for former-carpet rooms
When you’re replacing carpet, choosing between laminate, engineered hardwood, and vinyl plank comes down to how much moisture resistance, durability, and realism you want for the space. You’ll pick laminate for budget and scratch resistance, engineered for authentic look and refinishing, and vinyl for superior water resistance and easy maintenance.
| Option | Best for |
|---|---|
| Laminate | Budget, durability |
| Engineered | Authentic look |
| Vinyl plank | Wet areas, easy care |
Underlayment types compared (foam, cork, waterproof) and when to use each
Once you’ve settled on laminate, engineered hardwood, or vinyl plank, the next choice is what goes beneath the boards: underlayment affects comfort, sound, and moisture protection.
Use foam for budget installs and minor sound dampening; choose cork for better acoustics and eco-friendliness; select waterproof or vapor-barrier underlayment over concrete or in moisture-prone areas.
Match thickness to manufacturer recommendations.
Best laminate wear ratings and finishes for high-traffic areas
For high-traffic rooms, focus on AC wear ratings and durable finishes so your laminate keeps looking good under daily use.
Choose AC3 for moderate, AC4–AC5 for heavy residential or light commercial traffic.
Prefer textured or embossed finishes to hide scratches and matte or low-sheen surfaces to reduce visible wear.
Look for UV-cured aluminum oxide coatings and 8–12 mm thickness for added durability and stability.
Common Problems and How to Fix Them
You’ll run into a few common issues when switching to laminate, but most have straightforward fixes.
Learn how to diagnose and level an uneven subfloor and stop squeaks, correct gaps, cupping, or buckling, and hide visible seams or mismatched boards.
Also, you’ll want to identify moisture risks and apply the right underlayment, vapor barrier, or repairs to prevent failures.
Uneven subfloor and squeaks diagnosis and remedies
When you walk across a newly laid laminate floor and feel a dip or hear creaks, those signs usually point to an uneven subfloor or loose joists that need attention before installation.
Check with a straightedge for high or low spots, tighten or sister joists, shim or level subfloor, and replace rotten panels.
Secure underlayment and retest for firmness before laying planks.
Gaps, cupping, and buckling causes and corrections
After you’ve leveled the subfloor and fixed squeaks, watch for surface issues like gaps, cupping, and buckling that can still appear later; these problems usually stem from moisture imbalance, improper acclimation, or incorrect installation.
To correct them, control humidity, guarantee boards acclimate longer, tighten or replace loose planks, reinstall with proper expansion gaps, and repair water damage promptly to prevent recurrence.
Visible seams or mismatched boards solutions
If seams are showing or boards don’t match, don’t panic—you can usually fix the look without ripping up the floor.
Start by tightening loose planks, realigning rows, and replacing isolated mismatched boards. Use matching border strips or color-matched filler to hide tiny seams.
Sand and stain replacement pieces for better color blend, and always acclimate new planks before installing to minimize future mismatch.
Moisture-related failures and how to address them
Seams and mismatched boards can often be fixed cosmetically, but moisture problems need a different approach because water can warp, swell, or separate laminate planks beyond simple repairs.
You should identify the moisture source, test subfloor dampness, remove affected planks, dry and treat the subfloor, replace with new laminate plus proper underlayment and vapor barrier, and improve ventilation to prevent recurrence.
Tips, Best Practices, and Time-Saving Strategies
You’ll learn layout tricks that cut down on awkward pieces and make the floor look professional.
I’ll show how to protect your new laminate during and after installation, plus budget-smart choices that don’t skimp on quality.
Finally, you’ll get simple maintenance and cleaning tips to extend the floor’s lifespan.
Layout tricks for fewer cuts and better appearance
When you plan your laminate layout up front, you’ll make far fewer cuts and end up with a cleaner, more professional look; measure room dimensions, locate focal points, and snap chalk lines for a balanced starting row.
Stagger end joints at least 8–12 inches, run planks along the longest sightline, and pre-fit tricky areas to minimize waste and visible short pieces.
Protecting new laminate during and after installation
One clear rule: protect the floor from day one — during installation and for weeks after — to keep your new laminate looking factory-fresh.
Lay rosin paper or cardboard in high-traffic zones, use felt pads under furniture, and avoid rolling heavy loads.
Keep humidity stable, wipe spills immediately, and limit shoe traffic for 48–72 hours so seams settle and the underlayment bonds properly.
Budget-saving tips without compromising quality
After you’ve protected the floor during installation and the first few weeks, it’s smart to look for ways to save money without cutting quality.
Buy end-of-roll underlayment and clearance laminate, compare warranties, and shop seasonal sales.
Do straightforward demolition and layout yourself, rent tools for tricky cuts, and buy extra planks from the same batch to avoid mismatched color runs.
Maintenance and cleaning practices to extend lifespan
Keep dirt and moisture off your new laminate to prevent scratches, swelling, and premature wear: sweep or vacuum with a soft-brush attachment daily in high-traffic areas and wipe spills immediately with a barely damp cloth.
Use felt pads under furniture, avoid steam mops and excess water, place mats at entries, trim pet nails, and refinish edges or replace boards when damage appears to maintain appearance and longevity.
Tools and Materials Checklist for Downloadable Shopping Guide
Before you head to the store, gather a downloadable checklist that separates must-have tools from optional pro-level gear so you don’t forget anything.
You’ll want to include tape measure, spacers, tapping block, pull bar, underlayment, and a saw, plus optional items like a floor jack or pneumatic nailer.
The guide should also show the simple math for calculating how many laminate planks and how much underlayment you’ll need, with a waste allowance.
Must-have tools
You’ll want a compact set of reliable tools to make replacing carpet with laminate smooth, safe, and efficient.
Gather a pry bar, utility knife, tape measure, carpenter’s square, chalk line, hammer, rubber mallet, tapping block, pull bar, spacers, circular saw or miter saw, jigsaw, vacuum, and safety gear (gloves, eye protection, knee pads).
Keep essentials handy for quicker installation.
Optional tools for professionals/homeowners
While the basic kit handles most jobs, pros and serious DIYers often bring a few optional tools that save time and improve finish quality.
Consider a pneumatic flooring nailer, track saw for precise cuts, oscillating multi-tool for tight spots, tapping block and pull bar set, laser distance measurer, knee pads, and a portable vacuum for cleanup.
These speed work and refine results.
Material quantities: how to calculate required laminate and underlayment
Wondering how much laminate and underlayment to buy? Measure room length × width for square footage, add 10% waste for cuts, and round up to full-box coverage.
Underlayment matches same footage.
- Measure room area
- Add 10% waste
- Check plank coverage per box
- Match underlayment area
- Round up to whole boxes
Frequently Asked Questions (FAQ)
You probably have a few quick questions before you start, like whether laminate can go over carpet, how long a typical room takes, and if you need a moisture barrier on concrete.
You’ll also want to know if laminate raises floor height enough to affect doors and how to handle stairs and changes to other flooring.
Below are clear, practical answers to each point to help you plan the job.
Can laminate be installed directly over carpet?
Because laminate needs a firm, flat base to lock together properly, you shouldn’t install it directly over carpet; the soft, uneven surface will compromise the floating floor’s stability and warranty.
You should remove carpet and pad, inspect and level the subfloor, then lay recommended underlayment.
In rare cases, very low-pile, tightly anchored carpet might work, but manufacturers typically forbid it.
How long does replacement typically take for a standard room?
How long will it take to replace carpet with laminate in a typical room?
For a 12×12 room, expect 4–8 hours for one person:
- Remove carpet and tack strips (1–2 hours)
- Prepare and clean subfloor (1–2)
- Lay underlayment and measure (30–60 minutes)
- Install laminate plus trim (1.5–3).
Two people can finish faster, often in a single day.
Do I need a moisture barrier over concrete slab subfloors?
Wondering if you need a moisture barrier over a concrete slab? Yes—usually.
Concrete can wick moisture that damages laminate, so install a vapor barrier or use laminate with an integrated underlayment rated for concrete.
Test slab moisture first (calcium chloride or moisture meter). If levels exceed manufacturer limits, don’t skip the barrier; proper moisture control prevents buckling, mold, and warranty voids.
Will laminate raise the floor height and affect doors?
Yes—laminate will raise your floor, and that extra height can affect doors and connections; how much depends on the underlayment and plank thickness you choose.
Measure total buildup, then check door clearances, hinge positions, and jambs. You may need to trim doors, raise thresholds, or shorten strikes.
Plan around appliance kickplates and built-in cabinetry to avoid binding or uneven reveals.
How do I handle stairs and transitions to other floor types?
When you’re installing laminate near stairs or where it meets other floors, plan changes and edge protections before laying any planks so you get safe, neat results.
Use stair nosing for exposed edges, glue or screw nosing to the substructure, and install connector strips (T-molding, reducer, or threshold) at doorways.
Match heights, leave expansion gaps, and secure trim for a smooth, safe connection.