
How to Remove Sticky Tile Glue From Floor Bathroom Without Damage
You can remove sticky tile glue without damage by first identifying the adhesive and testing a small spot, then softening with warm water, steam, or a heat gun and gently scraping with plastic or thin metal scrapers; use vinegar, rubbing alcohol, citrus gel, or a matched commercial solvent for stubborn residue, always wearing gloves, goggles, and a respirator in well-ventilated space; finish by cleaning and priming the floor — keep going to learn safe step-by-step techniques.
What This Guide Covers : Quick Roadmap
This guide walks you through the fastest, safest ways to remove sticky tile glue—from identifying the adhesive and choosing tools to step-by-step removal methods and finishing cleanup—so you can pick the right approach for your floor and timeframe.
You’ll learn to spot adhesive types, assess sticky residue severity, select tools and products, follow targeted removal steps, and finish with safe cleanup to protect flooring.
Quick: Safest Way to Remove Sticky Tile Glue
When you need the fastest, safest way to remove sticky tile glue, start by selecting a gentle method that matches the adhesive type and your flooring—mechanical scraping for cured thinset or a solvent/heat approach for mastic or pressure-sensitive adhesives.
Work in small sections, protect nearby surfaces, test any solvent, and consider eco friendly options or alternative methods like steam or citrus-based removers to minimize damage.
What Type of Adhesive Is on Your Bathroom Floor
Before you start scraping or applying solvents, identify what kind of adhesive is on your bathroom floor so you pick the right removal method. You’ll check for dried mastic, thinset, organic glue, or peel-and-stick residue. Knowing adhesive types guides safe removal techniques and prevents damage. Choose solvent, heat, or mechanical approach based on the adhesive.
| Adhesive | Clues |
|---|---|
| Mastic | Smells, gummy |
| Thinset | Hard, cement-like |
| Organic glue | Dark, tarry |
| Peel‑and‑stick | Paper backing |
How Tile and Subfloor Types Change Which Methods to Use
Because different tiles and subfloors handle tools and solvents differently, you’ll pick removal methods that protect the substrate while getting the adhesive off.
Match your approach to Tile Adhesive Types—mastic, thinset, epoxy—and to Subfloor Materials like plywood, cement board, or concrete.
Use gentler solvents and scrapers on wood and delicate tiles; reserve grinders and stronger removers for concrete and ceramic.
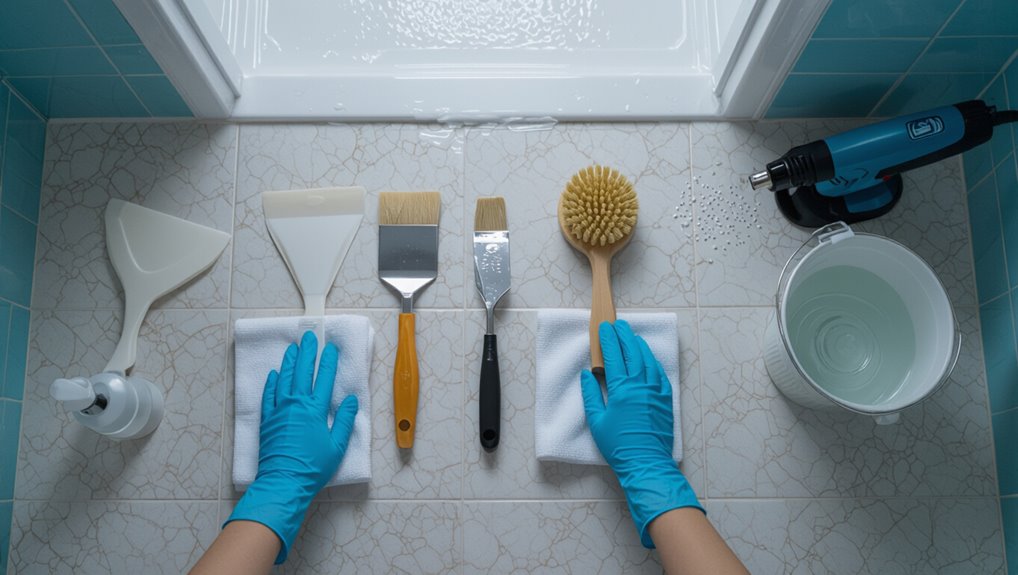
Tools and Supplies to Gather Before You Start
Gather a compact kit of essential tools and supplies so you won’t stop midway through the job: scraper, putty knives in varying sizes, a heat gun or steamer, nylon brushes, a bucket, rags, and a pry bar.
Include solvent options matched to adhesive types and test pads for removal techniques.
Have plastic sheeting and trash bags ready for debris and cleanup.
Personal Protective Equipment for Adhesive Removal
You’ll want a reliable set of personal protective equipment (PPE) when removing sticky tile glue to protect your skin, eyes, lungs, and hands from chemical exposure, sharp edges, and flying debris.
Wear chemical-resistant gloves, safety goggles, a respirator rated for organic vapors, and sturdy footwear.
PPE importance is about preventing long-term harm from adhesive hazards; replace damaged gear promptly.
How to Test a Small Area Safely First
Before you start, pick an inconspicuous spot like under a cabinet or behind a baseboard to test.
Apply your chosen remover to a tiny patch and wait the recommended time.
Inspect the area carefully for finish loss, discoloration, or substrate damage before proceeding.
Choose An Inconspicuous Spot
Since old adhesive and finishes can react unpredictably, pick a discreet corner or behind a fixture to test your removal method first.
You’ll confirm compatibility with Adhesive Types and preserve Floor Safety before wider work.
Check results after drying, note staining or finish loss, and proceed only if safe.
- Note discoloration
- Inspect finish integrity
- Record product used
Try A Tiny Test Patch
Start with a coin-sized patch in the inconspicuous spot you chose, so you can see how the glue and your chosen remover interact without risking visible damage.
Apply remover, wait the recommended time, then gently scrape. Note how the adhesive softens and any color change.
Use test patch techniques to compare products and learn adhesive properties before treating larger areas.
Inspect For Damage Carefully
Now that you’ve tried a tiny patch, inspect the surrounding area closely for scratches, discoloration, or loose grout so you won’t worsen hidden damage when you remove more adhesive.
Check how adhesive types reacted and confirm surface compatibility before proceeding. Look for subtle changes, document findings, and choose solvents or tools accordingly.
- Note color shifts
- Test grout adhesion
- Photograph results
Preparing the Room to Protect Fixtures and Grout
Before you start scraping, cover faucets, light fixtures, and any exposed hardware with plastic and painter’s tape to keep glue and solvent off them.
Seal or tape over grout lines and use painter’s tape along edges to prevent stubborn residue from settling into seams.
Clear the room of clutter and open windows or run a fan so fumes from cleaners don’t build up.
Cover Fixtures Carefully
Cover every fixture and nearby grout with protective material so adhesive and cleaning solutions don’t cause stains or damage.
You should plan fixture protection and note adhesive considerations before you work. Use coverings that resist solvents, tape gently, and keep removal easy.
- Use plastic sheeting for sinks and tubs
- Mask edges with painter’s tape
- Protect exposed metal hardware
Protect Grout Lines
You’ve protected fixtures; next focus on keeping grout intact while you remove sticky tile glue.
Tape thin painter’s tape along grout edges and use plastic scrapers at a low angle to avoid gouging.
Apply gentle heat or solvent only to glue, not grout.
Follow grout protection techniques and adhesive removal tips: work in small sections, test methods on a hidden spot, and wipe residues promptly.
Clear And Ventilate
Once you’ve removed loose items and moved furniture out of the room, open windows and doors and run a fan to create steady airflow—this helps clear dust and solvent fumes while you work on protecting fixtures and grout.
Seal drains and cover fixtures, then follow tile maintenance tips and adhesive prevention strategies:
- Tape plastic over fixtures
- Lay down drop cloths
- Keep ventilation running
Soften Sticky Tile Glue With Warm Water and Detergent
If the old tile adhesive’s stubborn but not rock-hard, soften it first by soaking the area with warm water mixed with a few drops of dish detergent so the glue loosens and wipes away more easily.
Let it sit several minutes, then scrub gently with a nylon brush or cloth.
Test a small spot—different adhesive types react differently—so you remove glue residue without damaging the surface.
Break Down Adhesive Residues With Household Vinegar
When adhesive residue resists warm water, grab plain white vinegar to dissolve the remaining tackiness: its mild acidity loosens most organic glues so you can scrape and wipe them away with less elbow grease.
When warm water fails, dab plain white vinegar — its mild acidity loosens adhesive so you can scrape and wipe away residue.
Use vinegar solutions for targeted adhesive breakdown, then:
- Apply diluted vinegar, wait 10–15 minutes.
- Scrape gently with a plastic scraper.
- Wipe with a damp cloth and repeat if needed.
Apply Rubbing Alcohol or Acetone Safely on Tile
Choose rubbing alcohol for mild adhesive or acetone for tougher residues, and always test a small, inconspicuous spot first to guarantee the solvent won’t damage your tile or grout.
Wear gloves and ventilate the room, apply solvent sparingly with a cloth, blot—don’t rub—let it sit briefly, then scrape gently.
Follow acetone safety and neutralize residue with warm soapy water.
Choosing the Right Commercial Adhesive Remover
Before you buy a commercial adhesive remover, check a solvent compatibility chart to make sure it won’t damage your tile or grout.
You’ll also want gloves, eye protection, and good ventilation—don’t skip the safety gear.
Finally, follow the product’s recommended application method and dwell time for best results.
Solvent Compatibility Chart
Solvent compatibility matters because using the wrong adhesive remover can damage tile, grout, or underlying subfloor.
You’ll want a chart that matches common commercial solvents—like citrus-based d-limonene, acetone, methyl ethyl ketone (MEK), and commercial citrus blends—to the materials in your floor and surrounding surfaces so you can pick a product that removes glue without causing harm.
- Match solvent to adhesive types
- Note porous vs. nonporous surfaces
- Follow specific removal tips and test a small area
Safety Gear Essentials
Because adhesive removers can be harsh, you’ll need the right personal protective equipment to keep yourself safe—gloves rated for the solvent type, splash-resistant goggles, a respirator with appropriate cartridges for organic vapors, and long sleeves to protect skin.
Choose safety gear that fits well and is chemical-resistant.
Include essential tools like chemical-resistant buckets, scrapers, and absorbent pads to contain and clean spills.
Application And Dwell-Time
When you pick a commercial adhesive remover, match its formulation to the glue type and substrate, then follow the manufacturer’s instructions for application and dwell time.
You’ll test a small area, time the dwell per label, then proceed carefully to avoid damage.
Consider these factors:
- surface sensitivity and adhesive types
- recommended removal techniques and tool choice
- ventilation, PPE, and cleanup procedure
Use a Citrus-Based Gel Remover Without Staining
If you want to dissolve old tile adhesive without damaging the surface, reach for a citrus-based gel remover designed for porous materials.
You’ll enjoy citrus benefits: pleasant scent, strong solvency, and reduced toxicity.
Apply a thin coat, wait according to label, then gently scrape. Rinse thoroughly to avoid residue.
These eco friendly alternatives cut glue effectively without harsh chemicals or staining.
How and When to Use Heat
When the glue’s softened but not fully gone, you’ll want to apply heat to loosen the bond before scraping.
Use a heat gun or hair dryer on low to medium, keep the tool moving, and never let the surface get scorching hot.
Wear gloves and eye protection, and test a small area first to avoid damaging the tile or subfloor.
When To Apply Heat
Once the adhesive’s softened and you’ve cleared loose debris, apply heat to stubborn spots to loosen the glue for scraping.
Time heat application where residue remains, balancing heat duration and heat effectiveness to avoid heat damage.
Consider heat sources, heat insulation and heat safety before starting.
- Use short bursts for control
- Test on a small area first
- Keep heat alternatives ready
Safe Heat Techniques
Because heat can loosen stubborn adhesive quickly, you should use it deliberately and with safety in mind: hold a heat gun or hair dryer 6–8 inches away, move constantly to avoid scorching, and test a small area first.
Monitor adhesive properties as they soften, wear gloves and eye protection, and stop if fumes appear. Use safe heat only for spot treatment, not prolonged exposure.
Using a Heat Gun Safely on Ceramic and Porcelain
A heat gun can speed softening stubborn tile adhesive, but you’ll need to control temperature and distance to avoid cracking ceramic or crazing porcelain.
You’ll use gradual heat application and follow simple safety precautions so glaze isn’t damaged. Monitor surface, keep gun moving, and test a small area first.
- keep temperature low
- maintain 6–12 in. distance
- wear eye and hand protection
Using a Steam Cleaner to Loosen Glue Without Scrubbing
Turn on the steam cleaner and let its high‑temperature vapor loosen the adhesive so you can lift residue with minimal scrubbing.
You’ll appreciate steam cleaner benefits: reduced chemical use, gentler treatment for grout, and faster softening.
Work in small sections, blot softened glue with a microfiber cloth, and repeat steaming.
The adhesive steam effectiveness lets you avoid aggressive tools while preserving tile finish.
Safe Scraping Techniques to Avoid Tile Scratches
Start with the right tools and a light touch: use plastic scrapers, old credit cards, or a razor held almost flat to lift glue without digging into the tile. You’ll practice safe scraping and prioritize tile protection.
Work slowly, test a discreet spot, and follow these steps:
- Apply gentle pressure and angle tool shallowly
- Soften residue first with heat or solvent
- Wipe often to check progress
Best Scrapers and Blades for Different Tile Finishes
1 key to preserving tile appearance is matching your scraper or blade to the finish—use soft plastic scrapers or old credit cards on glazed or polished tiles, thin single-edge razor blades held almost flat for matte or wear-tolerant surfaces, and stiff metal scrapers or putty knives for unglazed, rough, or quarry tiles where scratching is less of a concern.
Choose scraper types and blade materials by tile finishes and adhesive compatibility.
When to Use a Plastic Putty Knife vs a Metal Scraper
When you’re working with delicate surfaces like glazed or soft stone tile, use a plastic putty knife to avoid scratches.
If you’re tackling thick, stubborn adhesive, switch to a metal scraper for the added leverage and sharper edge.
Start with plastic and only move to metal if the glue won’t come off with gentle pressure.
When Working With Delicate Surfaces
If you’re working on delicate surfaces like plaster, painted drywall, or vintage tile, choosing between a plastic putty knife and a metal scraper comes down to balancing effectiveness with the risk of damage.
You’ll usually favor plastic for thin residues; assess adhesive types before starting.
- Plastic: gentle, less gouging
- Metal: use cautiously, low angle
- Test patch first
When Removing Thick Adhesive
Moving from delicate surfaces to heavy-duty removal, thick adhesive calls for sturdier tools and a different technique.
You’ll start with a plastic putty knife to pry softened spots after applying effective cleaning solutions, preventing gouges.
For stubborn, cured glue, switch to a metal scraper at a low angle, keeping steady pressure and short strokes.
These adhesive removal techniques protect tile while maximizing lift.
How to Remove Stubborn Glue With a Floor Scraper
Grab a sturdy floor scraper and get ready to tackle stubborn glue patches—this tool gives you controlled leverage to lift residue without gouging the subfloor.
Use safe scraper techniques and steady pressure for effective glue removal. Work in small sections, keep blade angle low, and change blades when dull.
- Hold firm, push forward
- Scrape with grain
- Clean debris frequently
When to Use an Oscillating Multi-Tool for Adhesive Removal
Once you’ve removed the bulk of adhesive with a floor scraper, reach for an oscillating multi-tool when glue sits in tight corners, along edges, or on uneven surfaces where a flat blade can’t follow contours.
You’ll appreciate the oscillating versatility for precise cuts and plunge work. Use a stiff scraper blade, low speed, and short passes to maximize adhesive efficiency without gouging the substrate.
Sanding for Adhesive: When It’s Appropriate
If mechanical scraping and chemical solvents haven’t removed stubborn glue, sanding can be a practical next step—especially on solid, durable substrates like plywood or hardwood that can tolerate abrasion.
If scraping and solvents fail, sanding is a practical next step for durable surfaces like plywood or hardwood.
You should assess surface hardness and adhesive types, choose appropriate sanding techniques, and work cautiously to avoid gouging.
- Start with coarse grit, finish finer
- Use dust control and PPE
- Test a small area first
How to Protect Grout While Removing Adhesive
Because grout is porous and can stain or crumble when you remove tile adhesive, you’ll want to shield it before you begin work.
Use painter’s tape and thin plastic or masking paper to cover lines, press tape edges firmly, and seal with a grout-safe barrier.
During adhesive removal, work gently with hand tools, avoid aggressive scrapers, and wipe residues promptly to guarantee grout protection.
How to Remove Glue From Textured or Porous Tiles
Textured and porous tiles demand a gentler, more patient approach, since abrasive scraping and strong solvents can damage the surface or drive glue deeper into pores.
You should assess adhesive types and plan removal techniques, prioritizing surface protection and grout care. Use mild solvents, soft brushes, and blotting.
Damage assessment guides next steps.
- gentle solvents
- soft-bristled tools
- staged cleaning processes
How to Handle Glue That Soaked Into the Subfloor
If the glue soaked into the subfloor, first inspect the area to assess structural damage and rot.
You’ll want to test a small patch with the adhesive solvent you plan to use to see if it breaks down the glue without harming the substrate.
If the subfloor’s compromised, reinforce or cut out and replace affected sections before reinstalling flooring.
Assess Subfloor Damage
Start by inspecting the area where the glue soaked in to determine how deep the adhesive penetrated and whether the subfloor material—plywood, OSB, or concrete—has swollen, delaminated, or crumbled. This assessment tells you whether surface removal will do or if you’ll need to repair or replace sections of the subfloor.
Perform subfloor inspection and moisture assessment, then:
- Probe for soft spots.
- Measure moisture content.
- Mark damaged panels for repair or replacement.
Test Adhesive Solvent
Before you commit to a full cleanup, test a small area with an adhesive solvent to see how the glue and subfloor react; this tells you whether a solvent will loosen the residue or damage the wood or concrete. Try different adhesive types and note solvent effectiveness.
| Solvent | Result |
|---|---|
| Water | Minimal |
| Acetone | Fast |
| Citrus | Moderate |
| Heat | Softens |
| Alcohol | Mild |
Reinforce And Replace Sections
When glue has soaked into the subfloor and solvent or scraping won’t remove it, you’ll need to assess damage and reinforce or replace affected sections to restore a stable, level surface.
You’ll evaluate rot, delamination, and load-bearing capacity, then proceed with Tile Repair and proper Adhesive Bonding.
- Remove compromised plywood or OSB.
- Sister joists or add blocking.
- Install new subfloor panels and seal seams.
When to Replace Underlayment Instead of Removing Adhesive
If the adhesive has deeply penetrated, seriously damaged, or permanently bonded to your underlayment, you’ll save time and get better results by replacing the underlayment instead of fighting to remove the glue.
Check underlayment types and assess replacement indicators: rot, crumbling, mold, structural flex, or unevenness.
If multiple signs appear or removals risk further damage, replace the underlayment for a reliable, long-lasting floor.
How to Clean Residue After Adhesive Is Lifted
Scrape away loose bits with a plastic putty knife, then tackle the remaining gummy film with a targeted cleaner so you don’t smear adhesive across the surface.
Use safe residue removal techniques and tested adhesive cleaning solutions. Work in small sections, rinse, and assess.
- Test cleaner on an inconspicuous spot
- Agitate gently with a microfiber pad
- Rinse thoroughly and dry before inspection
How to Neutralize Chemical Remover Residue Safely
Because chemical removers can leave corrosive or oily residues, you should neutralize them promptly and safely to protect the tile and grout. Rinse thoroughly, apply mild neutralizer (baking soda solution), blot, and ventilate. Test a small area first. Use gloves and eye protection; avoid mixing products.
| Step | Product | Action |
|---|---|---|
| Rinse | Water | Remove residue |
| Neutralize | Baking soda | Neutralizing techniques |
| Protect | PPE | Prevent damage |
How to Restore Tile Shine After Adhesive Removal
Once you’ve rinsed and neutralized remover residue, bring back the tiles’ shine by cleaning, polishing, and protecting the surface.
Use gentle solutions and microfiber cloths, following tile maintenance tips and proven floor cleaning techniques to avoid damage.
Use gentle cleaners and microfiber cloths—follow tile-care tips and trusted floor-cleaning techniques to prevent damage.
- Buff with a soft pad for even gloss
- Apply a pH-neutral polish sparingly
- Seal grout and edges to retain luster
How to Prep the Floor for New Tile or Finish After Cleaning
Now that the old adhesive’s gone, you should clean the floor thoroughly to remove any dust, oils, or residue that can stop new materials from bonding.
Check for high or low spots and sand or skim-coat as needed so the surface is smooth and level.
Finally, apply the appropriate primer or sealer to protect the substrate and improve adhesion before laying tile or finishing the surface.
Clean Thoroughly First
Before you lay new tile or call a contractor, clean the floor thoroughly so any remaining glue, dust, and debris won’t compromise adhesion or the final finish.
You’ll remove visible adhesive residue, then prep with appropriate cleaning products and dry completely.
Follow these steps:
- Scrape loose bits, vacuum grit.
- Use solvent or cleaner per label.
- Rinse and air-dry fully.
Smooth And Level
With the floor clean and dry, it’s time to get the surface flat and even so your new tile or finish will sit properly.
Check for high spots, gouges, and leftover adhesive types that resist simple sweeping. Use sanding, grinding, or scrapers per removal techniques you’ve used, then fill low areas with a compatible floor patch.
Level, dry, and inspect before tiling.
Prime And Protect
After you’ve smoothed and leveled the floor, prime and protect the surface so new tile or finish bonds reliably and lasts longer.
You’ll choose a primer compatible with substrate and adhesive types, seal seams, and guarantee even absorption.
Follow these tile maintenance tips to extend life.
- Use a bonding primer for porous floors
- Seal joints and cracks
- Apply moisture barrier where needed
Common Mistakes That Damage Tile and How to Avoid Them
Don’t rush the cleanup—many tile mistakes come from haste or using the wrong tools, and they can lead to scratches, etching, or loosened tiles.
You should avoid aggressive scraping, harsh chemicals, and metal tools that gouge glaze.
Address common adhesive issues by softening glue with appropriate removers, use plastic scrapers, test cleaners on inconspicuous spots, and work slowly to prevent chipping and preventing tile damage.
How to Spot Test for Colorfastness and Glaze Damage
Before you start removing glue, test a small, hidden area to make sure your cleaner and scraper won’t strip color or dull the glaze.
You’ll perform a simple colorfastness test and check glaze integrity. Use gentle steps, note results, and proceed only if safe.
- Apply cleaner, wait, blot
- Lightly scrape, inspect
- Rinse, compare nearby tile
Time-Saving Tactics for Large Bathroom Floors
Tackle a large bathroom floor methodically by breaking the job into zones and using tools that cover more surface area at once; this lets you work faster without sacrificing control.
Plan with time management tips: schedule short focused sprints, rotate tasks, and prep supplies.
Match methods to adhesive types, use long-handled scrapers and wide pads, and rinse frequently to keep momentum and avoid rework.
Eco-Friendly and Low-Odor Methods for Small Spaces
For small rooms, you’ll want eco-friendly, low-odor methods that won’t overwhelm the space.
Try a gentle citrus solvent to break down sticky glue, then follow with a steam-cleaner and a diluted vinegar rinse to lift residue without harsh fumes.
You’ll get effective results while keeping indoor air comfortable.
Gentle Citrus Solvent
A gentle citrus solvent offers a low-odor, eco-friendly way to soften and lift sticky tile glue in small spaces where heavy chemicals aren’t practical; you’ll find it’s effective on many adhesive types, easy to apply with a cloth or small brush, and simple to rinse away without leaving harsh fumes.
Use citrus benefits and eco friendly options to:
- Spot-test first
- Apply, wait, wipe
- Rinse and dry
Steam And Vinegar Combo
If citrus solvent doesn’t do the job, try combining steam and white vinegar for another low-odor, eco-friendly option that works well in tight spots.
You’ll direct steam to soften glue, demonstrating steam effectiveness, then dab diluted vinegar to break residue—vinegar benefits include cutting tackiness and deodorizing.
Work in small sections, scrape gently with a plastic tool, and rinse thoroughly to avoid surface damage.
Cost Comparison: DIY Supplies vs Professional Removal
You’ll usually spend less up front doing the work yourself, but tools, chemicals, and time can narrow the gap quickly.
DIY Supplies like scrapers, heat guns, adhesive removers, and replacement blades often total $50–$200, while hiring a pro can run $300–$1,200 or more depending on square footage and difficulty.
You’ll weigh Cost Efficiency, Time Investment, Labor Costs, Adhesive Types, Surface Damage, and Long term Solutions.
- DIY Supplies: lower upfront, higher time cost
- Professional Services: higher Labor Costs, lower risk of Surface Damage
- Consider Adhesive Types and Long term Solutions for best Cost Efficiency
When to Call a Pro (And What They’ll Do)
If your DIY attempts aren’t removing the glue, or the residue seems hazardous or unusually complex, it’s time to call a pro.
They’ll assess the mess, use industrial solvents or mechanical methods, and handle disposal and safety concerns.
Hiring a pro can save time, prevent damage, and preserve any remaining warranty or resale value.
When DIY Attempts Fail
When stubborn glue won’t come off despite heat, scraping, and solvent, it’s time to call a pro; they’ll save you time and prevent damage by evaluating the adhesive type, choosing proper removal tools, and applying industrial-strength methods like mechanical grinding, chemical strippers, or heat guns with controlled settings.
You’ll get professional insights into DIY frustrations, adhesive challenges, common pitfalls, effective techniques.
- They assess substrate risk
- They pick alternative solutions
- They protect surrounding surfaces
Complex Or Hazardous Residue
Because some adhesive residues contain hazardous chemicals or bond so tightly that DIY methods risk injury or damage, call a professional as soon as you suspect complex or hazardous glue.
They’ll assess the adhesive, test for hazardous materials, use industrial-grade removers or heat, and employ safe tools.
Pros also handle proper residue disposal and ventilation, minimizing surface damage and health risks you shouldn’t tackle alone.
Time, Cost, And Warranty
Deciding whether to call a pro often comes down to three practical factors: how quickly you need the job done, how much you’re willing to spend, and whether a contractor’s warranty matters to you.
You’ll get a time estimate, clear cost analysis, and warranty implications up front. Consider project timeline, financial considerations, and product guarantees when choosing.
- Fast removal and cleanup
- Detailed price breakdown
- Written guarantees
How Professionals Remove Glue Differently From DIYERS
While you might tackle adhesive removal with a scraper and elbow grease, professionals approach the job with a plan, specialized tools, and safety protocols that make the process faster and less damaging. You’ll notice Expert Techniques reduce residue and time, while DIY Challenges often prolong work. Compare methods below.
| Role | Tools | Outcome |
|---|---|---|
| Pro | Heat gun, grinder | Cleaner finish |
| Pro | Chemical gel | Faster softening |
| You | Scraper | More effort |
| You | Solvent | Risk unevenness |
Safety Checklist Before Using Power Tools or Chemicals
Pros work faster and with fewer mistakes, but their tools and chemicals bring real hazards you need to respect before you start.
You’ll follow a tight checklist to protect yourself and the room, focusing on Power Tool Safety and Chemical Precautions.
- Wear PPE: eye, ear, respiratory protection.
- Confirm ventilation and no ignition sources.
- Inspect tools, cords, and grounding before use.
How to Dispose of Removed Adhesive and Chemicals Responsibly
Because removed adhesive and solvent residues can harm your health and the environment, you should handle and dispose of them carefully: wear gloves, collect solids and rags in sealed, labeled containers, and never pour solvents down drains.
Check local hazardous waste programs for drop-off or pickup, follow regulations, and choose eco-friendly disposal services or recycling options to minimize environmental impact.
How Seasonal Humidity Affects Adhesive Removal Success
If you tackle adhesive removal during a humid season, expect slower drying, softer residues, and the need for different techniques than you’d use in dry conditions.
Tackle adhesive removal in humid seasons knowing drying slows, residues stay soft, and techniques must be adjusted.
You’ll adapt tools and timing because humidity effects change adhesive durability. Adjust strategy:
- Use dehumidifiers or fans to speed drying.
- Choose solvents that cut softened glue without damaging tile.
- Work in smaller sections for better control.
How to Remove Glue From Grout Lines Specifically
Start by softening the glue in the grout lines with heat or a recommended solvent so it loosens without spreading.
Once the adhesive is pliable, use a soft-bristled brush or a plastic scraper to lift it gently from the grout.
Finish by wiping the area with a mild cleaner to remove residue without damaging the grout.
Soften Glue First
When grout lines are packed with dried tile adhesive, soften the glue first so you can remove it without damaging the joints.
Warm the area with a heat gun or a hair dryer on medium while keeping the tool moving and the temperature moderate to avoid cracking the grout.
Use gentle scrapers after warming.
- glue softening techniques
- test small sections first
- debunk adhesive removal myths
Clean Grout Gently
Because grout is porous and delicate, you’ll want to work slowly and use gentle methods to lift glue without grinding or gouging the joints.
Apply a mild solvent or warm soapy water, let it sit, then use gentle scrubbing with a soft nylon brush.
Rinse frequently, repeat as needed, and finish with grout cleaning solution to restore appearance without damaging joints.
How to Handle Glue on Specialty Tiles (Mosaic, Natural Stone)
If you’re dealing with glue on mosaic or natural stone tiles, proceed gently and pick methods that protect fragile surfaces and irregular grout lines.
You’ll focus on mosaic tile care and natural stone maintenance, testing cleaners on a hidden spot and avoiding acids. Use soft tools, solvents sparingly, and blot instead of scrubbing:
- Soft plastic scraper
- pH-neutral cleaner
- Microfiber cloth and patience
Repair Options If Tile or Grout Is Accidentally Damaged
If you spot chips or loose grout after removing glue, first assess the extent of the damage so you know whether a quick fix will do or a full replacement is needed.
For small grout cracks or gaps, you can patch them with matching grout or a grout repair kit to restore the seal.
If a tile is cracked or badly scored, plan to remove and replace that tile, matching size and finish for a seamless repair.
Assess The Damage
Not sure how bad the damage is? Do a quick damage assessment and adhesive identification before choosing repairs.
Check tiles, grout, and substrate for cracks, loose pieces, or staining. Consider professional help if structural issues appear.
- Inspect tile movement and sound.
- Test grout integrity and depth.
- Identify adhesive type and residue severity.
Minor Grout Repairs
Take care of small chips or cracked grout right away to keep moisture and dirt from making things worse. You can scrub with a grout cleaning brush, apply epoxy or cement grout, and finish with grout sealing to protect repairs. Use a narrow tool for precision and let it cure fully before use.
| Task | Tip |
|---|---|
| Clean | Brush first |
| Repair | Use grout mix |
| Seal | Apply sealer |
| Cure | Wait fully |
Replace Damaged Tiles
When a tile cracks or comes loose, you can replace it yourself without redoing the whole floor—start by removing the damaged tile and the surrounding adhesive, clean the substrate, set a matching replacement with thinset, and finish by grouting and sealing the joints so the repair blends in and holds up.
Consider tile replacement options and appropriate adhesive types:
- Match tile size, thickness, and finish
- Choose thinset, mastic, or epoxy based on substrate
- Allow proper cure time, then grout and seal the joint
How Long Each Removal Method Typically Takes
Because removal speed depends on glue type, surface, and method, you’ll want realistic time expectations before you start.
Small areas with heat or solvent often take 30–90 minutes; scraping tougher adhesive can take several hours.
Mechanical grinding may need half a day. Factor cure age and cleanup.
Compare removal timelines and method effectiveness to choose the approach that fits your schedule.
Quick Reference: Best Method by Tile Type and Glue Severity
When deciding how to remove sticky tile glue, you’ll match the method to the tile type—porcelain and ceramic usually handle scraping and heat, while natural stone needs gentler, pH-neutral approaches.
Assess glue severity (light residue, stubborn patches, or thick layers) to pick between simple solvents, a heat gun and scraper, or mechanical removal.
Below you’ll get a quick reference that pairs each tile type with the best options by glue severity.
Porcelain And Ceramic Tiles
Although porcelain and ceramic look similar, you’ll treat their glue removal the same way: start with low-impact methods and step up only if residue won’t budge.
For porcelain cleaning and ceramic maintenance, try gentle solvents, scraping, then heat. Follow tile-safe steps and test first.
- Warm soapy water and plastic scraper
- Rubbing alcohol or citrus solvent
- Heat gun on low, then scrape gently
Natural Stone Surfaces
Porcelain and ceramic methods give you a useful starting point, but natural stone needs gentler, more specific care to avoid etching or staining.
Match your approach to the stone type and how stubborn the glue is. You’ll face adhesive challenges that demand tailored cleaning techniques, surface protection, grout compatibility checks, careful restoration methods, and practical maintenance tips to preserve appearance and integrity.
Glue Severity Levels
Start by categorizing the glue into three quick severity levels—light, moderate, and heavy—so you can pick the safest, most effective removal method for each tile type.
Match glue removal techniques to adhesive types and tile material. Consider:
- Light: solvent wipe or heat gun for delicate tile.
- Moderate: scraper plus mild solvent.
- Heavy: mechanical removal with cautious grinding.
Decision Flowchart to Choose the Safest Removal Method
When you’re choosing how to remove sticky tile glue, follow a simple decision flowchart that guides you from inspection to the safest method based on adhesive type, surface material, and your tools or tolerance for chemicals and labor.
Use flowchart design to sequence tests: identify adhesive properties, try low-impact methods first, then escalate to heat, solvents, or mechanical removal only if safe for the substrate.
Frequently Asked Questions
Can Leftover Adhesive Affect Bathroom Ventilation or Indoor Air Quality?
Yes — leftover adhesive can impact ventilation concerns and indoor air quality: you’ll notice sticky residue effects like odors and off-gassing, which can reduce fresh airflow efficiency and may irritate occupants, especially in poorly ventilated bathrooms.
Will Adhesive-Removal Chemicals Void My Home Insurance or Warranty?
Generally no, you won’t void your insurance policy just by using adhesive-removal chemicals, but you should check coverage and approved adhesive types; using harsh solvents improperly or causing damage could affect claims, so follow manufacturer and insurer guidance.
How to Remove Glue From Metal Fixtures or Drain Covers Without Damage?
Sure — you’ll magically avoid damage by using gentle eco friendly methods: soften glue with warm soapy water, scrape with plastic, dab rubbing alcohol or citrus solvent, then polish stainless; these adhesive removal techniques protect finishes and piping.
Can Pets or Children Safely Re-Enter the Bathroom After Removal?
You can let pets and children re-enter once surfaces are dry and ventilated, but don’t rush; guarantee pet safety and child supervision while airing out fumes, removing residue, and storing chemicals locked away until completely cleaned and odor-free.
Are There Biodegradable Disposal Options for Removed Adhesive and Rags?
“Where there’s a will, there’s a way.” You can choose biodegradable adhesives and eco friendly disposal methods: compost small natural-residue rags, use certified hazardous-waste drop-offs for solvent-soaked materials, and follow local regulations to protect pets and people.
Conclusion
You’ve now got a clear, practical road map to get that stubborn sticky tile glue off without wrecking your bathroom. Pick the gentlest method that fits your tile and adhesive, gather the right tools, and work patiently—one small area at a time. If something goes wrong, know the repair options and call a pro before damage spreads. With a little care, your floor will look brand-new again—like magic, but real.