How to Install Vinyl Plank Tile: Everything You Need for a Smooth Finish
You can install vinyl plank tile yourself in a weekend if you prep properly, use the right tools, and follow a clear plan. Inspect and level the subfloor, test for moisture, and acclimate planks 48–72 hours. Snap chalk lines, click or glue planks with staggered seams, leave expansion gaps, and finish with trim and connections. Clean and monitor humidity to prevent issues. Keep going and you’ll find detailed steps, tips, and troubleshooting to guarantee a smooth finish.
How to Install Vinyl Plank Tile: and Project Overview
You can tackle vinyl plank tile yourself with basic DIY skills, or hire a pro for tricky layouts, and the job usually takes a weekend for a single room.
Expect simple tools, a cost range from budget-friendly to mid-priced depending on material and whether you glue or float, and choose vinyl when you want water resistance, easy maintenance, and a realistic look versus tile or laminate.
Below is a visual summary of the steps: prepare the subfloor, plan the layout, cut and fit planks, and finish edges and connections.
One-paragraph who can install, time, tools, cost range
Although a novice DIYer can lay click‑lock vinyl planks in a single weekend, hiring a pro makes sense for large rooms, complex patterns, or subfloor repairs.
Expect a skilled homeowner to finish a 200–300 sq ft room in a day or two with basic tools (tapping block, pull bar, utility knife, straightedge, spacers, and a floor roller for some adhesives).
Contractors bring specialized equipment and can handle moisture mitigation or leveling issues that add time.
You’ll spend $1–5 per sq ft for materials, $3–8 installed DIY, and $5–12+ per sq ft for pro installation, depending on scope; follow how to install vinyl plank tile guidance for best results.
When to choose vinyl plank tile vs alternatives
Having weighed who should install and what it costs, now compare vinyl plank tile to other flooring so you can pick the right product for your space. Vinyl suits moisture-prone, high-traffic rooms and budget projects; hardwood fits value and resale; tile handles showers. Choose based on durability, budget, and moisture tolerance.
| Feature | Best for |
|---|---|
| Moisture | Vinyl |
| Resale | Hardwood |
| Showers | Tile |
Visual summary of the installation process
1 clear diagram can make the whole vinyl plank installation feel manageable: it outlines site prep, underlayment (if needed), layout and snapping lines, cutting and fitting planks, adhesive or click-lock joining, and finishing trim.
Use a simple flowchart and labeled photos to show sequence, tools, common measurements, and trouble spots so you can follow steps, avoid mistakes, and estimate time.
Basic Understanding What Vinyl Plank Tile Is and Why Choose It
Vinyl plank tile (LVP, SPC, WPC) is a layered synthetic flooring that mimics wood or stone while offering different cores for rigidity and comfort.
You’ll appreciate its durability, water resistance, and ease of maintenance, though some types are firmer underfoot or less scratch-resistant than hardwood.
It’s a solid choice for kitchens, bathrooms, basements, and high-traffic rooms when you match the plank type to the space.
What is vinyl plank tile (LVP, SPC, WPC)
Think of luxury vinyl plank (LVP) as a tough, low‑maintenance floor that mimics wood or stone while staying more affordable and water-resistant than the real thing.
You’ll choose between formats: LVP (flexible vinyl), SPC (rigid, stone‑enhanced core), and WPC (wood‑plastic core with extra cushioning). Each clicks or glues down for easy DIY installation.
- LVP: flexible, realistic visuals
- SPC: ultra‑stable, thin profile
- WPC: softer, thicker feel
Benefits and limitations (durability, water resistance, comfort)
Having picked between LVP, SPC, and WPC, you’ll want to weigh what each offers in durability, water resistance, and comfort so you can match the floor to your lifestyle.
LVP feels softer, offers decent wear layers, and handles occasional moisture.
SPC is extremely rigid and water-resistant but firmer underfoot.
WPC adds cushioning and warmth yet can be less rigid.
All need proper installation for longevity.
Common room applications and suitability
A versatile choice for many homes, vinyl plank tile works well in kitchens, bathrooms, basements, entryways, and even some living areas because it balances water resistance, durability, and ease of maintenance.
You’ll prefer it where moisture, traffic, or easy cleaning matter. Avoid high-heat spots; choose cushioned or thicker planks for comfort and sound control in living spaces.
Preparations Before You Start
Before you lay a single plank, gather a checklist of materials, tools, and supplies and inspect the subfloor—whether concrete, wood, or existing flooring—for flatness and cleanliness.
You’ll need to test for moisture and apply mitigation if required, acclimate the planks to room temperature, and confirm the space meets the manufacturer’s temperature and humidity guidelines.
Finally, plan your layout, take precise measurements, and calculate how much material and waste allowance you’ll need.
Materials, tools, and supplies checklist
Tools and supplies checklist lets you confirm everything you need before you cut or lay a single plank.
Gather quality planks, underlayment, and trims; verify adhesive type if required. Have measuring and cutting tools ready, plus safety gear. Check quantities against room area.
- Tape measure, square, and chalk line
- Utility knife, saw, and spacers
- Underlayment, adhesive, and junction strips
Assessing and preparing the subfloor (concrete, wood, existing flooring)
Start by inspecting your subfloor for flatness, moisture, and damage so you know exactly what repairs or prep it needs.
Remove trim, nails, and loose boards; fill gaps and level low spots with appropriate compound.
Sand high areas, secure squeaks, and guarantee the surface is clean, dry, and free of debris.
For existing flooring, confirm it’s stable and well-adhered.
Moisture testing and moisture mitigation methods
Now that your subfloor is sound and clean, check for moisture because vinyl plank can fail if the substrate is damp.
Use a hygrometer, calcium chloride test, or a concrete moisture meter per manufacturer specs. If levels are high, apply a moisture barrier, epoxy sealer, or a slab primer.
Confirm proper curing and re-test before installation to prevent adhesive or plank issues.
Acclimation and temperature requirements for planks
Before you lay a single plank, let the flooring acclimate to the room’s temperature and humidity so the material can expand or contract to match site conditions.
Keep planks flat in unopened boxes for 48–72 hours at 60–80°F (15–27°C) and stable humidity per manufacturer specs.
Avoid direct heat, AC blasts, or wet surfaces during acclimation to prevent cupping or gaps after installation.
Layout planning, measuring, and calculating materials
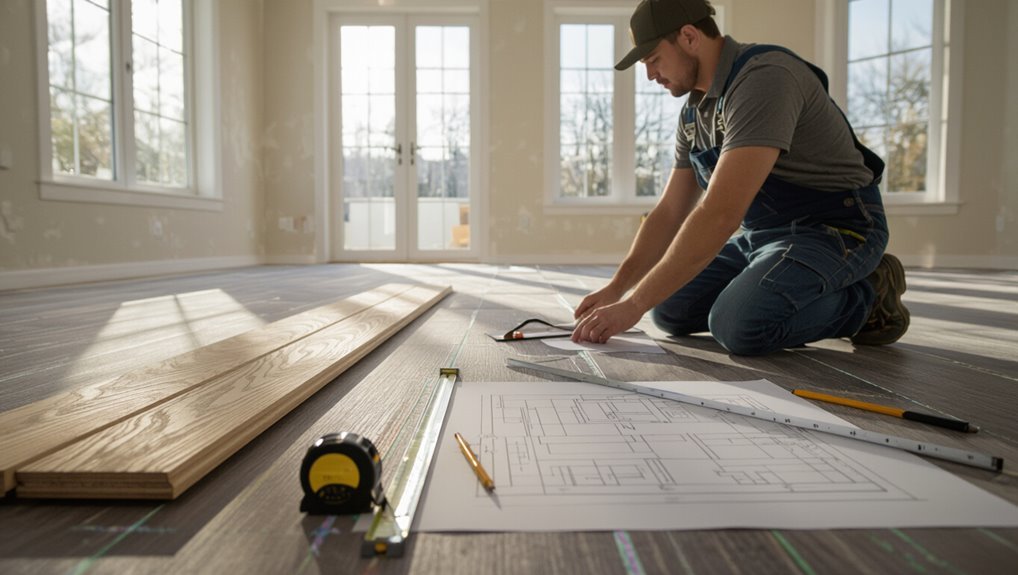
Measure the room carefully and map a layout that minimizes waste and creates balanced seams—begin by measuring length and width at several points, note any alcoves or obstacles, and sketch the room to scale.
Calculate square footage, add 8–10% for cuts and pattern matching, account for changes and thresholds, and determine plank direction.
Buy extra planks for repairs and verify manufacturer coverage.
Step-by-Step Installation Guide
Now you’ll follow a clear, step-by-step installation guide that walks you from removing baseboards and prepping the room to choosing when to use underlayment.
You’ll learn how to establish reference lines and a starting corner, make precise plank cuts with the right tools, and install floating click-lock rows.
Stick to the sequence and techniques here to get a tight, professional-looking floor.
Step 1 Remove baseboards and prepare the room
With a clear workspace, remove baseboards carefully using a pry bar and putty knife to avoid damaging walls and trim.
Label and store trim for reinstallation.
Clear furniture, fixtures, and wall hangings.
Vacuum and sweep thoroughly, then inspect for loose nails or debris.
Confirm doors open freely over new flooring and mark thresholds.
Measure and note irregular areas before proceeding.
Step 2 Repair and level the subfloor; when to use underlayment
Check the subfloor for gaps, high spots, and soft areas, then repair or replace damaged sections so your vinyl planks sit flat and secure.
Sand high spots, fill low areas with patch compound, and tighten loose boards. Use a level to confirm flatness (typically within 3/16″ over 10′).
Install underlayment when subfloor is uneven, noisy, or concrete needs moisture protection.
Step 3 Establish reference lines and starting corner
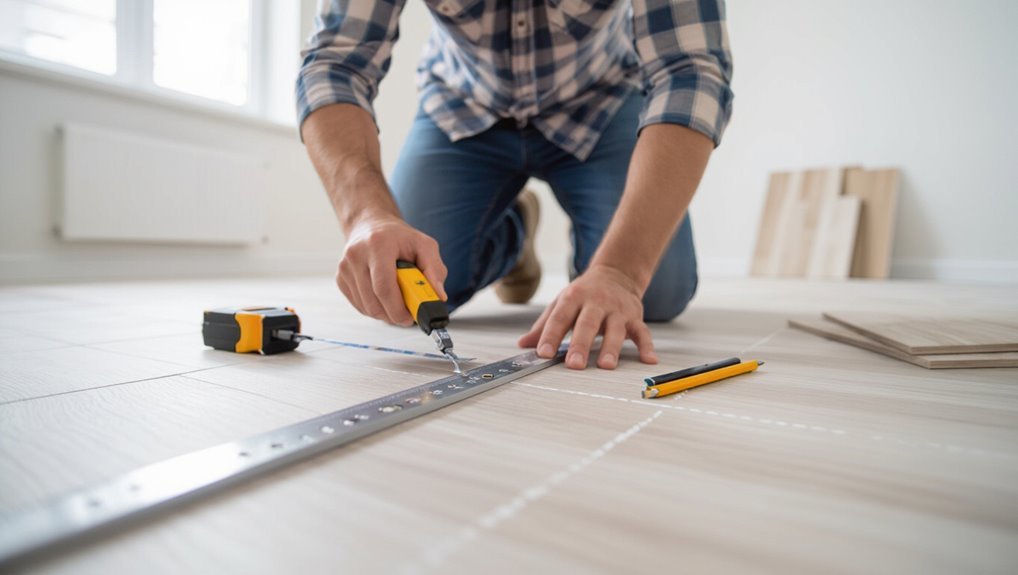
1. Measure the room’s longest wall and snap a chalk line one plank width from it to account for expansion.
Square a perpendicular line from the doorway to guarantee your first row runs straight.
Choose a starting corner that shows full-width planks toward focal areas.
Dry-lay a few rows to confirm alignment and adjust the reference line before fastening the first plank.
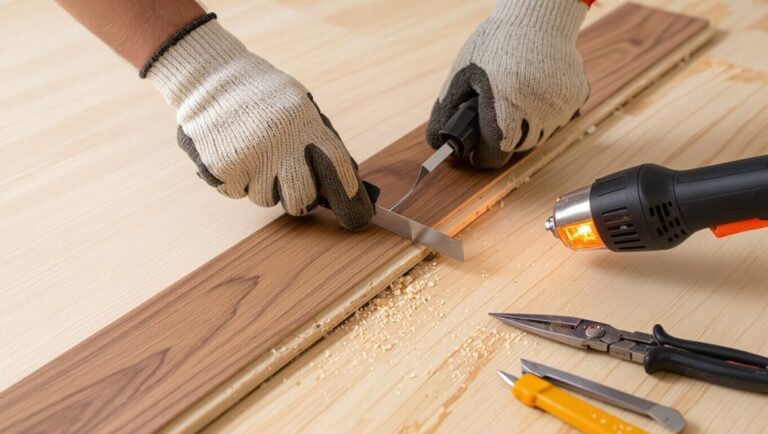
Step 4 Cutting planks: tools and techniques
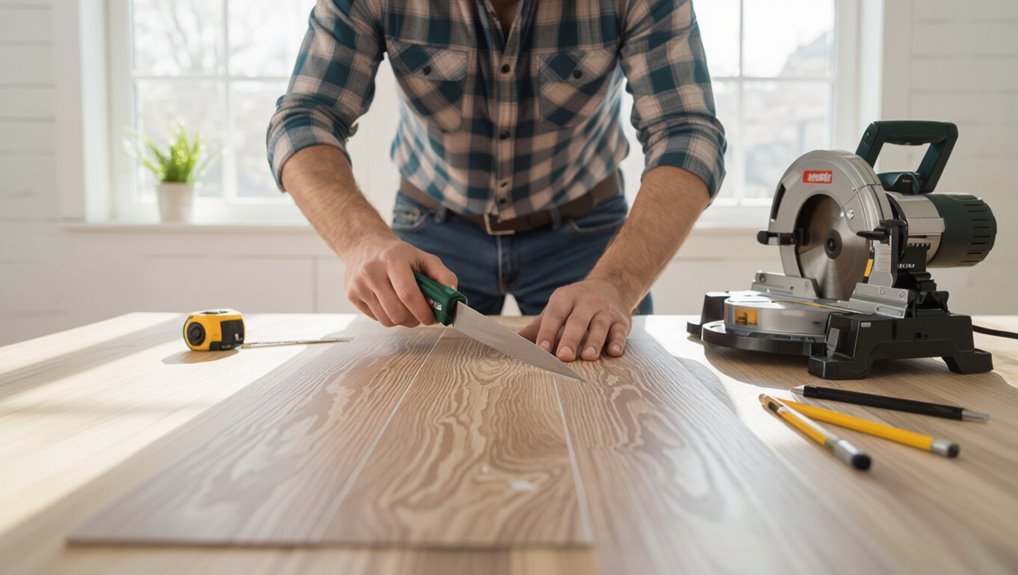
Gather your tools and plan each cut before you begin: a utility knife, straightedge, tape measure, carpenter’s square, and a pull saw or jigsaw for angled or irregular cuts will cover almost every situation.
Measure twice, mark clearly, score and snap straight cuts with the knife. Use a fine-tooth blade for clean edges.
Cut slowly on irregular shapes, leaving expansion gaps as planned.
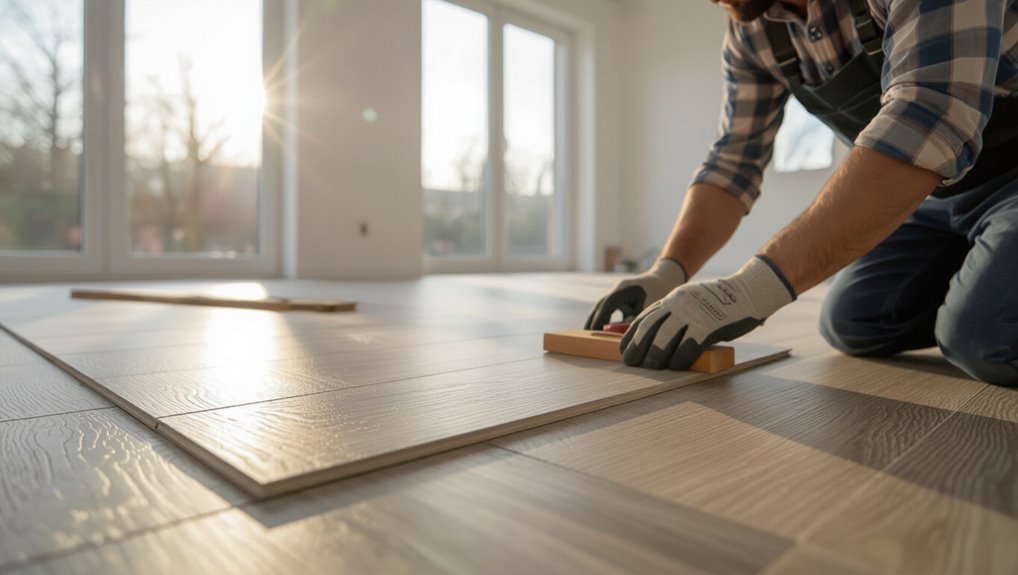
Step 5 Floating click-lock installation: row-by-row procedure
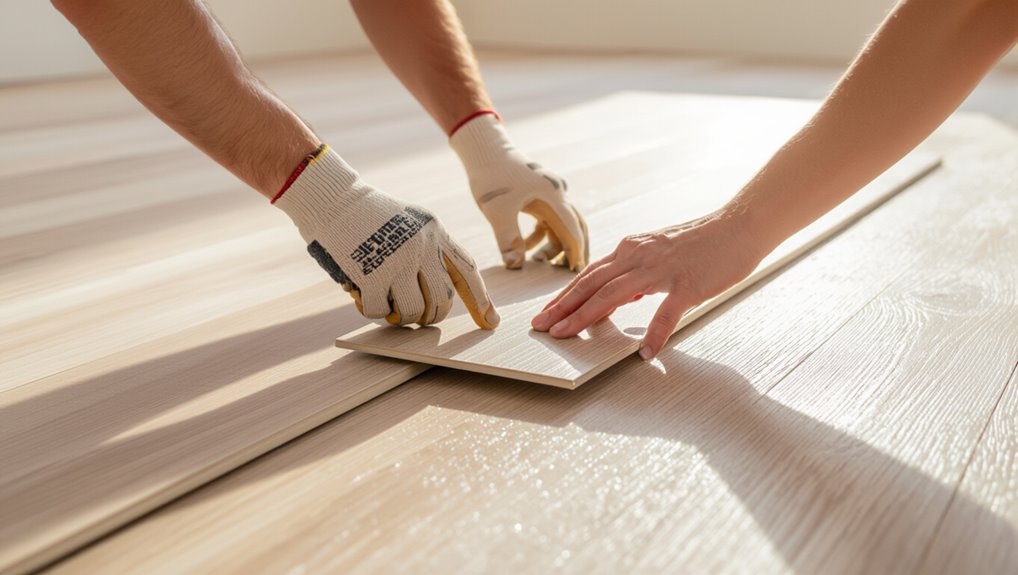
Now you’ll install the planks row by row using the click-lock system: start with a full plank against the longest wall (groove side facing the wall), maintain the recommended expansion gap with spacers, then angle the next plank’s tongue into the groove and press down or tap it with a mallet and tapping block until it clicks.
Continue across the row, stagger end joints at least the manufacturer’s minimum (usually 6–8 inches), and lock subsequent rows by angling the plank’s long edge into the previous row and lowering it until it clicks, keeping seams tight and checking alignment as you go.
Cut end pieces to fit, use a pull bar for tight final joints, and remove spacers before installing trim.
Step 6 Glue-down installation: adhesive selection and trowel techniques
When you choose glue-down installation, pick an adhesive rated for vinyl plank and your subfloor—pressure-sensitive (removable) or permanent acrylic adhesives work for most residential installs, while urethane or epoxy may be required for high-moisture or commercial settings.
Test a small area, follow manufacturer open time, notch trowel per spec, spread consistent ridges, set planks with firm pressure, roll with a 100-pound roller.
Step 7 Installing around obstacles and irregular shapes (pipes, cabinets)
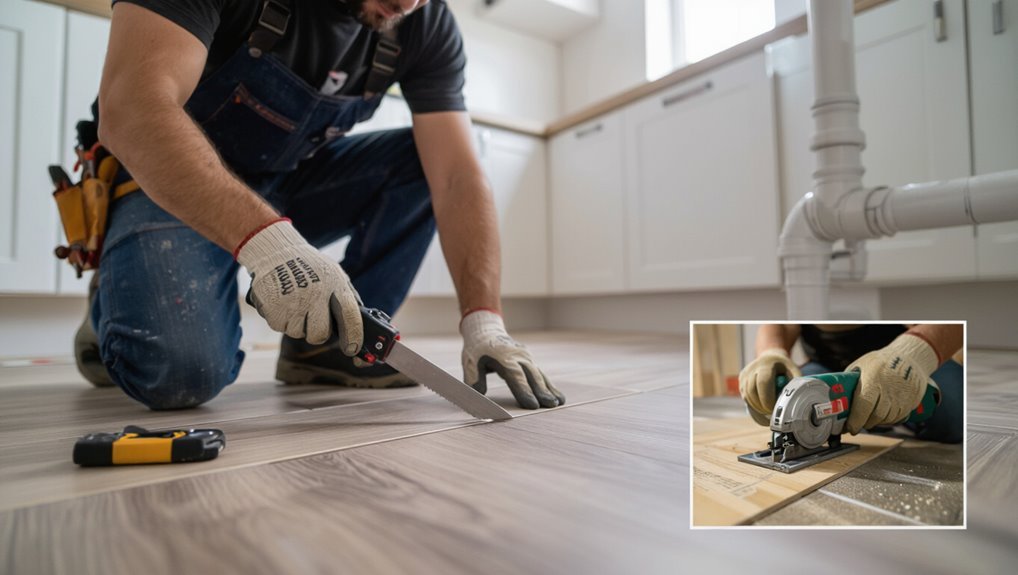
Although tricky bends and tight clearances can slow you down, tackling pipes, cabinets, and other obstacles methodically will give you a clean, professional finish.
Mark and measure each obstruction, transfer shapes onto planks, and cut with a jigsaw or coping saw. Use pipe collars, expansion offsets, and adhesive or seam sealer as needed.
Dry-fit pieces, then secure and trim for tight, neat connections.
Step 8 Final rows, edge gaps, and fitting narrow cuts
After you’ve worked around pipes and cabinets, you’ll face the final rows and narrow edge cuts that demand patience and precise measuring.
Measure twice, scribe fit to walls, and maintain the recommended expansion gap.
Use a pull bar for tight rows, score-and-snap or a fine-tooth saw for narrow pieces, and stagger seams for stability.
Clean debris before laying each strip.
Step 9 Reinstalling trim, baseboards, and transition strips
Gather your tools and work systematically as you reinstall trim, baseboards, and junction strips to finish the floor and conceal expansion gaps.
Remove old nails, test fit each piece, and cut trim to length. Nail or adhesive-mount baseboards, keeping a slight gap for expansion hides.
Install threshold strips at doorways and level changes, ensuring secure, flush connections for a clean, professional finish.
Tools, Materials, and Cost Comparison
Now you’ll compare the essential tools you’ll need versus optional specialty gear and which ones are worth the investment.
You’ll also weigh material choices—LVP, SPC, and WPC—against their cost and performance tradeoffs.
Finally, you’ll see typical labor costs compared to DIY time estimates so you can decide whether to hire help or tackle it yourself.
Essential tools vs optional specialty tools
You’ll need a handful of reliable, everyday tools to install vinyl plank tile correctly, and a few specialty items that can make tricky cuts or large jobs much faster; knowing which are essential versus optional will help you budget and avoid mistakes.
- Tape measure, utility knife, spacers (essential)
- Tapping block, pull bar, mallet (essential)
- Jigsaw, oscillating tool, floor roller (optional)
Material types (LVP vs SPC vs WPC) and cost/performance comparison
Three common vinyl plank constructions—LVP (luxury vinyl plank), SPC (stone plastic composite), and WPC (wood plastic composite)—offer distinct balances of cost, durability, and comfort, so pick the one that matches your priorities. Compare features and price to decide whether you need rigid SPC for high traffic, cushioned WPC for comfort, or versatile LVP.
| Type | Durability | Price |
|---|---|---|
| LVP | Moderate | $$ |
| SPC | High | $$$ |
Labor cost vs DIY time estimates
Wondering whether to hire a pro or tackle vinyl plank yourself?
Pros charge $2–$5 per sq ft labor; complex jobs or removal raise rates.
If you DIY, expect 4–8 hours for a 200 sq ft room if prepared, longer for irregular layouts.
Factor tool rental, underlayment, and your skill—DIY saves money but costs time and potential mistakes.
Common Problems and How to Fix Them
You’ll encounter a few common issues like gapping, buckling, and plank separation, and you’ll need to know whether they’re caused by humidity, poor subfloor prep, or improper clicks.
Check for peaking or uneven seams by running a straightedge and correct them by loosening and re-laying affected planks or adjusting acclimation and expansion gaps.
For glue-down floors, watch for adhesive failures and water damage—remediate with proper adhesive reapplication, plank replacement, or subfloor drying and repair as needed.
Gapping, buckling, or plank separation causes and fixes
If your vinyl planks are gapping, buckling, or separating, it’s usually because of moisture, improper acclimation, or installation mistakes—issues you can often spot and fix without ripping up the whole floor.
Check subfloor moisture and humidity; dry, stabilize, and acclimate planks before reinstalling.
Replace damaged planks, guarantee correct expansion gaps at edges, and refasten or re-click loose boards to restore a flat, stable surface.
Peaking or uneven seams detection and correction
When seams between vinyl planks rise into a ridge or sit unevenly, they not only look bad but can catch dirt and trip toes. You can often spot peaking by running your hand over seams and watching for light gaps or raised edges.
To correct, loosen nearby planks, realign and tap seams flat with a pull bar. Add weight while joints settle, and trim warped edges.
Adhesive failures and remediation for glue-down floors
Peaking and loose seams can sometimes signal a deeper bonding issue, especially on glue-down installations where the adhesive holds everything together.
If planks lift or edge bond fails, peel back affected areas, remove old adhesive, and clean substrate.
Apply recommended pressure-sensitive or wet-set adhesive per manufacturer specs, roll and weight planks, then allow full cure.
Monitor for reappearance and correct substrate contaminants.
Water damage and repair options
Because vinyl plank is water-resistant but not invincible, you need to act quickly when moisture shows up to prevent warped planks, cupping, or mold under the floor.
Dry the area, remove wet rugs, and ventilate.
For minor swelling, replace affected planks; for widespread damage, lift sections, inspect the subfloor, dry or replace it, then reinstall with moisture barrier and proper acclimation.
Best Practices, Tips, and Maintenance
To make your vinyl plank last, follow proven installation practices like proper subfloor prep, correct acclimation, and leaving recommended expansion gaps.
Keep it clean with regular sweeping, gentle mopping, and prompt spill cleanup to prevent damage.
Watch seasonal humidity and temperature changes and adjust gaps or use a humidifier/dehumidifier to prevent buckling or gapping.
Installation best practices to ensure longevity
1 key to making your vinyl plank floor last is doing the prep and follow-up right: level the subfloor, acclimate the planks, maintain proper expansion gaps, and use recommended adhesives or underlayment so the installation can move and breathe without buckling or delaminating.
Follow these practical steps to prevent failures and keep seams tight:
- Stagger end joints for stability and appearance
- Use proper connector strips at thresholds
- Tighten loose boards during installation
Ongoing cleaning and maintenance tips
When you keep a simple routine—regular sweeping, prompt spill cleanup, and gentle mopping—you’ll preserve the look and lifespan of your vinyl plank floor.
Use a damp microfiber mop, pH-neutral cleaner, and avoid abrasive pads or wax.
Put felt pads on furniture, use entry mats to trap grit, and clean spills immediately to prevent staining.
Inspect seams and repair minor damage promptly.
Seasonal considerations and preventing expansion issues
Although vinyl plank is durable, seasonal temperature and humidity swings can make it expand or contract.
So you should control indoor conditions and leave proper expansion gaps during installation. Monitor humidity (35–55%), avoid extreme heat from sunlight or vents, and use transition strips at doorways.
Periodically check gaps and adjust thresholds if needed to prevent buckling or gapping as seasons shift.
Mistakes to Avoid
Don’t skip moisture testing or proper subfloor prep, because trapped dampness or an uneven base will ruin your installation.
Make sure you acclimate planks, leave the recommended expansion gaps, and use the correct adhesive and underlayment for your product.
Plan your layout carefully to avoid awkward cuts and visible seams that draw the eye.
Skipping moisture testing or improper subfloor prep
If you skip moisture testing or rush subfloor prep, you risk cupping, buckling, or adhesive failure that can ruin your new vinyl planks.
Check concrete with a moisture meter and test plywood for dampness. Remove old glue, level uneven spots, and repair cracks.
A clean, dry, flat substrate guarantees adhesives bond and planks lay true, preventing costly callbacks and premature replacement.
Ignoring acclimation and spacing requirements
Once your subfloor’s prepped and moisture-checked, you still can’t just unbox and snap planks into place—skipping acclimation and proper spacing will undo all that work.
Let planks sit in the room for the recommended 48–72 hours so they adjust to temperature and humidity.
Always leave manufacturer-specified expansion gaps at walls and around fixtures; failing to do so causes buckling, warping, and separation.
Using wrong adhesive or incompatible underlayment
While selecting planks, also match the adhesive and underlayment to the vinyl’s type and your subfloor conditions; using the wrong glue or an incompatible pad will lead to delamination, cupping, or a squishy, unstable surface.
Check manufacturer recommendations, confirm moisture compatibility, and avoid generic adhesives or thick foam underlays unless approved.
Test a small area if unsure; proper pairing guarantees long-lasting adhesion and dimensional stability.
Poor layout planning leading to visible seams
Because seams catch the eye, a poor layout will turn a professional-looking floor into an obvious DIY job. So plan your plank placement before you cut anything.
Measure room dimensions, establish a balanced starter row, and stagger end joints per manufacturer specs.
Dry-lay rows, adjust for focal points and doorways, and trim edge planks carefully to keep seams consistent and nearly invisible.
Tools and Techniques Quick Reference Cheat Sheet
A compact cheat sheet gives you the tools, measurements, and cutting techniques you’ll use most often when installing vinyl plank tile, so you can work faster and avoid common mistakes. Use this quick reference to keep accuracy and speed.
| Tool | Use |
|---|---|
| T-square | Straight cuts |
| Utility knife | Scoring planks |
| Pull bar | Tight joints |
Frequently Asked Questions
You probably have a few quick questions before you start, like whether you can install vinyl plank over existing tile or how much expansion gap to leave.
You’ll also want to know if vinyl plank is waterproof or just water‑resistant, and whether it works in bathrooms and basements.
Finally, we’ll cover how long installation and any curing or acclimation typically take.
Can I install vinyl plank tile over existing tile?
Wondering whether you can install vinyl plank tile over existing tile? Yes—you can, provided the current tile is level, secure, and clean.
Fill grout lines, remove loose tiles, and sand glossy surfaces for adhesion. Use an appropriate underlayment if manufacturer recommends.
Inspect for moisture issues first. Follow the vinyl maker’s guidelines to guarantee warranty compliance and a durable finish.
How much expansion gap should I leave?
If your old tile is level and prepped, next think about how much room to leave around the perimeter for the vinyl to expand and contract.
Generally leave 1/4 inch for rooms under 40 feet; use 1/2 inch for larger spaces or long runs.
Keep gaps at doorways and thresholds, and cover them with trim or reducers so the planks can move without showing gaps.
Is vinyl plank waterproof or only water-resistant?
Curious whether vinyl plank stands up to spills and moisture? Most luxury vinyl planks are water-resistant; many are fully waterproof thanks to a sealed wear layer, waterproof core, and tight plank joints.
You should check product specifications and installation method—glued, click-lock, or loose lay affect performance. Proper seams and baseboard sealing help prevent damage from prolonged standing water.
Can I install vinyl plank in bathrooms and basements?
Yes—you can usually install vinyl plank in bathrooms and basements, but choosing the right product and following proper installation steps makes all the difference.
Pick a fully waterproof, mold-resistant plank with a tight-locking seam.
Prep subfloors: level, dry, and clean. Use appropriate underlayment, moisture barriers where needed, and seal perimeters.
Maintain ventilation to reduce humidity and prolong the floor’s life.
How long does vinyl plank installation and curing take?
Now that you’ve picked a waterproof plank and prepped the subfloor, you’ll want to know how long the job and curing actually take.
Installation for a typical room often takes one day for a DIYer; pros may finish faster.
Adhesive or glue-down planks need 24–48 hours to cure before heavy traffic; click-lock floors can be used immediately but avoid heavy furniture for 24 hours.