
How to Install Herringbone Flooring: A Step-by-Step Pattern Guide
You can install herringbone flooring yourself if you’re comfortable with careful measuring, cutting, and patience. Start by acclimating planks and preparing a flat, dry subfloor, then mark center lines and dry-lay the first V to set alignment. Work outward with adhesive or nails, cutting border pieces to fit, maintain tight joints, and check squareness often. Finish with sanding or sealing and allow cure time. Keep going and you’ll get clear step‑by‑step techniques, tool lists, and tips.
Can You Install Herringbone Flooring Yourself?
You can tackle herringbone flooring yourself if you have patience, basic carpentry skills, and the right tools—expect a multi-day project for a single room.
It’s moderately difficult because precise measuring, cutting, and pattern alignment are essential, so hire a pro for large areas, complex layouts, or if you don’t own specialized tools.
We’ll cover a quick timeline, required tools, and clear signs you should call a professional.
Short summary of timeline, difficulty, and tools required
Although a DIY herringbone install takes more time and precision than a straight‑lay floor, you can often do it yourself if you’re comfortable with measuring, cutting, and steady glue- or nail-down work.
Expect 2–4 days for a medium room: prep, layout, cutting, installation, and finishing. Difficulty is moderate to high.
Essential tools: tape measure, square, miter saw, adhesive or nailer, spacers, and tapping block for how to install herringbone flooring.
When to hire a professional vs. DIY
If you’re comfortable with exact measuring, steady cutting, and patient layout work, you can tackle a herringbone install yourself; hire a pro when the room is large, irregular, or demands perfection.
You should weigh skill, time, and budget before deciding.
- Skill level: advanced carpentry needed
- Time: expect long, detailed work
- Cost: DIY saves labor, risks errors
- Warranty: pros offer guarantees
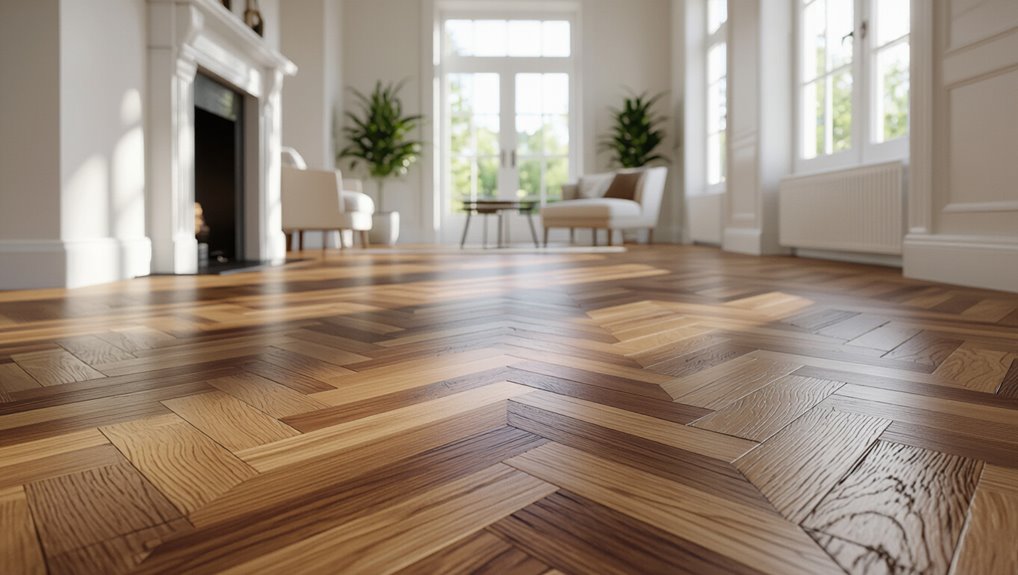
What Is Herringbone Flooring and Why Choose It?
Herringbone flooring is a patterned layout where rectangular planks are set in a zigzag ‘V’ formation, and you’ll recognize it by the crisp, staggered joints that set it apart from straight-laid boards.
You’ll choose it for the instant visual texture and elegance it adds to rooms, commonly used in entryways, living areas, and formal spaces to make them feel more refined.
It’s available in solid and engineered wood as well as more budget- and moisture-tolerant options like vinyl and laminate, so you can pick the material that fits your style and practical needs.
Definition and distinguishing features
A classic parquet pattern, the herringbone layout arranges rectangular wood planks in a staggered zigzag so each short end meets a long side at a right angle, creating a V-shaped repeat across the floor.
You’ll recognize it by its interlocking, offset joints, predictable geometry, and rhythmic texture.
It’s defined by precise plank proportions, consistent angle alignment, and tight, repetitive seams.
Aesthetic benefits and common applications
When you choose herringbone, you introduce a timeless pattern that elevates any room with visual depth and refined movement.
You’ll create a focal point that suggests craftsmanship and luxury, enlarges narrow spaces, and guides traffic visually.
Use it in living rooms, entryways, kitchens, or commercial lobbies to add elegance and rhythm without overwhelming existing decor or architectural details.
Types of materials used (solid wood, engineered wood, vinyl, laminate)
Material choice shapes both the look and lifespan of your herringbone floor, so pick the substrate that fits your budget, traffic level, and installation constraints. Choose solid for longevity, engineered for stability, vinyl for moisture resistance, or laminate for affordability.
| Material | Pros | Cons |
|---|---|---|
| Solid wood | Durable, refinishable | Sensitive to moisture |
| Engineered | Stable, versatile | Limited refinishing |
| Vinyl | Waterproof, cheap | Less authentic |
| Laminate | Affordable, easy | Not refinishable |
Preparing for the Project Planning and Measurements
Before you start laying planks, you’ll want to calculate coverage, waste, and budget using a simple area formula so you know how many boards to buy.
Pick plank size and pattern direction to match the room’s scale, then inspect the subfloor, check for moisture, and confirm any permits or prep work needed.
Allow time for acclimation once materials arrive and plan for any repairs or leveling your subfloor before installation.
How to calculate boards, waste, and budget (coverage formula)
A clear coverage formula helps you figure how many herringbone boards you’ll need, account for cutting waste, and set an accurate budget so the project doesn’t stall halfway through. Measure area (sq ft), divide by plank coverage, add 10–15% waste, then multiply by unit cost to estimate budget. Use the table for quick reference.
| Item | Action |
|---|---|
| Area | Measure room sq ft |
| Coverage | Plank sq ft each |
| Waste | Add 10–15% |
| Budget | Unit cost × quantity |
Choosing plank size, pattern scale, and direction
Plank size, pattern scale, and installation direction shape both the look and layout complexity of your herringbone floor, so choose them with the room’s proportions and traffic flow in mind.
Use longer, wider planks to open large spaces; narrow, shorter pieces suit small rooms and fine detail.
Run the pattern along the main sightline or traffic axis for visual flow and fewer cuts.
Assessing subfloor types and conditions

Once you’ve settled on plank size and layout direction, check the subfloor because its type and condition determine what prep and adhesives you’ll need.
Identify plywood, OSB, concrete, or existing flooring. Look for levelness, damage, rot, mold, loose boards, and squeaks.
Measure flatness with a straightedge; note high or low spots. Plan repairs, reinforcement, and appropriate underlayment accordingly.
Required permits, moisture testing, and acclimation
Before you cut or glue, check local building codes and get any required permits. Then test subfloor moisture and acclimate the herringbone planks to the room’s temperature and humidity; this prevents failed adhesives, buckling, and costly rework.
Use a calibrated moisture meter, follow manufacturer limits, allow 48–72 hours (or longer in extreme conditions), and store cartons flat, off concrete, away from drafts.
Tools, Materials, and Supplies Checklist
Before you start laying planks, gather the essential tools you’ll need for a DIY herringbone install—saw, spacers, chalk line, tapping block, and measuring tools.
Know which adhesives, underlayments, and fasteners suit your subfloor and chosen flooring type so the pattern stays secure and performs well.
Consider optional tools or rentals like a floor nailer or a wet saw to speed the job and improve accuracy.
Essential tools for DIY herringbone installation
1 essential checklist will save you hours: gather the right tools, adhesives, and safety gear so you can work efficiently and avoid mid-project stops.
You’ll need accurate measuring, cutting, and alignment gear plus protection. Prioritize quality for tight herringbone joints.
- Tape measure and chalk line
- Miter saw or handsaw with square guide
- Flooring spacers and mallet
- Safety glasses and knee pads
Adhesives, underlayments, and fasteners explained
When you’re laying herringbone, choosing the right adhesive, underlayment, and fasteners makes the difference between a long-lasting floor and constant repairs. Each component addresses moisture control, sound, and stability in different ways.
You’ll pick moisture-resistant adhesive, dense underlayment for sound, and corrosion-resistant fasteners.
Consider these priorities:
- Moisture barrier
- Adhesive type
- Underlayment density
- Fastener finish
Optional tools and rental equipment
A few specialty tools and rental items can speed installation and improve accuracy, though you don’t need them for every job.
Rent a floor sander, panel saw, or plate joiner for large projects.
Consider a table saw with a crosscut sled, a flooring nailer, and a tile cutter for inlays.
Portable dust extractor and laser layout tools boost precision and cleanup.
Step-by-Step Installation Guide
Now you’ll walk through the installation in clear steps, starting with prepping the subfloor—clean, level, and install any required moisture barrier.
Next you’ll lay out reference lines and a centerpoint, dry-lay the first rows to confirm the layout, and choose your adhesive or fastening method.
Finally, you’ll place the first herringbone “V” and keep the pattern at a true 90° as you work outward.
Step 1 Preparing the subfloor (cleaning, leveling, moisture barrier)

Start by thoroughly preparing the subfloor: clean away all dust, debris, and adhesive residues, then check for level and moisture so your herringbone planks sit flat and long-lasting.
Remove loose board fragments, vacuum, and mop.
Repair dips or high spots with leveling compound.
Test moisture with a meter; install an appropriate vapor barrier or underlayment if readings exceed manufacturer limits before flooring installation.
Step 2 Laying out reference lines and centerpoint for pattern

Begin by finding and marking the exact center of the room—measure and snap a chalk line between midpoints of opposite walls, then repeat for the other pair to create a precise cross.
This centerpoint and lines will guide the herringbone’s primary axis so the pattern stays balanced and symmetrical as you work outward.
Square the lines to walls, snap parallel layout lines for each rib, and mark starter plank locations.
Step 3 Dry-laying the first few rows to confirm layout

With your centerlines and starter plank marks in place, dry-lay the first several rows to confirm the pattern, fit, and spacing before applying adhesive.
Walk the layout, check alignment against centerlines, and verify right-angle joints and consistent gaps at walls.
Trim and adjust end pieces as needed. Make note of any irregularities so you can correct them before permanently fixing planks.
Step 4 Applying adhesive or fastening system
Once you’ve confirmed the dry layout, apply the adhesive or engage the fastening system section by section so you’re only working on an area you can cover in the open time of the product; this keeps joints tight and prevents slipping.
Trowel to the manufacturer’s notch size, work in manageable zones, and tool out air pockets.
Clean excess immediately and follow cure times before walking.
Step 5 Placing the first herringbone “V†and maintaining 90° alignment

Set the first “V” by laying the two starter planks at a perfect 90° to your chalk lines so their inner ends meet cleanly at the apex; this orientation establishes the pattern and dictates every joint that follows.
Check both angles with a square, press ends firmly into adhesive, and verify alignment from several sightlines. Adjust before adhesive skins to keep rows true.
Step 6 Continuing the pattern: tips for consistent spacing and tapping
After you’ve nailed the first “V,” keep the pattern steady by working outward row by row, keeping spacer gaps uniform and tapping each plank snugly into its neighbor.
Use a tapping block and mallet to seat joints without damaging edges, check alignment frequently with a straightedge, and adjust spacer size to maintain consistent expansion gaps.
Work deliberately to prevent cumulative drift.
Step 7 Cutting and fitting border and end pieces (around walls, obstacles)

Now you’ll cut and fit the border and end pieces that finish the room’s edges and wrap around obstacles. Measure each gap, transfer the exact profile to your plank, and make precise cuts so the herringbone pattern meets the wall cleanly.
Fit pieces dry first, trim for expansion gaps, cope around pipes and doorjambs, sand tight spots, then glue or lock border boards into place, checking alignment.
Step 8 Dealing with transitions to other flooring types
When your herringbone floor meets another surface, plan the junction so both materials can expand and look intentional; identify the height difference, movement requirements, and the visual finish you want before cutting any pieces.
Use joining strips, reducers, or T-molds sized to cover gaps and match heights. Fasten per manufacturer instructions, leave expansion gaps, and trim edges cleanly for a seamless, durable junction.
Step 9 Final sanding, cleaning, and finishing (if required)
Sit down the expectation that final sanding, cleaning, and finishing are the last critical steps that protect your herringbone floor and set its appearance; you’ll smooth minor imperfections, remove dust and debris thoroughly, and apply the finish specified for your chosen wood and traffic level.
Use fine-grit sanding to level, vacuum and tack cloth, inspect seams, then apply thin, even coats of sealer or varnish per manufacturer instructions.
Step 10 Curing time and initial care after installation
Although the finish feels dry to the touch, give the floor its full curing time before heavy use; you’ll protect the coating and let adhesives and finishes reach their full strength by following the manufacturer’s cure schedule, controlling humidity and temperature, and avoiding traffic and rugs until recommended.
After curing, clean gently, use felt pads on furniture, avoid high heels and rolling casters, and maintain recommended humidity.
Common Challenges and How to Solve Them
You’ll likely run into issues like an uneven subfloor or lippage, misaligned patterns in big rooms, gaps or cupping from humidity, and awkward cuts around doors or odd-shaped spaces.
Tackle subfloor flatness and lippage with proper leveling and correct fastening methods. Keep pattern alignment by snapping reference lines and working outward. Manage moisture with acclimation and appropriate expansion gaps.
For irregular shapes, plan templates and trim carefully so your herringbone stays tight and visually continuous.
Uneven subfloor or lippage prevention and fixes
Uneven subfloors and lippage can wreck the crisp look of a herringbone install, so you’ll want to identify and address these issues before laying any planks.
Check with a straightedge and level; shim low spots, sand high spots, or use a self-leveling compound for larger dips.
Secure loose boards, dry-fit rows, and recheck frequently to prevent gaps, rocking, or visible lippage.
Maintaining pattern alignment over large rooms
When working across a large room, small misalignments can compound into noticeable shifts in the herringbone pattern.
Gaps, cupping, or movement related to humidity
Because wood responds to moisture, gaps, cupping, and seasonal movement are often signs of humidity changes rather than installation errors.
So you should aim to control moisture before and after laying herringbone flooring. Monitor and stabilize subfloor and room humidity (35–55% RH).
Acclimate boards, use proper underlayment, leave recommended expansion gaps, and address leaks or HVAC issues promptly to prevent recurring distortion.
Handling irregular room shapes and doorways

Irregular room shapes and doorways can complicate herringbone layout, but with careful planning you can make the pattern flow smoothly around odd angles and openings.
First, map and snap reference lines from the focal point. Dry-lay and trim pieces for junctions.
Use tapered thresholds or custom sills at doorways. Consider partial rows, filler strips, and expansion gaps to maintain alignment and movement tolerance.
Best Practices, Tips, and Time-Savers
Before you start laying planks, plan a layout to minimize waste and avoid obvious pattern mismatches.
At each stage check plank fit, subfloor flatness, and adhesive coverage so problems don’t get locked in.
Finish with maintenance-friendly coatings, consider eco-friendly or reclaimed options, and use batching and jigs to save time and money.
Layout strategies to minimize waste and visual anomalies
When you plan the herringbone layout carefully, you’ll cut material waste and prevent awkward partial pieces at walls and doorways.
You should establish a centerline, dry-lay starter rows, and shift the pattern to hide narrow end cuts.
Follow these steps:
- Find and mark the room center.
- Dry-fit a few rows.
- Adjust starting point for balance.
- Minimize narrow cuts at edges.
Quality control: what to check at each stage
After you’ve planned the layout to minimize waste and odd end pieces, keep a checklist to catch small problems before they become big ones.
Check subfloor flatness, moisture, and cleanliness before installing.
Verify plank orientation, joint tightness, and consistent pattern alignment as you work.
Monitor adhesive coverage, clamp pressure, and expansion gaps.
Inspect for damage and color consistency during and after installation.
Finishing options and maintenance-friendly choices
Because the finish you choose affects appearance, durability, and upkeep, pick options that match how you live and how much maintenance you’ll do.
Choose polyurethane for scratch resistance, oil for natural warmth and easy spot repairs, or hardwax oil for balanced protection.
Prefer lighter sheens to hide wear.
Seal edges and gaps, follow manufacturer curing times, and use recommended cleaners to simplify upkeep.
Eco-friendly and budget-saving recommendations
If you want to save money and shrink your project’s environmental footprint, focus on smart material choices and simple labor-saving strategies: buy FSC- or reclaimed-wood herringbone, choose low-VOC finishes, order a bit extra to account for waste but avoid massive overbuying, and batch tasks like sanding and finishing to reduce tool setup time and energy use.
Reuse offcuts for thresholds, shop sales, rent specialty tools, and plan efficient cuts.
Cost Estimates and Comparing Installation Methods
Deciding between DIY and hiring a pro will largely shape your budget, so compare quotes and realistic time commitments before you start.
Account for material type, labor rates, pattern complexity, and regional pricing when estimating total cost.
Consider whether specialized installs—like engineered click systems or glue-down—justify higher fees based on durability, subfloor condition, and long-term value.
DIY vs. professional installation costs
Choosing between DIY and professional installation for herringbone flooring comes down to your budget, skill level, and timeline. You can save money DIY but risk mistakes and extra time; professionals cost more yet guarantee precision and warranty. Weigh stress, pride, and peace of mind.
| Option | Cost feeling | Outcome |
|---|---|---|
| DIY | anxious-savings | variable |
| Pro | costly-relief | reliable |
| Hybrid | cautious-hope | balanced |
Cost factors: material, labor, complexity, region
Materials, labor, job complexity, and where you live all affect what you’ll pay to install herringbone flooring.
You’ll pay more for hardwood species, wider planks, or specialty cuts. Labor rises with pattern complexity, room shape, and prep or subfloor work.
Urban areas and high-demand seasons increase rates.
Get multiple quotes and itemized estimates so you can compare materials, labor, and contingency costs.
When specialized installation (engineered click systems, glue-down) is worth it
After you’ve compared quotes and understood how species, plank width, and labor drive cost, you’ll want to weigh whether a specialized installation method will give you enough benefit to justify higher upfront charges.
Choose engineered click if you want faster, floating installs and easier repairs. Opt for glue-down for superior stability, sound control, and moisture resistance.
Match method to subfloor, traffic, and resale goals.
Mistakes to Avoid
You’ll want to watch for common installation errors like uneven subfloors, incorrect plank orientation, and inconsistent gaps that ruin the herringbone pattern.
Learn simple checks you can do as you go—straight lines from reference points, frequent dry fits, and routine level tests—to spot problems early.
If you catch an issue, act quickly with corrective actions such as shimmed leveling, re-cutting misaligned pieces, or pulling back sections before adhesive sets.
Top installation errors homeowners make
While herringbone makes a bold statement, a few common installation mistakes can ruin the look and create costly problems down the road. You should avoid misaligned starter rows, uneven subfloor prep, improper adhesive or fastener use, and poor acclimation. Fix these before you begin.
- Misaligned starter rows
- Uneven subfloor
- Wrong adhesive/fasteners
- Insufficient acclimation
How to detect errors early and corrective actions
If you spot a small misalignment, uneven plank, or adhesive squeeze-out early, you can usually fix it without ripping up the whole floor; catch problems during layout and the first few rows so corrections stay simple and cheap.
Check alignment with a straightedge, monitor gaps and row squareness, and fix adhesive with solvent or scrape.
Replace warped pieces immediately and re-check chalk lines often.
Project Checklist and Timeline
Before you start, make a concise pre-install checklist of materials, tools, and site prep tasks so nothing stalls the job.
Account for acclimation, subfloor repairs, layout, installation, and finishing when you map your timeline.
That way you’ll know how many days each phase will take and can schedule work or trades efficiently.
Pre-install checklist (materials, tools, site prep)
Once you’ve confirmed the room’s measurements and layout, gather your materials, tools, and site-prep supplies so nothing interrupts the install.
Check moisture meter, acclimate wood, and clear the space. Prepare subfloor and underlayment. Verify layout lines and starter row.
- Flooring planks and trim
- Adhesive/fasteners and underlayment
- Measuring, cutting, and leveling tools
- Safety gear and cleanup supplies
Typical project timeline from prep to finish
A clear timeline keeps the job moving and helps you plan work, deliveries, and downtime.
Begin with 1–2 days prepping subfloor, acclimating boards and marking layout.
Allow 1–3 days for installation depending on room size and pattern complexity.
Add 1 day for sanding/finish if required and 1 day for curing before furniture return.
Build in extra buffer for unexpected delays.
FAQ Herringbone Flooring Installation
You’ll find answers to common concerns like how long a typical room takes, whether you can install over existing flooring, and if stairs are an option.
I’ll also cover cleaning and maintenance tips and what warranties or guarantees you should expect.
If you have a specific situation, mention the room size, existing floor type, and stair details so I can give more precise guidance.
How long does herringbone installation take for a typical room?
How long will herringbone installation take for a typical room?
Expect one to three days for a 12×12–15×15-foot room: a day for prep (acclimation, layout, subfloor checks), one to two days for laying and cutting, then adhesive or nail set time.
Larger rooms, complex patterns, or inexperienced installers add time.
Plan for inspection and light traffic after curing.
Can herringbone be installed over existing flooring?
Wondering if you can lay herringbone over your current floor? You often can, provided the substrate is flat, clean, dry, and structurally sound.
Thin-set or adhesive methods work over tile, concrete, or plywood, but remove loose coverings, fix height changes, and guarantee moisture barriers where needed.
Check manufacturer guidelines and local codes before proceeding to avoid warranty voids or failures.
Is it possible to install herringbone on stairs?
If your herringbone run will pass near or across a stairway, you can also apply the pattern to the stairs themselves, but it takes extra planning and skill.
You’ll need precise cuts for nosing and risers, matched grain and direction, and secure adhesive or mechanical fastening.
Consider prefabricated stair treads or a skilled installer to guarantee safe, durable joints and consistent pattern alignment.
How do I maintain and clean herringbone wood floors?
Keep dirt and grit off your herringbone floor by sweeping or vacuuming regularly and wiping up spills promptly to prevent stains and finish damage.
Use a microfiber mop and pH-neutral wood cleaner for routine cleaning, avoiding excessive water.
Place felt pads under furniture, use rugs in high-traffic areas, and refinish or spot-sand when wear appears to restore protection and appearance.
What warranty or guarantees should I expect?
Good maintenance helps preserve your herringbone floor, but you’ll also want clear warranty protection in case of manufacturing defects, finish failures, or installation mistakes.
Check manufacturer warranties for plank defects, wear-through, and moisture limits; ask the installer about labor and workmanship guarantees.
Get terms in writing, note coverage duration and transferability, and retain receipts and photos to speed claims if issues arise.