
How to Remove Stains From Linoleum Flooring Without Harsh Chemicals
You can lift most linoleum stains without harsh chemicals by acting quickly and using gentle, natural solutions. Blot spills, sweep debris, then try a vinegar-and-water mix or a baking soda paste for spot cleaning. Use a soft brush, rinse with soapy water, and dry thoroughly to avoid residue. For ink or grease, dab rubbing alcohol or sprinkle baking soda before scrubbing. Test first on a hidden spot, and keep going below to find more targeted tips and troubleshooting.
Remove Linoleum Stains Without Harsh Chemicals
You can remove most linoleum stains safely using gentle, natural cleaners like a baking soda paste or a vinegar-and-water solution.
Start by testing a small area, then apply the cleaner, let it sit briefly, and gently scrub with a soft cloth or brush.
Rinse well and dry to avoid residue or warping.
One-sentence summary of the safest, most effective approach
When stains appear, tackle them gently with household ingredients—warm water, mild dish soap, baking soda, and white vinegar—so you remove grime without harming the linoleum finish.
For quick, safe results, blot spills, scrub lightly with a baking soda paste, rinse with warm water and mild soap, then use diluted vinegar for stubborn spots.
This practical method shows how to clean stains on linoleum flooring effectively.
Basic Understanding Linoleum Flooring and Stains
Linoleum is made from natural materials like linseed oil, cork dust, wood flour, and pigments, so it soaks up spills differently than tile or vinyl—understanding that helps you spot which stains will set quickly.
Common culprits you’ll face are food, dye, grease, ink, pet accidents, and rust, each needing a different approach.
Because linoleum can be sensitive and your indoor air matters, you’ll want to avoid harsh chemicals that can damage the floor or release harmful fumes.
What is linoleum made of and why it reacts to stains
Flooring made from natural materials—like cork dust, linseed oil, wood flour, and a jute backing—creates a porous, oil-rich surface that soaks up spills and reacts chemically with many common stains.
You should know its oils attract and bind contaminants, and pores trap pigments. That means stains can penetrate instead of sitting on top, so prompt, gentle cleaning matters to prevent permanent absorption.
Common types of stains on linoleum (food, dye, grease, ink, pet, rust)
Stains on linoleum come in a few predictable varieties—food, dye, grease, ink, pet accidents, and rust—each with its own chemistry and cleanup needs, so you’ll want to identify the type before treating it.
Food and dye often leave pigments; grease soaks in and darkens; ink transfers quickly; pet stains include odor and protein; rust etches if left.
Identify, blot, then treat appropriately.
Why avoiding harsh chemicals matters for linoleum and indoor air quality
Because harsh cleaners can strip linoleum’s protective finish and release volatile compounds, you should avoid them whenever possible to protect both the floor and the air in your home.
You’ll preserve color, flexibility, and finish by using mild, pH-neutral cleaners or natural alternatives. That also reduces indoor air pollution, allergy triggers, and long-term health risks for you, children, and pets.
Preparation What You Need Before You Start
Before you start, make sure you’ve got good ventilation and protective gloves to keep fumes and skin contact to a minimum.
Gather soft cloths, a mild cleaner, a soft-bristled brush, and any recommended gentle products so you don’t damage the floor.
Always test your chosen cleaner in an inconspicuous spot first to confirm it won’t harm the finish.
Safety precautions and ventilation
When you’re preparing to remove stains from linoleum, protect yourself and the room: open windows, run a fan, and wear gloves and eye protection so fumes and splashes don’t cause harm.
Clear the area of pets and kids, remove rugs, and keep doors ajar to promote airflow.
Read product labels, test a small patch, and never mix cleaning solutions.
Tools and gentle supplies list
Gather these basic tools and gentle supplies so you can tackle stains without damaging the linoleum: a soft-bristle broom or vacuum, microfiber cloths, a sponge, a bucket, mild dish soap, white vinegar, baking soda, rubbing alcohol, a plastic scraper or putty knife, and a few disposable gloves.
Use them wisely:
- Sweep or vacuum debris first.
- Spot-clean with soap or vinegar solutions.
- Lift residue with baking soda paste and a scraper.
Test spot protocol to protect finish
Pick a small, inconspicuous area—like a closet corner or under a cabinet—and test your cleaning method there first so you can confirm it won’t dull, discolor, or strip the linoleum finish.
Apply the cleaner, wait recommended dwell time, blot with a white cloth, rinse, and let dry.
Inspect for color change, haze, or softness; proceed only if unchanged.
Quick-Start: Universal Gentle Cleaning Method
Start by removing loose debris and blotting or gently scraping up fresh spills so you don’t grind dirt into the surface.
Mix a few drops of mild dish soap with warm water and clean the spot with a soft cloth or mop.
Rinse thoroughly with clean water and dry to remove residue and prevent streaks.
Step 1 Dry removal (sweeping, blotting, scraping)
Begin by removing loose debris and excess liquid so you don’t grind stains into the vinyl when you clean.
Sweep or vacuum crumbs and grit, blot spills with absorbent cloths or paper towels, and gently scrape dried residue with a plastic scraper or old credit card.
Work outward from the stain to prevent spreading, and discard collected waste properly before any wet cleaning.
Step 2 Mild soap and warm water solution
Mix a few drops of mild dish soap into a bucket of warm water, then dip a soft cloth or mop and wring it so it’s damp, not dripping.
Gently wipe stain areas in small sections, using light pressure and circular motions. Repeat as needed until the stain lifts.
For stubborn spots, let the damp cloth sit briefly to soften residue before wiping.
Step 3 Rinsing and drying to prevent residue
1. After washing, rinse the floor with clean water to remove soap and loosened grime.
Use a mop or microfiber cloth and change rinse water often to avoid spreading residue. Wring the mop well so the floor isn’t overly wet.
Finish by drying with a clean towel or dry microfiber mop, ensuring seams and edges are fully dry to prevent streaks and water damage.
Targeted Stain Removal Step-by-Step Methods
Now you’ll learn precise, step-by-step fixes for common problems like coffee, wine, and tomato stains so you can act quickly before they set.
For grease, ink, paint, and dye drips you’ll get targeted techniques and the right cleaners to lift spots without harming the linoleum.
I’ll also cover safe ways to remove pet stains and neutralize odors so your floor looks and smells fresh.
Food and beverage stains (coffee, wine, tomato)
Food and beverage stains like coffee, wine, and tomato can set quickly on linoleum, but you can usually lift them with a few targeted steps if you act promptly.
Blot excess, mix equal parts white vinegar and warm water, apply with a cloth, then scrub gently with a soft brush.
Rinse, dry, repeat for stubborn spots, and finish with a mild baking soda paste if needed.
Grease and oil stains
Often, grease and oil stains seem stubborn, but you can remove them effectively if you treat them promptly and follow a step-by-step approach.
Blot excess with paper towels, sprinkle baking soda or cornstarch to absorb oil, let sit 15–30 minutes, then sweep.
Apply a few drops of dish soap and warm water, scrub gently with a soft brush, rinse and dry.
Ink and marker stains
Frequently, ink and marker stains look worse than they are, and you can lift them from linoleum by acting quickly and using the right solvent.
Blot excess with a dry cloth. Apply rubbing alcohol or a nonacetone nail polish remover to a cloth, dab—don’t rub—then rinse with warm soapy water.
Repeat as needed and dry. Test first in an inconspicuous spot.
Dye and paint drips
A few quick, targeted steps will usually lift dye and fresh paint drips from linoleum without damaging the floor.
Scrape gently with a plastic scraper, then blot with a damp cloth.
For water-based paint, use mild dish soap; for stubborn spots, try rubbing alcohol on a soft cloth.
Rinse, dry, and finish with a light buff to restore shine.
Pet stains and odors
If scrape-and-blot tactics didn’t remove an accident, you’ll need a different approach for pet stains and odors because they can soak into seams and underlayment.
First, rinse area with cool water and blot.
Apply an enzyme cleaner per label to break down proteins, let sit, then blot and air-dry.
Repeat as needed; ventilate room and test cleaner on a hidden spot first.
Rust and metal stains
Rust and metal stains can bite into linoleum quickly, so act fast: blot loose debris, then apply lemon juice or white vinegar to the spot.
Let sit 5–10 minutes, scrub gently with a soft brush, rinse, and dry.
For stubborn rust, make a paste of cream of tartar and water, apply briefly, scrub, rinse, and repeat until the stain lifts.
Adhesive and gum removal
Tackle adhesive and gum quickly to prevent residue from embedding in the linoleum’s surface.
Freeze gum with ice cubes in a plastic bag, then scrape gently with a plastic spatula.
For sticky adhesive, apply a cloth dampened with white vinegar, let sit a few minutes, then rub with a soft cloth.
Rinse with warm water and dry.
Repeat if residue remains.
Natural and DIY Cleaning Solutions (Recipes and Uses)
You can tackle many linoleum stains with simple DIY recipes: a 1:1 vinegar-and-water solution for general cleaning, a baking soda paste for scrubbing stubborn spots, and diluted hydrogen peroxide to lighten organic stains with care.
Use lemon juice mixed with salt for tough localized marks, but always test any acidic or bleaching agent in an inconspicuous area first and avoid prolonged contact.
Follow specific application tips—gentle rubbing, short dwell times, and thorough rinsing—to protect the finish.
Vinegar-based cleaner ratio and uses
Although vinegar’s acidity makes it a powerful stain-fighter on linoleum, you’ll want the right dilution to avoid dulling or damaging the finish.
Mix one cup white vinegar with one gallon warm water for general cleaning; boost to a 1:3 ratio (vinegar:water) for tougher spots, apply briefly, then rinse with clean water.
Test in an inconspicuous area first.
Baking soda paste uses and application tips
If vinegar handles acidic stains, baking soda tackles alkaline cleaning tasks and scrubbing without harsh chemicals.
Make a paste with water, apply to stains, let sit 10–15 minutes, then gently scrub with a soft brush or cloth. Rinse thoroughly and dry.
For stubborn marks, repeat or let paste sit longer, but avoid abrasive pressure to protect linoleum’s finish.
Hydrogen peroxide for lightening organic stains precautions
When used correctly, hydrogen peroxide can lift organic stains like wine, blood, or fruit juice from linoleum without harsh chemicals.
However, you’ll need to take a few precautions to protect color and finish.
Test an inconspicuous spot first, use 3% solution, avoid prolonged soaking, blot gently, rinse thoroughly, and dry.
Don’t mix with ammonia or bleach; ventilate the area.
Lemon juice and salt for spot treatment precautions
A small dab of lemon juice mixed with salt can brighten localized stains, but you should take care: the acid can dull or strip linoleum’s finish and the abrasive salt can scratch it, so always test a hidden area first, work gently, limit contact time to a few minutes, rinse completely with water, and dry the spot to prevent lingering acidity.
If irritation or discoloration appears, stop immediately.
Comparison of Gentle Methods Effectiveness and Risks
You’ll want to match the gentle method to the stain, balancing speed and safety so you don’t damage the linoleum. Below is a quick reference to help you choose the right approach for common stain types and time frames. Use it to decide when a fast wipe, mild cleaner, scrubbing, or professional help makes the most sense.
| Method | Best for | Risk level |
|---|---|---|
| Quick wipe (water, cloth) | Fresh spills, light dirt | Low |
| Mild detergent solution | Grease, food stains | Low–Medium |
| Baking soda paste | Ink, scuffs | Medium |
| Vinegar solution | Mineral deposits, mild stains | Medium |
| Professional/strong cleaners | Deep or set-in stains | High |
When to use each method (speed, safety, stain types)
Because different stains and schedules call for different approaches, pick a method that balances speed, safety, and the stain’s nature.
For fresh spills, blot and use mild soap for fast, low-risk cleanup.
For greasy or set-in marks, try baking soda paste or vinegar on a test patch.
For dye or rust, use specialized, gentle removers and wear gloves; rinse thoroughly.
Tools and Techniques to Avoid Damage
Don’t use abrasive pads or metal scrapers, since they can scratch and dull linoleum.
Instead, stick to soft cloths, microfiber mops, and plastic scrapers to lift stains safely.
After cleaning, you can restore shine with a suitable polish or a light buff to preserve the finish.
Scrubbing tools to avoid (abrasive pads, metal scrapers)
While it might be tempting to reach for harsh scrubbing tools when a stubborn stain won’t budge, abrasive pads and metal scrapers can quickly gouge or dull linoleum’s protective finish.
You should avoid steel wool, scouring pads, wire brushes, and razor blades; they leave scratches that trap dirt and ruin sheen.
Use gentler approaches to prevent long-term damage.
Safe tools and techniques (soft cloths, plastic scrapers, microfiber)
1 simple rule will keep your linoleum looking its best: use soft, nonabrasive tools and gentle motions.
Wipe spills with microfiber or cotton cloths, blotting rather than scrubbing. Use plastic scrapers for dried residue, holding them flat to avoid gouges.
For stubborn spots, dampen the cloth with mild soap and water, rinse thoroughly, and dry to prevent water damage.
How to restore shine and finish after cleaning
After cleaning, you’ll want to restore the linoleum’s sheen without causing damage by sticking to nonabrasive products and gentle techniques.
Use a mild, pH-neutral floor polish or linoleum-specific sealer applied sparingly with a soft mop or microfiber pad.
Work in small sections, buff lightly with a clean cloth, and avoid abrasive pads, wax strips, or solvent-based cleaners that can dull or crack the finish.
Common Mistakes and How to Avoid Them
Don’t reach for harsh cleaners or straight bleach—you can strip finish and discolor the floor.
Avoid soaking seams or edges and don’t rub stains vigorously; blot instead to prevent spreading and wear.
Always test any product on an inconspicuous spot first so you know how the linoleum will react.
Using too-strong cleaners or bleach
While it might seem like a stronger cleaner will blast stains away, using harsh chemicals or bleach can actually damage linoleum’s finish and discolor the flooring.
Don’t risk pitting, fading, or weakening the surface. Test any cleaner on an inconspicuous spot first, follow manufacturer recommendations, dilute cleaners properly, and choose gentler, pH-neutral products to remove stains without compromising durability or color.
Over-wetting seams and edges
If you let water soak into seams and edges, you can cause adhesive failure, swelling, or mold, so you should avoid drenching those vulnerable areas.
Use a barely damp cloth or sponge, work small sections, and dry seams immediately with a microfiber towel.
Tilt or lift edges gently to air them if needed, and test any cleaning solution on a hidden spot first.
Rubbing instead of blotting
Start by blotting stains gently with a clean cloth or paper towel rather than rubbing them—rubbing can spread the spill, grind dirt into the linoleum, and wear away the finish.
If blotting doesn’t lift the stain, apply a mild cleaner and let it sit briefly, then blot from the edges inward.
Use soft motions to protect the surface and avoid permanent damage.
Ignoring test spots
Even though a cleaning product looks safe on the label, always test it on an inconspicuous patch of linoleum first—you’ll avoid discoloration, finish damage, or sticky residue that can be hard to reverse.
Don’t skip test spots: try a small area, wait for drying, then check for color change or texture shift. If it reacts, choose a gentler method or different product.
Prevention and Maintenance Best Practices
Keep a simple cleaning routine—sweep or vacuum daily and mop weekly with a pH-neutral cleaner—to prevent dirt buildup that leads to stains.
Use entry mats, felt pads on furniture, and tackle spills immediately to protect the surface.
Every few months give the floor a deeper clean and inspect for wear so you can address trouble spots before they worsen.
Regular cleaning schedule and methods
A simple, consistent cleaning routine prevents grime from bonding to linoleum and makes stain removal far easier later on.
Sweep or vacuum daily to remove grit, then mop weekly with warm water and a few drops of mild dish soap. For high-traffic areas, increase mopping to twice weekly.
Dry floors promptly to avoid water damage and check for spills after meals.
Protective measures (mats, felt pads, spot cleaning)
Once you’ve got a steady cleaning routine, add protective measures to stop stains before they start.
Lay washable mats at entrances and high-traffic zones to trap grit and spills.
Put felt pads under furniture legs to prevent scratches that trap dirt.
Wipe up spills immediately with a mild solution and soft cloth.
Inspect mats and pads regularly and replace when worn.
Seasonal deep-cleaning tips
When seasons change, schedule a thorough deep clean every few months to remove embedded grime, refresh sealants, and catch minor damage before it worsens.
Start by sweeping and vacuuming, mop with a gentle, pH-neutral cleaner, rinse, and dry thoroughly.
Inspect for scratches, lifting seams, or dull finish; treat spots, reapply sealant where needed, and rotate rugs to prevent uneven wear.
Troubleshooting Tough Cases
If a stain won’t budge after basic cleaning, you’ll need a clear set of escalation steps to try stronger cleaners, gentle abrasion, or targeted spot treatments.
For long-set or sun-damaged stains, you’ll learn which techniques can sometimes revive the finish and when discoloration is permanent.
Finally, I’ll tell you how to decide whether to call a professional or consider replacing the sheet or tiles.
When a stain won’t budge escalation steps
Even after trying the usual cleaners and gentle scrubbing, some marks just won’t lift—so you’ll need a clear escalation plan.
Try stronger but safe cleaners (baking soda paste, diluted hydrogen peroxide), test in an inconspicuous spot, and use a soft-bristle brush with light pressure.
If the stain persists, repeat treatments sparingly, then consult a professional before attempting abrasive methods or replacing flooring.
Dealing with long-set or sun-damaged stains
Because long-set and sun-damaged stains have chemically altered the surface or penetrated the finish, you’ll need a targeted, cautious approach that treats both the mark and the underlying vinyl.
Start by softening residues with a warm, mild detergent soak, blotting gently.
Use a poultice of baking soda and water for localized lifting, then rinse, dry, and lightly buff with a nonabrasive pad to even the sheen.
When to call a professional or consider replacement
When stubborn stains resist your best efforts or the vinyl shows cracking, cupping, or deep discoloration, it’s time to weigh professional help or replacement.
Call a flooring pro if stains penetrate beneath surface layers, adhesive fails, or subfloor damage exists. Expect assessment, targeted restoration, or replacement quotes.
If repairs cost near replacement or warranties are void, plan for new linoleum to guarantee longevity and safety.
FAQs Quick Answers to Common Questions
You probably have quick questions about what cleaners are safe and how aggressive you can be.
We’ll cover whether bleach, ammonia, or vinegar are okay, how long to let DIY solutions sit, and whether scrubbing will harm the finish.
You’ll also get tips for tackling yellowing or discoloration.
Can I use bleach or ammonia on linoleum?
Curious whether bleach or ammonia will get that linoleum spotless?
You can use diluted bleach sparingly for stubborn mold or heavy stains, but test a hidden area first and ventilate the room.
Avoid repeated use—bleach can fade finish and weaken seams.
Don’t mix ammonia with bleach (dangerous gas).
For routine cleaning, choose gentler, nonabrasive cleaners instead.
Is vinegar safe for all linoleum floors?
Wondering if vinegar is safe for all linoleum floors?
You can usually use diluted white vinegar (about 1 cup per gallon water) on sealed linoleum, but avoid concentrated vinegar and prolonged exposure.
Test a hidden spot first to check for discoloration or finish damage.
Don’t use vinegar on unsealed, waxed, or natural linoleum—opt for manufacturer-recommended cleaners instead.
How long should I let a DIY cleaner sit on a stain?
How long you let a DIY cleaner sit depends on the stain type and the cleaner’s strength: light spills often need only a few minutes, while set-in grime or oil may require 10–20 minutes to penetrate.
Check progress periodically, blotting gently to see if lift occurs. Don’t exceed 30 minutes unless the recipe specifies longer, and always test a hidden spot first.
Will scrubbing remove the top finish?
If you scrub too hard or use an abrasive pad, you can wear away linoleum’s protective finish, so stick to soft brushes, nonabrasive cloths, and gentle back-and-forth motions to protect the surface.
Test cleaners in an inconspicuous spot first. Use mild soap and water, avoid steel wool or harsh scrubbing pads, and dry promptly to prevent water seeping into seams or edges.
How do I remove yellowing or discoloration?
Why is your linoleum turning yellow, and can you fix it? Sunlight, age, wax buildup, or chemical reactions cause discoloration.
Clean with diluted white vinegar and warm water, rinse, then buff dry. For stubborn yellowing, try a paste of baking soda and water or a hydrogen peroxide spot treatment; test first in an inconspicuous area.
Reapply a suitable nonabrasive polish if needed.
Visual Guide and Before/After Examples
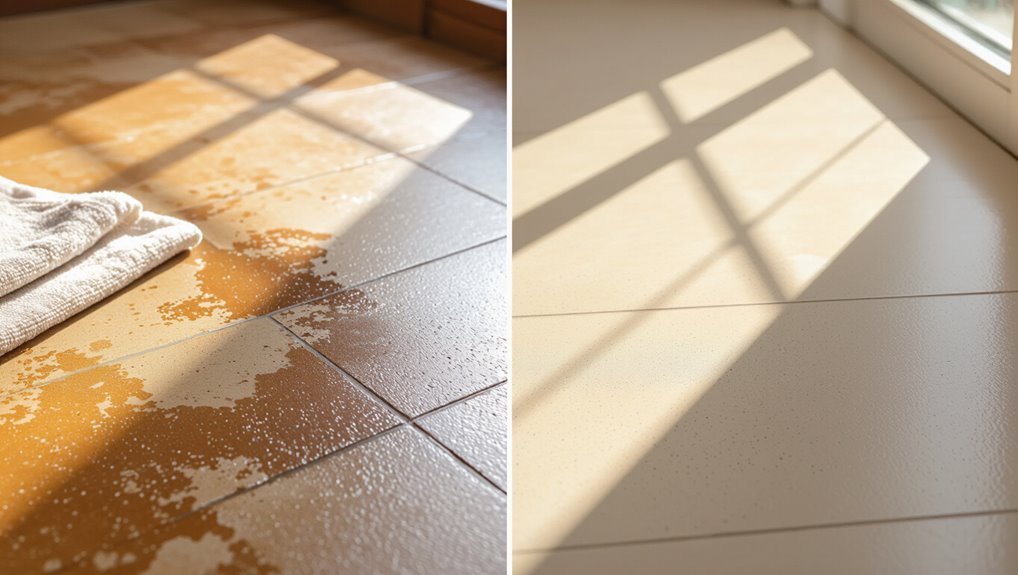
When you follow a clear visual guide, you’ll spot the exact stains and see which cleaning steps work best. The before-and-after photos here show realistic results for common spills, scuffs, and discoloration so you can compare outcomes and choose the right method.
You’ll learn which gentle cleaners, scrubbing tools, and dwell times produced visible improvement, helping you replicate success and avoid wasted effort.