
How to Clean Concrete Floors: Simple Solutions That Actually Work
You can clean concrete floors effectively with a few simple steps: sweep or vacuum loose dirt, spot-treat grease with a degreaser or absorbent like baking soda, then mop with a pH-neutral cleaner for sealed or polished surfaces. For unsealed or tough stains, use stronger concrete cleaners and scrub with a stiff brush or floor machine, rinse thoroughly, and let dry before resealing. Follow PPE and test cleaners first, and keep going to learn specific fixes for common stains and finishes.
How to Clean Concrete Floors: and What to Expect
You’ll learn simple, effective fixes for common concrete floor issues—like stains, dusting, and minor cracks—and what results to expect.
Try DIY methods first for routine cleaning and small repairs, but call a professional for deep-set stains, structural damage, or sealed floors that need special care.
Knowing the limits of DIY will save you time and money.
Simple, effective methods for common concrete floor problems
When stains, dust, or surface damage show up on your concrete floors, a few targeted, easy methods will usually fix the problem without calling a pro.
For greasy spots, use degreaser and scrub; for rust, try lemon juice or oxalic acid; for general cleaning, mop with mild detergent.
Wondering how do you clean concrete floors? Rinse, dry, and reseal if needed.
When to hire a professional vs. DIY
Wondering whether to tackle concrete cleaning yourself or call a pro? You can handle routine sweeping, degreasing, and mild stains with common cleaners and a stiff brush.
Hire a professional for deep-seated oil, large areas, sealed or decorative concrete, or if you lack time, equipment, or confidence.
Pros offer industrial cleaners, pressure washing, and sealant application for lasting results.
Basic Understanding of Concrete Floors
You’ll first want to recognize the type of concrete you’re working with—sealed, polished, painted, bare, or epoxy—because each one needs different care.
Cleaning methods vary because coatings and surface porosity change which cleaners and tools are safe and effective.
Common contaminants like oil, rust, efflorescence, mold, and paint also behave differently and can require targeted removal techniques.
Types of concrete floors (sealed, polished, painted, bare, epoxy)
Concrete floors come in several common types—sealed, polished, painted, bare, and epoxy—each with different looks, durability, and maintenance needs.
You’ll notice differences in gloss, porosity, and resistance that affect daily care. Consider these quick distinctions:
- Sealed: moisture barrier, moderate sheen.
- Polished: glossy, durable, low porosity.
- Epoxy/painted/bare: varying protection and texture; choose based on use.
Why cleaning methods vary by floor type
Because each finish reacts differently to moisture, abrasion, and chemicals, you should match your cleaning method to the floor type.
Sealed floors tolerate mild cleaners and gentle scrubbing; polished concrete needs pH-neutral products to preserve shine.
Painted or epoxy surfaces require low-abrasion techniques to avoid chipping.
Bare concrete often needs more aggressive cleaning but risks surface damage, so test first and proceed cautiously.
Common contaminants and how they affect concrete (oil, rust, efflorescence, mold, paint)
Stains and deposits on floors tell you what’s been tracked, spilled, or left to react with the surface, so it’s helpful to recognize common contaminants and their effects.
Oil soaks in and darkens pores; use degreasers.
Rust etches and needs chelators.
Efflorescence leaves white salts from moisture; dry and address leaks.
Mold discolors and needs cleaners plus moisture control.
Paint bonds; stripers remove it.
Safety, Tools, and Materials Needed
Before you start, put on proper PPE and make sure the area’s well ventilated to protect your lungs and skin.
Gather essential tools—broom, mop, scrub brush, shop vacuum or floor scrubber—and pick cleaners matched to the stain (oil, rust, mildew), using stronger chemicals only when needed.
Finally, plan how you’ll neutralize and dispose of runoff or used chemicals to meet environmental and local disposal rules.
Personal protective equipment (PPE) and ventilation
One key step before you start cleaning concrete is to gear up with proper personal protective equipment and set up good ventilation; both protect you from dust, chemical fumes, and airborne debris.
Wear N95 or respirator, chemical-resistant gloves, eye protection, and slip-resistant boots.
Open windows, run fans toward outdoors, and use an exhaust or box fan to keep fresh air moving while you work.
Essential tools and machines (broom, mop, scrub brush, shop vacuum, floor scrubber)
With your PPE on and ventilation set, gather the right tools so you can work efficiently and safely on concrete surfaces.
You’ll need basic hand tools and machines to remove dust, grit, and stubborn grime. Choose durable, concrete-safe equipment and match tools to area size.
- Broom, mop, scrub brush
- Shop vacuum for dry debris
- Floor scrubber for large areas
Recommended cleaners and chemicals by stain type
Although different stains call for different chemistries, you’ll typically choose cleaners based on stain type, surface finish, and ventilation limits; always read labels and wear PPE. Use: degreasers for oil, mild acid for rust, enzymatic for organic stains. Test small areas first.
| Stain | Cleaner | PPE |
|---|---|---|
| Oil | Degreaser | Gloves |
| Rust | Oxalic acid | Eye protection |
Environmental and disposal considerations
Because chemicals and runoff can harm local waterways and soil, you should plan cleanup and disposal before you start work.
Wear gloves and eye protection, contain wash water, and never pour solvents or concentrated cleaners down drains.
Neutralize and absorb spills with cat litter or absorbent pads.
Follow label disposal instructions, local hazardous-waste rules, and take leftover chemicals to an approved collection site.
Step-by-Step Cleaning Procedures
Before you start, clear the area, sweep or vacuum thoroughly, and test your cleaner in an inconspicuous spot.
For sealed or polished concrete you’ll follow a routine maintenance process, while unsealed or very dirty floors need a deeper clean and targeted stain treatments.
Finally, use gentle, non-abrasive methods for painted or epoxy-coated surfaces to avoid damage.
Preparation: clearing, dry cleaning, and testing in an inconspicuous area
Start by clearing the area completely—move furniture, tools, and loose items off the floor so you have full access and won’t trap dirt during cleaning.
Sweep or vacuum thoroughly to remove grit.
Spot-test any cleaner or stain remover in an inconspicuous corner, wait for recommended time, then inspect.
That prevents damage and guarantees your chosen method works before treating visible areas.
Step 1 Routine cleaning for sealed or polished concrete
Start by sweeping or dust-mopping to remove grit and loose debris so you won’t scratch the surface.
Then wet-mop with a pH-neutral cleaner to lift dirt without damaging the sealer or polish.
Finish by drying and buffing to restore shine and prevent streaks.
Sweeping and dust-mopping
Sweep or dust-mop the floor thoroughly to remove grit and loose debris that can scratch sealed or polished concrete; work in overlapping passes from one end of the room to the other, paying special attention to high-traffic zones and corners.
Use a microfiber dust mop or electrostatic broom, empty the collection frequently, and replace or wash mop heads when they’re visibly dirty to avoid redistributing dirt.
Wet-mopping with pH-neutral cleaners
1. You’ll mix a pH-neutral cleaner with water per label instructions, avoiding excess suds.
Damp-mop in sections with a microfiber or soft mop, rinsing frequently to prevent residue. Change solution when visibly dirty.
For stubborn spots, let the solution sit briefly, agitate gently, then rinse.
Finish by removing standing water so the sealed or polished concrete stays protected.
Drying and buffing
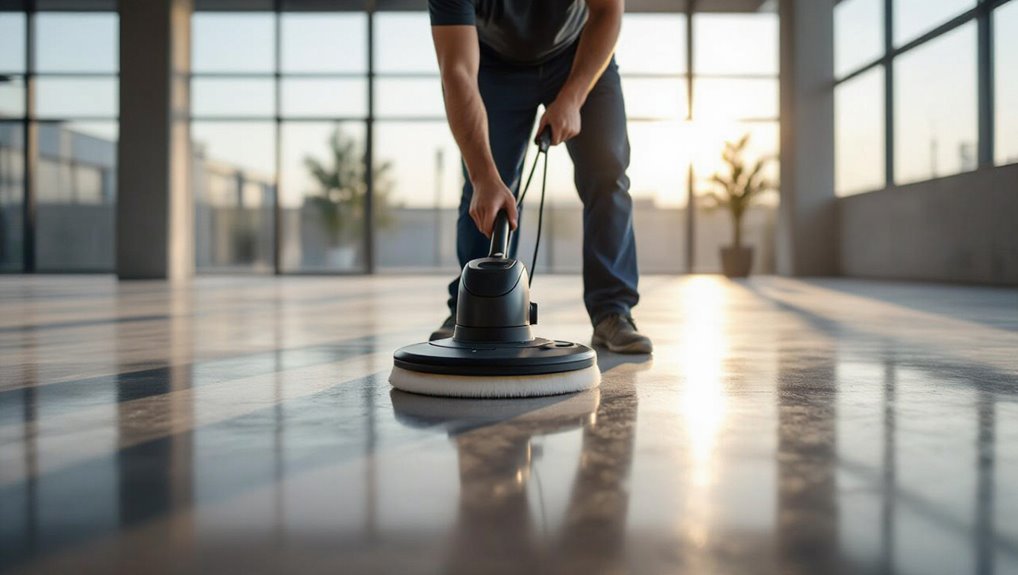
After mopping, dry the floor thoroughly with a clean microfiber mop or absorbent pads to prevent water spots and protect the sealer or polish.
Once dry, buff with a soft pad or microfiber bonnet on a low-speed floor buffer to restore shine. Move systematically, overlap passes, and avoid pressure that heats the surface.
Finish by inspecting for streaks and re-buffing small areas as needed.
Step 2 Deep cleaning for unsealed or heavily soiled concrete
For unsealed or heavily soiled concrete you’ll need stronger steps: degrease oil and grease stains with a suitable cleaner or solvent, then mechanically scrub and thoroughly rinse the area.
After rinsing, neutralize any cleaners or solvents to prevent residue and speed drying.
Finish by drying the floor completely to avoid re-soiling or staining.
Degreasing oil and grease stains (products and methods)
Start by removing excess oil with a dry absorbent—cat litter, sawdust, or baking soda—so you can see the full extent of the stain before treating it.
Apply a commercial concrete degreaser or a strong alkaline cleaner per label, let it dwell, then blot or lift residue with absorbent pads.
For stubborn spots, use a solvent-based degreaser sparingly and ventilate the area.
Mechanical scrubbing and rinsing
1. You’ll prepare a scrubber or stiff-bristled brush and a bucket of warm water mixed with appropriate cleaner.
Work in small sections, scrubbing in circular motions to agitate grime. Rinse frequently with clean water, using a wet vac or hose to remove suds and loosened dirt.
Repeat stubborn areas until surface looks uniformly clean before proceeding.
Neutralizing and drying
After scrubbing, you’ll neutralize any remaining cleaner or etchant so the concrete’s pH is safe for drying and any sealers you’ll apply later.
Mix the recommended neutralizer, apply evenly, scrub lightly, then rinse thoroughly.
Remove excess water with a wet vacuum or squeegee.
Let the floor air-dry or speed drying with fans and dehumidifiers until completely dry before inspecting or sealing.
Step 3 Removing specific tough stains
Now you’ll tackle stubborn, specific stains using targeted methods for each type.
For rust, you’ll consider chelating agents or mild acids; for paint and adhesives, weigh solvents against mechanical removal.
For mold, mildew, and efflorescence, you’ll use appropriate biocides and scrubbing plus cleaning and prevention steps to stop recurrence.
Rust stain removal (chelating agents and acid methods)
Sometimes a stubborn rust spot is the only thing that ruins an otherwise clean concrete floor, and you can tackle it effectively with either chelating agents or acid-based cleaners.
For chelators, apply per label, scrub gently, rinse.
For acid methods (muriatic or oxalic), dilute, test a small area, apply briefly, neutralize, rinse thoroughly.
Wear PPE and ventilate the area.
Paint and adhesive removal (solvents vs mechanical)
When paint or adhesive won’t come up with soap and scrubbing, choose between solvents that dissolve the material and mechanical methods that break it away — and pick based on the coating type, substrate sensitivity, ventilation, and your comfort with chemicals or tools.
Test solvent on a hidden spot, wear gloves and respirator, apply per directions, scrape gently.
For thick layers, use a grinder or floor scraper, avoiding gouges.
Mold and mildew remediation (biocides and scrubbing)
If mold or mildew has taken hold on your concrete, tackle it with a targeted biocide and firm scrubbing rather than hoping it will fade on its own; choose a product labeled for masonry, follow dilution and dwell-time instructions, ventilate the area, and wear gloves and a respirator.
Apply biocide, let it sit, scrub with a stiff brush, rinse thoroughly, repeat if stains persist, then dry completely to discourage regrowth.
Efflorescence treatment (cleaning and prevention)
Efflorescence looks like a chalky white powder on concrete and comes from salts migrating to the surface; you’ll remove it with the right cleaners and steps to keep it from returning.
Scrub with a stiff brush and a diluted muriatic or vinegar solution, rinse thoroughly, and dry.
Fix moisture sources, seal the concrete, and monitor for recurrence to prevent future deposits.
Step 4 Cleaning painted or epoxy-coated concrete without damage
When you clean painted or epoxy-coated concrete, use low-abrasion methods to avoid scratching the finish.
Stick to soft brushes, microfiber mops, and non‑abrasive cleaners formulated for coated surfaces.
Test any product in an inconspicuous spot first to guarantee it won’t dull or strip the coating.
Low-abrasion techniques and safe products
Because painted and epoxy-coated concrete can be scratched or dulled by harsh scrubbing, use low-abrasion methods and gentle cleaners that lift dirt without damaging the finish.
Sweep or vacuum debris, mop with pH-neutral cleaner diluted per label, and spot-treat stains using a soft microfiber pad.
Rinse with clean water, dry with a mop or towel, and avoid bleach, ammonia, or abrasive powders.
Step 5 Sealing and finishing after cleaning
Now that the floor’s clean, you’ll choose a sealer or finish based on traffic, exposure, and desired sheen.
Follow the manufacturer’s application tips—proper temperature, thin even coats, and the right tools make a big difference.
Allow full cure times before use so the finish hardens and protects as planned.
Choosing the right sealer or finish
Wondering which sealer will give your concrete the right look and protection?
You’ll pick based on use: high-traffic areas need durable acrylics or epoxy; exterior slabs benefit from penetrating silanes/siloxanes that repel water while preserving texture.
Consider sheen—matte, satin, or gloss—for appearance, and VOCs for safety.
Match chemical compatibility to cleaners and desired maintenance frequency before buying.
Application tips and cure times
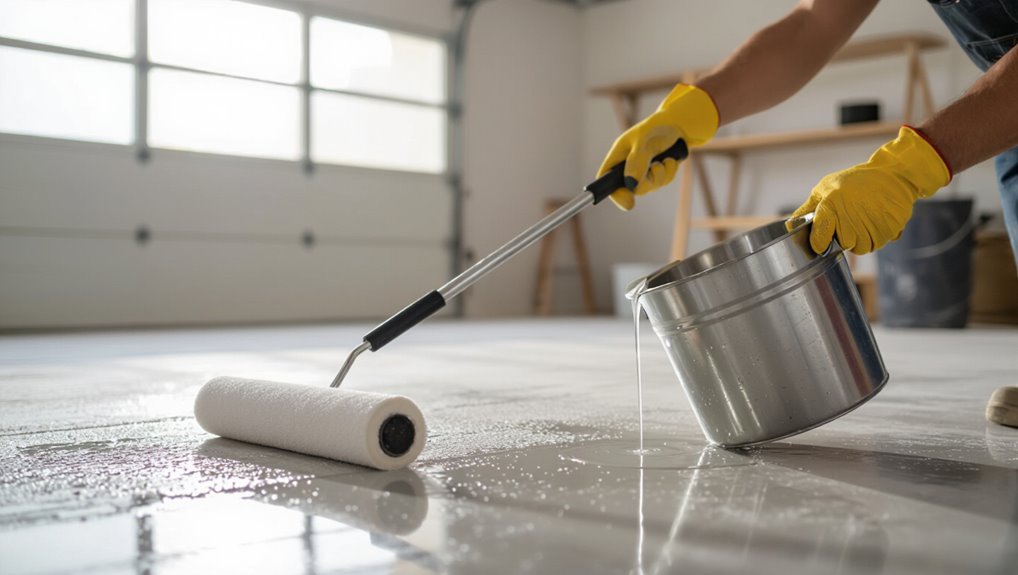
When you’ve finished cleaning and the surface feels dry, apply sealer in thin, even coats using the manufacturer’s recommended tools—roller for flat slabs, brush for edges, and low-pressure sprayer for large or textured areas—to guarantee uniform coverage and avoid puddling.
Work methodically, maintain wet edges, and follow dry times between coats.
Allow full cure per label before traffic or heavy loads—usually 24–72 hours.
Problem-Solution: Common Scenarios and Best Fixes
You’ll often face specific concrete problems that need tailored fixes, like oil spots in your garage or mold and dampness in a basement.
For patios and driveways you’ll tackle weather staining and salt damage, while commercial floors usually require stronger degreasers and mechanical cleaning for heavy grime.
Let’s go through each scenario and match the best cleaning and prevention steps to the problem.
Garage floor with oil spots
Tackle oil spots on your garage floor quickly to prevent stains from setting and to keep the surface safe and attractive.
Sweep loose debris, apply cat litter or an absorbent for fresh drips, then scrub older stains with a degreaser or dish soap and a stiff brush.
Rinse, repeat if needed, and consider a poultice or concrete cleaner for stubborn, set-in oil.
Basement concrete with mold and dampness
If your basement concrete’s showing dark spots, efflorescence, or a musty smell, act quickly to stop mold and dampness from getting worse.
Clear clutter, improve ventilation, and run a dehumidifier.
Scrub affected areas with a diluted bleach or commercial mold cleaner, rinse, and dry thoroughly.
Repair leaks, seal cracks, and consider a breathable masonry sealer to prevent recurring moisture problems and mold growth.
Patio or driveway with weather staining and salt damage
For patios and driveways exposed to winter salt and sun, you’ll often see white powdery deposits, rust-colored streaks, and faded concrete that make surfaces look neglected and can weaken the slab over time.
Sweep, rinse, then scrub with a sodium bicarbonate or diluted muriatic solution for efflorescence and rust.
Rinse thoroughly, neutralize acids, and seal the surface to protect against future salt and UV damage.
Commercial/warehouse floors with heavy industrial grime
After handling outdoor salt and sun damage, you’ll face a different beast inside: commercial and warehouse concrete that’s soaked with oil, grease, rubber marks, and layered grime from forklifts and heavy traffic.
Start by sweeping and degreasing with a high-alkaline cleaner or citrus solvent. Scrub with a stiff brush or floor machine, rinse thoroughly, and use a hot-water pressure washer or steam cleaner for stubborn deposits.
Comparison of Cleaning Methods and When to Use Them
You’ll weigh chemical cleaners against mechanical methods to match the stain type and surface condition.
Consider pressure washing versus floor scrubbers by comparing their pros and cons, including water use, surface impact, and maneuverability.
Factor cost, time, and effectiveness to pick the method that fits your budget and schedule.
Chemical cleaners vs. mechanical methods
When deciding between chemical cleaners and mechanical methods, consider the stain type, floor condition, and your tolerance for labor and cost—chemical agents dissolve oils, salts, and organic residues quickly, while mechanical techniques like scrubbing, grinding, or shot blasting remove surface contaminants and concrete layers without relying on harsh reagents. You’ll choose based on speed, damage risk, safety, budget, and desired finish.
| Choice | Feeling |
|---|---|
| Chemical | Relief |
| Mechanical | Confidence |
| Hybrid | Control |
| DIY | Pride |
Pros and cons of pressure washing vs. floor scrubbers
Pressure washers blast away heavy grime, oil, and salts fast but can etch or drive water into porous concrete.
On the other hand, floor scrubbers deliver controlled agitation and detergent cleaning for large indoor areas with less risk of surface damage or oversaturation.
You’ll choose pressure washing for exterior, heavily soiled spots and scrubbers for indoor, finished floors or routine maintenance, balancing surface sensitivity and accessibility.
Cost, time, and effectiveness comparison
Because budget, schedule, and desired results each matter, compare methods by their upfront and ongoing costs, the time they take, and how well they remove soil without damaging the slab.
You’ll find:
- mop and detergent—cheap, fast for light dirt, low effectiveness on stains;
- scrubber—moderate cost, efficient for larger areas;
- pressure washer—higher cost, fastest and best for deep grime but risks etching if misused.
Mistakes to Avoid When Cleaning Concrete Floors
Don’t use the wrong pH cleaner or harsh acids on sealed surfaces, since they can etch or strip the finish.
Avoid over-wetting concrete—too much water can cause structural damage or efflorescence—and always neutralize after any acid use.
Also don’t use abrasive tools on polished or epoxy floors, because they’ll scratch and ruin the surface.
Using the wrong pH or harsh acids on sealed surfaces
If you apply a cleaner with the wrong pH or an acidic product on a sealed concrete floor, you can quickly damage the finish and shorten the sealant’s life.
Don’t use strong acids or highly alkaline cleaners on sealed surfaces.
Test mild pH-neutral products first, follow manufacturer guidance, rinse thoroughly, and spot-check an inconspicuous area to avoid dulling, etching, or compromising the protective layer.
Over-wetting and causing structural damage or efflorescence
While avoiding the wrong cleaners protects a sealant, using too much water can do its own damage.
Don’t drench slabs or let puddles soak in; excess moisture can leach salts, cause efflorescence, or weaken mortar and joints over time.
Use controlled rinses, wring mops, work in sections, and dry promptly so you don’t invite staining, spalling, or hidden structural issues.
Improper neutralization after acid use
When you use acids to remove stains or etch a surface, failing to neutralize them properly can leave lingering acidity that continues to damage concrete and any sealers or coatings you apply afterward.
Rinse thoroughly and apply a proper neutralizer (follow product instructions), then test pH before sealing.
If you skip this, sealers won’t bond, discoloration will occur, and deterioration speeds up.
Using abrasive tools on polished or epoxy floors
Although it might seem like a quick fix, grabbing abrasive tools for polished or epoxy floors can cause irreversible damage—scratches, dulling, and compromised coatings that are costly to repair.
You should avoid wire brushes, harsh pads, and grinders. Instead, use soft microfiber mops, non-abrasive pads, and manufacturer-recommended cleaners.
Test products in an inconspicuous spot and follow gentle maintenance to preserve shine and longevity.
Prevention and Maintenance Tips
Keep a regular cleaning schedule and do seasonal checks so small issues don’t become big problems.
Use mats, protective coatings, and improve drainage to limit wear, and handle spills with a quick spot-cleaning routine.
Reseal concrete when water no longer beads—typically every 1–3 years depending on traffic and product.
Regular cleaning schedules and seasonal maintenance
Set a simple, consistent cleaning schedule—daily sweeping, weekly mopping, and monthly deep-cleaning—to prevent dirt buildup and protect your concrete’s finish.
Rotate tasks seasonally: spring stain checks, winter salt removal, fall debris clearing. Keep supplies handy and note trouble spots for prompt attention.
- Track tasks on a calendar
- Adjust frequency for high-traffic areas
- Use mild cleaners for routine care
Protective measures: mats, coatings, and drainage improvements
When you pair simple barriers and smart drainage with protective coatings, your concrete will resist stains, abrasion, and water damage far longer.
Place heavy-duty mats at entrances and under work areas, apply a breathable sealer or epoxy suited to traffic, and slope surfaces toward drains.
Clear gutters, install trench drains where needed, and inspect coatings annually to touch up wear before problems start.
Spot-cleaning routines for common household spills
Because spills happen fast, you should tackle them right away with the right routine to prevent stains and etching.
Blot liquids, don’t rub. For oil, sprinkle cat litter or baking soda, let absorb, then sweep and degrease with a pH-neutral cleaner.
For coffee or wine, blot, rinse, and use mild detergent.
For paint, scrape gently and use appropriate solvent sparingly.
When to reseal and how often
Aim to reseal concrete floors every 1–3 years depending on traffic, exposure, and the sealer type you used.
Check for dullness, water beading failure, stains that soak in, or surface wear; these signal it’s time.
Test a small area, clean thoroughly, then apply the recommended sealer.
In high-traffic or outdoor areas, reseal annually; lower-use interiors can wait up to three years.
Tools, Products, and Cost Guide
You’ll want to compare consumer cleaners and sealers with professional-grade products so you pick the right strength for your concrete.
Decide whether to rent or buy tools like pressure washers and floor buffers based on job size and frequency.
I’ll also outline typical cost ranges so you can weigh a DIY approach against hiring a pro.
Recommended consumer products and professional-grade options
When choosing cleaning products and tools, match them to your floor’s finish and the soil you’re dealing with—sealed concrete needs different cleaners than bare or stained surfaces, and grease requires a degreaser while general dirt responds to pH-neutral solutions.
For consumer and pro choices, pick trusted brands, check dilution rates, and prioritize safety.
- Consumer: pH-neutral cleaner
- Midgrade: heavy-duty degreaser
- Pro: industrial concrete cleaner
When to rent vs. buy equipment
After you’ve picked the right cleaners, decide whether to rent or buy the tools you’ll use—your choice affects cost, storage, and results.
Rent high-powered gear for one-off deep cleans or specialty tasks like shot-blasting.
Buy affordable items you’ll use regularly—vacuum, scrubber, or concrete sealer applicators.
Factor frequency, storage space, maintenance, and resale value before committing.
Estimated cost ranges for DIY vs professional cleaning
Compare costs up front so you can pick the most economical route for your project:
DIY supplies (brooms, scrub brushes, pH-neutral cleaner, degreaser, sealer) typically run $30–$150.
Equipment rental (floor scrubber, pressure washer) adds $50–$150/day.
Professional cleaning generally costs $0.50–$3.00 per sq ft, or $100–$600+ for typical jobs.
Factor time, skill, and prep when deciding.
Frequently Asked Questions
You probably have specific questions like whether you can use bleach, how to strip old paint safely, or if pressure washing will harm the slab.
I’ll also cover timing for resealing after cleaning and recommend the best sealers for garage versus patio concrete.
Read on for concise, practical answers.
Can I use bleach on concrete floors?
Wondering whether bleach is safe for your concrete floors? You can use diluted household bleach for disinfecting sealed concrete and light mildew, but avoid straight bleach and prolonged contact—it can dull sealers and etch unsealed concrete.
Rinse thoroughly, ventilate, and test a hidden area first. For persistent stains or unsealed surfaces, choose pH-neutral cleaners or specialized concrete products instead.
How do I remove old paint from concrete safely?
If old paint’s flaking or stained your concrete, you can remove it safely by matching the method to the paint type and surface condition—start with the least aggressive option and work up only if needed.
Try a solvent-based stripper for latex or oil paints, use a scraper and stiff brush, test a small area, wear gloves and eye protection, and neutralize residues per product instructions.
Will pressure washing damage my concrete?
Removing old paint often calls for more than scrubbing, and pressure washing is a tempting next step — but it can harm concrete if you’re not careful.
Use moderate pressure (under 3,000 psi), a wide fan nozzle, and keep the wand at least 12–18 inches away. Test a small area first.
Avoid etching, dislodging aggregate, or driving water into cracks that worsen deterioration.
How long after cleaning should I wait to reseal or use the floor?
How long should you wait to reseal or put traffic back on a cleaned concrete floor?
Wait until the slab is completely dry—usually 24 to 72 hours depending on temperature, humidity, and porosity.
For deep cleaning or etching, allow up to a week.
Check moisture with a meter or tape test.
Only reseal when surface moisture is gone to guarantee adhesion and avoid trapping dampness.
What is the best sealer for garage vs. patio concrete?
Want the best sealer for your concrete?
For garages, pick a solvent-based or epoxy sealer for chemical, oil, and abrasion resistance; it bonds well and handles traffic.
For patios, choose a breathable acrylic or silane/siloxane water repellent to prevent peeling and protect against weather while preserving appearance.
Match sealer to exposure, maintenance willingness, and desired finish—matte or glossy.
