
Which Way Should You Install Flooring? Direction Rules That Actually Matter
You should run your flooring parallel to the longest wall or toward the main light source to make rooms feel larger, minimize visible seams, and create a cleaner sightline. Always check joist direction and, when possible, lay planks perpendicular to joists to reduce sagging and squeaks. Consider room shape, traffic flow, and connected spaces so changes remain smooth; diagonal layouts can add drama but cost more. Keep these basics in mind and the rest will explain how to apply them.
Which Direction Should You Install Flooring?
For most rooms, you’ll install planks running parallel to the longest wall or toward the main light source to make the space look larger and more cohesive.
Exceptions apply when room layout, subfloor seams, or stair shifts force a different direction, or when you’re matching an existing floor.
Consider those constraints before you start so you don’t have to rip out and reorient later.
One-sentence recommendation for most situations
When choosing a direction, run your planks parallel to the longest wall or main light source so the room looks larger and seams are least noticeable.
For most projects, this simple rule answers which way to install flooring: follow the room’s longest visual axis and primary light flow, and you’ll get a balanced, spacious appearance with minimal visible joints and straightforward installation.
When exceptions apply (short summary)
Although the longest wall or main light source usually guides your layout, some situations call for a different approach — run planks toward an entry, align with a central focal point, follow open sightlines into adjoining rooms, or match the subfloor joist direction for stability.
You’ll weigh traffic flow, room shape, changes, and visual priorities; choose the direction that balances aesthetics, continuity, and structural soundness.
How Flooring Direction Affects Appearance and Perception
When you change flooring direction, you can make a room feel longer, wider, or more dynamic by guiding the eye along the planks.
The orientation also alters how light plays on the surface—affecting reflections—and how grain and plank length read from different vantage points.
Look at the same room with different directions to see these effects firsthand and choose the layout that best matches your desired look and flow.
Visual impact on room size and flow
If you run planks lengthwise toward a focal wall, you’ll make the room feel longer and guide the eye naturally through the space.
Running planks across a narrow room broadens perception, while diagonal layouts add dynamic movement and can mask awkward angles.
Consistent direction through connected rooms enhances flow; changing orientation at thresholds defines zones and subtly shifts perceived scale without altering layout.
Effect on light and reflections
Because light skims differently across plank seams and grain, the direction you lay flooring changes how bright and reflective a room looks, so you should factor that into your design.
Lay planks parallel to incoming light to emphasize sheen and length, or perpendicular to soften glare and hide imperfections.
Test samples under real lighting to choose the finish and orientation that best balances sparkle and subtlety.
How grain and plank length influence aesthetics
Though grain patterns and plank lengths might seem like small details, they shape how you perceive space: long, continuous boards elongate a room and draw the eye forward, while short, varied planks create a busier, more intimate feel.
Pronounced grain adds texture and movement, whereas subtle grain smooths shifts and reads as a more uniform surface. You should match plank length and grain to desired scale and mood.
Visual examples: same room, different directions
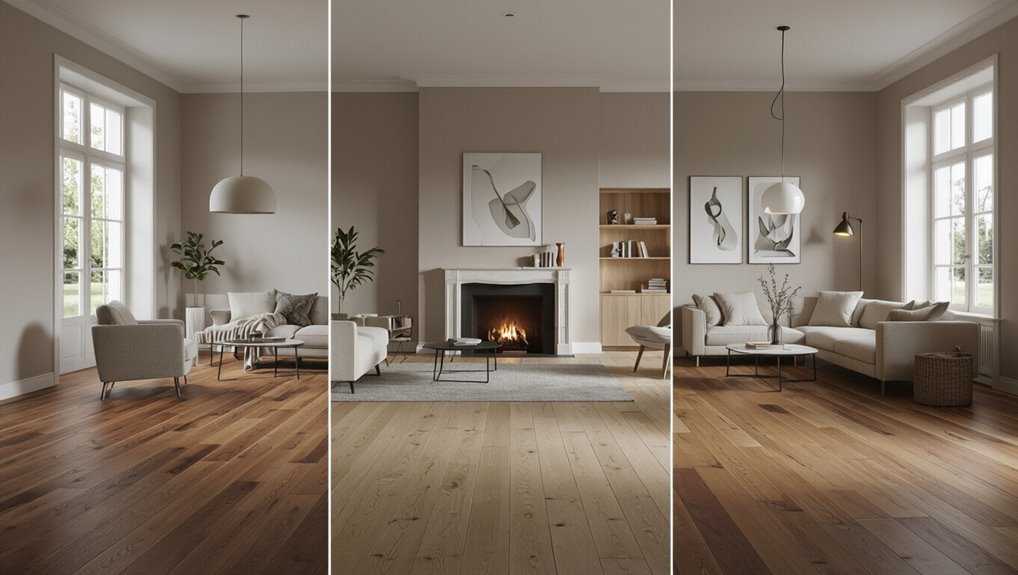
You’ve seen how grain and plank length set mood and scale; now picture that same room with the boards laid in different directions.
When boards run lengthwise, the room feels longer and streamlined. Across the short wall, it widens and feels cozier.
Diagonal or herringbone adds movement and luxury. Your choice changes perceived size, flow, and focal points—so test samples in place.
Basic Principles What Determines Best Direction
When choosing flooring direction, you should consider room shape, window placement, longest uninterrupted wall, traffic flow, and sight lines to decide what’ll look and function best.
Let natural light and the main light source guide plank orientation, and align flooring with the longest wall when it makes the space feel larger.
Also check structural constraints like joist direction and subfloor layout so your installation is both stable and efficient.
Room shape and layout considerations
Because the shape and layout determine how light, traffic, and visual flow interact, you should choose a flooring direction that complements those elements.
In long, narrow rooms run boards lengthwise to elongate space; in square or irregular plans consider diagonals or patterns to balance proportions.
Aligning runs with major walkways reduces seams underfoot and creates a cleaner, more intentional look throughout.
Location of windows and main light source
If natural light hits your floor from a strong, consistent direction, run the boards so their seams fall perpendicular to the light to minimize visible gaps and highlight the plank pattern.
Alternating or diagonal layouts can soften glare and mask minor imperfections when light comes from multiple windows.
You’ll also orient planks to lead the eye toward bright areas, enhancing flow and perceived space.
Direction of longest uninterrupted wall
Although you’ll consider light and room shape, a good rule is to run flooring parallel to the longest uninterrupted wall: it creates a cleaner visual flow, reduces visible seams, and simplifies installation by minimizing short end cuts.
You’ll align boards with that dominant plane so joins fall less conspicuously, waste decreases, and installers can maintain consistent board lengths for a neater, more efficient outcome.
Traffic patterns and sight lines
Beyond lining up with the longest uninterrupted wall, you should orient flooring to follow how people move through the space and what they see when they enter.
Run planks along main walkways to guide traffic, minimize visible seams at focal points, and align sight lines toward windows, fireplaces, or entryways.
This creates natural flow, reduces wear, and makes rooms feel intentional and cohesive.
Structural constraints: joist direction and subfloor
When choosing flooring direction, let the joists and subfloor dictate what’s structurally sound—lay boards perpendicular to joists for solid support and to prevent sagging or squeaks.
Check subfloor type and thickness: plywood, OSB, and plank sheathing require different fastening and expansion gaps.
If joist runs are awkward, add blocking or underlayment to stiffen the floor and follow manufacturer span limits.
Practical Rules of Thumb (Quick Reference)
When deciding direction, you’ll usually run boards parallel to the longest wall for a cleaner look and toward the main window to highlight light and grain.
Remember the structural rule: lay planks perpendicular to floor joists for strength, or choose diagonal runs for visual interest if you’re willing to handle extra waste and labor.
Use a quick checklist—room shape, joist layout, light source, and installation complexity—to make the final call.
Install parallel to longest wall when and why
If your room has one clearly dominant wall, run the flooring parallel to that longest wall to make the space feel more balanced and visually expansive.
Doing so aligns planks with the room’s primary axis, reduces awkward end cuts, and simplifies layout. You’ll highlight length, improve sightlines, and often speed installation.
Use this rule for rectangular rooms with a clear dominant wall.
Install toward main window/light source when and why
You’ve learned to run planks along the longest wall to lengthen a room; another quick rule is to install toward the main window or light source.
Laying planks so light travels along seams minimizes visible gaps, highlights grain, and gives a cleaner, more continuous look. Aim rows from the primary window; it’s a simple visual trick that improves perceived quality and hides minor imperfections.
Install perpendicular to floor joists structural rule
Because joists carry the load, lay your flooring perpendicular to them so the planks bridge multiple joists and distribute weight more evenly; this reduces sagging, prevents squeaks, and gives a firmer feel underfoot.
You’ll also improve fastening: nails or screws bite into joists rather than just subfloor, creating stronger joints and longer-lasting stability.
Check joist orientation before starting installation.
Diagonal installation aesthetic reasons and trade-offs
Switching from joist-oriented layout to a diagonal pattern can make a room look larger and hide uneven walls or awkward angles, so consider it when straight runs won’t flatter the space.
You’ll get a dynamic, custom look that camouflages defects, but expect more waste, longer cuts, higher labor costs, and tricky changes.
Use diagonals selectively for impact.
Quick checklist for choosing direction
When deciding plank direction, focus on sightlines, light source, and structural layout to pick the option that gives the best balance of appearance, material use, and installation effort; this quick checklist helps you weigh those factors fast.
Use this quick guide to decide confidently:
- Run planks toward primary sightlines for visual length.
- Align with incoming light to minimize seam visibility.
- Follow joists or subfloor for easier installation.
Step-by-Step Decision Guide (How to Choose Direction)
Start by measuring the room, noting focal points, and marking window, door, and traffic locations so you know where attention and wear will fall.
Check joist or subfloor orientation and compare that to your plank size and pattern choices—wide planks and herringbone may influence direction differently than narrow boards.
Finish with a quick mock-up viewed from key vantage points to confirm the look before you commit.
Step 1: Measure room dimensions and identify focal points
A quick, accurate measurement of your room and a clear note of its focal points will guide your flooring direction choices and prevent costly mistakes.
Measure length and width, note alcoves, fireplace, built-ins, or visual anchors.
Sketch dimensions to scale, mark baseboard runs and changes, and decide whether plank runs accentuate the focal point.
Accurate notes simplify layout and material estimates.
Step 2: Locate windows, doors, and traffic flow
Now that you’ve mapped the room and noted focal points, locate windows, doors, and primary traffic paths to refine your plank direction.
Run planks toward the main light source for visual continuity, align with the longest sightline to minimize seams, and orient perpendicular to frequent door swings to reduce edge stress.
Prioritize unbroken runs through high-traffic zones for durability and flow.
Step 3: Check joist or subfloor orientation
1 quick check you should do before laying planks is confirm which way the joists or subfloor panels run, because that determines how you’ll stagger seams and fasten the flooring.
Walk the room, note joist direction, and mark panel edges.
Run boards perpendicular to joists when nailing, parallel when using floating installs.
Adjust layout to avoid short end joints over unsupported gaps.
Step 4: Consider plank size and pattern (wide vs narrow, herringbone)
Consider plank width and pattern early, because they change how direction affects the room’s look and installation challenges.
Wide planks visually widen a room and need fewer seams, so run them with the longest sightline. Narrow boards read busier and hide junctions.
Herringbone or chevron demand precise layout and often work best centered or parallel to the main focal wall for balance.
Step 5: Mock-up and view from key vantage points
Before you commit, lay out a short mock-up of the planks and walk the room from your key vantage points—entry, main seating area, and any focal walls—to see how direction, seams, and pattern read in real life.
Take photos from each viewpoint, note how light and sightlines affect perception, adjust a few rows, and decide which orientation looks balanced and minimizes awkward seams.
Step 6: Finalize direction and plan starter wall
Now that you’ve mock‑ups and photos, lock in the running direction and choose the starter wall by prioritizing the view from the main entrance and longest sightlines; you’ll want the most visually prominent wall to carry full-width planks and hide any necessary cut rows on less visible walls.
Measure the starter wall for straightness, mark high spots, and plan junction thresholds so layout stays balanced and trim fits cleanly.
Material-Specific Considerations
When choosing direction, you’ll need to match the rules to each material’s quirks: solid hardwood requires attention to expansion, board length, and joist orientation.
Engineered wood gives you more stability and installation options, while laminate and vinyl plank depend on click systems and manufacturer-recommended layouts.
For tile and stone watch grout lines, pattern, and room geometry, and for carpet consider pile direction and seam placement.
Solid hardwood: expansion, board length, and joists
Because solid hardwood responds to moisture and temperature, you’ll need to plan for expansion gaps, limit board lengths over joists, and orient planks to minimize movement and squeaks.
Cut boards to manageable runs, stagger end joints, and leave recommended perimeter gaps.
Lay boards perpendicular to exposed joists when possible for support, and secure fastenings to reduce squeaks while allowing seasonal movement.
Engineered wood: stability and installation flexibility
Although engineered wood has a real hardwood surface, its multi-ply core gives you far greater dimensional stability than solid planks.
This allows you to install it in wider rooms, over radiant heat, or on grade with fewer worries about seasonal movement.
You’ll still follow manufacturer guidelines: allow acclimation, maintain recommended expansion gaps, choose glue, float, or nail methods per spec, and stagger end joints for visual strength.
Laminate and vinyl plank: click systems and recommended layouts
Engineered wood’s stability gives you options that solid planks don’t, but laminate and vinyl plank bring their own practical advantages through click-lock systems and layout choices.
You can float floors quickly, stagger end joints for strength, and run planks lengthwise to visually elongate rooms. For open plans, align with the longest view; in narrow spaces, consider diagonal runs sparingly to avoid waste.
Tile and stone: grout lines, pattern, and room geometry
Anyone planning tile or stone should think about grout lines, pattern, and room geometry together, since those choices affect both appearance and performance.
Run tiles to align grout with long sightlines and major light sources, minimizing awkward cuts.
Use patterns that complement room proportions—brick, herringbone, or straight—while keeping grout color and joint width consistent to hide movement and simplify maintenance.
Carpet: pile direction and seam placement
Switching from hard surfaces to carpet means you’ll think about pile direction and seam placement instead of grout or tile patterns.
You’ll orient pile toward the main entrance or natural light so fibers reflect evenly and wear looks consistent.
Place seams in low-traffic areas, tuck them under thresholds, and run seams along walls or furniture lines to minimize visibility and reduce tripping risks.
Comparison of direction rules by material
While each floor type follows the basic idea of aligning with room flow, the specific rules change with material properties—wood and laminate demand plank direction for structural stability and appearance, tile calls for grout lines and pattern alignment, vinyl needs consideration of sheet seams and directional embossing, and carpet relies on pile direction and seam placement to control light reflection.
| Material | Key rule | Why it matters |
|---|---|---|
| Wood/laminate | Run lengthwise | Strength, look |
| Tile | Align pattern | Visual flow |
| Vinyl/carpet | Hide seams | Seam visibility |
Special Cases and Room-by-Room Guidance
When planning direction in special spaces, you’ll need techniques for hallways, narrow runs, and small rooms that keep lines feeling balanced.
Think about sight-line continuity in open-plan areas, safe changes on stairs, and the unique needs of bathrooms, basements, or installations over radiant heat.
I’ll walk through practical room-by-room guidance and tips for those tricky changeover areas.
Hallways and narrow spaces
Because hallways channel traffic and often sit between rooms with different flooring directions, you’ll want to plan layout and changes carefully before you cut any planks.
Run boards along the hall’s length to visually widen the space and align seams with doorways. Use threshold strips where directions meet, stagger end joints for stability, and keep expansion gaps consistent to prevent buckling.
Open-plan living and sight-line continuity
If you want sight lines to feel seamless in an open-plan space, plan a dominant flooring direction that follows the longest visual axis so the eye moves naturally from one area to the next.
Align planks to connect living, dining, and kitchen zones. Use consistent board width and finish to unify spaces.
Passage thresholds should be minimal and parallel to that main flow.
Small rooms and bathrooms
Smaller rooms and bathrooms need different planning than open-plan areas, so carry your main flooring direction into these spaces where it makes sense, but be ready to adjust for scale and function.
In tight rooms run planks to lengthen the space visually; in tiny baths consider short-width tiles or diagonal layout to minimize seams.
Prioritize water-resistant materials and simple grout lines for easy cleaning and cohesion.
Stairs and transition areas
When you move from open floors into staircases and thresholds, plan direction and changes deliberately so traffic flows smoothly and sightlines stay consistent.
Run planks down stair treads where possible for safer visual continuity, but match grain and color at nosing.
Use compatible connections at doorways, orient narrow runs parallel to stairs, and keep trim tight to prevent trip hazards.
Installations over radiant heat or basements
Because radiant heat systems and below-grade spaces demand different moisture and thermal strategies, you should plan direction and installation details specifically for those contexts.
Run boards perpendicular to heat pipes when recommended, allow expansion gaps, and use recommended engineered or approved solid products.
In basements, prioritize moisture barriers, slope drainage where needed, and follow manufacturer limits for adhesive, acclimation, and temperature to avoid failures.
Common Mistakes and How to Avoid Them
Don’t just run planks parallel to short walls without testing the look first, and pay attention to joist direction and any structural recommendations.
You’ll also want to reflect on light sources and viewing angles, plan clean shifts between rooms, and always acclimate your material before you start.
Addressing these common missteps up front saves time and prevents costly fixes.
Installing parallel to short walls without testing
If you lay flooring parallel to the short walls without checking room dimensions and light flow first, you’ll often end up with visible seams, awkward board cuts, or a layout that makes the room look smaller.
Before installing, test a few rows, mock up changes, and walk the space. That quick trial reveals whether a perpendicular or diagonal run will produce cleaner sightlines and fewer ugly cuts.
Ignoring joist direction and structural recommendations
Testing layout with a few rows will also uncover issues that relate to the subfloor and joists beneath—ignoring joist direction and structural recommendations can undo even a well-planned layout.
You should align boards perpendicular to joists for support, follow manufacturer span limits, and secure appropriate underlayment. If you don’t, boards can sag, squeak, or fail warranty—consult structural guidance before nailing or gluing.
Failing to account for light sources and viewing angles
When you ignore how natural and artificial light hits your floor, imperfections and seams that were barely noticeable during installation can become glaringly obvious once the room is lit.
Plan for light direction and viewing angles so your layout reads consistently from the places people will stand and sit.
Walk rooms at different times, mock up plank orientation under lamps, and adjust layout to minimize visible joints and shade variation.
Overlooking transitions between rooms
Lighting and sightlines don’t just affect a single room—they’ll highlight the seams where two floors meet, so you need to plan how different rooms will flow together.
Decide connection types, match plank direction or use thresholds to create intentional breaks, and keep pattern alignment consistent.
Measure doorways, allow movement at expansion gaps, and coordinate trim so seams look deliberate rather than overlooked.
Not acclimating material before installation
Because flooring materials expand and contract with temperature and humidity, you should always acclimate them to the room before installation.
If you skip this, boards can warp, gap, or buckle.
Bring materials in advance, store them flat in the installation environment for the manufacturer’s recommended time, and monitor humidity and temperature.
That prevents costly repairs and guarantees stable, long-lasting floors.
Best Practices and Pro Tips for a Professional-Look Installation
Plan your layout so end pieces look balanced and joints are staggered with a consistent reveal to avoid weak seams.
Do a quick dry-lay to confirm direction, then think through shifts, thresholds, and trim to keep sightlines clean.
If you hit structural issues or complex shifts, call a pro or structural engineer before you install.
Planning layout and end-piece sizing
When you lay out your flooring, think ahead to the edges: evenly sized end pieces make the installation look intentional and professional.
Measure room width, calculate plank counts across, and adjust starting row so both wall-side end pieces are similar width.
Cut wider planks to fill gaps, keep at least manufacturer minimum width for stability, and dry-fit rows before gluing or clicking permanently.
Staggering joints and maintaining consistent reveal
If you stagger joints thoughtfully, your floor will look balanced and stay more stable over time.
Space end joints at least 6–8 inches apart (or follow manufacturer specs) and vary row starts to avoid continuous seams.
Keep a consistent reveal along walls and junctions by using spacers and checking alignment frequently.
Tighten or adjust boards to prevent gaps and maintain visual flow.
Using temporary dry-lay to validate direction
Although it takes a bit of extra time, doing a temporary dry‑lay lets you confirm board direction, color variation, and seam placement before you commit, so you can spot and fix issues like awkward end joints or mismatched grain.
Lay a representative area, step back, and view from multiple angles. Adjust orientation, swap boards, and refine your pattern until visual flow and balance satisfy you.
Transition thresholds and trim strategies
Because changes and trim finish the room, you’ll want clean, well‑planned thresholds that both protect edges and create a seamless visual line between surfaces.
Choose junction profiles that match height differences, secure them to stable substrates, and leave expansion gaps under trims.
Coordinate trim color and material with flooring and baseboard.
Install fasteners discreetly and caulk or seal joints for durability and a polished look.
When to consult a pro or structural engineer
When your project involves unusual subfloor conditions, structural changes, large areas, or complex alterations, call a pro or structural engineer to avoid costly mistakes and safety issues.
You should also consult one if you see sagging, rot, mold, or inconsistent joist spacing.
A pro assesses load, moisture, and leveling, recommends materials and layout, and guarantees code compliance so your floor performs and lasts.
Cost, Time, and Waste Implications of Direction Choices
Which direction you choose will change how much material you waste and how tricky the cuts become, especially with diagonal or patterned layouts.
Those more complex orientations usually add labor and time, and you’ll need to factor in extra cutting and fitting.
Also expect more junction pieces and specialty trim, which can raise costs and require planning.
How direction affects material waste and cutting complexity
If you run boards perpendicular to the longest wall, you’ll often need fewer full-length pieces but more short cuts at the ends, which raises both cutting complexity and scrap; conversely, laying parallel to the longest run usually reduces end cuts but can require extra starter pieces and awkward rip cuts around doorways.
You should plan layout, measure runs, and stagger joints to minimize waste and tricky cuts.
Time and labor differences for diagonal or patterned installs
Although diagonal and patterned installs can create dramatic visual impact, they usually take more time and labor than straight lays because you’ll be doing frequent angled cuts, fitting irregular pieces, and managing more joint alignments.
You’ll spend extra hours measuring, marking, and cutting, and skilled installers charge more. Expect slower progress, higher labor costs, and careful planning to avoid mistakes that waste time.
Impact on transition pieces and additional materials
When you change the direction of flooring between rooms, you’ll usually need extra junction pieces, reducers, or T-molding to bridge height or pattern differences. Those additions raise both material costs and installation time.
You’ll also cut more connector pieces to fit mismatched grain or pattern, increasing waste and labor.
Plan for extra trim, adhesives, and fasteners when estimating budget and schedule.
FAQ Common Questions About Flooring Direction
You’ll have a few practical questions when picking direction—like whether boards should run lengthwise or widthwise, if you can change direction between rooms, and whether layout affects resale.
You’ll also want to know what to do when joists run the “wrong” way and how to handle open-concept spaces.
Let’s answer each clearly so you can make the best choice for appearance and structure.
Should flooring run lengthwise or widthwise in a room?
Which way should your flooring run: lengthwise or widthwise?
You’ll usually run boards lengthwise along the longest wall or toward the main light source to visually elongate space and showcase planks. Lengthwise installation also reduces visible seams and supports traffic flow.
Choose widthwise only for specific architectural reasons or to emphasize a room’s width, but prioritize light, sightlines, and structural layout.
Can I change direction between rooms?
Can you change flooring direction between rooms? Yes—you can, but plan shifts carefully.
Align planks where visual flow matters, like open sightlines, and use thresholds or reducers at doorways to handle direction changes and expansion gaps.
Match patterns, grain, and plank width for cohesion.
For small rooms or awkward layouts, keep consistent direction to avoid a choppy appearance and installation complications.
Does flooring direction affect resale value?
How much does flooring direction matter to buyers? It matters, but modestly. Most buyers notice overall quality, color, and room flow before grain direction.
You should align planks to emphasize room length and natural light; avoid odd shifts or diagonal installs that look amateur. Proper installation and consistent style boost resale more than strict adherence to directional “rules.”
What if my subfloor joists run the “wrongway?
Even if your subfloor joists run the “wrong” way for the planks you prefer, you’re not stuck — installers commonly handle this by adding a layer of plywood or underlayment, or by fastening sleepers to create a proper nailing surface and direction.
You can also glue or float engineered or laminate flooring perpendicular to joists. Discuss options with your installer to balance structure, cost, and appearance.
How do I choose direction for open-concept spaces?
Wondering which way to run flooring in an open-concept space? Think about sightlines, traffic flow, and light.
Run boards parallel to the longest visual axis or main entry sightline to make the area feel cohesive. Align with stairs or major features when possible.
Use consistent direction across connected rooms; change only for structural necessity or deliberate visual shift.
Visual Planning Tools and Resources
You can mock up flooring by photographing the room, laying down tape to mark plank direction, and comparing proportions directly on the photos.
Try recommended apps or simple drawing tools to sketch layouts and test patterns before ordering.
Request physical samples and use manufacturer digital visualizers when you need final confirmation of color and texture.
How to create mock-ups using photos and tape
When planning flooring, creating simple mock-ups with photos and painter’s tape helps you visualize patterns, color contrasts, and how pieces meet at seams before committing to materials.
Photograph the room from multiple angles, print or display images, then lay tape on floors or photos to mark plank direction, seam placement, and connections.
Move tape to test alternatives until a confident layout emerges.
Recommended apps and drawing methods
Start with one or two reliable apps and a simple drawing method so you won’t get overwhelmed: use a room-measuring app (to capture dimensions and angles), a floor-visualizer or tile-layout app (to preview plank direction, patterns, and shifts), and sketching software or graph paper for precise seam placement.
Use layers, note thresholds, mark focal lines, and export PDFs for installer reference.
When to request samples and digital visualizers
Curious how soon to bring samples and digital visualizers into your planning?
Request physical samples early—before ordering—to check color, texture, and light interaction in your space.
Use digital visualizers once you have room photos to test plank direction, contrast, and flow.
Combine both: samples confirm realism; visualizers speed decisions.
That prevents costly returns and guarantees confident, accurate installation choices.