How to Clean Slate Floors Without Stripping Their Natural Finish
You can keep slate floors looking great without stripping their natural finish by sweeping or vacuuming grit, mopping with a pH-neutral cleaner diluted in warm water, and using soft microfiber tools to avoid scratches; rinse well and blot spills promptly. Avoid straight vinegar, harsh acids, abrasives, and steam mops on sealed slate. Test products in an inconspicuous spot, seal when needed, and protect high-traffic areas with rugs—continued guidance will help you maintain and restore without damage.
How to Clean Slate Floors Without Stripping Their Natural Finish
Start by sweeping or vacuuming loose grit, then mop with a pH-neutral cleaner and warm water to protect the slate’s natural finish.
Use soft tools and rinse well so you won’t leave residue that dulls the stone.
If stains, grout damage, or worn sealer persist, call a pro for restoration rather than using harsh strippers.
One-paragraph direct method summary
Although slate’s natural finish is delicate, you can keep it clean without stripping it by regularly sweeping or vacuuming grit, mopping with a pH-neutral cleaner diluted in warm water, and blotting spills immediately.
Avoid acidic or abrasive products, use a soft mop or microfiber cloth, rinse with clean water to remove residue, and dry the floor to prevent mineral spots.
For clear guidance on how do I clean slate floors, follow these steps.
When to choose gentle cleaning vs. professional restoration
When your slate looks dull but still feels smooth and the grout is intact, stick with gentle cleaning—regular sweeping, a pH‑neutral mop, spot treating stains, and prompt drying will preserve the natural finish;
call in professional restoration if you see deep scratches, etching from acids, persistent stains that don’t lift, loose or crumbling grout, or large areas of uneven color that indicate sealer failure.
You should schedule pros for structural damage, widespread staining, or when DIY fixes risk further harm.
Basic Understanding of Slate Floors and Their Finish
Slate is a dense natural stone that comes in honed, natural cleft and other textures, and it may be sealed or left unsealed.
You shouldn’t use harsh strippers because they can penetrate slate’s pores, strip color, and remove protective sealants.
To check for a sealant, sprinkle a few drops of water on the surface—if it beads, it’s sealed; if it soaks in, it’s likely unsealed.
What slate is and common finish types (honed, natural cleft, sealed vs. unsealed)
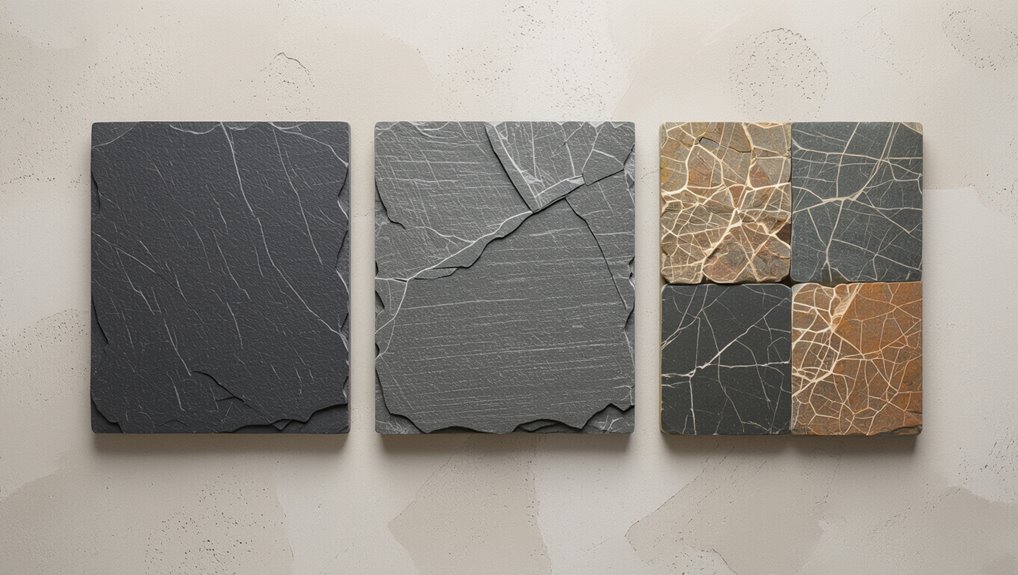
A metamorphic rock formed from compressed clay and volcanic ash, slate gives floors a durable, layered look that can vary widely in texture and color.
You’ll find honed slate smooth and muted, natural cleft textured and rustic. Some slabs come factory-sealed for stain resistance, while unsealed slate soaks in liquids and needs routine sealing.
Match cleaning to finish to preserve appearance.
Why harsh stripping damages slate (pore structure, color loss, sealant removal)
If you strip slate too aggressively, you’ll strip away more than old sealant — harsh chemicals and abrasive methods can open up the stone’s pores, dull or leach natural pigments, and remove protective coatings that were meant to stay.
You’ll weaken the surface, increase staining risk, and accelerate weathering. Treat slate gently to preserve color depth, pore integrity, and any remaining finish.
How to identify if your slate has a protective sealant
Wonder whether your floor has a protective sealant? Test discreetly: sprinkle a few drops of water on an inconspicuous area.
If beads form and sit, a sealant’s present; if water soaks in or darkens the stone, it’s unsealed or worn.
You can also check for a slight sheen, uniform color, or consult installer records.
Perform a small patch test before cleaning.
Safety and Preparation Before Cleaning
Before you start cleaning slate, make a quick checklist of the tools and materials you’ll need so you’re not scrambling mid-job.
Put on gloves and eye protection, keep the area well ventilated, and don’t use strong chemicals without proper PPE.
Always perform a small patch test in an inconspicuous spot to confirm the cleaner and method won’t damage the finish.
Tools and materials checklist
1 clear kit makes the job faster and safer: gather protective gear (gloves, knee pads, eye protection), appropriate cleaning tools (soft-bristled broom, microfiber mop, non-abrasive scrub brush), compatible cleaners for your specific slate finish, a bucket, clean water, and absorbent cloths or towels.
- pH-neutral cleaner
- Microfiber mop head
- Soft scrub brush
- Clean buckets
Keep items organized and test cleaners on an inconspicuous area first.
Personal protective equipment and ventilation
Because slate cleaning can stir up dust and expose you to chemical fumes, put on appropriate personal protective equipment and guarantee good ventilation before you start.
Wear gloves, safety goggles, and a respirator or mask rated for dust and vapors. Open windows, run fans or exhaust vents, and avoid enclosed spaces.
Stop if you feel dizzy, nauseous, or irritated.
Testing a small area: how to perform a patch test
How should you test a cleaner on your slate? Choose an inconspicuous spot, like under furniture.
Clean it as you plan to for the whole floor: dilute product, apply with a soft cloth or sponge, wait the recommended time, then rinse and dry.
Check for color change, haze, etching, or residue over 24–48 hours before treating the rest of the floor.
Step-by-Step Gentle Cleaning Method
Start by dry-cleaning the slate with a broom or vacuum to remove grit that can scratch the surface.
Then pick a pH-neutral cleaner at the correct dilution and mop with minimal water, treating oil, rust, or organic stains with appropriate safe remedies as needed.
Finish by rinsing with clean water and drying thoroughly to protect the finish.
Step 1 Dry cleaning: sweeping and vacuuming techniques
1. You’ll begin by dry cleaning to protect slate’s finish: remove grit and dust before any wet work.
Use gentle tools and systematic motions.
- Sweep with a soft-bristle broom, pushing debris toward a single pile
- Vacuum with a hard-floor setting or brush attachment
- Work along grout lines and edges
- Empty collector frequently to avoid re-depositing grit
Step 2 Choosing the right pH-neutral cleaner and dilution
Anyone can damage slate by using the wrong cleaner, so pick a pH-neutral product specifically labeled for natural stone and follow the manufacturer’s dilution instructions closely; this keeps the stone’s sealant intact and prevents etching or discoloration.
Test diluted solution in an inconspicuous spot, measure carefully, and mix with clean water. Store concentrate safely and discard any overly strong batches.
Step 3 Mopping technique for slate to avoid over-wetting
After you’ve mixed and tested the pH-neutral solution, move on to mopping with as little water as possible to protect the sealant and prevent water from seeping into grout lines.
Use a well-wrung microfiber mop, work small sections, and rinse the mop frequently to avoid residue.
- Wring until damp, not wet
- Mop with the grain of slate
- Change water often
- Dry promptly with a towel
Step 4 Stain spot treatment (oil, rust, organic stains) with safe remedies
Treat stains promptly and gently to prevent them from setting into the slate; you’ll use mild, non-acidic solutions and soft tools to lift oil, rust, and organic marks without harming the sealant.
For oil, blot and apply a poultice of baking soda and water.
For rust, use a commercial rust remover safe for stone.
For organic stains, try diluted hydrogen peroxide.
Test first.
Step 5 Rinsing and drying properly to protect finish
While the stain treatments sit briefly, rinse the slate thoroughly with clean water to remove all cleaning residues.
Then dry it immediately with soft, absorbent towels or a microfiber mop to prevent water spots and protect the sealant.
Work in small sections, blotting excess water rather than rubbing.
Confirm edges and grout lines are dry to avoid mineral buildup or moisture damage.
Step 6 Reapplying topical sealers or enhancers (when and how)
Once the slate is rinsed and dried, you can decide whether to reapply a topical sealer or enhancer based on shine, water beading, and manufacturer recommendations; you’ll want to do this only when the surface is fully clean, dry, and at room temperature.
Test a small area, apply thin even coats with a microfiber pad, wait recommended cure times, and avoid heavy traffic for 24–48 hours.
Alternative Methods and Products (Comparison)
You can weigh commercial pH-neutral cleaners against DIY natural options to pick what’s safest and most effective for your slate.
Consider when steam cleaning is worth the risk and when it’s better avoided to prevent damage.
For stubborn stains, compare enzyme cleaners and poultice treatments to decide which will work without harming the stone.
Commercial pH-neutral cleaners vs. DIY natural cleaners
Because slate reacts differently to acids and abrasives, choosing the right cleaner matters — and you’ll find clear trade-offs between pH-neutral commercial products and DIY natural mixes. You’ll prefer commercial cleaners for consistent pH, streak-free results, and warranty-safe use. DIY mixes cost less and avoid harsh chemicals but need testing first.
| Commercial | DIY |
|---|---|
| Consistent pH | Inexpensive |
| Warranty-safe | Natural ingredients |
| Ready-to-use | Requires testing |
| Predictable | Variable results |
Steam cleaning: risks and safe use cases
Although steam cleaners can sanitize and lift grime without chemicals, they carry risks on slate that you should consider before use.
Steam’s high heat and moisture can loosen grout, strip sealers, or cause surface flaking on softer slabs.
Use low-pressure, controlled steam only on well-sealed slate, test a hidden area first, and dry thoroughly to prevent moisture penetration and long-term damage.
Enzyme or poultice treatments for stubborn stains
When stains resist scrubbing, enzyme cleaners and poultices offer targeted alternatives that break down organic matter or draw out embedded pigments without aggressive abrasion.
You’ll apply enzyme gel to digest food, grease, or pet stains, or mix a poultice (absorbent plus solvent) to lift tannins and dye.
Test inconspicuously, follow product directions, cover while acting, then gently remove residue.
Common Mistakes That Strip or Damage Slate Finishes
Watch what you use and how you clean, because acidic or highly alkaline cleaners will eat away at slate finishes.
Don’t scrub with abrasive pads or the wrong brushes, and avoid overusing sealant or choosing an incompatible sealer.
Also prevent prolonged wetness by limiting moisture and drying the floor properly to keep the finish intact.
Using acidic or alkaline cleaners
If you reach for harsh acidic or strongly alkaline cleaners thinking they’ll remove stains quickly, you’ll likely end up stripping the slate’s natural finish and dulling its color.
Instead, test any cleaner on an inconspicuous spot, choose pH-neutral products made for stone, rinse thoroughly, and dry promptly.
Neutral cleaners preserve sealers and prevent etching, keeping slate rich and resilient.
Abrasive scrubbing and wrong pads
Because slate’s surface is softer than many people think, aggressive scrubbing or using the wrong pad will scratch, dull, or strip its finish quickly.
You should use soft brushes or microfiber pads and gentle, circular motions. Avoid metal scouring pads, stiff-bristled brushes, or high-speed floor machines with abrasive pads.
Test any pad on a hidden spot before full use to prevent irreversible damage.
Overuse of sealant or wrong sealer types
When you slather on too much sealant or pick the wrong type, you can trap moisture, alter the slate’s appearance, and even cause flaking or peeling of the finish.
You should choose a sealer formulated for natural slate, apply thin, even coats, and follow cure times.
Test in an inconspicuous area first to verify color and sheen stay true before sealing the whole floor.
Excessive moisture and improper drying
Although slate is hardy, too much water or slow drying can ruin its finish and bond, leaving stains, mineral deposits, or delamination.
You should avoid puddles, mop with minimal moisture, and speed drying with fans or open windows.
Don’t seal surfaces when damp; wait until fully dry.
Promptly address spills and humidity to prevent long-term damage and finish loss.
Maintenance Strategies to Preserve Natural Finish
Keep a regular cleaning schedule using pH-neutral cleaners and soft tools to prevent grime buildup and wear.
Once a season, do a gentle deep clean—use mild detergent, test a small area first, and avoid harsh scrubbing or strong chemicals that strip the finish.
Protect high-traffic zones with rugs and entry mats and add felt pads to furniture legs to minimize scratches and abrasion.
Regular cleaning schedule and best practices
Set a simple routine you can stick to: sweep or vacuum slate floors three times a week and spot-clean spills immediately to prevent stains and mineral deposits.
You should mop gently with pH-neutral cleaner, dry tiles to avoid water marks, and protect high-traffic areas with mats. Maintain grout and avoid harsh chemicals.
- Use soft-bristle tools
- Rinse mop frequently
- Address grout promptly
- Rotate mats regularly
Seasonal deep-clean tips without stripping finish
After you’ve kept up with weekly sweeping and spot-cleaning, schedule a seasonal deep clean to lift embedded dirt and refresh the finish without stripping it.
Use a pH-neutral stone cleaner, warm water, and a soft-bristle brush to scrub grout lines gently. Rinse thoroughly, dry with microfiber cloths, and let the floor air-dry completely.
Repeat twice yearly or as traffic dictates.
Protective measures: rugs, furniture pads, entry mats
A few simple barriers—area rugs in high-traffic zones, felt pads under furniture legs, and durable entry mats at doorways—will dramatically reduce abrasion, stains, and moisture exposure to your slate’s natural finish.
Choose breathable, non-slip rug backings and replace mats when saturated. Clean pads and rugs regularly to prevent grit buildup, and reposition furniture occasionally to avoid indentations and uneven wear across the floor.
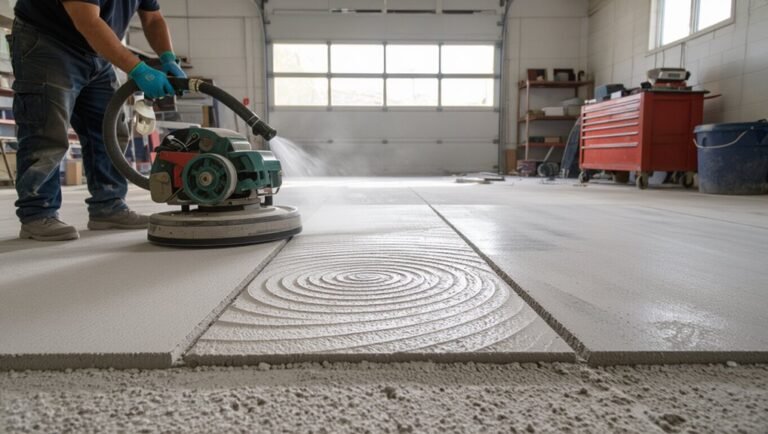
When to Repair, Reseal, or Call a Professional
Watch for dull patches, water beading, or loose grout to decide if your slate just needs resealing or a full restoration.
You can reseal small areas yourself with cleaning, etching if needed, and a quality sealer, but deep cracks, heavy staining, or uneven tiles usually call for professional refinishing.
Expect DIY resealing to take a few hours and cost modestly for supplies, while pro work can run higher in price and take days to complete depending on severity.
Signs your floor needs resealing vs. full restoration
How do you tell if your slate floor just needs a reseal or a full restoration?
Check for dull patches, water beading, or minor surface scratches—those usually mean resealing will restore protection.
Deep gouges, loose or cracked tiles, widespread staining that won’t lift, or structural unevenness indicate full restoration and possibly professional help.
Assess scope before deciding.
DIY resealing steps vs. professional refinishing
While small chips and worn sealer you can tackle yourself, bigger damage usually calls for a pro—so start by honestly matching the problem to the fix.
For DIY, clean, sand lightly, apply compatible slate sealer in thin coats, and cure fully.
Call a professional for deep cracks, uneven surfaces, or old finishes needing stripping and color matching to guarantee durability and warranty.
Cost and timeline expectations for professional work
When you’re weighing repair, reseal, or a full professional refinishing, expect costs and schedules to vary with the scope: minor repairs and resealing often run $200–$800 and finish in a day or two; larger repairs or honing cost $800–$2,500 and take several days; full refinishing can exceed $3,000 and require a week.
Get written estimates, timelines, and warranties before hiring.
FAQ
You probably have quick questions like whether vinegar is safe, how often to reseal, or if steam mopping will harm the finish.
You’ll also want to know how to remove oil stains without damaging the stone and whether commercial “stone and tile” cleaners are appropriate for slate.
Below are concise answers to those common concerns.
Can I use vinegar to clean slate floors?
Curious whether vinegar’s a good choice for slate floors? You should avoid using straight vinegar or strong acidic cleaners—they can dull or etch natural slate and harm sealers.
A diluted solution (very mild) used sparingly and rinsed immediately can work for spot cleaning, but pH-neutral stone cleaners are safer for regular use to preserve the finish and prevent long-term damage.
How often should I reseal slate floors to maintain the finish?
How often should you reseal slate floors to keep their finish looking good?
Reseal every 1–3 years depending on traffic, moisture, and product durability.
Check by sprinkling water: if it beads, seal is fine; if it soaks in, reseal.
High-traffic or wet areas need closer attention.
Always clean thoroughly before applying sealer and follow manufacturer cure times for best protection.
Will steam mopping remove my slate’s natural finish?
Will steam mopping strip your slate’s natural finish? You shouldn’t use steam on sealed slate; high heat and moisture can soften sealers, open grout, and dull the surface.
If your slate is unsealed, steam risks deeper penetration and discoloration.
Use a pH-neutral cleaner and microfiber mop instead.
Test any method in an inconspicuous spot before treating the whole floor.
How do I remove oil stains without damaging the stone?
Got an oil stain on your slate? Blot excess oil with paper towels—don’t rub.
Sprinkle baking soda or cornstarch to absorb for several hours, then sweep it up.
For residue, make a paste of mild dish soap and water, apply gently with a soft brush, rinse, and dry.
If stain persists, use a poultice made for natural stone or consult a pro.
Is it safe to use commercial “stone and tile” cleaners on slate?
Curious whether those “stone and tile” cleaners are safe for your slate? You can use some commercial products, but pick pH-neutral, non-acidic formulas labeled safe for natural stone.
Avoid acidic, alkaline, or abrasive cleaners—they can etch, dull, or strip sealers. Test any product on an inconspicuous spot first.
Rinse thoroughly and follow manufacturer instructions to preserve slate’s finish and longevity.