
How to Clean a Shower Floor So It Looks Like New Again
You can make your shower floor look like new by picking the right cleaner and tools for the surface, ventilating, and using protective gear. For quick fixes, scrub grout and tile with a baking soda paste and vinegar, rinse well, then squeegee and towel-dry. Use non‑abrasive, pH‑neutral products on fiberglass, acrylic, and stone; stronger cleaners for porcelain if safe. Target stains and reseal grout as needed, and keep up with weekly maintenance to preserve results — explore the full step‑by‑step guide for more.
Restore a Shower Floor to Like-New in Minutes
Want the fastest effective fix? Mix a baking soda paste with vinegar, scrub the grout and tile for about 10–15 minutes, and rinse for like-new results with minimal effort.
It’s low difficulty, takes under 30 minutes total, and you’ll see a clear cosmetic improvement immediately.
One-sentence summary of the fastest effective method
In just a few minutes you can restore a shower floor to like-new by scrubbing with a strong but safe cleaner (vinegar or a commercial bathroom cleaner), targeting grout and soap scum with a brush, rinsing thoroughly, and drying to prevent residue.
For a fast, effective how to clean a shower floor approach, focus on concentrated cleaner, elbow grease on grout lines, quick rinse, and towel-dry.
Time, difficulty, and results expectation
Plan on spending about 15–30 minutes for a typical shower floor refresh; you’ll get most dirt and soap scum gone in one short session. Tougher grout stains may take a bit longer.
You’ll need minimal effort and basic supplies. Expect noticeably cleaner tile, with deep stains requiring repeats or stronger cleaners.
- Quick: visible improvement
- Moderate: grout attention
- Intensive: repeat or reseal
Why Shower Floors Age: Basics You Need to Know
You’ll notice different shower floors age in different ways depending on the material—tile and grout can crack or stain, acrylic and fiberglass may scratch or yellow, and natural stone can etch.
Common culprits are soap scum, hard-water minerals, mildew and mold, and chemical or abrasive damage that gradually wears finishes.
Knowing whether stains and buildup will come off with cleaning or if you’re facing permanent damage that needs repair or replacement helps you choose the right next step.
Common materials and how they wear (tile, grout, acrylic, fiberglass, stone)
Five common shower-floor materials—ceramic or porcelain tile, grout, acrylic, fiberglass, and natural stone—each age in distinct ways you should recognize.
Tile may chip or glaze-wear; grout darkens and crumbles; acrylic scratches and dulls; fiberglass crazes and stains; natural stone etches and loses sealant.
You should inspect surfaces regularly, choose appropriate cleaners, and reseal or repair before damage spreads.
Main causes of discoloration and damage (soap scum, hard water, mildew, mold, mineral buildup, etching)
Grime, minerals, and microorganisms are the usual culprits that darken and degrade shower floors: soap scum and body oils leave a filmy residue, hard water deposits chalk and cloud surfaces, mildew and mold stain and eat at grout, mineral buildup roughens finishes, and acidic cleaners or products can etch stone and dull acrylic or fiberglass.
You’ll prevent damage by rinsing after use, drying surfaces, scrubbing grout, and removing deposits promptly.
When cleaning is enough vs. when repairs or replacement are needed
Those common offenders—soap scum, minerals, and mold—are usually fixable with regular cleaning, but some damage goes past what scrubbing and cleaners can correct.
If stains fade, grout holds, and surfaces feel smooth, keep cleaning and sealing.
If grout crumbles, tiles are cracked, or porcelain is deeply etched, plan targeted repairs or full replacement to prevent leaks and restore safety and appearance.
Safety, Tools, and Supplies Checklist
Before you start scrubbing, make sure you’ve planned for safety—open windows or run a fan, wear gloves and eye protection, and cover drains and fixtures.
Gather the right tools for your floor type (brushes, non-scratch pads, squeegee) so you don’t damage surfaces.
Choose cleaners wisely—know when to use acidic, alkaline, enzymatic, or bleach-free alternatives, and consider simple homemade options for gentler maintenance.
Safety precautions (ventilation, PPE, protecting fixtures and drains)
Because many shower cleaners contain strong chemicals and you’ll be working in a confined, wet space, take a few safety steps first: ventilate the bathroom by opening windows and running the exhaust fan, put on gloves, eye protection, and (for strong cleaners) a mask or respirator, and cover fixtures and the drain with tape or a small grate to prevent damage or clogs.
Then rinse spills immediately, avoid mixing products, and keep children and pets out.
Essential tools for every floor type
If you want the job done right and without damage, grab the right tools for your floor type: soft-bristled brushes and nonabrasive pads for tile and vinyl, a nylon scrub brush or pumice stone for textured porcelain, a stiff bristle brush for concrete or stone, and a microfiber mop for gentle finishing.
Also include rubber gloves, eye protection, a bucket, a grout brush or old toothbrush, a sponge, a plastic scraper, and pH-appropriate cleaners (neutral for natural stone, mild alkali for tile/vinyl).
- Pick brushes by surface.
- Protect yourself and drains.
- Rinse and finish with microfiber.
Recommended cleaners and homemade solutions (acidic vs. alkaline, enzymatic, bleach alternatives)
Anyone can get overwhelmed by the range of cleaners, so pick products that match your floor material and the soils you’re tackling: choose acidic for mineral stains, alkaline for soap scum, enzymatic for organic residue, and bleach alternatives for safe brightening. Use gloves and ventilation.
| Type | Best for | Note |
|---|---|---|
| Acidic | Hard water | Avoid on stone |
| Alkaline | Soap scum | Rinse well |
| Enzymatic | Organic | Gentle |
| Oxygen bleach | Whitening | Safer than chlorine |
How to Clean a Shower Floor Step-by-Step (By Material)
Start by clearing the area, pre-wetting the floor, and testing your cleaner on a small spot so you don’t damage the surface.
Then follow material-specific steps: deep-clean tile and grout, use non-abrasive methods for fiberglass and acrylic, use pH-safe cleaners for natural stone, and restore shine on porcelain and enamel.
Work methodically from gentlest to strongest treatments to protect the finish.
Preparing the area (declutter, pre-wet, test spot)
Before you clean, clear everything off the floor and from the shower ledges so you have full access and nothing gets damaged by cleaners; then rinse the surface with warm water to loosen soap scum and grime.
Do a small test spot with your chosen cleaner on an inconspicuous area to confirm it won’t harm the material. Remove mats, curtains, and products; ventilate the room.
Step 1: Tile and grout deep-clean procedure
Start by mixing the right cleaner for your tile—follow label ratios or use a mild bleach solution for mold-prone grout.
Use a stiff brush or grout brush and scrub in small sections, focusing pressure on the grout lines.
Rinse thoroughly with clean water and squeegee or towel-dry to prevent new staining.
Materials and mixing ratios
You’ll need just a few household supplies to deep-clean tile and grout effectively: a stiff nylon brush, a spray bottle or bucket, rubber gloves, goggles, and either a pH-neutral cleaner, diluted bleach, or a baking soda–vinegar paste depending on stain type.
Mix pH-neutral cleaner per label; bleach: 1 cup bleach to 1 gallon water; paste: 3 parts baking soda to 1 part vinegar.
Scrubbing technique and grout-focused tools
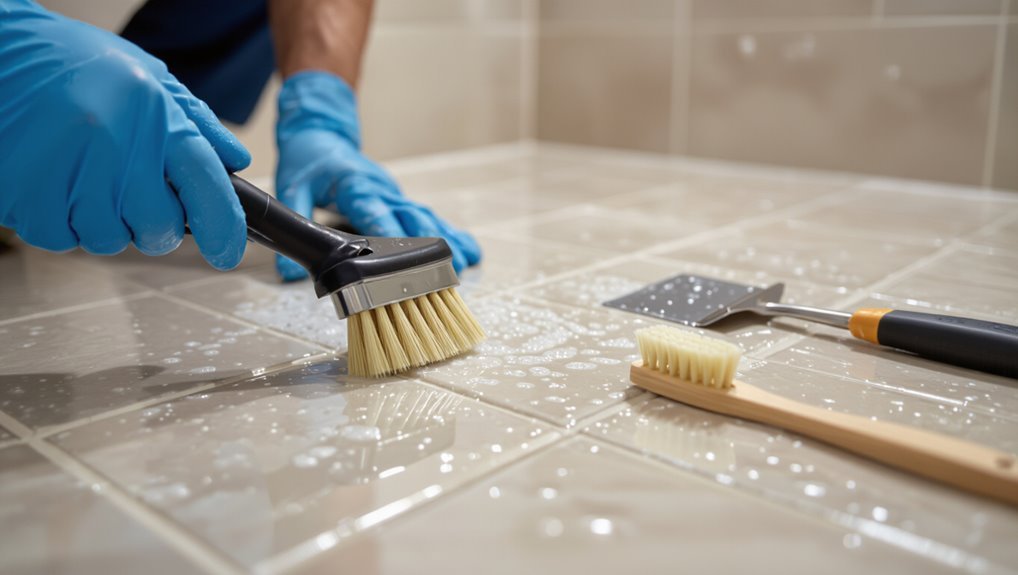
Now that your cleaner or paste is mixed and you’ve got gloves and a brush, focus on technique and the right tools for grout.
Use a stiff nylon brush or grout brush for agitation, and a toothbrush for tight lines.
Work in small sections, scrub along grout lines with firm, consistent strokes, applying extra pressure to stained areas.
Repeat until grout looks even.
Rinsing and drying tips
1. Rinse thoroughly with warm water, starting at the highest point and working toward the drain to flush loosened dirt.
Use a handheld sprayer or bucket and a soft brush to remove residue.
Squeegee the floor to expel excess water, then towel-dry grout lines gently.
Leave ventilation running and doors open until the area is fully dry to prevent mold and streaks.
Step 2: Fiberglass and acrylic non-abrasive method
For fiberglass and acrylic floors you’ll want to use non-abrasive cleaners and a soft buffing technique to avoid dulling the surface.
Start with a gentle, soap-based cleaner or a diluted vinegar solution and work in circular motions with a microfiber cloth or soft sponge.
For stains, apply a paste of baking soda and water or a specialized non-scratch cleaner, let it sit briefly, then rinse and buff—never scrub hard with rough pads.
Safe cleaners and buffing technique
When cleaning fiberglass or acrylic, choose non-abrasive, pH-neutral cleaners—gel formulas or mild dish soap work well—so you don’t dull the surface; avoid bleach, powdered scouring agents, and anything labeled “heavy-duty.”
Apply cleaner, let it sit briefly, then scrub gently with a soft sponge or microfiber pad in circular motions.
Rinse thoroughly, dry with a soft towel, and buff lightly to restore shine.
Stain removal without scratching
Now that you’ve rinsed and buffed the surface, it’s time to tackle stubborn stains without scratching the fiberglass or acrylic.
Apply a paste of baking soda and water, let it sit 10–15 minutes, then gently scrub with a soft nylon brush or microfiber pad.
For persistent marks, use a non-abrasive cleaner or diluted vinegar, rinse thoroughly, and dry to prevent water spots.
Step 3: Natural stone (marble, travertine, slate) pH-safe cleaning
For natural stone like marble, travertine, or slate, don’t use acids or ordinary bathroom cleaners because they can etch the surface.
Use a pH-neutral stone cleaner applied with a soft cloth or mop, working gently to lift grime.
For soap scum and mineral stains, let the cleaner sit briefly then rinse and blot dry, repeating as needed until the stains loosen.
Do not use acids: recommended stone cleaners and application
Although natural stone looks durable, it reacts to acids and harsh cleaners, so don’t use vinegar, lemon, or generic bathroom sprays on marble, travertine, or slate; instead, choose a pH-neutral or stone-specific cleaner and follow the manufacturer’s dilution and application instructions.
Test in an inconspicuous spot, apply with a soft cloth or mop, rinse thoroughly, and dry to prevent water spots and residue.
Removing soap scum and mineral stains on stone
Step 1: deal with soap scum and mineral stains gently—use a pH-neutral stone cleaner or a stone-specific paste so you won’t etch the surface.
Apply cleaner, let sit per directions, then scrub with a soft nylon brush or microfiber pad. Rinse thoroughly and dry.
For stubborn mineral deposits, repeat or use a poultice designed for your stone; avoid acids and abrasive pads.
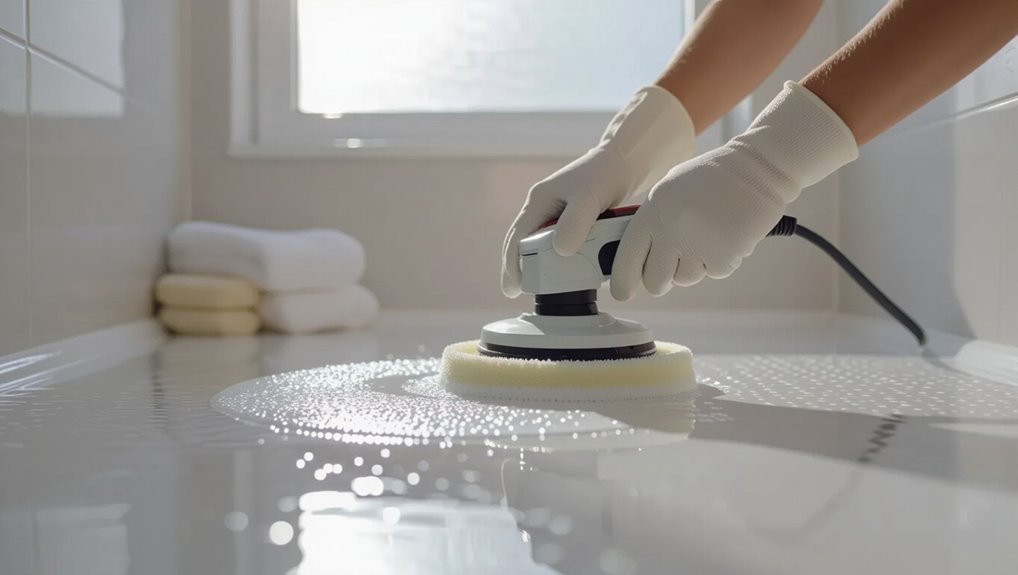
Step 4: Porcelain and enamel restoring shine
For porcelain or enamel, you’ll choose between abrasive and non-abrasive cleaners depending on scratches and stubborn buildup.
Use non-abrasive products or creams for regular maintenance and to keep the factory finish intact, and save mild abrasives or a soft scrubbing pad for dull spots or soap scum that won’t come off otherwise.
Always test a small hidden area first so you don’t accidentally worsen the surface.
Abrasive vs. non-abrasive options and when to use them
When you’re restoring shine to porcelain or enamel, choosing between abrasive and non‑abrasive cleaners matters because the wrong option can scratch or dull the finish.
Use non‑abrasive cleaners (mild detergent, baking soda paste, diluted vinegar) for regular maintenance and light stains.
Save abrasive pads or powders for heavy mineral buildup, testing an inconspicuous spot first.
Always rinse thoroughly and dry to prevent streaks and damage.
Step 5: Deep mold and mildew remediation
If you spot stubborn black or green spots, you’ll need stronger cleaners like diluted bleach, hydrogen peroxide, or a labeled mold remover—use them with gloves, ventilation, and the manufacturer’s instructions.
Test any product on a hidden area first and never mix bleach with ammonia or acids.
If mold covers large areas, keeps returning, or has penetrated grout and wall seams, call a professional to assess and remediate.
Use of bleach, hydrogen peroxide, or specialty mold cleaners safely
Although strong cleaners like bleach, hydrogen peroxide, and commercial mold removers work fast, you’ll need to use them carefully to protect yourself, the shower surface, and nearby grout or caulk.
Ventilate, wear gloves and eye protection, test an inconspicuous spot, dilute per label, avoid mixing chemicals, apply briefly, rinse thoroughly, and repeat only if stains persist to prevent damage.
When to call a professional for mold infestation
Wondering whether you can handle a mold problem on your own?
If mold covers more than 10 square feet, returns after cleaning, or hides in grout, behind tiles, or under flooring, call a professional.
Also hire one if you have asthma, allergies, or weakened immunity.
Pros assess structural damage, use containment, and apply commercial remediation to protect your health and prevent recurrence.
Targeted Treatments for Specific Problems
When a specific issue crops up—hard water buildup, soap scum, rust, grout yellowing, or small chips and etching—you’ll need targeted fixes rather than a general cleaner.
You’ll learn which products and techniques work best for mineral deposits, greasy residue, metal stains, stubborn grout, and surface repairs.
Follow the right steps and you’ll restore both appearance and function without wasting time or damaging the floor.
Removing hard water stains and mineral deposits
If you’ve noticed chalky white rings or cloudy patches on your shower floor, those are mineral deposits from hard water and they need specific treatments to come off effectively.
Use vinegar or a citric acid solution, let it sit, then scrub gently. Follow with a rinse and dry.
- Apply acid solution
- Soak briefly
- Scrub and rinse
Eliminating soap scum and body oil layers
After tackling hard water rings, you’ll likely still see a filmy buildup from soap and body oils that needs a different approach.
Mix equal parts white vinegar and warm water or use a commercial soap-scum remover.
Spray, let sit 5–10 minutes, scrub with a nonabrasive brush or sponge, then rinse thoroughly.
Repeat stubborn spots and dry to prevent recurrence.
Lifting rust stains and metal discoloration
Though rust and metal stains often look permanent, you can usually lift them with the right acidic or chelating cleaner and a little elbow grease.
Pick a product labeled for rust or iron stains, test a small area, apply, let sit per instructions, scrub with a nylon brush, rinse thoroughly, and repeat if needed.
Protect surrounding finishes and ventilate the space.
Tackling stubborn grout stains and yellowing
When grout darkens or turns yellow, you can usually restore its original color with targeted cleaning and a little patience.
Start by identifying whether the problem is surface dirt, soap scum, mold, or mineral buildup so you choose the right treatment.
Use bleach or hydrogen peroxide for mold, a baking soda paste for stained grout, and a vinegar rinse for mineral deposits—scrub with a stiff brush.
Repairing minor chips, scratches, and etching
Fix small chips, scratches, and etching with targeted repairs so they don’t worsen or become breeding grounds for grime.
Assess the surface: porcelain, tile, or acrylic. Use color-matched repair kits for chips, fine-grit sanding and polishing for light etching, and epoxy or filler for deeper damage.
Follow product instructions, let cures fully set, then seal or reseal to protect and blend repairs.
Tools and Cleaner Comparison Guide
Now you’ll compare manual tools and powered scrubbers to see which fits your elbow grease, budget, and floor material.
You’ll also weigh store-bought cleaners against DIY solutions for effectiveness and safety, including fumes and surface compatibility.
Use this guide to pick the easiest, safest combo for your shower.
Manual tools vs. powered scrubbers pros and cons
Although both manual brushes and powered scrubbers can get your shower floor clean, they offer different trade-offs in effort, cost, and control. You’ll choose based on stamina, budget, and surface sensitivity. Manual gives precision and low cost; powered saves time but can be rough.
| Manual | Powered |
|---|---|
| Low cost | Faster |
| More control | Higher cost |
| Gentler | Labor-saving |
| Requires effort | Potential surface wear |
Store-bought cleaners vs. DIY solutions effectiveness and safety
When choosing between store-bought cleaners and DIY solutions, weigh effectiveness, safety, and convenience so you get the best result for your shower floor. You’ll find commercial products often remove grime faster but can be harsher; DIY mixes are gentler and cheaper but need testing. Pick based on stain type, ventilation, and surface compatibility.
| Option | Notes |
|---|---|
| Store-bought | Fast, potent, read labels |
| DIY | Mild, inexpensive, test first |
| Safety | Ventilate, gloves, avoid mixes |
| Effectiveness | Match product to stain type |
Common Cleaning Mistakes to Avoid
Don’t use a cleaner that’s incompatible with your shower’s material, or you could stain or etch the surface.
Don’t over-scrub—too much force can damage finishes—and never mix chemicals, which creates dangerous fumes.
Always rinse thoroughly to remove residue that can attract dirt or harm sealants.
Using the wrong cleaner for the material
If you grab a cleaner meant for a different surface, you can damage tile, grout, stone, or acrylic without realizing it.
Check labels and pH levels before using anything. Acidic cleaners eat natural stone; bleach can discolor grout and weaken sealers; abrasive powders scratch acrylic.
Use products specified for your shower material, test in an inconspicuous spot, and follow manufacturer guidance.
Over-scrubbing and causing surface damage
Although it feels like elbow grease will speed things up, over-scrubbing can wear away grout, scratch tiles, and dull finishes—especially on softer materials like acrylic or natural stone.
You should use soft brushes or microfiber, apply gentle pressure, and let cleaners soak to lift grime.
Inspect frequently; stop when stains loosen. Reseal grout or stone if you see wear to protect surfaces.
Mixing chemicals and safety hazards
When you mix cleaners without checking labels, you can create toxic gases or reactions that put your health and home at risk; always read ingredients and never combine products like bleach and ammonia.
Use one product at a time, ventilate the bathroom, wear gloves and eye protection, and store chemicals safely.
If unsure, consult the label or manufacturer before use.
Neglecting proper rinsing and residue removal
Because leftover cleaner can build up quickly, failing to rinse and remove residue leaves your shower floor slippery, discolored, and prone to grime.
After scrubbing, rinse thoroughly with warm water, using a sponge or mop to lift suds and loosened dirt.
Dry the surface with a microfiber cloth or squeegee to prevent streaks and mineral deposits that attract buildup.
Prevention and Maintenance Plan to Keep Floor Looking New
Keep a simple routine so your shower floor stays like new: do quick weekly cleans and a monthly deeper scrub, plus seasonal deep-clean checks.
Protect surfaces with the right treatments—sealers, grout sealer, or anti-slip coatings—and apply them per product instructions.
Adopt daily habits like squeegeeing, drying, and running ventilation to cut soap scum and mildew buildup.
Weekly and monthly cleaning routines
Although a deep scrub is only occasional, a simple weekly routine and a short monthly tune-up will prevent buildup and keep your shower floor looking new.
You should:
- Wipe and squeegee after each use; weekly scrub with a mild cleaner.
- Rinse grout lines and spot-clean soap scum.
- Monthly: deep-clean grout and rinse thoroughly, letting floor dry before use.
Protective treatments: sealers, anti-slip coatings, grout sealer when and how to apply
When you want to extend the life and safety of your shower floor, protective treatments like sealers, anti-slip coatings, and grout sealers are the most effective tools.
Applied correctly, they repel water, reduce staining, and improve traction without changing the look of your tile.
Test a small area, clean and dry thoroughly, then follow manufacturer instructions—usually apply evenly, allow full cure, and reapply grout sealer yearly.
Daily habits that reduce buildup (drying, squeegeeing, ventilation)
If you dry the shower floor after each use, you’ll stop soap scum and mineral deposits from setting in and make weekly cleaning much easier.
Squeegee walls and floor, then towel any wet corners. Leave the door or curtain open and run an exhaust fan for 20–30 minutes to cut humidity.
Wipe down fixtures quickly; small daily actions prevent stubborn buildup and save time.
Seasonal deep-clean schedule
Daily maintenance keeps most grime away, but a seasonal deep-clean schedule will prevent stubborn buildup and keep your shower floor looking new year-round.
Every three months, scrub grout with a brush and grout cleaner, descale fixtures, and apply a tile-safe cleaner.
Annually, reseal grout and inspect caulking.
Mark calendar reminders, gather supplies ahead, and tackle tasks consistently to avoid major restoration.
Cost, Time, and When to Hire a Pro
Estimate how much time and money you’ll spend on a DIY deep clean versus hiring a pro so you can weigh labor, materials, and service fees.
If you see persistent stains, cracked grout, or surface wear that cleaning won’t fix, consider refinishing or replacing instead of repeating treatments.
When you do hire someone, check reviews, ask for before-and-after photos, verify licensing and insurance, and get a written estimate.
Estimated time and cost for DIY vs. professional deep cleaning
Expect to spend anywhere from 1 to 4 hours on a DIY deep clean—depending on grime level, tile type, and drying time—and about 2–6 hours for a professional team to complete the job. You’ll pay roughly $10–$60 for supplies DIY, or $150–$400+ for pros. Choose DIY for savings; hire pros for stubborn buildup or time constraints.
| Option | Time | Cost |
|---|---|---|
| DIY basic | 1–2 hrs | $10–$30 |
| DIY deep | 2–4 hrs | $30–$60 |
| Professional | 2–6 hrs | $150–$400+ |
Signs it’s time to replace or refinish instead of clean
If stains, grout erosion, or cracks keep coming back despite repeated deep cleans, it’s likely time to refinish or replace rather than keep scrubbing—especially if the floor is uneven, the waterproofing’s compromised, or mold keeps returning.
Consider cost vs. longevity: refinish costs less but may be temporary; replacement is pricier yet permanent.
Hire a pro if structural or waterproofing repairs are needed.
How to choose a reputable cleaning or refinishing service
When recurring stains, eroding grout, or persistent mold suggest refinishing or replacement, the next step is finding a reputable service that matches your budget and timeline.
Check licenses, read reviews, and request written estimates. Ask about materials, warranties, and cleanup time. Prioritize transparency and references.
- Compare quotes
- Verify insurance
- Confirm timeline and warranty
FAQ Fast Answers to Common Questions
You’ve probably got quick questions—like whether vinegar is safe, how often to reseal grout or stone, and what actually removes stubborn black mold.
You’ll also want to know if bleach will damage your shower floor and how to make it non-slip without ruining the look.
Below are brief, practical answers to those common concerns.
Can I use vinegar on my shower floor?
Curious whether vinegar’s safe and effective for your shower floor? You can use white vinegar on ceramic, porcelain, and glazed tiles to remove soap scum and mineral deposits.
Don’t use it on natural stone, marble, travertine, or sealed grout—acid can etch or degrade surfaces.
Always test a small area, dilute with water for routine cleaning, and rinse thoroughly afterward.
How often should I reseal grout or stone?
How often should you reseal grout or stone?
You should reseal grout every six to twelve months in high-traffic or wet areas and every one to two years elsewhere.
Natural stone typically needs sealing annually, though some stones last longer.
Test by sprinkling water—if it soaks in, reseal.
Wipe surfaces dry before applying a quality sealer and follow manufacturer instructions.
What removes stubborn black mold from grout?
When stubborn black mold appears in grout, tackle it quickly with a targeted cleaner and a stiff brush to prevent spread and staining.
Apply a commercial mold remover or a hydrogen peroxide spray, let it sit, scrub firmly, then rinse.
For persistent spots, repeat treatment or use a grout-specific cleaner.
Dry thoroughly and improve ventilation to discourage regrowth.
Will bleach ruin my shower floor?
If you used bleach to attack that black mold, you might be wondering whether it can damage your shower floor.
Bleach can harm grout, fade colored tile, and degrade some sealants if overused or left standing.
Dilute properly, rinse thoroughly, ventilate, and test a hidden spot first.
For porous surfaces, opt for milder cleaners to protect finish and longevity.
How can I make my shower floor non-slip without losing appearance?
Want a safer shower without ruining its look? You can add traction discreetly: apply clear anti-slip coatings or a textured, low-profile epoxy sealer, or use transparent adhesive grip strips cut to size.
Regularly clean treatments to keep them invisible. For temporary needs, choose clear suction-mat options.
Test products on a small area to confirm finish and color match before full application.
Final Checklist Before You Finish
Before you call the job done, walk the shower and check for missed spots, residue, or damaged grout.
Apply any final conditioners or protective coatings per the product instructions to preserve the finish.
Take photos, note what you did, and set a date for the next maintenance so the floor stays in top shape.
Post-clean inspection steps
Ready for a final once-over? Check drain flow, grout lines, and all corners for leftover residue or damp spots.
Run water briefly to confirm even drainage and no suds remain.
Inspect caulk for gaps or looseness, and test non-slip areas for texture.
Wipe fixtures and surrounding tiles, then note any spots needing touch-up before you declare the job complete.
Final conditioning and preventive coatings
Seal and protect: once the floor is clean and dry, apply final conditioning and preventive coatings to lock in your work and slow future grime buildup.
Choose products suited to your surface and follow manufacturer directions. Let cures complete before use.
- Apply sealant evenly.
- Treat grout with a protector.
- Use a non-slip finish if needed.
How to document results and schedule next maintenance
Document your results and set the next maintenance date so you don’t lose track of the work you’ve just done.
Take photos, note products used, concentrations, and any repairs. Record the date, observed issues, and recommended frequency.
Add a reminder to your calendar and label supplies with their next-use dates.
This log makes future cleanings quicker and prevents grime recurrence.