How to Install a Floating Floor Without Calling a Contractor
You can install a floating floor yourself by prepping the subfloor, acclimating planks 48 hours, and using a click-lock system with underlayment and spacers. Check for level, moisture, and damaged boards, then start the first row straight, stagger seams, and cut edges with a miter or jigsaw. Finish with thresholds and trim, maintain expansion gaps, and clean spills promptly to avoid damage. Keep going to get step-by-step tips, tool lists, and troubleshooting.
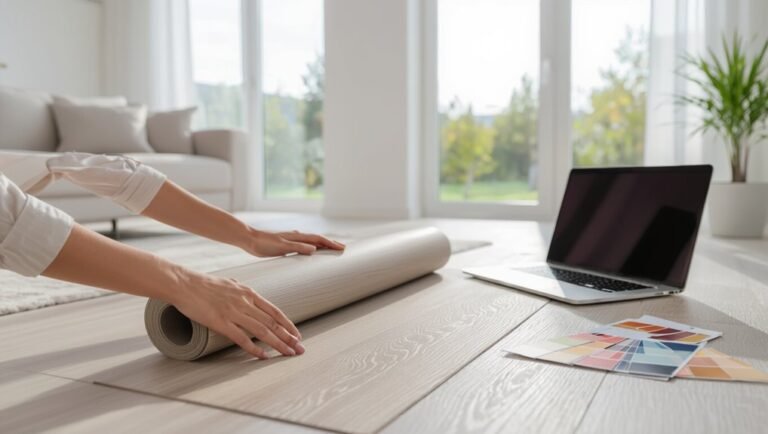
Can You Install a Floating Floor Yourself?
You can often install a floating floor yourself if you’re reasonably handy and have basic carpentry skills.
Expect to spend a weekend for a medium room and to use simple tools like a saw, spacers, tapping block, and pull bar.
If your subfloor is uneven or you’re uncomfortable with measurements and cuts, hiring a pro might save time and mistakes.
Short summary of feasibility, time, tools, and skills required
If you’ve ever handled basic DIY projects, installing a floating floor is usually within reach — most homeowners can do it themselves with modest patience and attention to detail.
You’ll ask how do you install a floating floor: expect a weekend for a single room, basic tools (saw, spacers, tapping block, underlayment), moderate skill, careful measuring, and safe lifting.
What Is a Floating Floor and Why Choose It?
A floating floor is a plank system that locks together and rests on the subfloor instead of being nailed or glued down, so you’ll notice different installation and movement behavior than with traditional floors.
It’s often cheaper, easier to install yourself, and simple to repair or replace individual boards, though some materials can feel less solid and may be less suitable for every room.
Common floating options include laminate, engineered hardwood, and luxury vinyl, each offering different looks, durability, and price points.
Definition and how it differs from nailed/glued floors
Because it rests above the subfloor and locks together instead of being nailed or glued down, a floating floor offers a distinct installation method that’s faster and more forgiving than traditional nailed or glued floors.
You simply fit planks with click-lock or tongue-and-groove joints over underlayment. It moves slightly with humidity, is removable, and avoids penetrating the subfloor like nailed or glued systems.
Pros and cons (cost, DIY-friendliness, repairability)
When you weigh the benefits and trade-offs of a floating floor, you’ll find it’s often the most cost-effective and DIY-friendly option for many homeowners.
- Lower upfront cost versus glued/nail-down.
- Easier DIY installation with click systems.
- Faster replacement of damaged planks, though full matches can be tricky.
- Susceptible to moisture and subfloor issues; repairs may require partial lifts rather than spot fixes.
Common materials for floating floors (laminate, engineered hardwood, luxury vinyl)
If cost, ease of installation, and repairability guided your choice, next you’ll want to pick the right material—each floating-floor type brings different looks, durability, and moisture performance.
| Material | Strength |
|---|---|
| Laminate | Affordable, scratch-resistant |
| Engineered hardwood | Real wood looks, refinishing limits |
| Luxury vinyl | Waterproof, flexible installation |
| Choose based on traffic, moisture, and budget to match your needs.
How to Prepare Before You Start
Before you begin, check your subfloor for level, damage, and moisture—concrete and wood have different prep and vapor requirements.
Measure the room carefully and calculate extra boards, then gather a tools-and-materials checklist so you don’t stop mid-project.
Finally, pick the correct underlayment and junction pieces for your floor type and traffic needs.
Assessing subfloor condition and moisture (concrete vs. wood)
Start by inspecting the subfloor for level, damage, and moisture—concrete and wood behave differently, so you’ll need to test and address each accordingly.
For concrete, perform a moisture test and patch cracks; use a vapor barrier if needed.
For wood, check for rot, squeaks, and loose boards; repair, replace, or reinforce.
Verify the surface is clean, dry, and flat before proceeding.
Measuring the room and calculating material needs
With the subfloor checked and repaired, move on to measuring the room and calculating how much material you’ll need.
Measure length and width, include alcoves, and note irregular shapes. Calculate area, add 10% for waste, and verify plank dimensions.
Record totals and sketch layout to minimize joins.
- Measure room accurately
- Include obstacles
- Add 10% waste
- Sketch layout and totals
Tools and materials checklist
Once you’ve confirmed measurements and inspected the subfloor, gather the essential tools and materials so you won’t interrupt the job to run to the store.
You’ll need durable items and safety gear; organize them nearby before starting.
- Tape measure, chalk line, carpenter’s square
- Saw (miter or jigsaw), tapping block, pull bar
- Spacers, hammer, utility knife
- Safety glasses, knee pads, vacuum
Choosing the right underlayment and transitions
Before you lay a single plank, pick an underlayment and switch pieces that match your flooring type, subfloor conditions, and traffic patterns.
Choose foam or cork for sound and comfort, vapor barrier for concrete, and dense pads for uneven subfloors.
Match transition strips to height and finish at doorways and thresholds.
Buy reducers, T-moldings, and end caps for smooth, durable joins.
Step-by-Step Installation Guide
Now you’ll follow a clear sequence to get the floor down correctly: acclimate and plan your layout, make sure the subfloor is flat, and roll out underlayment and a moisture barrier.
Start the first row straight while keeping a consistent expansion gap, then lock in subsequent rows and stagger seams for stability and appearance.
Take each step methodically and you’ll avoid common mistakes.
Step 1 Acclimate the flooring and plan layout
Start by letting your new flooring sit in the room where it’ll be installed for at least 48 hours so it can acclimate to the temperature and humidity; this prevents future gaps or buckling.
Measure room dimensions, note doorways and vents, and sketch a layout.
Decide direction of planks for best appearance, calculate rows to avoid narrow edge strips, and order extra pieces.
Step 2 Prepare and level the subfloor
Because a flat, clean subfloor is the foundation of a durable floating floor, inspect the surface carefully for high spots, low spots, debris, and moisture issues before you lay anything down.
Remove loose material, sweep and vacuum thoroughly, and repair cracks or gaps with appropriate filler.
Sand high spots and use a self-leveling compound where needed so the surface is smooth, solid, and dry.
Step 3 Install underlayment and moisture barrier
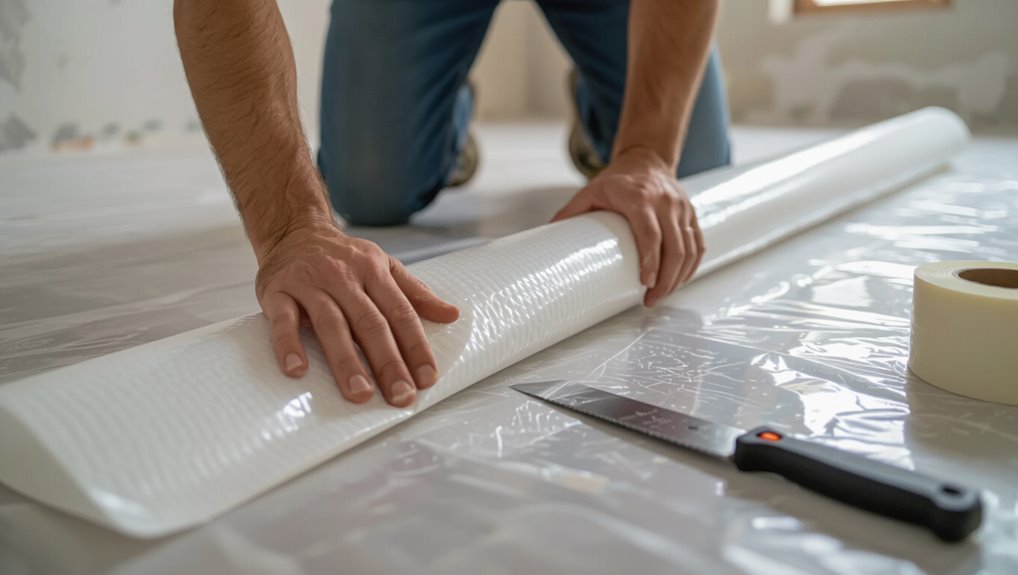
Before you lay planks, install the underlayment and a moisture barrier to cushion the floor, reduce noise, and protect against dampness; choose the right materials for your subfloor and follow manufacturer instructions so seams are sealed and the surface is smooth and continuous.
Roll out, trim to fit, tape seams, and overlap vapor barriers as recommended. Smooth wrinkles and keep edges clean for plumbing penetrations.
Step 4 First row: starting straight and maintaining expansion gap

With the underlayment and moisture barrier in place, you’ll lay the first row of planks along the longest, straightest wall so the floor looks balanced and the tongue faces the room.
Use spacers to keep a consistent expansion gap at the wall, trim the final plank to fit, and check alignment frequently so the row remains straight before you lock in subsequent rows.
Step 5 Locking subsequent rows and staggering seams
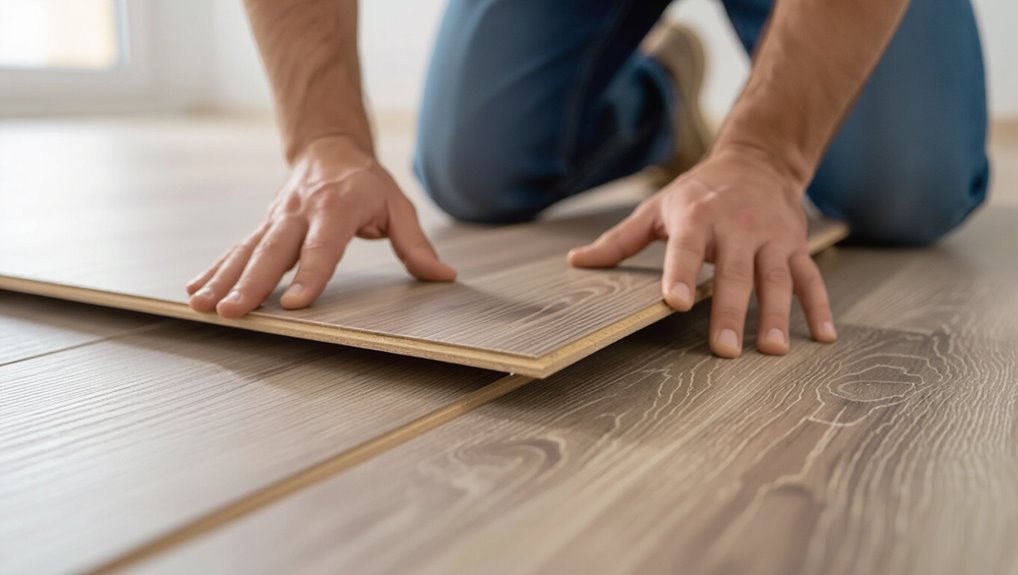
Begin the next row by angling the tongue of the plank into the groove of the installed row and press down or tap it gently until it locks; continue this tongue-and-groove motion across the room, keeping each new plank snug against the previous one.
Stagger end joints at least 6-8 inches from adjacent rows, using varied plank lengths for a natural look, and check alignment frequently.
Step 6 Cutting boards for edges and doorways (tools and techniques)
Now that rows are locked and seams staggered, you’ll measure and cut planks to fit along walls, around doorways, and against cabinets.
Use a tape measure, pencil, and carpenter’s square for accurate marks. Cut with a jigsaw for curves and door jambs, a miter saw for straight end cuts, and a pull saw or utility knife for delicate trimming.
Test-fit before installing.
Step 7 Installing transitions, thresholds, and trim
Finish the look by installing connectors, thresholds, and trim that bridge gaps, protect edges, and give the floor a polished edge.
Measure openings, cut profiles to fit, and dry-fit pieces. Secure junction strips with manufacturer-recommended fasteners or adhesive, leaving required expansion space.
Snap or nail baseboards and quarter-round trim without pinching the floor. Caulk gaps where needed for a clean, finished appearance.
Step 8 Final inspection and clean-up
After you’ve installed changes and trim, do a thorough final inspection and clean-up to confirm the floor looks great and performs properly.
Walk the room, check seams, expansion gaps, and connections. Tighten loose trim, replace damaged planks, and make sure appliances or cabinets clear expansion space.
Vacuum, mop with manufacturer-approved cleaner, and remove debris.
Document issues and enjoy your finished floor.
Time, Cost, and Labor Estimates
You’ll generally finish a typical room faster as your skill increases—expect a novice to take a full day while an experienced DIYer can often finish in a few hours.
Budget for materials (planks, underlayment, trim), plus tool costs whether you’re renting or buying, and add a cushion for extras like connecting pieces or underfloor repair.
Factor labor if you’re hiring help—hourly rates and crew size will change both time and total cost.
Typical time per room by skill level
While your exact time will depend on room size and prep, a straightforward bedroom or living room typically takes a novice a full weekend (8–12 hours) to complete.
An intermediate DIYer about 4–6 hours, and an experienced installer 2–3 hours.
You’ll pace tasks: prep, installation, trim. Visualize workflow:
| Stage | Typical duration |
|---|---|
| Prep | 1–3 hours |
| Install | 2–8 hours |
| Finish | 0.5–1 hour |
Cost breakdown: materials, tools rental/purchase, extras
A clear cost breakdown helps you budget the project and avoid surprises.
Estimate materials (planks, underlayment, trim) per room; expect $1–$6/sq ft for laminates, $3–$10 for engineered wood.
Factor tools: buy a pull bar, spacers, saws, or rent a flooring saw ($20–$60/day).
Add adhesives, underlayment, and contingency (10–15%).
Track receipts and adjust as needed.
Common Problems and How to Fix Them
You’ll likely run into gaps, buckling, squeaks or clicking noises, and uneven seams or floor appearance if installation or acclimation wasn’t right.
Learn how to spot and fix those issues, plus what to do about moisture damage and cupping before they get worse.
I’ll walk you through practical checks and fixes so you can keep the floor stable and looking even.
Gaps, buckling, squeaks, and clicking noises
If your floating floor is developing gaps, buckling, squeaks, or clicking, you can usually fix each issue with targeted steps that address movement, moisture, or installation errors.
Tighten loose boards, add or replace underlayment, releasably lift and re-lock planks with proper expansion gaps, control humidity, and secure connections.
For persistent squeaks, apply silicone or talc to joints or use adhesive at problematic seams.
Uneven seams or uneven floor appearance
Uneven seams and an irregular floor surface often show up after you’ve fixed gaps, buckling, or squeaks, because small alignment or underlayment problems can become more obvious once the floor settles.
Check for loose planks, misaligned click joints, or uneven subfloor areas. Relock or replace affected planks, sand high spots in plywood underlayment, and add thin underlayment shims to level minor low spots.
Handling moisture damage and cupping
Because floating floors sit above the subfloor, moisture can warp planks and cause cupping if you don’t control humidity and water exposure.
Start by identifying the moisture source and extent of damage. Dry the area, fix leaks, and raise ventilation.
Replace severely cupped planks and acclimate new boards. Use a moisture barrier and maintain 30–50% indoor humidity to prevent recurrence.
Mistakes to Avoid When Installing a Floating Floor
Don’t skip acclimating your boards or testing for moisture, because trapped humidity will warp the floor.
Make sure you leave proper expansion gaps and install correct joints so the planks can move without buckling.
Prepare the subfloor properly and choose the right underlayment — poor prep or the wrong padding causes squeaks and uneven wear.
Skipping acclimation or moisture testing
If you skip acclimating your planks or testing for moisture, you’re risking buckling, warping, or gaps once the floor settles into its environment.
Let materials sit in the room 48–72 hours and use a moisture meter on subfloor and planks.
Follow manufacturer tolerance specs; remediate high moisture or wait longer.
Proper prep prevents costly repairs and preserves warranty coverage.
Ignoring expansion gaps or improper transitions
When you skip proper expansion gaps and skimp on changes, the floor has nowhere to move as temperatures and humidity change, which leads to buckling, popping seams, or gaps along walls and doorways.
You need consistent perimeter gaps, correct gap sizes per manufacturer, and proper connector strips at thresholds.
Measure, mark, and install connectors flush to prevent stress and noisy, uneven joints.
Poor subfloor preparation and incorrect underlayment
Because the floating floor sits on whatever’s beneath it, you need a flat, clean subfloor and the correct underlayment or you’ll pay for it with squeaks, uneven seams, and premature wear.
Check for level, remove debris, repair dips, and guarantee moisture barriers where needed.
Choose underlayment compatible with your product for sound control and moisture protection to extend performance and avoid callbacks.
Best Practices and Pro Tips for a Professional-Looking Result
Plan your layout and stagger seams so boards fall straight and joints don’t line up, and measure twice before cutting.
Use efficient cuts and simple tool shortcuts—like a jigsaw for obstacles and a snap cutter for straight runs—to save time and reduce waste.
Finish with clean trim, quarter round, and proper door clearances to hide gaps and guarantee smooth operation.
Layout planning and seam staggering strategies
If you want a professional-looking floating floor, start by mapping your room and marking a clear layout line so seams fall in natural, low-traffic areas; staggering end joints at least 8–12 inches between adjacent rows and offsetting seams from doorways will minimize visual repetition and boost stability.
Plan row widths to avoid narrow final strips, align plank grain for flow, and maintain consistent expansion gaps.
Efficient cutting techniques and tool shortcuts
With your layout set and seams staggered, you’ll save time and get cleaner edges by using the right cuts and a few smart shortcuts.
Score and snap planks where possible, use a pull bar for tight end cuts, and a jigsaw for notches.
Mark clearly, cut slowly, and clamp guides for straight rip cuts.
Keep a sharp blade and measure twice.
Finishing touches: trim, quarter round, and door adjustments
Three final touches—baseboard trim, quarter round, and door clearances—turn installed planks into a finished floor; handle each with care to hide expansion gaps and guarantee smooth changes.
Install baseboards to sit over the gap, nail into wall studs, not flooring.
Add quarter round where baseboard won’t meet.
Trim door bottoms so doors swing freely over new height, test before finishing.
When to Call a Professional
If your subfloor has hidden damage, severe unevenness, or signs of moisture intrusion, call a pro so the problem’s diagnosed and fixed correctly.
You should also consider professional help for very large rooms, difficult changes, or when your warranty requires certified installers.
A pro can save time and protect your investment when the job goes beyond basic DIY.
Complex subfloor issues, severe unevenness, or moisture intrusion
When your subfloor has widespread dips, soft spots, or signs of water damage, don’t assume a DIY fix will hold—call a pro.
Experts can assess structural rot, mold, hidden leaks, or compromised joists and recommend repairs or moisture mitigation. You’ll avoid repeated failures, ruined flooring, and health risks.
Hire a qualified contractor or structural specialist when issues exceed simple leveling or patching.
Large rooms, uneven transitions, or warranty requirements
Because large rooms and multiple-level shifts raise the complexity of a floating-floor install, you should consider a professional if the space exceeds about 400–500 square feet, has several doorways or elevation changes, or if the floor manufacturer’s warranty requires certified installers.
A pro guarantees correct expansion joints, smooth shifts, and warranty compliance, saving time, preventing costly mistakes, and preserving your floor’s performance and appearance.
FAQ
You probably have a few quick questions — like whether you can install over existing flooring, how big the expansion gap should be, and if the floor can be sanded or refinished.
You might also wonder if a floating floor works in a bathroom or basement and how to clean and maintain it.
Below are concise answers to help you decide and care for your new floor.
Can I install a floating floor over existing flooring?
Wondering if you can lay a floating floor over what’s already down? Yes, often you can—over vinyl, tile, or well-adhered hardwood—if the surface is flat, dry, and secure.
Remove loose material, fix squeaks, and use appropriate underlayment for moisture and cushioning.
Avoid installing over carpet, warped boards, or damp subfloors; those need removal or repair first.
How much expansion gap do I need?
How much space should you leave around the edges?
Leave a 1/4 to 3/8 inch gap for most laminate and engineered wood; wider rooms or greater humidity shifts may need 1/2 inch.
Follow manufacturer specs.
Keep gaps at doorways, around pipes, and at junctions.
Use spacers during installation and cover gaps with baseboards or trim, avoiding nailed connections to the floor.
Can floating floors be sanded or refinished?
Can a floating floor be sanded or refinished? Most floating floors—vinyl, laminate, and some engineered wood—aren’t designed for sanding because wear layers are thin or decorative.
You can refinish engineered planks only if they’ve a thick real-wood top layer.
Instead, repair by replacing damaged boards or use surface treatments recommended by the manufacturer to restore appearance without sanding.
Will a floating floor work in a bathroom or basement?
Curious whether a floating floor will suit a bathroom or basement? You can use water-resistant luxury vinyl or engineered planks in bathrooms if seams and connections are well sealed; avoid solid hardwood.
Basements work if subfloor is dry, level, and you install a vapor barrier and suitable underlayment. For higher moisture, choose waterproof products and follow manufacturer guidelines to prevent warping and mold.
How do I clean and maintain a floating floor?
Keep dirt and moisture off a floating floor and it’ll last far longer—sweep or vacuum regularly with a soft-brush attachment, wipe up spills immediately, and use damp (not wet) mops with a cleaner recommended by the manufacturer.
Protect surfaces with felt pads on furniture, area rugs in high-traffic zones, and avoid steam cleaners or abrasive products.
Check expansion gaps and door clearances periodically.