How to Insulate a Concrete Floor and Stop Cold From Creeping up
You can stop cold creeping up through a concrete floor by adding insulation, moisture control, and tight seals. Start by testing for moisture, then lay a vapor barrier and rigid foam or an insulated subfloor; tape seams and seal edges with low-expansion foam. For basements or slabs, consider under-slab insulation or an insulated floating subfloor and fix cracks first. Finish with proper flooring and ventilation for lasting warmth—keep going for step-by-step methods, materials, and costs.
How to Insulate a Concrete Floor and Stop Cold from Creeping Up
To stop cold from creeping up through a concrete floor, you’ll usually get the best results by installing a continuous layer of rigid foam insulation beneath or over the slab and sealing all joints and edges.
Insulate when you feel persistent floor chill, see high energy bills, plan to finish a basement, or if the slab sits directly on cold ground with no crawlspace.
Start by evaluating your situation and pick a method that balances cost, moisture control, and planned use.
Best Overall Approach in Brief
One clean strategy stops cold from creeping up through a concrete slab: create a continuous thermal break between the slab and your living space by adding rigid insulation and a proper vapor barrier before finishing the floor.
To answer how do I insulate a concrete floor, layer rigid foam, tape seams, install a vapor barrier, then finish with subfloor or flooring for lasting warmth and moisture control.
When to Insulate a Concrete Floor (Signs and Situations)
If your concrete floor feels cold underfoot, shows persistent dampness, or transfers noticeable chill into adjoining rooms, it’s time to contemplate insulation; these signs—cold floors, high energy bills, condensation, or uncomfortable rooms above basements and slabs—indicate heat is leaking through the slab and a thermal break is needed to stop it.
Act when occupants complain, HVAC runs too long, or renovation exposes the slab; insulate then.
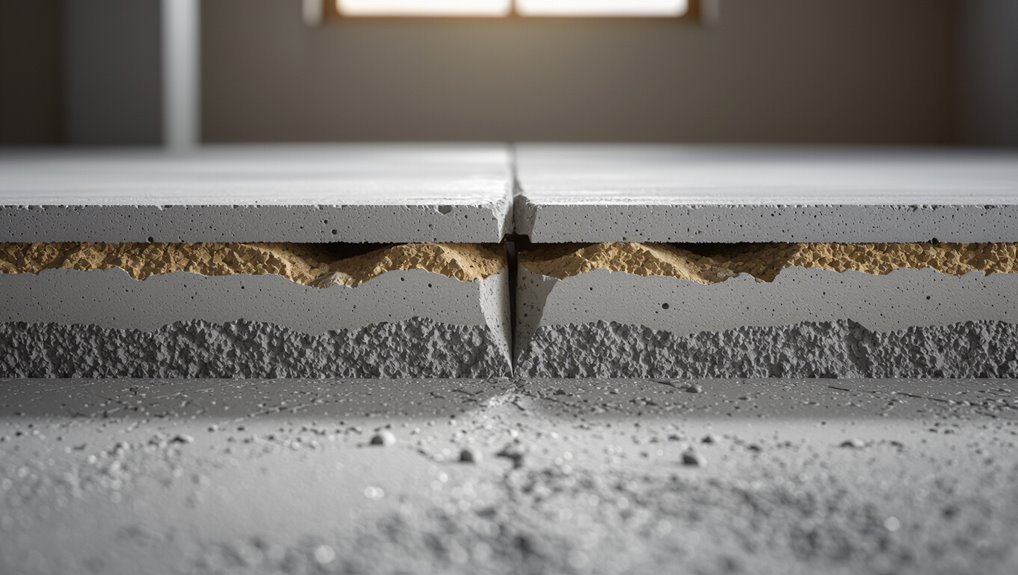
Basic Understanding Why Concrete Floors Get Cold and Heat Loss Mechanics
Concrete pulls heat away from your feet through its thermal mass, direct conduction to colder ground, and even moisture wicking up by capillary action.
You’ll want to understand R-value (how well a material resists heat flow) and U-value (how much heat actually passes through the whole floor assembly) because they determine how effective insulation will be.
Also remember moisture and vapor movement can lower insulation performance and cause issues unless you manage them with proper barriers and drainage.
How Concrete Transfers Cold (thermal mass, conduction, capillary rise)
Because it sits in direct contact with cold ground and air, a slab pulls heat away from your living space through conduction, thermal mass effects, and moisture-driven capillary action.
Concrete conducts heat fast, so warm indoor air and objects lose energy on contact. Its high thermal mass stores cold, prolonging chill.
Moisture wicks ground cold upward, lowering surface temperature and increasing heat loss.
R-Value, U-Value, and Why They Matter for Floors
When you feel a cold slab underfoot, that’s heat flowing from the warm interior to the colder ground — and R-value and U-value tell you how fast that happens.
R-value measures insulation’s resistance; higher R slows heat loss. U-value is overall heat transfer rate; lower U means better performance.
For floors, aim for high R and low U to keep interiors warmer and reduce energy waste.
Moisture, Vapor, and Their Impact on Insulation Performance
R-values and U-values tell you how well insulation resists and conducts heat, but moisture and vapor control determine whether that insulation can actually perform as rated.
If vapor drives into or condenses within the insulation, it loses R-value and promotes mold.
You should install a continuous vapor barrier, guarantee drainage under slabs, and ventilate or dehumidify crawlspaces to keep insulation dry.
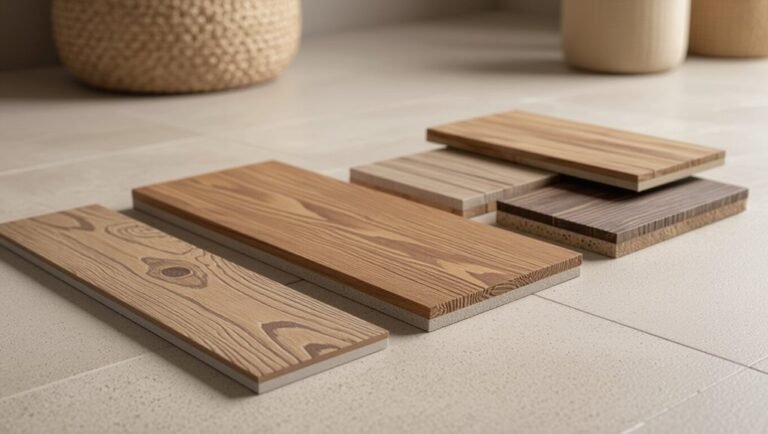
Materials Overview Insulation Options for Concrete Floors
You’ll weigh several insulation types for concrete—rigid foam boards (XPS, EPS, polyiso) for high R-value, spray foam (closed- or open-cell) for air sealing, and thinner insulating underlayments like cork, rubber, or foil-faced options for thermal breaks.
You can also choose insulated subfloor or floating systems (sleepers, joist assemblies) when height and finish flooring matter, and you’ll need to plan differently if you’re adding radiant heat (hydronic or electric) to guarantee proper insulation and heat direction.
I’ll summarize pros, cons, typical R-values, and best use cases so you can pick the right solution for your project.
Rigid Foam Boards (XPS, EPS, Polyiso): pros, cons, typical R-values
Although they look similar at a glance, rigid foam boards—XPS, EPS, and polyiso—perform differently and suit different budgets and installation methods, so it helps to know the basics before you pick one. You’ll choose based on R-value, moisture resistance, and cost. Compare options:
| Type | Typical R-value/inch | Strength/moisture |
|---|---|---|
| XPS | 5.0 | Good |
| EPS | 3.6–4.0 | Moderate |
Spray Foam (closed-cell vs open-cell): pros, cons, use cases
If rigid foam boards don’t fit your moisture, thickness, or sealing needs, spray foam offers an alternative that both insulates and air-seals in one step.
You’ll choose closed-cell for high R-value, moisture resistance, and structural support, though it’s pricier and rigid.
Open-cell’s cheaper, fills gaps, and dampens sound but absorbs moisture and has lower R-value.
Both need professional installation.
Insulating Underlayments and Thermal Breaks (cork, rubber, foil-faced)
Insulating underlayments and thermal breaks—like cork, rubber, and foil-faced products—sit between your concrete slab and the finished floor to reduce heat loss, cut cold-floor sensations, and prevent thermal bridging at edges and penetrations.
Choose by moisture resistance, compressive strength, and R-value. Consider installation ease and floor type.
- Cork: natural, breathable, moderate R-value
- Rubber: durable, compressive
- Foil-faced: thin radiant barrier
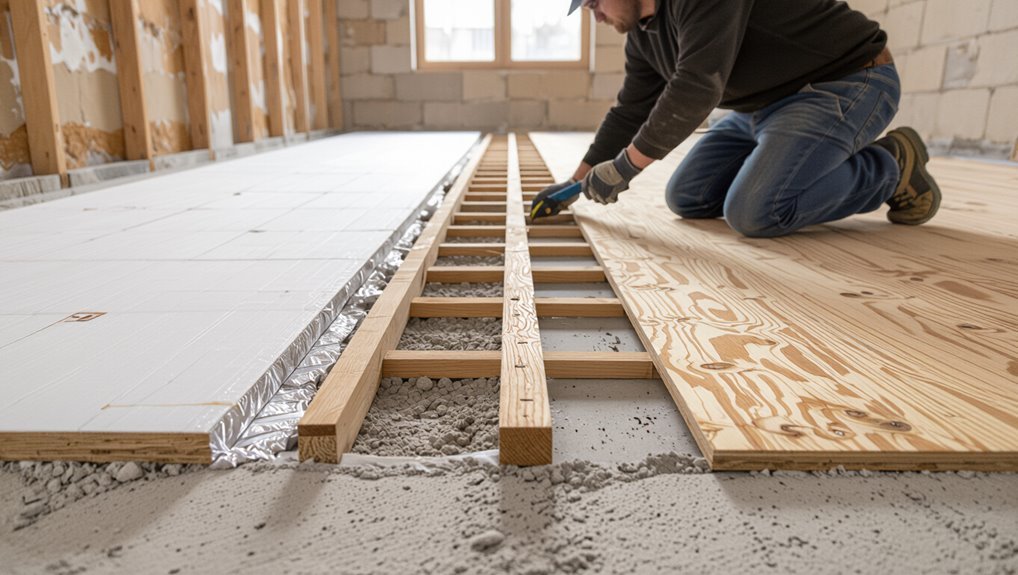
Insulated Subfloor Systems and Floating Floors (joist systems, sleepers)
After choosing an underlayment or thermal break, you may want a higher-profile solution that creates a service cavity and more insulation depth: insulated subfloor systems and floating floors do just that.
You’ll install joists or sleepers over the slab, add rigid foam or mineral wool between them, then cap with plywood. This raises floor level, improves thermal performance, and allows wiring or plumbing without penetrating the slab.
Radiant Floor Heating Integration (hydronic, electric) and insulation needs
When you plan to add radiant floor heating—whether hydronic tubing or electric mats—proper insulation below and around the slab becomes critical to get heat into the living space instead of the ground; the right insulation strategy also reduces run times and energy costs.
Use continuous rigid foam under slab, perimeter insulation, and thermal breaks at edges.
For hydronic systems, add a thin screed and insulation/control layers.
How-To: Step-by-Step Guide to Insulating Existing Concrete Floor (Indoor Retrofits)
Before you start, assess the slab for moisture, levelness, cracks, and any load requirements so you pick the right approach.
Next, choose the insulation method for your space—rigid foam, sleepers, or a raised subfloor—then prep the concrete by cleaning, repairing, and adding a vapor barrier if needed.
Finally, install the insulation layers in the proper sequence and finish with your chosen flooring (tile, hardwood, laminate, or carpet) and neat connections.
Step 1 Assess Conditions: moisture test, level, condition, load requirements
Since your insulation’s performance depends on the slab’s state, start by evaluating moisture, level, structural condition, and load needs so you can choose the right approach.
You’ll test for dampness, measure flatness, and note cracks or settlement. Record load-bearing requirements for appliances or storage. Check ventilation and drainage paths.
- Moisture: calcium chloride or probe tests
- Level: dipstick or straightedge
- Condition: cracks, spalling, settlement
Step 2 Choose Material and Method based on use (basement, garage, slab-on-grade)
Now that you’ve assessed moisture, flatness, and load needs, pick materials and a method that match the space: basements, garages, and slab-on-grade areas each demand different insulation types and installation approaches.
For basements, use rigid foam or insulated subfloors to control cold and vapor.
Garages need impact-resistant panels or spray foam.
Slab-on-grade favors under-slab or floating insulated subfloor systems.
Step 3 Prep Work: clean, repair cracks, install vapor barrier if needed
Clear the room and get the concrete ready: sweep and vacuum debris, wash away oils or stains, and let the slab dry completely.
Inspect and repair cracks or spalling with epoxy or patching compound. If moisture’s present, add a vapor barrier before insulating.
Key tasks:
- Clean and dry thoroughly
- Fill and level cracks
- Test for moisture and install barrier if needed
Step 4 Install Insulation Layers (detailed sequence for rigid foam, sleepers, or subfloor)
Choose the insulation approach that fits your budget, moisture conditions, and finished floor height—rigid foam directly on slab, a sleeper system to raise and ventilate the floor, or a full subfloor assembly—and follow the step-by-step sequence for that method.
For rigid foam: dry-fit, tape seams, adhesive or mechanical fasten.
For sleepers: set treated sleepers, insulate between, seal gaps.
For subfloor: install joists, insulation, and plywood deck.
Step 5 Install Finish Flooring (tile, hardwood, laminate, carpet) and transitions
Finish the job by installing your chosen floor covering and the necessary thresholds so the room looks complete and performs well.
Lay tile with proper underlayment and grout, nail or float hardwood to the subfloor, click-lock laminate over vapor barrier, or stretch and tack carpet with padding.
Install threshold strips at doorways and height changes for a clean, safe finish that accommodates movement.
Step 6 Seal Perimeter and Joints to Stop Air Leakage (sealants, tape, insulation strips)
Step 6 tightens the room’s thermal envelope by sealing gaps where the insulated floor meets walls, doorways, or adjoining slabs—stop drafts at the perimeter and joints with caulk, foam, foil tape, or insulation strips so your retrofit actually performs.
You’ll seal for air, not moisture, using:
- Low-expansion spray foam for irregular gaps
- Acoustic/foil tape for seams
- Foam backer rod plus caulk for large joints
Step 7 Final Checks: moisture, thermal performance, and load test
Before you close up the floor, run a final round of checks to confirm moisture control, thermal performance, and structural load capacity are all within safe limits.
Test surface and slab moisture with a meter, verify vapor barrier seams, measure R-value or temperature differential, and inspect insulation coverage.
Finally, perform a load test on a small area to guarantee the floor supports designated furniture and traffic.
How-To: Insulating New Concrete Slab (Construction Best Practices)
When you’re pouring a new slab, start by preparing the subgrade and drainage with proper grading, gravel, and capillary breaks to keep moisture out.
Place continuous sub-slab insulation and a vapor barrier with edge insulation as needed, and design frost-protected edge details for slab-on-grade applications.
If you’ll use radiant heat, integrate tubing layout and insulation thickness now to optimize performance and avoid thermal bridges.
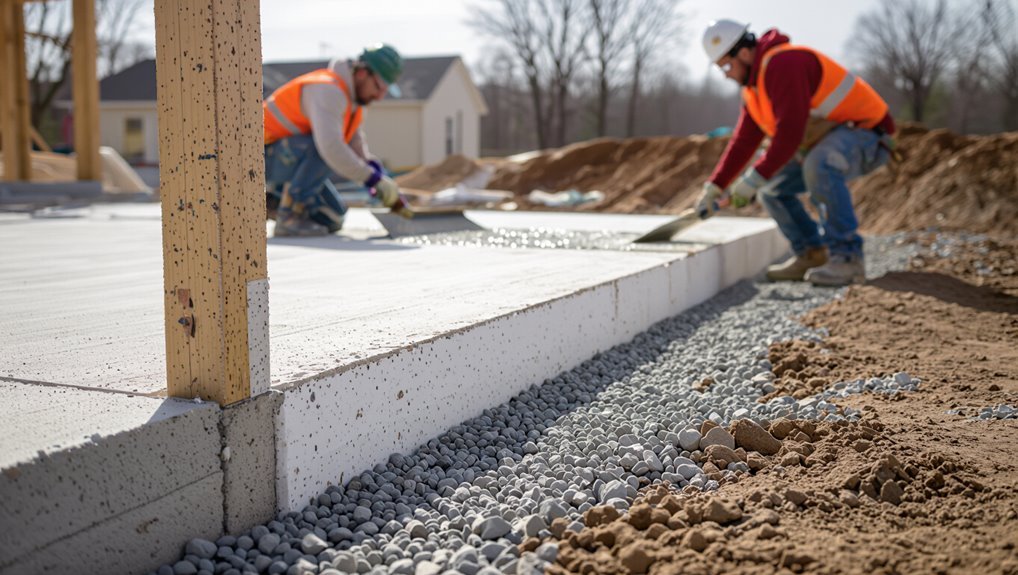
Prepare Subgrade and Drainage (grading, gravel, capillary breaks)
Because a stable, well-drained subgrade is the foundation for any insulated slab, you’ll want to grade the site, install a compacted gravel layer, and include capillary breaks to keep moisture away from insulation and concrete.
Slope soil away from the slab, compact to prevent settlement, place 4–6 inches of clean crushed stone, and add a polyethylene capillary break at the gravel–slab interface.
Install Sub-Slab Insulation and Vapor Barrier (placement, edge insulation)
Start by laying out your insulation and vapor barrier plans so they align with the slab edges, plumbing penetrations, and any mechanicals you’ll route through the floor.
Roll or sheet the vapor barrier continuous, tape seams, and tuck into service chases.
Lay rigid foam or EPS panels over the barrier, butting edges tightly. Stagger joints, compress as needed, and protect insulation during concrete placement.
Edge Insulation and Frost Protection for Slab-on-Grade
If you live where frost penetrates the ground, edge insulation is essential to keep your slab stable, reduce heat loss, and prevent frost heave.
Install continuous rigid foam around the perimeter down to below the frost line, fastening and sealing joints.
Protect exposed edges with boards or curbs, extend insulation above grade for thermal break, and guarantee proper drainage to divert water away.
Integrating Radiant Heat and Insulation in New Slabs
Having perimeter insulation and frost protection in place sets you up to add in-floor radiant heating without wasting energy or risking slab movement.
Install continuous rigid insulation under the slab, then place tubing on a dedicated thermal break or wire mesh at the slab mid-depth.
Use proper expansion joints, vapor barrier, and manifold controls.
Test hydronic pressure before pouring concrete to guarantee leak-free operation.
Comparison: Best Methods by Room Type and Budget
You’ll choose different insulation strategies depending on whether you’re working in a basement, garage, or ground-level living space because moisture, load, and comfort needs vary.
For tight budgets you’ll lean toward DIY-friendly options like rigid foam or insulated mats.
Mid-range projects often use thicker foam plus a vapor barrier.
Premium installs combine sub-slab insulation with radiant heating and high-R materials.
In the next sections we’ll compare the best methods for each room type across low-budget, mid-range, and premium scenarios.
Basements vs Garages vs Ground-Level Living Spaces
Because each space has different moisture, load, and use characteristics, the best way to insulate concrete varies by room type and budget. You’ll choose damp-proofing and rigid foam for basements, heavy-duty, ventilated solutions for garages, and thin subfloor plus radiant options for living areas. Compare quickly:
| Space | Key Concern | Typical Solution |
|---|---|---|
| Basement | Moisture control | Rigid foam, vapor barrier |
| Garage | Load, fumes | Thick insulation, ventilation |
| Living area | Comfort, thin profile | Subfloor + radiant heat |
Low-Budget vs Mid-Range vs Premium Solutions
1 clear way to choose insulation is to match your budget tier to the room’s needs: low-budget options prioritize basic moisture control and comfort, mid-range adds performance and durability, and premium brings long-term efficiency and comfort gains.
Pick by room: basement, garage, living space.
- Low: vapor barrier, foam mats
- Mid: rigid foam + underlayment
- Premium: insulated slab systems, radiant heat
Common Mistakes and How to Avoid Them
Don’t skip moisture control—you’ll invite mold and ruin insulation if vapor and drainage aren’t handled first.
Make sure you pick the right insulation thickness and R‑value for your climate and load needs, and seal the perimeter and any penetrations tightly to prevent heat loss.
Also check local building codes and load requirements before you start so your work is safe and compliant.
Mistake 1 Skipping Moisture Management
If you skip moisture management, you’ll quickly undo any insulation gains by inviting damp, mold, and warped flooring materials.
You need a proper vapor barrier, sealed joints, and perimeter moisture control before insulating.
Test slab moisture, fix drainage issues, and vapor-seal any seams.
Doing this prevents insulation failure, preserves indoor air quality, and stops rot—don’t rush this foundational step.
Mistake 2 Using Wrong Insulation Thickness or R-Value
When you pick insulation that’s too thin or has the wrong R-value for your climate and floor use, you’ll waste money and still feel drafts and cold floors; match the R-value to local code or climate zone and consider the floor’s planned use so you get real performance.
Check manufacturer specs, factor compressed thickness under flooring, and upgrade R-value if the space is heated or below grade.
Mistake 3 Poor Sealing at Perimeter and Penetrations
Even with the right R-value, gaps at the slab edge, around plumbing, or under door thresholds will let cold air and moisture bypass your insulation, undoing its benefits.
Seal all seams, joints, and penetrations with compatible caulk, spray foam, or gasketed trim.
Tie vapor and air barriers into perimeter walls, and inspect for missed gaps.
Proper sealing preserves performance and prevents mold.
Mistake 4 Ignoring Building Codes and Load Requirements
Because codes and load specs dictate safety and long-term performance, you can’t treat them as optional when insulating a concrete floor.
Ignoring local codes or live/dead load ratings can void permits, create structural risks, or damage insulation and finishes.
Check thickness, compressive strength, fire ratings, and vapor control requirements.
Consult engineers or inspectors, get approvals, and document compliance before installing materials.
Maintenance, Longevity, and Troubleshooting
Keep checking your insulated concrete floor for moisture, mold, or any compression that could reduce performance over time.
If you find damaged insulation or a compromised subfloor, you’ll need to repair or replace affected sections promptly to prevent bigger problems.
When your needs change, you can upgrade insulation later—I’ll cover when upgrades make sense and how to do them without tearing everything out.
Inspecting for Moisture, Mold, and Compression Over Time
When you inspect a concrete floor for moisture, mold, and compression, move methodically—check surface dampness, smell for musty odors, and look for discoloration or soft spots that signal mold or deterioration.
- Note damp areas, stains, or efflorescence.
- Measure humidity and use a moisture meter regularly.
- Monitor soft spots or sinking that indicate compression or subfloor collapse.
Repairing Damaged Insulation or Subfloor
Noting moisture, mold, or soft spots during inspection tells you where repairs will be needed, so start by isolating affected areas and removing any soaked or moldy insulation and soft subfloor sections.
Dry the slab and framing thoroughly, treat mold with appropriate cleaners, replace damaged insulation with moisture-resistant materials, and patch or replace subfloor panels.
Re-seal seams and check vapor barriers before finishing.
Upgrading Insulation Later When and How
If you plan to upgrade insulation later, schedule regular inspections and keep detailed notes on performance so you can spot wear, moisture, or settling before small issues become big ones.
When ready, assess R-value needs, moisture barriers, and subfloor condition. Remove damaged layers, replace with higher-R materials or rigid foam, reseal seams, and test for thermal improvement and vapor integrity to guarantee lasting results.
Tips, Best Practices, and Cost-Saving Strategies
To get the most warmth for your money, prioritize high-R-value materials in key spots and focus on proper installation.
Combine insulation with air sealing and small HVAC adjustments to cut drafts and operating costs.
Think seasonally about when to tackle projects and choose DIY for simple fixes but hire pros for structural or warranty-sensitive work.
Maximizing Thermal Performance with Minimal Cost
When you’re insulating a concrete floor on a budget, focus on strategies that give the biggest thermal gains per dollar spent: air-sealing the slab edges and joints, adding a thin layer of rigid foam or insulated underlayment, and sealing gaps where pipes or vents penetrate the concrete.
Prioritize continuous insulation, choose high R-value-per-inch materials, stagger seams, and use moisture-resistant products to avoid future repairs.
Combining Insulation with Air Sealing and HVAC Adjustments
Although insulating the slab is a major step, you’ll get the most comfort and savings by pairing insulation with airtight sealing and smart HVAC tweaks.
Seal gaps, rim joists, and penetrations with caulk or spray foam. Add door sweeps and weatherstripping.
Balance vents, insulate ducts, and lower dead zones with programmable thermostats. These steps reduce heat loss, improve efficiency, and cut energy bills.
Seasonal Considerations and DIY vs Professional Help
Because seasons change how your floor performs, plan insulation work around temperature and moisture conditions to get the best results and costs.
You can DIY small projects in dry, mild months, but hire pros for vapor barriers, radiant heat, or complex layouts.
Consider:
- Cost vs skill: simple batts or foam boards for DIY
- Timing: install in spring or fall
- Warranty and permits for pros
Tools, Materials, and Estimated Costs
You’ll need a handful of basic tools—tape measure, utility knife, saw, adhesive or fasteners, and a roller—plus safety gear to install most floor insulation systems.
I’ll outline typical material amounts, ballpark cost ranges for DIY vs. bought materials, and what tasks and timeframes contractors usually handle.
That way you can decide whether to tackle the job yourself or hire a pro.
Essential Tools for Installation
Before you start, gather the essential tools and materials so the job goes smoothly and safely.
You’ll need reliable gear, appropriate fixings, and safety equipment. Pack compactly and check condition before work.
- Tape measure, chalk line, utility knife, straightedge
- Insulation adhesive, vapor barrier, fasteners
- Knee pads, gloves, safety glasses, dust mask
Typical Material Quantities and Cost Ranges
A quick inventory of quantities and costs will help you budget and buy the right amounts of tools and materials for insulating a concrete floor. You’ll need foam boards, adhesive, and fasteners; quantities depend on area. Expect $1–$6 per sq ft installed for materials only, more for premium options.
| Item | Typical Qty | Cost Range |
|---|---|---|
| Foam board | per sq ft | $0.50–$3 |
| Adhesive/fasteners | per project | $20–$150 |
When to Hire a Pro scope and expected contractor tasks
If your floor has complex issues—uneven slab, moisture intrusion, radiant heating to integrate, or a large area—you should hire a pro to guarantee a durable, code-compliant installation.
Hire licensed contractors for site assessment, moisture testing, insulation selection, vapor barriers, leveling, and professional adhesive or mechanical fastening.
Expect tools like moisture meters, grinders, screeds, and power saws.
Materials and labor typically run $2–8 per sq ft, higher for radiant work.
FAQs
You’ll likely have a few practical questions about insulating a concrete floor—like whether you can insulate from above without trapping moisture, how thick insulation needs to be to stop cold transfer, and whether you need a vapor barrier.
You might also wonder if radiant floor heating removes the need for insulation or if added thickness will affect doors and trim.
I’ll answer each of these clearly so you can choose the right approach for your space.
Can you insulate a concrete slab from above without causing moisture problems?
Wondering whether you can insulate a concrete slab from above without inviting moisture problems?
Yes—you can if you control moisture. Use a vapor-permeable insulation or install a proper vapor barrier beneath the insulation layer, seal joints, and guarantee drainage and humidity control.
Avoid trapping moisture between finish flooring and slab. Monitor for dampness and address leaks before insulating.
How thick should floor insulation be to stop cold from creeping up?
Because cold moves up through concrete and along edges, you need enough insulation to lower the slab’s surface temperature and break thermal bridging—typically R-10 to R-20 for slabs in temperate climates, more in colder zones.
Aim for rigid foam 1–2 inches (R‑5–R‑10) beneath finished floors or 2–4 inches (R‑10–R‑20) under slabs.
Increase thickness in colder regions.
Is it necessary to install a vapor barrier with floor insulation?
Insulating to stop cold at the slab edge also raises questions about moisture, since concrete can wick water up from the ground and condensation can form on cooler surfaces.
You’ll usually install a vapor barrier under insulation or between slab and finished floor in damp sites. It prevents ground moisture from saturating insulation and flooring.
Check local code and site drainage; don’t skip it if risk exists.
Can radiant floor heating eliminate the need for floor insulation?
Can radiant floor heating replace the need for floor insulation? You might think heat solves cold, but radiant systems perform far better with insulation beneath.
Without it, heat escapes into the slab and ground, raising energy use and response time. Insulation improves comfort, efficiency, and system lifespan.
In short, don’t skip insulation just because you’re installing radiant floor heating.
Will insulating a concrete floor raise my floor level and affect doors/trim?
If you add insulation under or over a concrete slab, expect the finished floor height to change and plan accordingly so doors and trim still work.
Even a thin layer of underlayment, foam board, or subfloor raises thresholds and may require trimming doors, adjusting jambs, or reinstalling baseboards.
Measure total build-up, check clearances, and factor transition strips to guarantee smooth operation and appearance.