Best Bathroom Floor Tiles: What Experts Actually Recommend
You should pick porcelain for most bathrooms because it’s waterproof, durable, and low‑maintenance, while ceramic is a good budget option and natural stone gives a luxury look if you’re willing to seal and care for it. Vinyl/LVT works well where comfort and slip resistance matter, especially for families. Prioritize textured finishes and higher COF ratings for safety, size and grout for visual space, and factor installation and long‑term maintenance costs — more details follow.
Quick Answer Best Bathroom Floor Tiles at a Glance
You’ll get quick top picks by category to make choosing a bathroom floor tile simple.
I’ll give one-line recommendations for common needs—budget, luxury, kid-friendly, and slip-resistant—so you can compare at a glance.
Use these short summaries to pick the best option for your space.
Top Picks by Category
Here’s a quick, ready-to-scan list of the best bathroom floor tiles by category so you can match style, budget, and performance at a glance.
- Porcelain — durable, waterproof; answers what floor tile is best for bathroom.
- Ceramic — affordable, versatile.
- Natural stone — luxury look, needs sealing.
- Vinyl/LVT — soft underfoot, great for remodels.
One-line Recommendations for Common Needs (budget, luxury, kid-friendly, slip-resistant)
When you need a quick pick, choose porcelain for overall durability and waterproofing; ceramic for a budget-friendly, stylish option; luxury natural stone for high-end looks (but plan on sealing); and vinyl/LVT for kid-friendly, softer, slip-resistant floors.
For steeper budgets, pick honed stone or large-format porcelain; for safety, prioritize textured finishes and higher COF ratings; for kids, choose wear-resistant, easy-clean surfaces.
Why Tile Choice Matters for Bathrooms
You’ll want tiles that stand up to water, resist slips, and handle regular wear without constant upkeep.
Consider how size, color, grout lines, and texture affect both the look and safety of your space.
Also weigh upfront material and installation costs against long-term maintenance and replacement needs.
Key Performance Factors (water resistance, slip resistance, durability, maintenance)
Because bathrooms combine constant moisture, frequent foot traffic, and occasional slips, choosing the right tile matters more than aesthetics alone.
You should prioritize water resistance to prevent damage, slip resistance to reduce falls, durability to withstand wear, and low-maintenance surfaces for easy cleaning.
Match tile material and finish to your usage patterns, and consider grout type and sealing frequency to maintain performance.
Aesthetic Considerations (size, color, grout lines, texture)
Scale matters: tile size, color, grout lines, and texture shape how your bathroom feels and functions, so choose them to match the room’s proportions, light, and traffic.
Use larger tiles to enlarge small spaces, light colors to brighten, narrow grout to simplify patterns, and textured finishes where slip-resistance matters.
Coordinate finishes with fixtures for a cohesive, intentional look that complements practicality.
Cost Factors (material cost, installation, long-term maintenance)
When you pick bathroom tile, cost goes beyond the sticker price: material quality, installation complexity, and ongoing upkeep all shape the total you’ll pay over time.
You’ll weigh porcelain’s durability against ceramic’s lower cost, factor in labor for cuts, patterns, or underfloor heating, and consider grout sealing, repairs, and replacement frequency to estimate true lifetime expense and value.
How to Choose the Best Bathroom Floor Tile Step-by-Step
Start by evaluating your bathroom type and how it’s used—main baths need tougher tiles than a powder room.
Next, prioritize performance (PEI, COF, water absorption), match tile size, pattern and grout to the room’s scale, and set a budget that includes materials and labor.
Finally, confirm installation and subfloor requirements before you buy.
Step 1 Assess Bathroom Type and Usage (main, ensuite, powder room)
Although bathrooms may share fixtures, their functions and traffic vary, so you should first identify whether you’re tiling a main bathroom, ensuite, or powder room.
Consider who uses it, how often, and whether it sees children or guests. That determines durability, maintenance tolerance, and aesthetic priorities—high-traffic mains need tougher, easy-clean tiles; ensuites can be more luxurious; powder rooms can emphasize style.
Step 2 Prioritize Performance Criteria (PEI rating, COF, water absorption)
Because tiles look great only when they perform, prioritize measurable criteria—PEI rating for wear, COF for slip resistance, and water absorption for moisture resistance—so you can match material to the room’s use.
Check PEI 3+ for floors, choose COF ≥0.42 (wet) or textured surfaces for safety, and pick low-absorption porcelain in wet zones.
Verify specs before buying.
Step 3 Match Style and Scale to Space (tile size, pattern, grout color)
With performance checked, turn your attention to how the tile will look and feel in the room.
Choose larger tiles to make small bathrooms feel bigger; pick smaller or patterned tiles to add interest in spacious baths.
Match grout color to either blend for a seamless look or contrast for defined lines.
Consider scale, repeat patterns, and visual flow before buying.
Step 4 Set Budget and Calculate Total Cost (tiles, underlayment, labor)
Before you start shopping, set a clear budget so you can compare tile types and installation options without surprises.
List costs: tiles per square foot, underlayment or backer board, mortar/grout, trim, and labor.
Add 10–15% for waste and unexpected repairs.
Get multiple quotes, factor warranties, and prioritize where to save or splurge to meet style and longevity goals.
Step 5 Check Installation and Subfloor Requirements
After you set your budget, check how the floor and subfloor will affect both material choices and installation costs.
Inspect for level, rot, moisture, and joist spacing. Choose tile and underlayment that match structural conditions—decoupling membrane, cement board, or waterproofing.
Ask your installer about adhesives, expansion joints, and required prep time so quotes reflect real work, not surprises.
Best Tile Materials Compared
Now that you know how to choose, it’s time to compare common materials so you can pick what fits your bathroom best.
Consider porcelain and ceramic for durability and low maintenance, natural stone like marble, slate, or travertine for unique beauty, and vinyl or LVT for budget-friendly moisture resistance.
Also weigh engineered stone and composite options if you want the look of stone with easier care.
Porcelain Tiles
Porcelain tiles combine durability and low maintenance, making them a top pick for bathroom floors you want to last. You’ll get water resistance, stain resistance, and versatile looks that mimic stone or wood without the upkeep. Choose matte finishes for slip resistance and larger formats to minimize grout.
| Look | Texture | Benefit |
|---|---|---|
| Stone | Matte | Slip resistance |
| Wood | Grain | Warmth |
| Marble | Polished | Luxury |
| Concrete | Smooth | Modern |
Ceramic Tiles
While ceramic tiles aren’t as dense as porcelain, they’ll still give you a durable, water-resistant bathroom floor at a lower price point. You’ll find lots of colors and patterns, easy maintenance, and DIY-friendly installation. Use a matte, textured finish for safety and seal grout regularly.
| Feature | Benefit | Consideration |
|---|---|---|
| Cost | Affordable | Varies by glaze |
| Durability | Good for bathrooms | Less than porcelain |
| Maintenance | Easy | Grout needs sealing |
| Style | Wide range | Avoid slippery glazes |
Natural Stone (marble, slate, travertine)
Natural stone—marble, slate, and travertine—brings unmatched natural beauty and unique veining to a bathroom floor, but it also demands more care than ceramic or porcelain. You’ll love the depth and warmth, but you’ll seal regularly, avoid acidic cleaners, and accept natural variation. Consider finish and slip resistance before installing.
| Stone | Character |
|---|---|
| Marble | Luxurious veining |
| Slate | Textured grip |
| Travertine | Warm pores |
Vinyl and Luxury Vinyl Tile (LVT)
Comfort and practicality make vinyl and luxury vinyl tile (LVT) a top choice for bathroom floors, because they mimic wood or stone looks while resisting water and wear. You’ll enjoy easy maintenance, cushioned comfort, and affordable realism; choose waterproof options for wet areas and higher wear layers for longevity.
| Benefit | Note |
|---|---|
| Water resistance | Ideal for bathrooms |
| Comfort | Softer underfoot |
| Durability | Wear layers vary |
| Style | Many realistic patterns |
| Cost | Budget-friendly options |
Engineered Stone and Composite Options
If you want the look of stone with added strength and consistency, engineered stone and composite tiles deliver—combining crushed quartz or porcelain with resins to create durable, low-porosity surfaces that resist stains and moisture. You’ll get consistent color, easy maintenance, and strong wear resistance—ideal for busy bathrooms where beauty must endure.
| Sensation | Promise |
|---|---|
| Calm solidity | Lasting beauty |
| Practical luxury | Low worry |
Mosaic and Glass Tiles (accent uses)
Engineered stone gives you strength and consistency, while mosaic and glass tiles let you add personality and sparkle in focused doses. You can use them as borders, niches, or shower floors to create contrast without slippery expanses. They resist stains, reflect light, and demand careful grout. Use small formats where traction and drama matter.
| Use | Benefit |
|---|---|
| Borders | Accent |
| Niches | Highlight |
| Shower floor | Traction |
| Backsplash | Light |
| Inlay | Customization |
Best Tiles for Specific Needs and Styles
Now you’ll match tile types to specific needs and styles, from small powder rooms to busy family bathrooms.
You’ll learn which options offer extra slip resistance for kids and elders, which keep costs low, and which deliver a luxury designer look.
Use these guidelines to pick the best tile for your space and lifestyle.
Best for Small Bathrooms and Powder Rooms
Small bathrooms and powder rooms can feel larger and more polished when you choose tiles that reflect light, draw the eye, and keep patterns in scale; pick lighter hues, smaller-format tiles like 2×2 or subway, and vertical or diagonal layouts to create height and movement without overwhelming the space.
Use matte porcelain for slip resistance, narrow grout lines to minimize visual breaks, and bold accent tiles sparingly.
Best for Large Family Bathrooms and High Traffic
When you’re outfitting a large family bathroom that sees heavy daily use, pick tiles that pair durability with easy maintenance so they’ll still look great years from now.
Choose porcelain or large-format ceramic for toughness and fewer grout lines. Opt for neutral, patterned, or textured finishes to mask wear.
Prioritize stain-resistant glazes and professional installation to guarantee longevity under constant foot traffic.
Best Slip-Resistant Options for Elderly and Kids
Because slips can cause serious injuries for both kids and older adults, choose tiles with a high slip-resistance rating and a textured or matte finish to give feet better traction.
Look for porcelain or natural stone with a COF of 0.6+ (wet), pebble or grooved designs, and smaller-format tiles to increase grout lines.
Add non-slip treatments and secure rugs for extra safety.
Best Budget-Friendly Choices
Safety matters, but budget and style do too—especially if you’re retiling an entire bathroom or updating on a tight schedule.
Choose porcelain or ceramic for durability, low cost, and easy maintenance. Look for matte finishes to hide wear, standard sizes to reduce waste, and sale or surplus tiles for bargains.
Consider vinyl plank for quick installs and moisture resistance without breaking the bank.
Best Luxury and Designer Options
If you’re aiming for a high-end look that lasts, luxury tiles bring timeless materials, bold textures, and designer finishes that transform a bathroom into a statement space.
Choose natural stone like marble or honed limestone for veining and depth, large-format porcelain for seamless elegance, or artisanal encaustic patterns for personality.
Pair with heated floors and matte metallic accents for cohesive, upscale style.
Best for Wet Areas and Shower Floors
When choosing tiles for wet areas and shower floors, prioritize slip resistance, water impermeability, and grout durability so your bathroom stays safe and low-maintenance.
Pick textured porcelain or matte-finish porcelain with a COF rating above 0.6, or natural stone treated and sealed correctly.
Use smaller tiles or mosaic for better traction and slope, and opt for epoxy grout to resist mold and cracking.
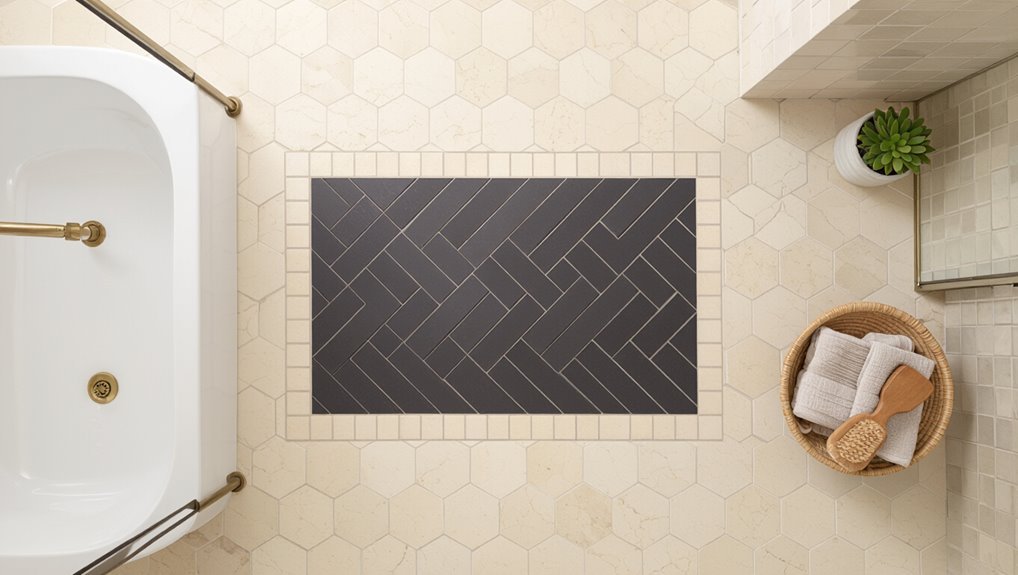
Tile Size, Pattern, and Layout Guidance
Think about how tile size changes how big your bathroom feels—larger tiles can make a small room seem more open, while smaller tiles suit curved floors and detailed patterns.
Pick a layout like straight, diagonal, herringbone, or grid to set the room’s style and direction.
Use borders, insets, or accent strips to define zones, add contrast, or highlight features without overwhelming the space.
How Tile Size Affects Perceived Space
Because tile size and layout guide the eye, choosing the right dimensions can make a bathroom feel larger or cozier depending on your goals.
Use larger tiles with fewer grout lines to create continuity and expand visual space, while smaller tiles add texture and warmth.
Match tile scale to room size and fixtures, and keep grout color subtle to avoid breaking the visual plane.
Popular Layouts (straight, diagonal, herringbone, grid)
Size and grout choices set the stage, but layout determines how your floor reads at a glance: straight (stacked) installs keep things clean and understated, diagonal layouts add perceived breadth, herringbone brings dynamic movement, and grid or offset patterns introduce rhythm.
Choose a layout that complements tile size and room shape, align with sightlines, and balance visual energy—simpler patterns suit small baths; bold ones fit larger spaces.
Using Borders, Insets, and Accent Strips
A narrow border, a wide inset, or a single accent strip can change how your tile field reads and guide the eye through the room.
So plan their width, placement, and pattern with the tile size and layout in mind. Use borders to frame, insets to define zones, and accent strips to lead sightlines.
Match grout color and scale for cohesion.
Installation Basics and Considerations
Before you lay a single tile, you’ll need to assess and prep the subfloor, choose the right waterproofing and adhesives, and pick grout and sealers that match your tile and moisture level.
Decide whether you’ll tackle the job yourself or hire a pro based on skill, tools, and the room’s complexity, and know the typical steps so surprises don’t slow you down.
A realistic timeframe—demolition, prep, setting, grouting, and curing—helps you plan around drying times and inspections.
Preparing the Subfloor and Waterproofing
When you’re ready to lay tile, make sure the subfloor is clean, level, and structurally sound so your floor won’t crack or flex over time.
Remove debris, repair soft spots, and reinforce joists if needed.
Install a cement backer board or waterproof membrane per manufacturer instructions.
Flash waterproofing at wet areas and curb changes prevents leaks and protects subfloor integrity for years.
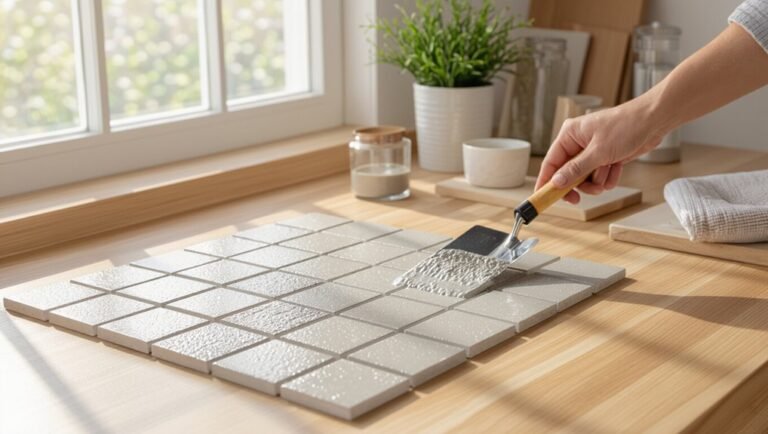
Adhesives, Grout Types, and Sealers
Now that your subfloor and waterproofing are set, you’ll need the right adhesives, grout, and sealers to keep tiles bonded, joints stable, and moisture out.
Use thin-set mortar rated for wet areas and your tile type.
Choose sanded grout for wide joints, unsanded for narrow.
Seal porous grout and natural stone; use mildew-resistant, penetrating sealer for longevity and easier cleaning.
DIY vs Professional Installation When to Hire a Pro
If you’re handy, patient, and working with standard-sized ceramic or porcelain tiles on a flat floor, you can often tackle the job yourself; but complex layouts, large-format tiles, uneven substrates, or wet-room areas usually call for a pro.
Hire a pro if you want guaranteed waterproofing, precise leveling, warranty protection, or faster, code-compliant installations to avoid costly mistakes.
Estimated Timeframe and Typical Installation Steps
A typical bathroom tile install takes anywhere from a couple of days to a week, depending on room size, tile type, and prep work required.
You’ll follow clear steps and can expect downtime while materials cure.
- Demo and subfloor prep
- Layout and dry fit tiles
- Mortar setting and grout after cure
- Seal, trim, and final cleanup
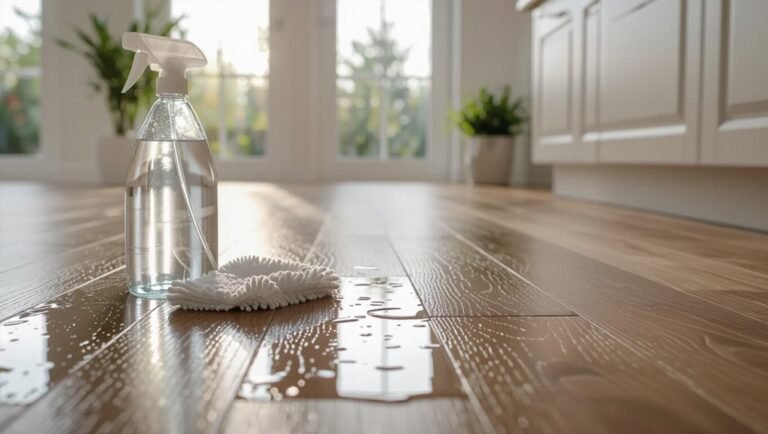
Maintenance, Cleaning, and Longevity
To keep your bathroom tiles looking and performing their best, you’ll want simple daily and weekly cleaning routines and prompt stain-and-grout care.
Check whether your tile material needs periodic sealing and follow the recommended schedule to prevent water damage.
Watch for cracking, loose tiles, persistent stains, or grout failure—those are clear signs it’s time to replace the floor.
Daily and Weekly Cleaning Routines
When you keep up with simple daily and weekly cleaning tasks, your bathroom tiles will stay looking new and last longer; consistency prevents grime buildup and costly repairs.
Each day, sweep or vacuum and wipe spills.
Weekly, mop with a pH-neutral cleaner, rinse thoroughly, and dry to avoid water spots.
Check sealant lines and ventilation to reduce moisture and mold risk.
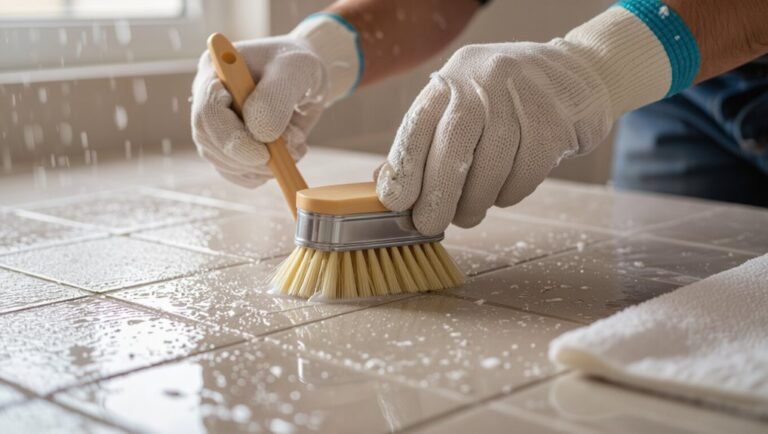
Stain Removal and Grout Care
Stubborn stains and dirty grout don’t have to ruin your bathroom’s look—treating them quickly and correctly keeps tiles bright and prevents long-term damage.
For spills, blot then scrub with a pH-neutral cleaner; avoid harsh acids on sensitive tiles.
Use a stiff brush for grout, apply baking soda paste for stubborn spots, rinse thoroughly, and dry.
Reapply grout cleaner as needed to maintain appearance.
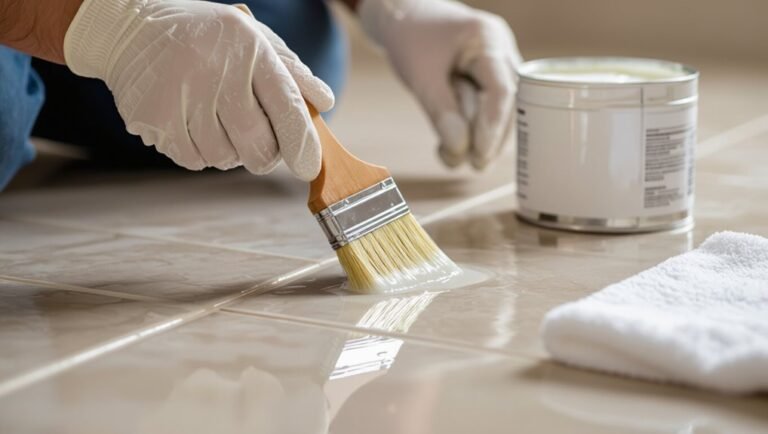
Sealing Requirements by Material
Because different tile materials absorb moisture and stains at different rates, you’ll need specific sealing approaches to keep them durable and easy to clean.
Seal porous natural stone (marble, travertine) annually with impregnating sealers.
Reapply sealer on unglazed ceramic and quarry tiles every couple years.
Glazed porcelain rarely needs sealing—only grout does.
Always follow manufacturer instructions and test in an inconspicuous spot.
Signs It’s Time to Replace Your Bathroom Floor
You’ll know it’s time to replace your bathroom floor when persistent issues keep coming back despite regular cleaning and maintenance: loose or cracked tiles, grout that won’t stay sealed, chronic water damage or mold, uneven or soft spots underfoot, or a surface that’s become excessively worn and slippery.
If repairs repeatedly fail, odors persist, or tiles shift, replace flooring to prevent structural damage and health risks.
Common Mistakes and How to Avoid Them
Don’t pick tiles just because they look good—consider slip resistance and water absorption ratings so your floor stays safe and durable.
Avoid choosing a tile size that overwhelms or fragments the room, and don’t skimp on waterproofing or proper subfloor prep.
Addressing these issues up front will save you time, money, and headaches down the road.
Choosing Tiles Based on Look Alone
While a tile’s color and pattern can catch your eye, choosing solely for looks often leads to problems down the road—slippery surfaces, difficult maintenance, and mismatched scale are common pitfalls.
Don’t ignore texture, grout color, and tile size; test samples in your bathroom light, feel finish underfoot, and consider how patterns read in small spaces so aesthetic choices work practically.
Ignoring Slip Resistance or Water Absorption Ratings
Looks matter, but they won’t keep you safe when the floor gets wet—so pay attention to slip resistance and water absorption ratings.
You’ll reduce falls by choosing tiles with appropriate R-values or COF for your home’s traffic and moisture.
Pick low-absorption porcelain in wet zones, verify manufacturer test data, and match finish texture to use.
Don’t assume glossy equals safe; check the specs.
Wrong Tile Size for the Space
Choosing the wrong tile size can make even a beautiful bathroom feel cramped or oddly proportioned, so think about scale before you buy.
You’ll want larger tiles to reduce grout lines in small rooms and smaller tiles for curved or sloped areas where traction matters.
Lay out samples, measure sightlines, and consider pattern direction to guarantee balance and visual flow.
Skimping on Waterproofing or Subfloor Prep
If you cut corners on waterproofing or skip proper subfloor prep, you’ll pay for it with mold, warped boards, and grout that fails—often long before the tile’s life should end.
Don’t rush membrane installation or ignore moisture barriers. Level and secure the subfloor, fix leaks, and use appropriate underlayment.
Invest time now to avoid costly demolition, repairs, and ruined tiles later.
Best Practices and Expert Tips
When picking bathroom tiles, you’ll want to balance looks with slip resistance and durability so the room stays stylish and safe.
Coordinate floor tiles with wall tiles and fixtures, and choose grout color and joint width that’s easy to clean and hides wear.
Also think about resale and long-term durability so your choice still works years from now.
Balancing Aesthetics with Functionality
Although aesthetics matter, you should prioritize materials and finishes that withstand moisture, slip risk, and daily wear.
Choose textured or matte tiles in high-traffic zones, and opt for durable porcelain or natural stone with proper sealing.
Match grout color for low maintenance, select realistic patterns that hide dirt, and test samples under lighting.
Prioritize safety and longevity without sacrificing style.
Coordinating Floor Tile with Wall Tile and Fixtures
Because tiles set the visual foundation of your bathroom, coordinating floor tile with walls and fixtures will make the whole space feel intentional and cohesive.
Choose a dominant tone, then echo it in smaller accents—vanity, trim, or shower. Use contrast for focal points, repeat a subtle motif to unify, and match finishes (matte vs. glossy) so materials read as a deliberate, harmonious package.
Selecting Grout Color and Joint Width for Maintenance
If you want a bathroom that stays cleaner and looks good longer, choose grout color and joint width with both maintenance and style in mind.
Pick a mid-tone grout to hide dirt without clashing, and prefer narrower joints for large-format tiles to reduce grime traps.
Use epoxy grout where moisture and staining risk is high, and seal sanded grout yearly to simplify cleaning.
Future-Proofing Your Choice (resale, durability)
When you pick tiles with resale and longevity in mind, favor timeless styles, durable materials, and neutral tones that appeal to a broad range of buyers; porcelain and natural stone with a low water absorption rate will stand up to daily wear and retain value over time.
Choose slip-resistant finishes, standard sizes for easy replacement, and reputable brands—document warranties and maintenance to reassure future buyers.
Cost Comparison and Value Analysis
You’ll compare typical price ranges for tile materials and installation so you can see where costs add up.
Think about long-term value by weighing durability against the upfront price to choose what lasts without breaking the bank.
I’ll also point out practical budgeting tips and smart spots to save or splurge.
Typical Price Ranges by Material and Installation
Because tile choices and installation complexity drive most of the budget, knowing typical price ranges helps you plan realistically and compare value across options. You’ll see porcelain often runs $3–$10/sq ft plus $5–$15 labor, while natural stone sits higher. Match budget to slip resistance and maintenance needs.
| Material | Typical Total Cost |
|---|---|
| Porcelain | $8–$25/sq ft |
| Natural stone | $15–$40/sq ft |
Long-Term Value: Durability vs Upfront Cost
Cost per square foot tells part of the story, but long-term value comes from balancing upfront cost against durability, maintenance, and how long the floor will perform.
You should weigh expected lifespan, scratch and moisture resistance, and repair frequency.
Durable options like porcelain cost more initially but need less upkeep.
Cheaper tiles may require earlier replacement, raising lifetime cost despite lower purchase price.
Budgeting Tips and Where to Save vs Splurge
When planning tile choices, map out a clear budget that separates priorities—materials, labor, and long-term maintenance—so you can decide where to save and where to splurge.
Spend on durable, water-resistant flooring and skilled installation. Save on decorative accents, larger-format tiles with simple patterns, or grout color.
Factor warranties and expected lifespan to compare true cost, not just sticker price.
Case Studies and Real-World Examples
You’ll see how small bathroom renovations used compact, slip-resistant tiles to maximize space and style.
You’ll learn which durable materials hold up best in high-traffic family baths and why they were chosen.
You’ll also compare premium tile and installation decisions from luxury remodels to weigh cost versus finish.
Small Bathroom Renovation Tile Choices and Outcomes
Though small bathrooms limit square footage, thoughtful tile choices can make them feel larger, brighter, and more useful.
You’ll see case studies where large-format porcelain, light grout, and diagonal layouts expanded sightlines; glossy subway walls reflected light; matte textured floors added slip resistance without visual clutter.
Choices balanced aesthetics, maintenance, and budget, delivering measurable perceived space gains and improved daily usability.
High-Traffic Family Bath Durable Solutions
Moving from space-saving strategies, let’s look at family bathrooms where durability and daily wear matter more than the illusion of size.
You’ll read case studies showing porcelain plank tiles resisting scratches, textured ceramic reducing slips, and grout sealed to cut staining.
Installers recommend large-format for fewer joints and epoxy grout in busy homes.
You’ll get practical maintenance tips and cost-aware product choices.
Luxury Remodel Premium Tile and Installation Decisions
When you opt for a luxury bathroom remodel, every tile choice and installation decision becomes part of the room’s statement—think book-matched marble, honed porcelain slabs, or hand-glazed mosaics paired with precision substrate prep and moisture-management systems.
You’ll learn from case studies: calibrate grout color, specify large-format Lippage controls, hire certified installers, and budget for vapor barriers and custom cutting to preserve material value and performance.
FAQ Common Questions About Bathroom Floor Tiles
You probably have a few quick questions about bathroom tiles—like which option is safest, whether you can use the same tile on floors and walls, and what tile size works best in a small space.
You’ll also want to know if floor tiles need sealing and how long different materials typically last.
Below we’ll answer each question clearly so you can pick the right tile for your bath.
What tile is safest for bathroom floors?
How can you pick the safest tile for a bathroom floor?
Choose textured, matte-finish porcelain or ceramic with a high COF (coefficient of friction).
Look for tiles rated R10–R12 or COF ≥0.42 for wet areas.
Smaller tiles with more grout lines improve traction.
Avoid highly polished or smooth natural stone unless treated with anti-slip coatings.
Maintain clean, dry surfaces for safety.
Can I use the same tile on the floor and walls?
Absolutely—you can use the same tile on both the floor and walls, but pick a tile that meets the specific performance needs of each surface.
Choose a floor-rated tile with proper slip resistance and durability; the same style can adorn walls if weight and thickness suit wall adhesion.
Porcelain often works well; make certain grout and waterproofing details are appropriate for wet areas.
How big should bathroom tiles be for a small space?
Wondering which tile size makes a small bathroom feel larger? Choose medium to large tiles—think 12×24 inches or similar rectangles—to reduce grout lines and create a sense of openness.
Large-format tiles visually expand the floor, especially when laid diagonally or in a staggered pattern.
Keep patterns subtle and grout color close to the tile for a seamless, airy look.
Do bathroom floor tiles need to be sealed?
Do you need to seal your bathroom floor tiles? It depends on the material.
Porcelain and glazed ceramic are typically waterproof and don’t require sealing, though grout benefits from a sealant.
Natural stone—like marble, limestone, and unglazed travertine—does need sealing to prevent stains and moisture damage.
Reseal grout and stone periodically, following manufacturer guidance for best protection.
How long do different types of bathroom tiles last?
If you pick the right material and maintain it properly, bathroom floor tiles can last decades—porcelain and glazed ceramic often survive 50+ years, while well-sealed natural stone like marble or granite can also last many decades but may need periodic resealing and more careful upkeep.
Unglazed ceramic and vinyl tile might wear sooner (15–30 years). Proper installation, grout care, and avoiding harsh cleaners extend lifespan.