How to Install a Shower Drain in a Concrete Floor
You’ll cut the concrete to create the drain opening, set the drain body and flange at the finished floor height, then connect the P-trap and waste pipe to your drain line. Secure the drain with mortar or a clamping collar, build a 1/4 in. per foot sloped mortar bed, apply waterproof membrane, and finish with tile or concrete topping. Test and cure the assembly, check for leaks, and follow product instructions for best results — keep going to learn detailed steps and tips.
How to Install a Shower Drain in a Concrete Floor Quick Answer
You’ll cut into the concrete, set the drain flange with mortar or a clamping collar, and connect the trap and drainpipe to the waste line.
Expect 4–8 hours for a skilled DIYer (or a day with curing time), moderate difficulty, and about $100–$400 in materials plus labor if you hire a pro.
Plan for extra time and cost if you need to break and replace finished flooring or deal with complex plumbing.
One-sentence summary of the process
Begin by cutting and setting the flange into the concrete. Attach the drain body to the flange and plumbing. Seal the joints with appropriate gasket or mortar.
Finish by testing for leaks and ensuring the drain sits flush with the finished shower floor.
You’ll measure, trim, and secure the drain, connect to waste piping, waterproof the surround, and verify proper slope while following how to install a shower drain in concrete floor.
Estimated time, difficulty, and cost
Expect to spend about 4–8 hours on a straightforward shower drain install in a concrete floor, with the work ranging from moderate DIY to requiring a pro depending on your skills and tools.
You’ll need basic plumbing tools, a concrete saw for cuts, and sealant.
Typical costs: parts $50–$200, tools rental $30–$100, pro labor $200–$600.
- Time estimate
- Skill level
- Materials cost
- Labor cost
Basic Understanding What Is a Shower Drain in Concrete and Why It Matters
When installing a shower drain in concrete, you’ll choose among types like center, linear, or floor-sink drains based on layout and finish.
You’ll also need to know the key components—the drain body, flange, clamping ring, P-trap, and proper waterproofing—and how they work together.
Finally, you’ve got to meet building-code requirements and slope standards so water drains reliably and inspections pass.
Types of shower drains for concrete floors (center, linear, floor sink)
Choosing the right drain for a concrete-floor shower matters because it affects water flow, slope requirements, and long-term maintenance.
Three common options are center (point) drains, linear drains, and floor sinks, each suited to different layouts and waterproofing methods. You’ll pick based on slope, aesthetics, tile size, and ease of cleaning.
- Slope needs
- Tile layout
- Drain capacity
- Maintenance
Key components (drain body, flange, clamping ring, P-trap, waterproofing)
Think of the shower drain as a small system where every part matters: the drain body anchors into the concrete, the flange links to the waterproofing layer, the clamping ring secures the tile and membrane, the P-trap prevents sewer gases from entering, and a proper waterproofing assembly keeps water out of the slab.
You’ll inspect and install:
- Drain body
- Flange
- Clamping ring
- P-trap and membrane
Building code and slope requirements overview
Because a shower drain sits at the low point of your wet area, building codes and proper slope are what keep water flowing to it and out of the structure, preventing leaks and mold.
You must follow local codes for trap size, drain placement, and accessible cleanouts.
Maintain a 1/4 inch per foot slope on the mortar bed unless code specifies otherwise, and document compliance.
Tools, Materials, and Safety Preparations
Before you start cutting concrete, gather the right tools—wet saw or core drill, trowel, level, and anything else needed for accurate cuts and fittings.
Make sure you have the drain assembly, PVC/ABS pipe, mortar, waterproof membrane, and sealant on hand.
Put on PPE, control dust, and call utility locate so the site is safe and ready to work.
Required tools (wet saw, core drill, trowel, level, etc.)
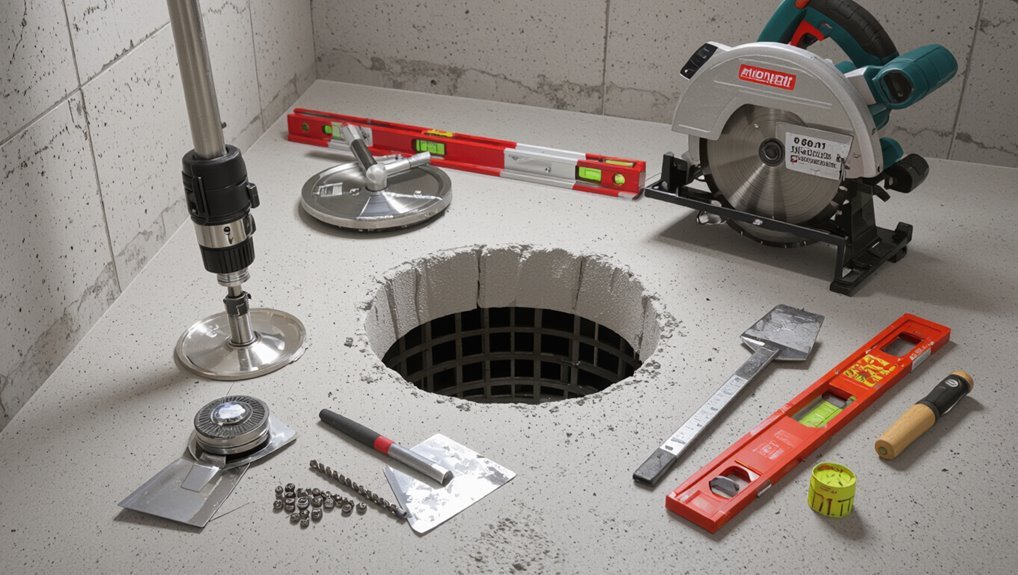
You’ll need a handful of reliable tools to cut, drill, set, and level the drain assembly: a wet saw or tile cutter for neat openings, a core drill for precise pipe penetrations, a masonry trowel for mortar, a spirit level for slope accuracy, and assorted hand tools (wrenches, screwdrivers, utility knife) plus safety gear.
- Wet saw or tile cutter
- Core drill
- Trowel and level
- Hand tools and PPE
Required materials (drain assembly, PVC/ABS pipe, mortar, waterproof membrane, sealant)
Materials make the job reliable and watertight: you’ll need a compatible drain assembly, the correct diameter PVC or ABS waste pipe and fittings, a polymer-modified mortar or deck mud for bedding, a waterproof membrane or liner, and a quality sealant or plumber’s putty for final connections.
- Drain assembly
- PVC/ABS pipe & fittings
- Mortar/deck mud
- Waterproof membrane & sealant
Safety gear and site prep (PPE, dust control, utility locate)
Now that you’ve gathered the drain parts and bedding materials, put safety and site prep at the top of your checklist so the work area stays controlled and you stay protected.
Wear gloves, eye protection, dust mask/respirator, and hearing protection.
Control dust with plastic sheeting and a shop vac with HEPA filter.
Mark and verify underground utilities before cutting concrete to avoid hazards.
Pre-installation Checks and Planning
Before you cut or pour anything, verify where the existing plumbing runs and how deep the drain pipe sits so you can tie in correctly.
Measure and mark the exact drain location and plan the slope so water will flow to the drain without pooling.
Also check concrete thickness and any reinforcement so your drain flange and anchors will be compatible and structurally safe.
Verify existing plumbing location and depth
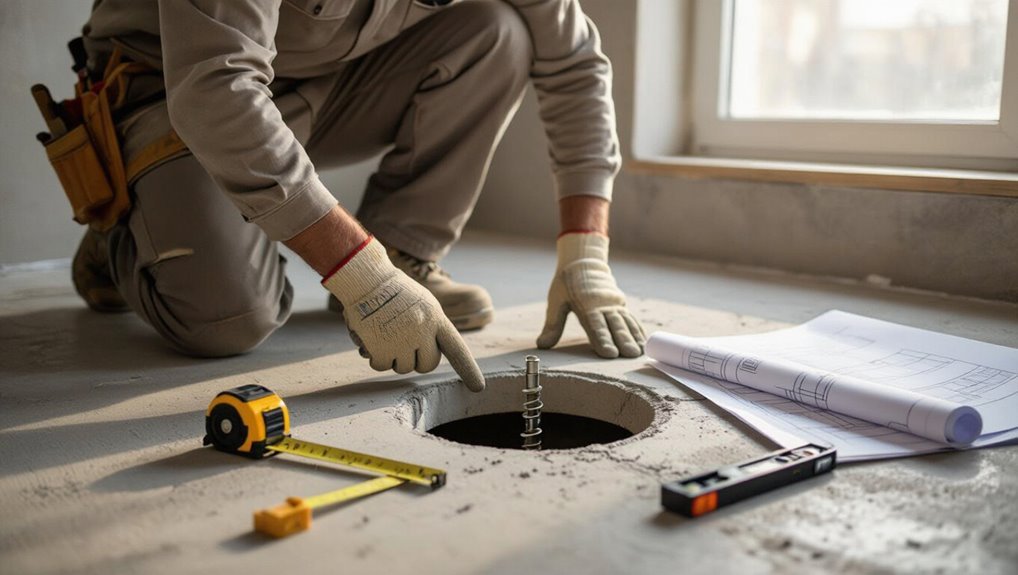
Because your shower drain must align with the home’s waste line and sit at the right depth, you should locate and measure the existing plumbing before cutting or pouring anything.
Use a stud finder with pipe mode or inspection camera, expose cleanouts or junctions, and confirm pipe diameter, invert elevation, and slope availability.
Note obstacles, clearances, and any need for rerouting or adapters.
Measure and mark drain location and slope plan
With the plumbing located and measurements recorded, you’ll lay out the exact drain position on the subfloor and sketch the slope plan.
Mark centerline, outlet alignment, and tile joints. Determine 1/4″ per foot slope toward drain. Confirm accessible cleanout.
Follow these steps:
- Mark drain center
- Draw slope lines
- Note high/low points
- Verify alignment with waste pipe
Check concrete thickness and reinforcement considerations
Check the slab thickness at several points and note any rebar or wire mesh so you can plan the drain cutout and support correctly.
Probe with a core drill or small hammer to verify depth to reinforcement. If rebar’s near the surface, adjust cut size or use hand tools to avoid damage.
Confirm remaining slab thickness meets structural and waterproofing requirements before cutting.
Step-by-Step Installation
Now you’ll walk through the actual install, starting by removing concrete and preparing the opening.
You’ll set the rough plumbing, connect the trap and drain pipe, then test for leaks and proper flow before installing the drain body at the correct elevation.
Finally, you’ll build the mortar bed with the required slope to the drain (typically 1/4 inch per foot) and secure everything in place.
Step 1 Remove concrete and prepare opening
Start by removing the old concrete and exposing the drain area so you can see the pipe and surrounding slab clearly.
Chip away concrete with a hammer and chisel or rotary hammer, keeping edges square. Clear debris, dust, and loose aggregate.
Check slab thickness and level. Protect surrounding tile.
Verify the opening is large enough for the drain body and any required flange adjustments.
Step 2 Set rough plumbing and connect trap and drain pipe
Lay out the rough plumbing so the drain, trap, and horizontal waste pipe line up and slope steadily toward the main soil stack; you’ll want a continuous fall of about 1/4 inch per foot to prevent standing water and sewer gas.
Position the trap, cut pipe to fit, deburr ends, and dry-fit components.
Glue or solder joints per material, secure pipe supports, and confirm alignment before backfilling.
Step 3 Test plumbing for leaks and proper flow
Pressure-test the rough plumbing and run flow checks to catch leaks and blockages before you close up the floor.
Fill the trap and pressurize the line per code, watch for pressure drop and visible drips.
Run multiple gallons of water, check for slow drainage or gurgling, inspect joints and cleanouts.
Repair or re-seat fittings until flow is steady and leak-free.
Step 4 Install drain body and secure to pipe at correct elevation
With the rough plumbing verified, you’re ready to set the drain body at the correct height and attach it to the waste pipe.
Position the flange so its top aligns with your planned finished floor level. Use a firm sealant or gasket, then secure the connection with the proper coupling or solvent weld.
Check alignment, tighten fasteners, and confirm a watertight joint.
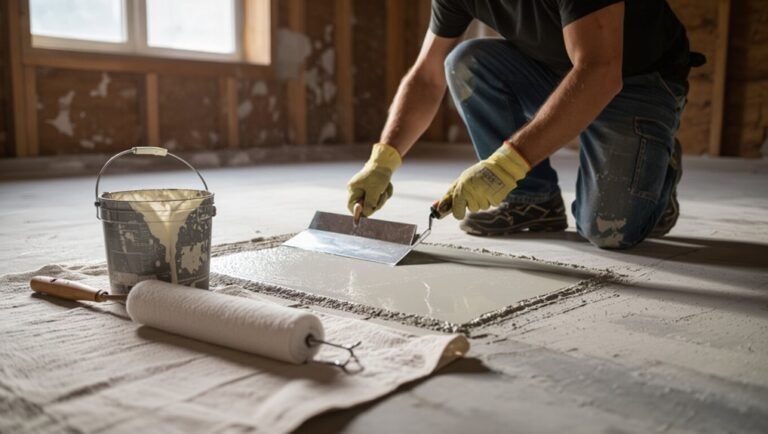
Step 5 Build mortar bed and create required slope to drain (show slope measurements)
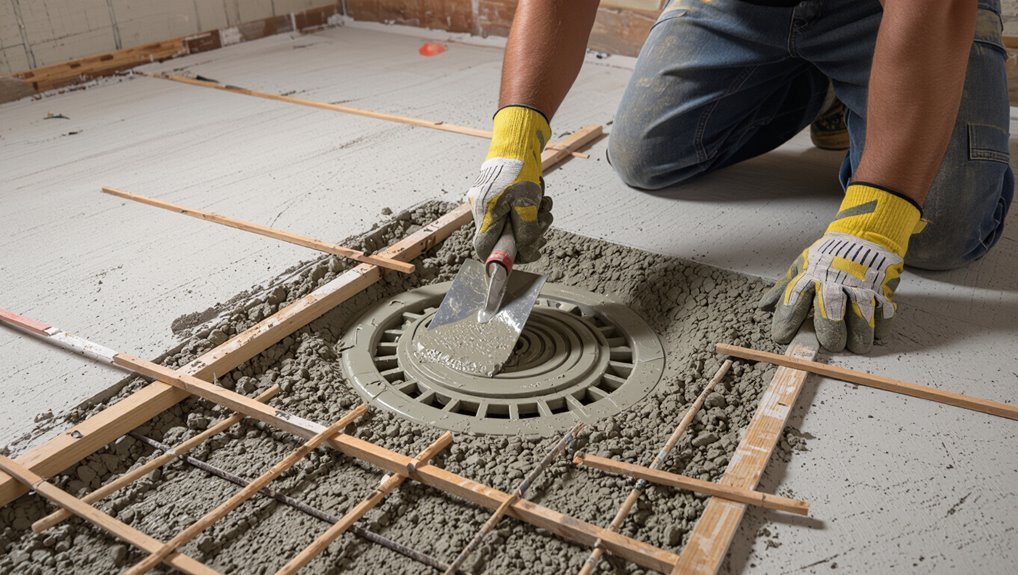
Now you’ll build the mortar bed that supports the tile and directs water—mix a 3:1 sand-to-portland cement mortar to a firm, workable consistency and spread it so the finished surface slopes uniformly toward the drain.
Trowel to create a consistent fall: 1/4″ per foot toward the drain (minimum), checking with a level or slope gauge.
Compact and smooth for tile setting.
Step 6 Apply waterproofing membrane and seal around drain flange
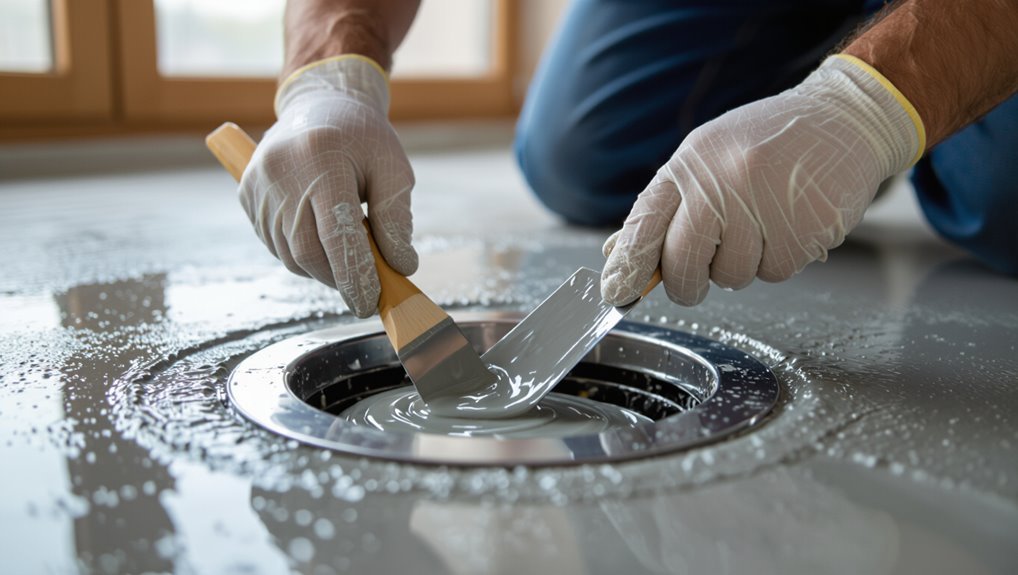
After the mortar bed is compacted and sloped, you’ll apply the waterproofing membrane to protect the assembly and keep water out of the substrate.
Roll or trowel membrane per manufacturer instructions, overlapping seams and extending up walls.
Cut and fit tightly around the drain flange, glue or bond flange gasket, then fasten and seal with approved sealant or tape to guarantee a watertight connection.
Step 7 Pour and finish top layer (thinset/tile underlayment or finished concrete)
Set the final surface carefully, whether you’re laying thinset and tile underlayment or pouring a finished concrete topping: this layer must be leveled to the proper slope toward the drain, bonded to the waterproofed base, and smoothed to receive the chosen finish.
Mix materials per manufacturer, apply uniformly, screed or trowel to slope, remove air pockets, cure as directed, and protect until ready for tile or finish.
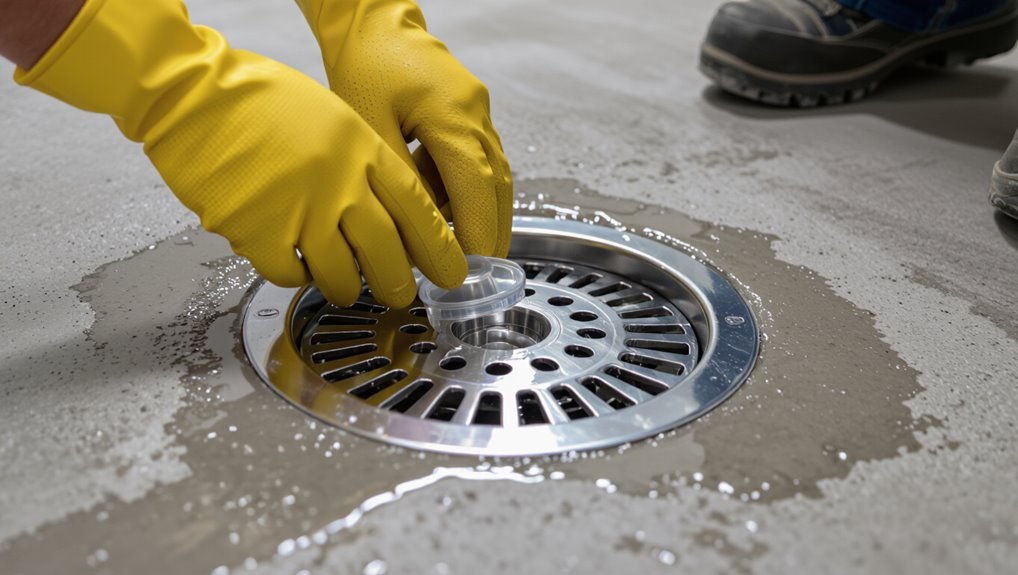
Step 8 Install tile or shower floor finish and finalize drain grate
With the topping cured and checked for proper slope, you can begin installing the tile or other chosen shower floor finish and fitting the drain grate.
Lay tiles from the drain outward, keeping grout joints consistent and slope intact.
Cut tiles neatly for a tight fit around the drain, set the grate flush with tile, and seal grout edges to prevent water intrusion.
Step 9 Final water test and inspection
1 final water test confirms the shower installation is watertight and functioning correctly.
Fill the pan to the recommended depth, let it sit for 15–30 minutes, and check for leaks at joints, the drain connection, and concrete seams.
Inspect the grate, trap access, and surrounding floor for any moisture.
Fix any issues, retest, document results, and restore finishes.
Alternative Scenarios and Solutions
If your main drain sits below the slab you’ll need to plan for a sump or pump and I’ll cover what to size and where to place it.
For retrofits in finished concrete, you’ll learn cutting, forming, and waterproofing tricks to avoid major demolition.
I’ll also explain how linear drains differ from center drains and the specific steps for installing them.
Installing drain when plumbing is below slab (sump or pump options)
When your bathroom floor sits above the main sewer line or a poured slab, you’ll need to install a dedicated sump or pump system to move shower discharge upward.
Choosing between a gravity-less sump basin and a macerating pump depends on available space, budget, and maintenance tolerance.
You should evaluate:
- Space and access
- Power availability
- Noise and odor controls
- Serviceability and cost
Retrofit drain installation in existing finished concrete floor
Having covered options for raising wastewater from below-slab plumbing, you may face a different challenge: installing a shower drain into an existing finished concrete floor without tearing up the whole slab.
You’ll core drill or chisel a neat hole, set a flange adapter or low-profile trap, slope mortar for drainage, and seal edges.
Test for leaks and match finished flooring around the repair.
Linear drain installation differences and steps

Because linear drains run along one edge or across a shower floor instead of the center, you’ll plan different slopes, waterproofing details, and connection methods than you’d for a traditional center drain.
You’ll slope the floor uniformly toward the linear channel, set a continuous waterproof membrane up the wall and over the curb, position the drain outlet to meet plumbing, and secure the grate level with tile.
Common Mistakes and How to Avoid Them
Watch for a few common mistakes that can turn a solid install into a problem: incorrect slope causing pooling, poor waterproofing leading to leaks, and a flange set at the wrong elevation or misaligned with the drain.
You’ll also need to follow local codes and schedule any required inspections to avoid failed approvals. Addressing these issues early saves time and prevents costly repairs.
Incorrect slope and pooling water
If your shower floor isn’t sloped correctly, water will pool instead of flowing to the drain, causing mildew, slippery surfaces, and eventual damage.
You should measure slope toward the drain—aim for 1/4 inch per foot—trowel the mortar bed accurately, and check with a level.
Rework any low spots before tiling to guarantee consistent drainage and prevent standing water.
Poor waterproofing and leakage
When you skip proper waterproofing or cut corners on seams and membrane overlap, water will find the weakest point and lead to leaks, mold, and costly repairs.
You should seal all joints, extend the membrane up walls, and use compatible adhesives and sealants.
Test with a controlled flood before finishing.
Fix flashing gaps and guarantee drains are sealed to the pan membrane.
Improper flange elevation or drain alignment
Because the flange sits at the interface between your shower pan and the drain, getting its elevation or alignment wrong will cause slow drainage, standing water, or leaks at the seal.
You should set the flange flush with the finished drain height, guarantee proper slope to the weep holes, and check alignment before pouring concrete.
Use a level and temporary supports to lock position.
Neglecting code or inspection requirements
Even though it might seem like extra red tape, skipping local plumbing codes or required inspections can cost you time and money and may force costly rework.
You should follow rules, get permits, and schedule inspections to avoid failures.
Key steps:
- Check local code.
- Obtain permit.
- Use approved parts.
- Arrange inspection before covering work.
Best Practices and Pro Tips
When you’re setting the mortar bed and laying tile, use a dry-packed mix and proper bonding techniques so the base stays solid and tiles don’t loosen.
Choose proven waterproofing products and apply membranes or coatings according to manufacturer instructions to prevent leaks.
Finally, schedule simple maintenance—clear debris, test the trap seal, and inspect seals—to keep the drain working long-term.
Tips for durable mortar beds and tile adhesion
A few simple practices make a mortar bed last and keep tile bonded: use the right cement type and mix to a stiff, buttery consistency, trowel proper notch depths for your tile size, and back-butter large or irregular tiles so you get full coverage with no voids.
Compact and screed the bed, control curing time, avoid overwatering, and clean trowel ribs before setting tiles.
Best waterproofing products and application techniques
Good waterproofing starts before the tile goes down: after your mortar bed is set and cleaned, pick materials and techniques that match your shower’s substrate and the traffic it will see.
Use bonded waterproof membranes, liquid-applied coats, and sealed flange connections.
Follow these priorities:
- Substrate prep
- Full-coverage membrane
- Proper slope maintenance
- Watertight drain flashing and seam sealing
Maintenance tips to keep drain functioning long-term
Because regular care prevents most clogs and corrosion, set a simple maintenance routine you can stick to: remove the grate weekly, clear hair and debris, flush with hot water, and use a noncorrosive enzyme cleaner monthly.
Inspect seals and surrounding tile for leaks quarterly, tighten or replace components as needed, and keep a small drain snake handy to tackle early blockages before they worsen.
Materials and Product Comparison Table
Now you’ll compare common drain types and materials so you can pick what fits your shower.
I’ll cover costs and the ideal use cases for PVC, ABS, brass, and stainless options.
That’ll help you match budget, longevity, and installation needs.
Drain types, materials, costs, and ideal use cases
When you’re choosing a shower drain, pick the material and style that matches your shower type, budget, and maintenance preferences; each option—from PVC pop-up units to stainless-steel linear drains—has trade-offs in durability, cost, and installation complexity. Choose PVC for low cost, cast iron for longevity, stainless for aesthetics, and linear for accessibility.
| Type | Best use |
|---|---|
| PVC pop-up | Budget, DIY |
| Cast iron | Heavy-duty, long life |
| Stainless linear | Accessible, modern |
| Brass/trap | Decorative, durable |
Troubleshooting Guide
If your shower’s slow to drain, leaks under concrete, or you’re hearing gurgles and smelling sewer odors, you’ll want to troubleshoot quickly to avoid bigger damage.
I’ll walk you through common causes and fixes for slow drainage, how to detect and repair leaks beneath concrete, and what to do about noise, odors, and venting problems.
Follow the checks and simple repairs so you can pinpoint the issue and decide whether you can fix it yourself or need a pro.
Slow drainage causes and fixes
Because shower drains handle hair, soap scum, and mineral buildup every day, slow drainage often starts long before you notice it.
Check and remove visible clogs, then use a drain snake for deeper blockages.
Flush with hot water and a baking soda-vinegar treatment to dissolve residue.
Replace a damaged strainer or trap if flow remains restricted, and clean regularly to prevent recurrence.
Leak detection and repair under concrete
Detecting and repairing leaks under concrete takes systematic steps and the right tools, since you can’t see the pipe directly.
Start by isolating the drain, run a water test, and use a pressure gauge or acoustic leak detector to locate the breach.
If confirmed, expose the section minimally, cut and replace the damaged pipe or use epoxy repair sleeves, then re-test before patching concrete.
Dealing with noise, odors, and venting issues
When your shower drain sings, gurgles, or lets sewer smells into the bathroom, you’ll want to tackle the cause quickly to prevent bigger problems.
This guide walks through the common sources—blocked traps, dry vents, loose fittings, and venting defects—and shows practical checks and fixes you can do before calling a pro.
Check the trap seal, clear hair clogs, run water to re‑prime, inspect vent caps, tighten fittings, and use a snake or mild enzymatic cleaner.
If noises persist or vents are inaccessible, call a plumber.
When to Hire a Professional vs. DIY
If the job involves complex plumbing, cutting into a slab, or strict local codes, you should hire a pro rather than attempt it yourself.
Before you sign anything, ask a plumber about licensing, insurance, references, estimated timeline, and whether permits are required.
Get a written quote and clarify who’s responsible for code compliance and cleanup.
Criteria for hiring (complex plumbing, slab cutting, code)
Because cutting into a slab, rerouting drains, or meeting local code can quickly turn a weekend job into a costly mistake, you should hire a licensed plumber for anything beyond simple drain swaps or installing a new shower in an existing pan.
Evaluate these triggers to hire:
- Slab cutting or structural work
- Major rerouting of waste lines
- Permit or code compliance required
- Complex venting or multi-bath systems
Questions to ask a plumber or contractor
Wondering what to ask a plumber or contractor before you decide to hire them or tackle the job yourself?
Ask about licensing, insurance, and local code experience.
Request references and photos of similar slab work.
Get a written scope, timeline, and detailed estimate with permits and cleanup.
Ask who handles unexpected issues, warranty terms, and how they protect surrounding finishes.
Frequently Asked Questions (FAQ)
You probably have a few quick questions before you start, like how deep the drain needs to sit in a concrete slab and whether you can install one without cutting the slab.
You’ll also want to know what waterproofing a curbless drain needs, how much slope to pitch toward the drain, and how long to wait before using the shower.
Below are clear answers to each of those points.
How deep should the drain set be in a concrete slab?
How deep should the drain set be in a concrete slab?
You’ll set the drain so the top of the flange sits slightly below finished tile level, typically 1/8″–1/4″ for tile and mortar bed.
Allow enough depth for the membrane, mortar bed and slope to drain toward the weep holes.
Verify local code and plumbing fit before pouring concrete.
Can I install a shower drain without cutting the slab?
Is it possible to fit a shower drain without cutting into the slab? You can in some cases: use an above-slab drain assembly that sits on top of the concrete, connect to existing nearby waste lines, or route through wall or ceiling chases.
These options depend on floor height, slope needs, and existing plumbing layout. Consult a plumber to verify feasibility and local code compliance.
What waterproofing do I need for a curbless shower drain?
If you managed to avoid cutting the slab by routing waste elsewhere, the next big concern is keeping water out of the subfloor with a curbless shower.
You’ll need a continuous waterproof membrane (sheet or liquid-applied) lapped into the drain flange, waterproofed curb or threshold alternative, and sealed joints at walls and penetrations.
Use compatible drains and test for leaks before finishing.
How much slope is required toward the drain?
Most codes and manufacturers call for a 1/4-inch per foot slope toward the drain, which gives you reliable drainage without feeling steep underfoot.
Measure and set the fall from all walls to the drain, keeping it consistent. Use a leveling tool or straightedge during screeding, check changes at curbs or niches, and correct low spots to prevent pooling.
How long before I can use the shower after installation?
Once you’ve got the slope and screed right, you’ll want to know when the shower’s safe to use.
Wait for the concrete and mortar to cure—typically 24–48 hours for light use, but full strength can take 7 days; waterproof membranes often need 24–72 hours.
Test for leaks and proper drainage before regular use.
Follow product instructions for exact cure times.