How Thick Is Vinyl Flooring? A Guide to Wear Layers and Total Thickness
Vinyl flooring thickness varies a lot, so you’ll want to match type to use: sheet vinyl runs about 1.5–3 mm, standard vinyl plank/LVT is 2–8 mm, VCT sits near 3.2 mm, and rigid-core WPC/SPC ranges 3–8 mm. Wear layers are measured in mils—6 mil for light use, 12 mil for most homes, and 20+ mil for heavy traffic. Thicker products feel firmer and last longer, and if you keep going you’ll get tips on installation, comfort, and cost.
Quick Answer How Thick Is Vinyl Flooring?
You’ll typically find vinyl plank and LVT running about 2–8 mm thick, with thicker options offering better durability.
Sheet vinyl is usually much thinner, around 1–3 mm, while VCT is thicker and more rigid, often 3–5 mm before waxing.
This quick snapshot helps you compare options at a glance.
Short summary of typical thickness ranges for vinyl plank, luxury vinyl tile (LVT), sheet vinyl, and vinyl composite tile (VCT)
Vinyl flooring comes in several common thickness ranges: vinyl plank and luxury vinyl tile (LVT) usually measure between 2mm and 8mm, with higher-end products often 5–8mm for better durability and underfoot feel; sheet vinyl is thinner, typically 1.5–3mm (though cushioned or commercial-grade sheets can be thicker); and vinyl composite tile (VCT) is generally about 3.2mm (1/8 inch) thick, sometimes slightly more for heavy-duty commercial tiles.
| Type | Typical Thickness | Notes |
|---|---|---|
| Vinyl plank/LVT | 2–8mm | 5–8mm for premium |
| Sheet vinyl | 1.5–3mm | Cushioned variants thicker |
| VCT | ~3.2mm | Commercial use |
Basics What Thickness Means for Vinyl Flooring
You’ll want to understand the layers that make up vinyl flooring—the wear layer, printed design layer, vinyl core, and backing—because each one affects durability and feel.
Total thickness and wear-layer thickness are different: total thickness refers to the full product depth, while wear layer thickness is the protective top coat that resists scratches.
Thickness is commonly expressed in millimeters for total depth and in mils (thousandths of an inch) for wear layers, so check both when comparing options.
Layers of vinyl flooring explained (wear layer, vinyl core, printed layer, backing)
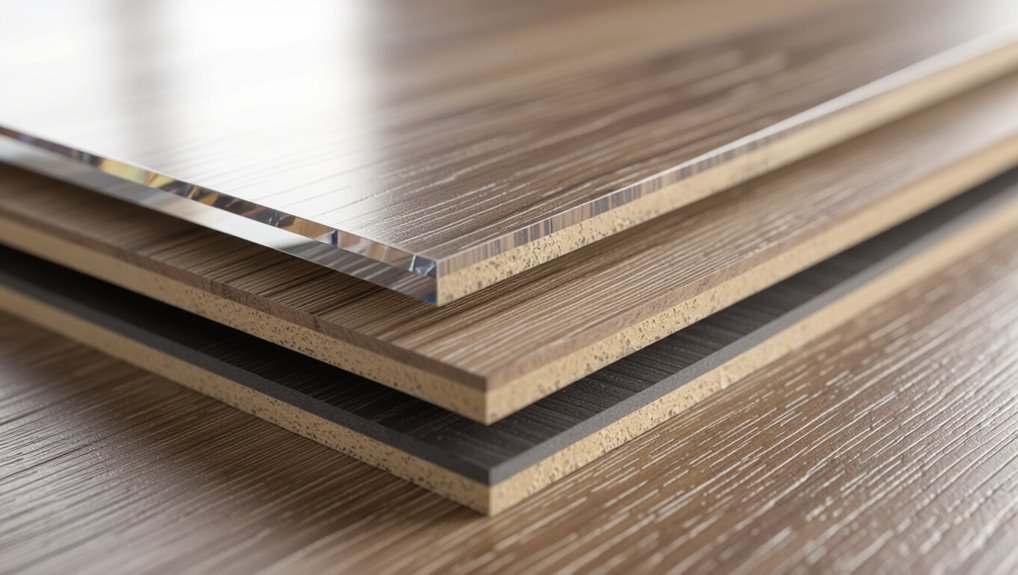
Think of vinyl flooring as a layered sandwich: each layer—the wear layer, printed design, vinyl core, and backing—has a specific job that affects durability, comfort, and how thickness is measured.
You rely on the wear layer for scratch and stain resistance, the print for appearance, the core for stability and resilience, and the backing for moisture protection and installation support.
Definitions: total thickness vs wear layer thickness vs overall construction
Because thickness can mean different things, it helps to be precise: total thickness measures the full plank or tile from top wear layer to bottom backing.
Wear layer thickness refers only to the transparent protective coating that resists scratches and stains.
Overall construction covers how those layers are assembled—rigid core, flexible vinyl, or layered vinyl—each affecting performance, feel, and installation.
You’ll use these distinctions to compare durability, comfort, and suitability for specific rooms.
Common thickness measurements and units (mm vs mil)
Thickness in vinyl flooring is usually given in either millimeters (mm) or mils, and knowing the difference helps you compare products quickly.
You’ll see total thickness in mm (common for planks/tiles) and wear layer in mils (1 mil = 0.001 inch).
Convert when needed: 25.4 mm equals 1000 mils.
Use mm for overall depth, mils for protective layer.
Typical Thickness Ranges by Product Type
Next, you’ll look at how thickness varies by vinyl type so you can pick the right product for your space.
Luxury vinyl plank (LVP/LVT) usually lists total thickness and separate wear layer options, while waterproof rigid core (WPC/SPC) adds thicker, denser cores for stability.
Sheet vinyl tends to be thinner and used in utility areas, and commercial options like VCT follow stricter thickness and durability standards.
Luxury Vinyl Plank (LVP/LVT) total thickness and wear layer options
Luxury vinyl plank (LVP) and tile (LVT) come in a range of total thicknesses—from about 2 mm for budget sheets up to 8 mm or more for premium rigid-core options—so you’ll want to match thickness to your subfloor, traffic level, and comfort preferences. Choose wear layers: 6–8 mil for light use, 12–20 mil for homes, 20+ mil for commercial.
| Total | Wear layer | Use |
|---|---|---|
| 2–3 mm | 6–12 mil | Low |
| 4–6 mm | 12–20 mil | Home |
Sheet vinyl typical thicknesses and where used
Sheet-vinyl comes in several common builds—light-gauge rolls, cushioned sheet, and heavy commercial-grade—each sized for different rooms and traffic. You’ll pick light (0.8–1.5 mm) for temporary or low-traffic spaces, cushioned (2–3 mm) for comfort in kitchens, or heavy (3.5–5 mm) for long-lasting durability in busy areas.
| Type | Thickness | Typical Use |
|---|---|---|
| Light-gauge | 0.8–1.5 mm | Short-term/low traffic |
| Cushioned | 2–3 mm | Kitchens, bathrooms |
| Heavy commercial | 3.5–5 mm | High-traffic areas |
Vinyl composite tile (VCT) and commercial vinyl thickness standards
When you’re choosing commercial flooring, vinyl composite tile (VCT) and other commercial vinyl products follow stricter thickness conventions because durability and maintenance cycles matter in high-traffic settings.
You’ll commonly see VCT at 1/8″ to 1/4″ (3–6 mm) with multiple filler layers; commercial sheet vinyl ranges 2–5 mm with heavier wear layers.
Specify thickness based on foot traffic, rolling loads, and maintenance frequency.
Waterproof rigid core (WPC/SPC) vinyl thickness and core differences
Several rigid-core vinyl options exist, and they differ mainly by core composition and overall thickness:
WPC (wood-plastic composite) and SPC (stone-plastic composite) both offer waterproof performance, but WPC cores are slightly thicker and more cushioned while SPC cores are denser and more rigid.
You’ll find WPC usually 5–8mm, SPC 3–7mm; choose based on comfort, stability, and subfloor needs.
How Wear Layer Affects Durability and Performance
The wear layer is the clear top coating that absorbs scratches, stains, and daily wear, and it typically comes in 6 mil, 12 mil, or 20+ mil thicknesses.
Thicker wear layers give you better scratch and stain resistance and a longer lifespan, while thinner ones save cost but wear faster.
For most homes you’ll be fine with 12 mil, but choose 20+ mil for high-traffic or commercial spaces and 6 mil only for low-use areas.
What the wear layer does and standard wear-layer thicknesses (6 mil, 12 mil, 20+ mil)
A vinyl plank’s wear layer is the clear, protective film on top that takes the brunt of foot traffic, scratches, and stains, and its thickness—measured in mils—directly shapes how long the floor will hold up: 6-mil suits low-traffic rooms, 12-mil works for most homes, and 20+ mil is best for heavy commercial use or busy households.
| Use | Mil | Typical space |
|---|---|---|
| Light | 6 | Bedrooms |
| Residential | 12 | Living rooms |
| Heavy | 20+ | Commercial |
Impact on scratch resistance, stain resistance, and lifespan
Now that you know how wear-layer thickness categories map to rooms and traffic levels, let’s look at what that layer actually does for durability.
A thicker wear layer improves scratch resistance, shields the printed film from scuffs, and provides better stain protection from spills and cleaners.
It also extends usable lifespan by delaying visible wear, so high-traffic areas maintain appearance longer with proper care.
Which wear layer to choose for residential vs commercial settings
Wondering which wear layer suits your space?
For homes, choose 6–12 mil for bedrooms and living areas. Use 12–20 mil for high-traffic zones or pets.
For commercial settings, use 20–28+ mil for heavy foot traffic, retail, or hospitality.
Thicker wear layers resist scratches, scuffs, and require less frequent replacement.
Match wear layer to expected use to optimize lifespan and performance.
How Total Thickness Affects Installation and Comfort
The total thickness of vinyl flooring affects how it feels underfoot and how much sound it absorbs, so you’ll notice thicker planks are generally quieter and more comfortable.
You’ll also need to evaluate subfloor flatness and whether extra underlayment or adjustments are required at changes and thresholds.
Finally, check door clearances, trim heights, and stair nosing so the new thickness doesn’t interfere with operation or safety.
Sound absorption and underfoot comfort by thickness
Thicker vinyl floors usually feel softer underfoot and reduce impact noise more effectively than thinner options. So you’ll notice less echo and footfall in busy rooms.
You’ll also find enhanced comfort during long standing periods and quieter footsteps when people move.
Higher total thickness often pairs with integrated cushion or padding, improving resilience and minimizing vibration without changing basic installation steps.
Subfloor requirements and transition/threshold considerations
Because total vinyl thickness changes how the floor sits and flexes, you’ll need to check subfloor flatness, height, and changes before installing.
Thicker vinyl tolerates minor irregularities but may need firmer, flatter substrates. Measure changes and thresholds to guarantee smooth ramps and adhesive compatibility.
Use underlayment where recommended to stabilize, prevent telegraphing, and maintain consistent feel across adjoining rooms.
Impact on door clearances, trims, and stairs
1 key measurement you’ll need before installing vinyl is door clearance: total floor thickness (vinyl plus underlayment and adhesive) directly affects whether doors will swing freely, trim will sit flush, and stair nosing will align.
Measure thresholds, adjust door bottoms if needed, choose appropriate threshold strips, and plan stair edge profiles so risers and nosings match for safety and a professional finish.
Comparison Thin vs Thick Vinyl: Pros and Cons
You’ll find thinner vinyl is cheaper, more flexible, and makes shifts easier when you’re installing.
Thicker vinyl, meanwhile, gives you greater stability, a nicer underfoot feel, and better long-term durability.
Consider your budget and how the floor will be used to choose between the two.
Advantages of thinner vinyl (cost, flexibility, easier transitions)
While thinner vinyl might seem like a compromise, it brings clear benefits: it’s cheaper up front, bends and conforms more easily around corners and changes, and simplifies thresholds between rooms so installations finish faster and look cleaner.
You’ll save on material and labor, handle tight curves without heat, and create smooth shifts that reduce trip hazards—ideal for budget projects and tricky layouts.
Advantages of thicker vinyl (stability, feel, longevity)
Thinner vinyl has its place, but thicker vinyl brings advantages that matter over time: it sits firmer underfoot, resists dents and gouges better, and stays flatter across imperfect subfloors so you get fewer squeaks and seams. You’ll notice better sound control, durability, and comfort.
| Benefit | Impact |
|---|---|
| Stability | Sits flat |
| Durability | Fewer dents |
| Comfort | Softer feel |
Step-by-Step Guide Choosing the Right Thickness for Your Project
Start by identifying how you’ll use the room and how much foot traffic it gets so you can gauge durability needs.
Then match the wear layer to that expected usage, account for your subfloor condition and any underlayment needed, and finally check manufacturer warranties and ratings to confirm suitability.
Following these steps will help you choose the right vinyl thickness for your project.
Step 1: Identify the room use and traffic level
How will the room be used and how much traffic will it see?
Consider daily activities: bedrooms get light footfall, kitchens and entryways face heavy, moist traffic, and living rooms vary.
Think about pets, kids, furniture movement, and rolling chairs.
Note long-term wear patterns and cleaning frequency.
This assessment guides your thickness and durability priorities before comparing wear layers.
Step 2: Match wear layer to expected usage
Now that you’ve assessed room use and traffic, it’s time to match that profile to a specific wear layer.
Choose 6–12 mil for low-traffic bedrooms, 12–20 mil for busy living areas and kitchens, and 20+ mil for commercial spaces or heavy wear.
Consider pets, kids, and furniture—thicker wear layers resist scratches and denting, extending lifespan and reducing replacement frequency.
Step 3: Consider subfloor condition and required underlayment
Because your subfloor sets the foundation for performance, check its material, flatness, and moisture before picking flooring thickness and underlayment.
If it’s uneven or damp, thicker vinyl or a quality underlayment can mask minor imperfections and provide moisture protection.
For plywood or concrete, verify tolerance levels and choose underlayments that add cushioning, sound control, and vapor barriers as needed for your room’s conditions.
Step 4: Check manufacturer warranties and ratings
When you’re choosing vinyl thickness, check the manufacturer’s warranty and product ratings to understand what performance they guarantee and under which conditions.
You’ll learn expected lifespan, wear resistance, and any installation or maintenance requirements that affect claims.
Compare warranty length, coverage for residential vs. commercial use, and finish protection to match your needs.
- Feel secure with solid coverage
- Avoid costly surprises
- Trust proven performance
Common Mistakes When Selecting Vinyl Thickness
Don’t pick vinyl just by total thickness — the wear layer matters more for durability.
You’ll also want to address subfloor prep and connections, because even a thick plank won’t perform well over uneven surfaces.
And don’t overpay for extra thickness in low-traffic rooms where a standard wear layer will do.
Choosing based solely on total thickness instead of wear layer
If you only look at a vinyl plank’s total thickness, you can be misled into thinking thicker always means tougher—when the wear layer is what really resists scratches, dents, and everyday traffic.
Don’t pick flooring by overall millimeters alone; check the wear layer rating (millimeters or mils) and abrasion class.
A thin plank with a robust wear layer often outperforms a thicker plank with a weak one.
Ignoring subfloor preparation and transitions
You’ve just learned that wear layer matters more than total thickness, but there’s another common mistake that’ll undermine any good choice: skipping proper subfloor prep and planning for thresholds and room joins.
If you don’t level, clean, and moisture-test the subfloor, planks won’t sit right.
Also map junction strips and door clearances so edges won’t lift or gap over time.
Overpaying for unnecessary thickness for low-traffic areas
Spending more on extra-thick vinyl for a low-traffic guest room or closet can waste money without adding meaningful durability. In those spaces, a standard thickness with a good wear layer will perform just as well.
You should match thickness to use: reserve premium, thicker planks for busy areas. Prioritize wear-layer rating and proper installation over chasing maximum total thickness.
Installation and Maintenance Tips Related to Thickness
When you’re installing thin vinyl, plan for a perfectly smooth subfloor and lighter adhesive techniques, while thicker vinyl can handle minor imperfections and may need heavier rollers.
Choose underlayment based on thickness—paper-backed or thin foam for slim planks, denser cork or rubber for thicker or SPC/LVT products—to control sound and stability.
Maintain floors according to the wear layer: softer wear layers need gentler cleaning and more frequent resealing or replacement, while robust wear layers tolerate more traffic and harsher cleaning.
Best practices for installing thin vs thick vinyl
Because thin and thick vinyl behave differently under foot traffic and subfloor conditions, you’ll need distinct installation and maintenance approaches for each.
For thin vinyl, make certain the subfloor is extra smooth, repair gaps, and use careful adhesive application to prevent telegraphing.
For thick vinyl, focus on proper acclimation, secure seam welding, and routine inspections for edge lifting; both benefit from gentle cleaning and prompt spill care.
Underlayment recommendations by thickness/type
Now that you’ve adjusted installation and maintenance for thin versus thick vinyl, pick the right underlayment to support those choices.
For thin vinyl, use a moisture-resistant, firm underlayment with minimal compressibility to prevent telegraphing.
For thicker vinyl or luxury vinyl plank, choose cushioned underlayment with sound reduction and slight give.
Match manufacturer specs and check subfloor flatness before laying.
Maintenance practices that extend lifespan based on wear layer
If you want your vinyl to last, match your maintenance to the wear layer: thinner wear layers need gentler care and more frequent protection, while thicker wear layers tolerate heavier traffic and more aggressive cleaning.
For thin wear layers, use soft brooms, microfiber mops, felt pads, and area rugs; clean spills promptly.
For thick wear layers, you can deep-clean periodically and use commercial vinyl cleaners as recommended.
Cost Considerations How Thickness Affects Price
When you compare vinyl options, you’ll see thicker wear layers and greater total thickness usually cost more upfront, with typical price ranges reflecting those differences.
Think beyond initial price: thicker, more durable vinyl often needs replacement less frequently, lowering your long-term cost.
We’ll look at how wear-layer ratings and overall thickness translate to both sticker price and lifecycle value.
Price ranges by wear layer and total thickness
Thickness and wear-layer ratings directly shape vinyl flooring costs: as you move from thin 6–8 mil residential wear layers to heavier 20–28+ mil commercial grades and thicker overall plank constructions (2–8 mm or more for LVT/WPC), prices rise correspondingly because durability, comfort, and installation options improve.
Expect budget 6–12 mil sheets or thin planks around $1–$3/ft², mid-range 12–20 mil at $3–$6/ft², and premium 20–28+ mil or thicker LVT/WPC from $6–$12+/ft².
Long-term cost vs upfront cost (replacement frequency, durability)
Because vinyl comes in a wide range of constructions, you’ll pay more up front for thicker, heavier products but likely save money over time through fewer replacements and lower maintenance.
Thicker wear layers resist scratches, dents, and moisture, extending service life.
Choose based on traffic and budget: invest more where durability matters, and opt for thinner, cheaper options in low-use areas to minimize overall lifecycle costs.
FAQ
You probably have quick questions like whether thicker vinyl is always better, what wear layer you need for pets and kids, and if you can install thick vinyl over existing floors.
You’ll also want to know how to measure thickness accurately and whether thickness affects waterproofing.
Let’s answer these so you can pick the right product for your home.
Is a thicker vinyl always better?
Although thicker vinyl often gives you better durability and cushioning, it isn’t always the best choice for every situation.
You should weigh factors like subfloor flatness, installation method, budget, and room use. Thicker plank can hide imperfections and feel sturdier, but thin options may suit tight budgets, height constraints, or glue-down installs.
Choose based on specific needs, not just thickness.
What wear layer thickness do I need for pets and kids?
How thick should the wear layer be when you’ve got pets and kids underfoot? Aim for 20 mil or higher for busy households—30 mil if you want extra durability and scratch resistance. Thicker wear layers resist claws, toys, and heavy foot traffic, and they extend lifespan. Combine that with easy-clean surfaces and stain-resistant vinyl to minimize maintenance and protect your investment.
Can I install thick vinyl over existing flooring?
Wondering if you can lay thick vinyl over your current floor? Yes, often you can, especially over smooth, level surfaces like existing vinyl or tile.
You’ll need clean, dry, and flat subfloors; remove loose trim and fill gaps. Thick vinyl can hide minor imperfections but not major damage or unevenness.
Check manufacturer guidelines for adhesives and height changes.
How do I measure vinyl thickness accurately?
Want to get an exact vinyl thickness? Use a digital caliper or micrometer on an unattached sample, measuring at several points—edge, center, and worn areas—to account for variations.
For multilayer products, measure total thickness and then carefully slice a cross-section to isolate the wear layer.
Record averages from multiple readings for a reliable, repeatable result.
Does thickness affect waterproof performance?
Although thicker vinyl can feel more substantial, thickness alone doesn’t guarantee waterproof performance; the material composition and installation matter most.
You should look for fully waterproof cores (WPC/SPC or vinyl with waterproof backing), sealed seams, and proper perimeter caulking.
Thickness helps comfort and sound, but to prevent water intrusion, choose products and installation methods rated for wet areas and follow manufacturer guidelines.