How to Install a Shower Floor Pan the Right Way the First Time
You’ll start by removing old materials, inspecting and leveling the subfloor, and confirming drain alignment. Pick the right pan—prefab, mud, or tiled—and gather drain parts, mortar, membrane, and tools. Dry-fit the pan, set a 1/4″ per foot slope on a solid mortar bed or compatible base, install a waterproof liner or membrane with sealed seams, secure the drain, and flood-test for leaks. Keep going to learn detailed steps, timing, and troubleshooting.
How to Install a Shower Floor Pan the Right Way the First Time
You’ll get the pan right the first time by choosing the correct size, ensuring a solid, level subfloor, and installing proper drainage and waterproofing.
Install or replace the pan when you’re remodeling, when leaks or soft spots appear, or if the existing pan shows cracks or failed seals.
Follow manufacturer specs and check local codes to avoid costly rework.
Quick Answer Summary of the Right Way (Direct, actionable overview)
Start by prepping the subfloor, drain and materials so you won’t stall mid-job: remove old flooring, patch or level the subfloor, set the drain flange at the correct height, and lay out a mortar bed plan.
Follow these steps for how to install a shower floor pan quickly and correctly:
- Dry-fit pan and drain alignment.
- Mix and slope mortar bed.
- Set pan, embed drain flange.
- Waterproof seams and test drainage.
When to Install or Replace a Shower Pan (scope and indicators)
After you’ve prepped the subfloor and confirmed the drain alignment, decide whether the existing pan can be salvaged or needs full replacement by checking for leaks, soft spots, persistent odors, or visible cracks.
If the shower has chronic drainage problems, water-stained ceiling below, or mold that returns after cleaning, plan on replacing the pan rather than patching.
- Inspect for soft spots and structural rot.
- Test for slow drainage and standing water.
- Smell for persistent mildew or mustiness.
- Look for visible cracks, warping, or previous repairs.
Basic Understanding What a Shower Floor Pan Is and Why Proper Installation Matters
Before you start, know that shower pans come as prefab units, custom mortar (mud) pans, or tiled pans—each needs different materials and techniques.
You’ll work with parts like the drain assembly, flange, mortar or membrane, and must create the proper slope for drainage.
Also check local codes and waterproofing standards so your installation stays watertight and compliant.
Types of Shower Pans: Prefab, Custom Mortar (Mud) Pan, and Tiled Pan
When you’re choosing a shower pan, you’ll pick among prefab pans, custom mortar (mud) pans, and tiled pans—each offers different trade-offs in cost, installation complexity, durability, and customization. You’ll weigh speed and affordability (prefab), flexibility and permanence (mud), or finish variety (tiled).
| Type | Pros | Cons |
|---|---|---|
| Prefab | Quick, cheap | Limited sizes |
| Mud | Durable, flexible | Labor-intensive |
| Tiled | Custom looks | Requires waterproofing |
Key Components and Materials (drain assembly, flange, mortar, membrane, slope)
Because a shower pan is a system, not just a surface, you need to understand its key parts—the drain assembly and flange, the mortar or sub-base, the waterproof membrane, and the slope that directs water—so you can install or evaluate it correctly.
Know each component’s role, compatibility, and sequencing to prevent leaks and guarantee drainage.
- Drain assembly
- Flange
- Mortar/sub-base
- Membrane/slope
Common Codes and Waterproofing Standards to Know
You’ve learned the parts that make a shower pan work; now you need to know the codes and waterproofing standards that govern how those parts must be installed.
Follow local plumbing codes, IRC/IPC drain requirements, and manufacturer instructions. Use approved membranes, vapor barriers, proper slope, and tested seams.
Inspect flashing, curb detailing, and venting. Obtain permits and schedule inspections to guarantee compliance.
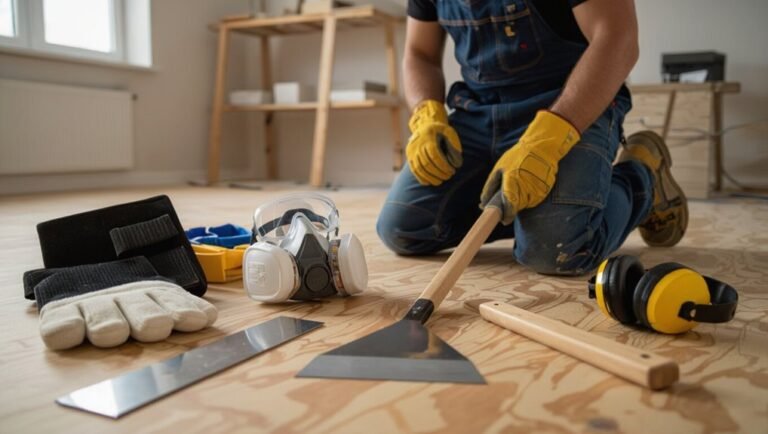
Tools, Materials, and Site Preparation
Before you start, gather the right tools—both power and hand tools—and the materials specific to your pan type (prefab, mortar, or tiled).
Clear the space, remove old fixtures, and inspect and measure the subfloor and drain location.
If you find rot, unevenness, or joist issues, you’ll need to repair or reinforce the structure before installing the pan.
Tools Checklist (power and hand tools)
When you’re getting ready to install a shower floor pan, gather both power and hand tools so the job flows without interruptions: a drill and driver, circular saw or jigsaw, reciprocating saw for any demo, level, tape measure, carpenter’s square, utility knife, caulk gun, adjustable wrench, pliers, and a set of screwdrivers and chisels.
- Inspect tool condition.
- Charge batteries and stock bits.
- Arrange tools by task.
- Keep safety gear handy.
Material Checklist by Pan Type (prefab vs. mortar vs. tiled)
Now that your tools are organized and ready, match the materials to the pan type you’ll install: prefab, mortar (deck mud), or tiled pan.
You’ll pick pans, drains, waterproofing, and bedding based on type.
- Prefab: pan, flange drain, silicone sealant, backerboard clips.
- Mortar: liner, weep holes, deck mud, screed tools.
- Tiled: waterproof membrane, thinset, tile, grout.
Pre-install Site Prep: Demolition, Subfloor Inspection, and Measuring
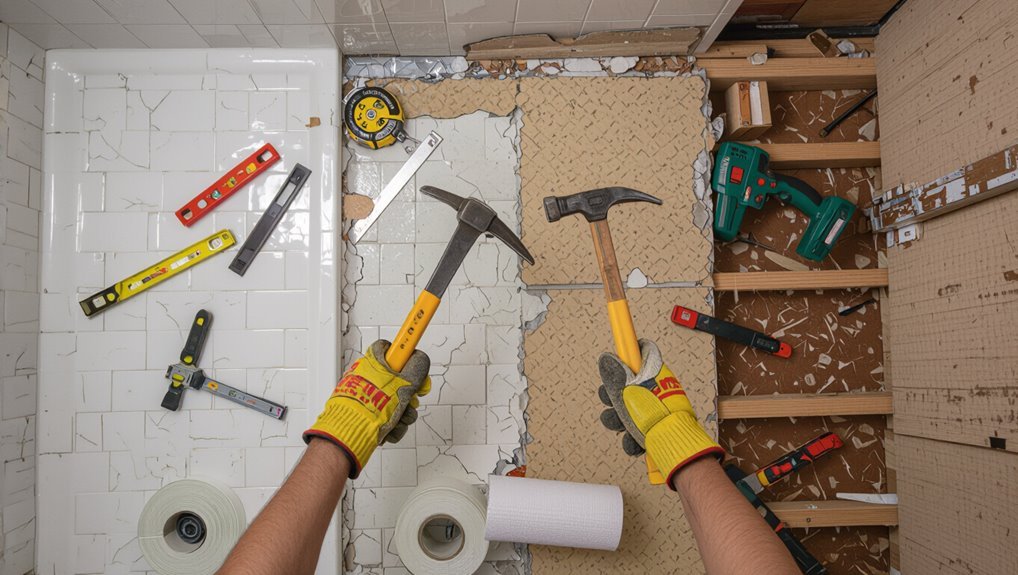
Start by clearing the space and taking careful measurements so you know exactly what you’re working with; remove the old pan, trim back damaged drywall, and sweep debris away.
Inspect the exposed subfloor for level, moisture, and fastener security. Verify drain placement and dry-fit the pan.
Gather tools and materials so installation proceeds smoothly.
- Tape measure
- Level
- Pry bar
- Shop vacuum
Assessing and Repairing Subfloor and Joist Issues
Before you set the pan, inspect the subfloor and joists for rot, soft spots, and movement so you can fix problems that would compromise the new installation.
Check underlayment thickness, fastener integrity, and joist spacing.
Remove damaged sections, sister joists where needed, replace plywood with exterior-grade or cement board, and secure everything with screws and construction adhesive.
Guarantee a level, solid base before proceeding.
Step-by-Step Installation Primary How-To Process
Start by dry-fitting the pan and aligning the drain so you can see how everything will sit.
Then prepare the drain assembly and either set a prefab pan or mix and screed a mortar bed to get a true slope.
Finish by installing the waterproofing membrane or liner with proper overlaps and sealed connections.
Step 1 Dry Fit and Layout (positioning the pan and drain)
1. You’ll dry fit the pan to confirm placement, alignment, and access before finalizing. Move it into position, check level, and ascertain the drain opening lines up with rough-in.
- Mark pan edges and drain center.
- Verify pan slopes toward drain.
- Check wall studs and curb alignment.
- Confirm clearance for shower door or curtain.
Step 2 Prepare the Drain and Waste Assembly (adapters, flange, weep holes)
Now you’ll prepare the drain and waste assembly so the pan will channel water properly: install the drain adapter and flange, guarantee the weep holes are clear, and confirm the drain lines up with the pan opening.
Tighten connections, test fit, and clear debris.
Then:
- Apply plumber’s putty or gasket to flange.
- Thread adapter to waste pipe.
- Clear weep holes with wire.
- Verify vertical alignment.
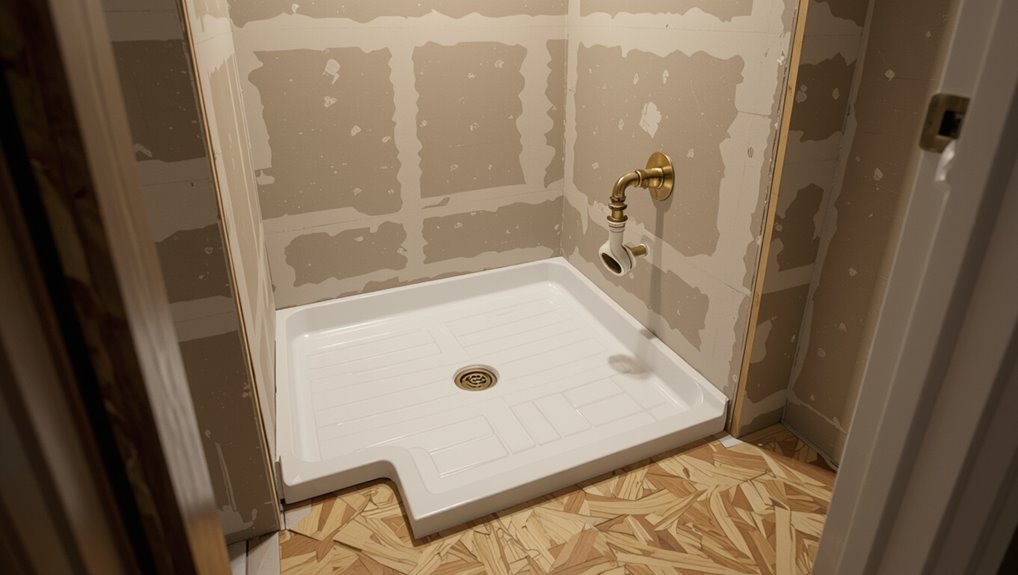
Step 3 Set the Shower Pan (prefab pan placement and leveling)
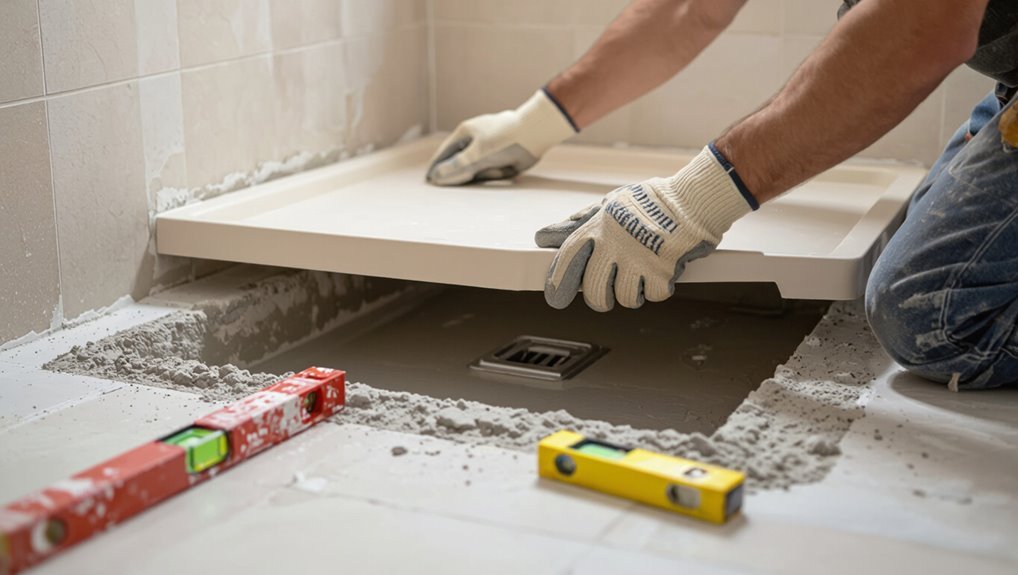
With the drain and waste assembly secured and the weep holes cleared, you can set the prefab shower pan into place.
Fit the pan, align the drain, and check perimeter gaps. Press firmly to seat the flange.
Verify level front-to-back and side-to-side, shim if needed, and confirm a consistent slope toward the drain.
- Center pan over drain
- Seat flange evenly
- Check four corners for level
- Adjust shims as needed
Step 4 Build a Mortar Bed for Mud Pan (mixing, screeding, creating slope)
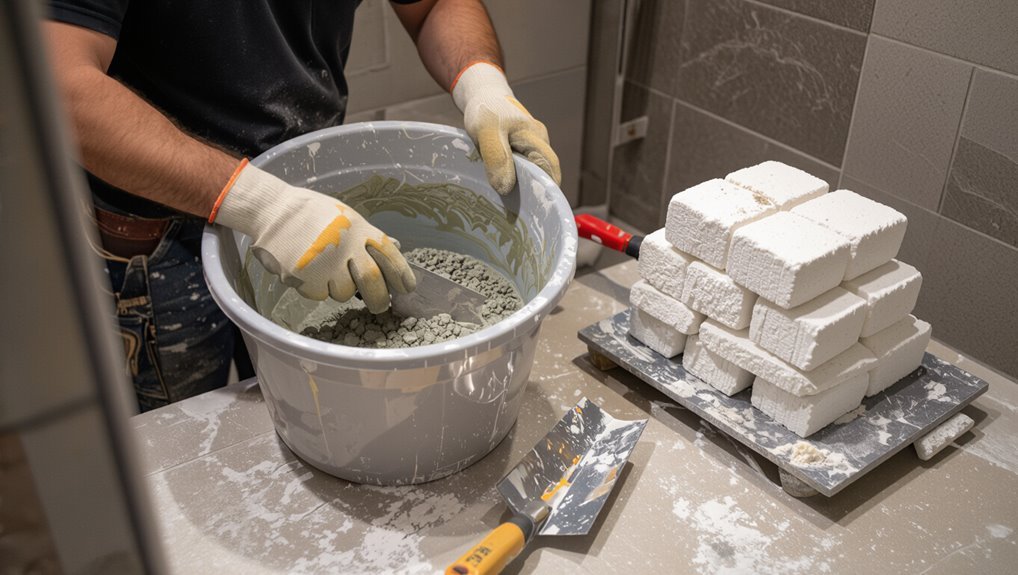
Mix and lay the mortar bed so the pan gets a stable, uniformly sloped base toward the drain.
You’ll mix dry pack mortar to firm consistency, spread it, and screed to create a 1/4″ per foot slope.
Tamp and float to remove voids, then shape a smooth runoff to the drain before curing.
- Mix proper ratio
- Check consistency
- Screed slope
- Compact and cure
Step 5 Install Waterproofing Membrane or Liner (methods and overlap)
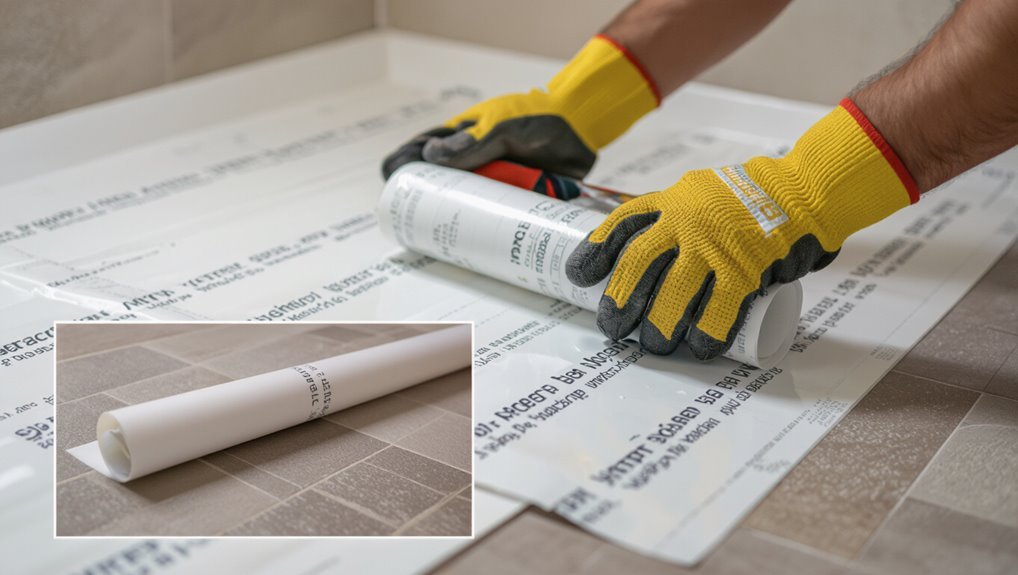
After your mortar bed has cured and the slope is consistent to the drain, you’ll install the waterproofing membrane or liner to keep water from reaching the subfloor.
Choose PVC, CPE, or liquid-applied systems, fitting tight to the drain and up walls. Overlap seams per manufacturer, seal corners, and test for full coverage.
- Select compatible material
- Dry-fit and cut
- Seal overlaps
- Flash corners
Step 6 Final Drain Connection and Testing for Leaks
Secure the drain assembly and test for leaks before you finish the shower to guarantee the membrane and plumbing are watertight.
Tighten the flange, secure the gasket, and connect the trap to the waste line. Flood test the pan, inspect for seepage, and make adjustments as needed.
- Hand-tighten then torque flange per instructions.
- Apply plumber’s putty or gasket.
- Perform a 24-hour flood test.
- Check below for dampness.
Step 7 Tiling or Finishing the Pan (thinset, grout, sealant, curb details)
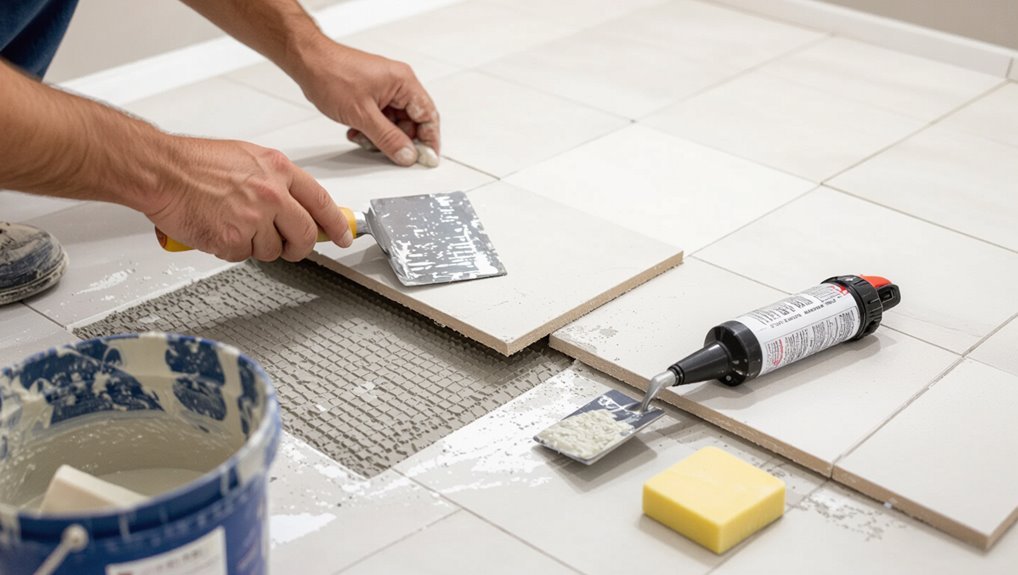
With the drain proven watertight and the pan fully dry, you can begin preparing the surface for tile or your chosen finish.
Spread thinset evenly, set tiles with proper slope, grout after curing, and seal all joints.
Pay special attention to the curb: slope, waterproof membrane wrap, and backerboard junction.
- Thinset and slope
- Tile placement
- Grout and sealant
- Curb waterproofing
Variations and Alternatives
You can choose between a prefab pan for quicker installation or a custom-built mortar pan for a tailored fit, and each has trade-offs in cost, durability, and slope control.
If accessibility matters, look at ADA-compliant or low-profile pans that reduce thresholds but may require specific drain and subfloor prep.
We’ll compare pros and cons and outline installation considerations so you can pick the best option for your space.
Installing a Prefab Pan vs. Building a Mortar Pan Pros and Cons
Although both prefab pans and mortar (mud) pans create a watertight shower base, they differ in installation speed, customization, and long-term maintenance, so you’ll want to weigh those trade-offs before deciding. You’ll pick prefab for quick, consistent installs; choose mortar for slope control and finish flexibility. Consider skill, time, budget, and repairability.
| Prefab | Mortar |
|---|---|
| Fast install | Custom slope |
| Easier repairs | Higher skill |
| Limited styles | Tile-ready |
ADA/Barrier-Free and Low-Profile Pan Options and Considerations
If accessibility or a sleeker look matters, consider ADA-compliant and low-profile pans as part of your decision between prefab and mortar options.
You’ll choose flush thresholds, slip-resistant surfaces, and proper slope without bulky curbs. Evaluate wheelchair access, drain placement, waterproofing, and installer skill.
Consider trade-offs: prefab ease versus mortar customization for true barrier-free layouts.
- Flush thresholds
- Slope/drain layout
- Slip resistance
- Waterproofing
Common Mistakes and How to Avoid Them
Watch for top installation errors like an improper slope, blocked weep holes, or poor drainage, because they’ll cause leaks and standing water.
If you notice slow draining, musty odors, or soft spots in the subfloor, those are signs a pan may have failed.
I’ll show how to diagnose each problem and what fixes you can use to prevent them.
Top Installation Errors (improper slope, blocked weep holes, poor drainage)
Three common mistakes—improper slope, blocked weep holes, and poor drainage—cause most shower pan failures, and you can prevent them with correct planning and careful execution.
Check slope with a level, keep weep holes clear, and guarantee drain alignment. Use proper mortar bed depth and test flow before finishing.
- Verify 1/4″ per foot slope.
- Protect weep holes.
- Align drain.
- Test drainage.
Signs of a Failed Installation and How to Diagnose Problems
Even with proper slope, clear weep holes, and a correctly aligned drain, installations can still fail — and the sooner you spot the signs, the easier they’re to fix.
Watch for slow drainage, pooling, soft spots, mold, or grout cracks.
Test drains, press the pan to detect flex, inspect beneath for leaks, and monitor moisture with a meter to pinpoint issues early.
Best Practices, Tips, and Time-Saving Tricks
Start by prioritizing waterproofing—use layered membranes and a secondary seal at seams to cut leak risk.
Plan your steps and gather helpers, templates, and sequencing notes so the install flows smoothly the first time.
Finally, follow simple maintenance routines like regular drain checks and grout inspections to extend the pan’s life.
Waterproofing Best Practices and Redundancies
Although waterproofing can feel tedious, doing it right prevents costly leaks and repairs down the road.
You’ll want layered protection: membrane, sealed corners, and drain flange integration. Follow manufacturer cure times and test before finishing.
- Install a continuous pan membrane.
- Tape and seal all seams and corners.
- Flash the drain flange properly.
- Add a secondary foam or liner barrier for redundancy.
Efficiency Tips for a Smooth First-Time Install (sequencing, helpers, templates)
When you plan the job in logical steps—measure and prep the subfloor, dry-fit the pan and drain, install the membrane, then set the pan—you’ll avoid wasted trips and costly rework; use simple templates, assign clear tasks to one helper, and stage tools and materials in the order you’ll need them to keep the workflow continuous.
- Pre-cut templates for offsets and drain.
- Assign one helper for lifting/holding.
- Lay out tools by step.
- Time-box each stage to stay focused.
Maintenance Tips to Extend Pan Life
Because regular care prevents small issues from becoming big repairs, you should adopt a few simple maintenance habits that keep your shower pan watertight and functioning for years.
Wipe dry after use, clean gently with nonabrasive cleaners, inspect grout and seals monthly, re-caulk as needed, and fix slow drains promptly.
Schedule annual checks for leaks and surface wear to catch problems early.
Cost, Timeframe, and When to Hire a Pro
Costs and timelines vary by pan type—cast-iron or tile-ready pans cost more in materials and labor than acrylic or prefabricated bases.
A DIY install of a prefabricated pan can take a day or two, while a custom or tiled shower pan might take several days to a week with skilled labor.
If you’re unsure about plumbing moves, subfloor repairs, or waterproofing, call a pro to avoid costly mistakes.
Typical Cost Breakdown by Pan Type (materials, labor)
If you’re shopping for a shower pan, expect big differences in price and installation time depending on the type you pick—acrylic and prefab pans are cheapest and quickest, while custom tile or mortar pans cost more and take longer to install. Typical costs: materials vs. labor vary—acrylic $100–300 / $150–400; prefab $200–600 / $200–500; tile/mortar $500–2,000 / $500–1,500.
| Pan Type | Cost Range |
|---|---|
| Acrylic | Low |
| Tile/Mortar | High |
Estimated Timeframe for Each Installation Type
Now that you’ve seen how material and labor costs vary by pan type, it helps to compare how long each option takes and when you should call in a pro.
You’ll plan around prep, setting, and curing times.
- Acrylic: 1–2 days total.
- Fiberglass: 1–3 days.
- Tile with mortar bed: 3–7 days (cure time).
- Precast concrete: 2–5 days.
When to Call a Professional vs. DIY
Because the right choice depends on your budget, skill level, and schedule, weigh the trade-offs between DIY and hiring a pro before you start.
If you’re handy, have time, and your project is simple, DIY saves money.
Hire a pro for complex layouts, plumbing moves, waterproofing concerns, tight deadlines, or if code compliance and warranty matter.
Factor labor costs and risk tolerance.
Tools, Materials, and Product Recommendations (Starter List)
You’ll want reliable brands for the pan, drain, and membrane—think Schluter, Oatey, and Kerdi or similar reputable manufacturers.
Keep common replacement parts and accessories on hand like extra drain assemblies, gasket kits, and waterproofing tape.
I’ll list tools, exact products, and spares next so you can shop confidently.
Recommended Brands and Products for Pans, Drains, and Membranes
Anyone tackling a shower pan installation will want reliable pans, drains, and waterproof membranes from trusted brands that match your skill level and budget.
Choose well-reviewed options that suit tile or prefabricated pans and compatible drains.
- Schluter (Kerdi) – membrane systems and drains
- Oatey – drains and flange fittings
- Schluter or Armacell alternatives – foam pans
- NobleSeal – liquid membranes and tapes
Replacement Parts and Accessories to Keep on Hand
Keep a compact kit of replacement parts and basic accessories so you can handle common shower-pan issues quickly and avoid project delays.
Include a spare drain assembly, compression gasket, O-rings, P-trap parts, neoprene flange, screws, and silicone sealant.
Add a small tub of mortar, waterproof tape, plumber’s putty, and a utility knife.
Store items in a labeled waterproof box for easy access.
FAQ Common Questions About Shower Pan Installation
You’ll probably have a few practical questions as you get ready to set the pan, like how much slope you need and whether a prefab pan will sit true on an uneven subfloor.
You’ll also want to know how to protect weep holes when tiling, whether a liner is still required if you use a waterproof membrane, and how long mortar should cure before tiling.
I’ll answer each so you can avoid common mistakes and finish the job correctly.
How much slope does a shower pan need?
A proper shower pan needs a consistent slope of about 1/4 inch per foot toward the drain to guarantee water flows efficiently and prevents pooling.
You should measure from all sides to the drain, keep the pitch even, and avoid high spots.
Use a level and straightedge while forming mortar or mud pack, and confirm slope before setting tile or liner.
Can I install a prefab shower pan on an uneven subfloor?
Can you install a prefab shower pan on an uneven subfloor? Yes, but you shouldn’t set it directly on a warped or bowed surface.
You’ll need to level the subfloor with shims, plywood underlayment, or a self-leveling compound so the pan sits flat and stable.
Follow manufacturer tolerances for flatness, secure the pan per instructions, and check for rocking before finishing.
How do I protect weep holes when tiling?
How do you keep weep holes clear when tiling?
Protect them by inserting removable plugs or tightly packed temporary wicking material (rope or cotton) before setting mortar, then remove and flush with water once tiles and grout cure.
Avoid blocking with thinset or mortar by using liquid barrier tape around drains and keeping the area free of excess mortar.
Inspect and clear final weep paths.
Do I need a liner under a tiled shower if I use a waterproof membrane?
Keeping weep holes clear during tiling helps protect the liner below, but you still need to decide whether a separate shower pan liner is required when using a waterproof membrane.
If you install a bonded or sheet membrane correctly, it can replace a traditional liner. However, follow manufacturer instructions and local code; consider redundancy for older homes or unclear drainage paths to guarantee long-term leak protection.
How long should mortar cure before tiling?
Before you lay tile, let the mortar bed cure fully so it can reach the strength and stability needed for a lasting installation.
Wait at least 24 to 48 hours for fast-setting mixes and 7 days for traditional sand-and-portland mortar before tiling.
Confirm the bed is dry to the touch, follow manufacturer instructions, and avoid traffic or water exposure until full cure time has passed.
Final Checklist Before Finishing the Shower
Before you grout and close up the walls, check the pan, drain connections, and substrate for proper slope and secure fastening.
Then run a leak test and inspect all fittings, making any corrections before you call the job complete.
Only sign off when the pan passes the test and every joint is sealed.
Pre-Grout and Pre-Final-Use Inspection Checklist
You’re almost done—now run a thorough pre-grout and final-use inspection to catch any issues that would be costly to fix after you tile.
Check for proper slope, secure pan edges, clean debris, and correct drain alignment. Address defects now so grout and tile bond correctly.
- Verify slope and level
- Confirm pan fastening
- Clear debris and dust
- Align and test drain fit
Leak-Test and Final Sign-Off Steps
Now that you’ve checked slope, fastening, cleanliness, and drain alignment, run a full leak-test and complete your final sign-off before tiling.
Fill the pan to the overflow, watch for drops at seams, drain flange, and connections for at least 30 minutes.
Note any moisture, repair immediately, then repeat. Document results, date, and signer.
Only proceed to waterproofing and tile once you’ve passed.