
How to Smooth a Concrete Floor for Any Type of Flooring Installation
You can get any floor to lay flat and last by grinding high spots, filling low areas, and using the right primer and self-leveling compound. Start by clearing the room, checking flatness with a straightedge, and testing moisture. Grind ridges, fill cracks and low spots, then prime before pouring a self-leveler or applying a cementitious overlay. Keep dust controlled and follow curing times. Continue to the full guide to learn tool choices, tolerances, and pitfalls to avoid.
How to Smooth a Concrete Floor for Any Type of Flooring Installation (Quick Answer + Hook)
Quick answer: you should grind, patch, or skimcoat until the concrete meets the flatness and smoothness specs required by your finish—tile needs the flattest surface, hardwood and vinyl need minimal height variation, carpet tolerates more, and epoxy needs a clean, profile-textured surface.
You’ll know smoothing is required when you see cracks, chips, high spots, or when your flooring manufacturer’s tolerances aren’t met.
Read on to match the right method to your flooring type and expected outcomes.
Quick Answer Best approach in 3 sentences
If you want a smooth base for any flooring, start by grinding low spots and filling cracks, then feather a self-leveling compound where needed.
Next, sand high ridges and verify flatness with a straightedge.
Finally, clean thoroughly and prime the surface so adhesives bond properly—this concise sequence shows how to smooth concrete floor efficiently and prepares you for installing any finish.
When smoothing is required: common scenarios and outcomes
When your concrete shows cracks, dips, or high spots, you’ll need to smooth it before installing any finish to avoid telegraphing, uneven wear, or adhesive failure.
You’ll assess severity, choose patching or grinding, and predict outcomes: better adhesion, longer flooring life, and a level surface for installation.
- Visible cracks or spalls
- Uneven slab or trip hazards
- Old coatings or residue
Required results by flooring type (tile, hardwood, vinyl, carpet, epoxy)
Different flooring types demand specific concrete preparations, so you’ll smooth the slab to meet each finish’s tolerance and adhesion needs. Match flatness and profile: tile needs +/-1/8″ over 10′, hardwood needs moisture control and low deviation, vinyl needs smooth, level substrate, carpet tolerates minor irregularities, epoxy needs clean, profiled concrete.
| Flooring | Flatness | Surface |
|---|---|---|
| Tile | Tight | Profiled |
| Hardwood | Moderate | Dry |
Basic Understanding What Smoothing Means and Why It Matters
Smoothing a concrete floor means removing high spots, filling low spots, and creating the right texture so coverings bond and sit flat.
You’ll need to meet flatness/levelness and texture tolerances (FF/FL, ICRI standards, mm/in), because different finishes—tile, vinyl, hardwood—have specific requirements.
Unevenness usually comes from poor finishing, improper curing, settlement, or subbase problems, and knowing those causes helps you choose the right correction.
What smoothing a concrete floor entails
Think of smoothing a concrete floor as refining its surface so it’s even, durable, and ready for whatever finish you plan—polish, paint, tile, or just a clean, usable slab.
You remove high spots, fill low areas, grind rough patches, and consolidate the surface for strength. You’ll use grinders, patching compounds, primers, and sequential abrasives to create a uniform, stable substrate.
Why surface flatness, levelness, and texture matter for different floor coverings
Because floor coverings bond and perform based on the surface beneath them, you’ll get predictable results only when flatness, levelness, and texture are right for the material you’re installing.
You’ll prevent telegraphing, ridging, adhesive failure, or premature wear by matching smoothing to the covering—tile needs firm flatness, resilient floors tolerate slight texture, and thin veneers demand very smooth, consistent substrates for long-term performance.
Key measurements and tolerances (FF/FL, ICRI, mm/inch standards)
Three simple numbers — flatness (FF), levelness (FL), and ICRI surface profiles — tell you whether a concrete floor will accept a given finish, and industry standards express them in both mm and inches so you can compare specs and tolerances directly. You’ll check FF/FL values, ICRI profile grit, and mm/inch tolerances to match flooring requirements.
| Metric | Typical Range | Unit |
|---|---|---|
| FF | 20–35 | mm/in |
| FL | 10–20 | mm/in |
| ICRI | CSP 1–5 | profile |
Common causes of uneven or rough concrete surfaces
Having the right FF/FL numbers and ICRI profile tells you what finish a floor can accept, but it won’t fix the root problems that produced those readings.
Uneven or rough concrete usually comes from poor placement, inadequate consolidation, improper screeding, rapid drying, uneven subbase, form movement, or inconsistent curing.
You’ll also see issues from rebar/mesh settlement, contamination, and traffic during set.
Assessing the Existing Concrete Surface
Before you start smoothing, inspect the slab with basic tools (straightedge, level, hammer, moisture meter) and know when to call a pro for specialized testing.
Use simple tests—straightedge for flatness, bubble/laser level for slope, hammer or rebound hammer for strength—and scan for moisture, cracks, contaminants, and soft spots.
Those findings will tell you whether to spot-repair, grind and patch, or go straight to full resurfacing.
Tools and materials for inspection
While you’ll rely on your eyes and hands for a quick look, a few specific tools will give you the precise information needed to assess a concrete surface:
- Tape measure and straightedge for visible gaps and runs.
- Moisture meter to spot damp areas before covering.
- Chisel and hammer for probing soft spots and delamination.
Gather gloves, eye protection, and a flashlight to inspect safely and thoroughly.
How to test flatness, level, and strength (simple tests and professional methods)
One quick way to judge a slab is to combine a few simple on-site checks with targeted professional tests: use a long straightedge and feeler gauges to find dips and highs, a spirit level or laser level for slope, and a hammer tap to sense delamination.
For strength, run a rebound hammer test or core sampling via a qualified technician to confirm compressive capacity.
Identifying moisture, cracks, contaminants, and weak spots

Because moisture, cracks, surface contaminants, and weak spots all compromise a floor’s performance, you should inspect each systematically before any smoothing work.
Check for dampness with a tape-and-plastic test, probe cracks for depth and movement, and scrape or test for oil, paint, or adhesive.
Tap slabs to find hollows and hammer out delaminated patches. Record locations for targeted remediation.
Deciding between repair vs. full resurfacing
Now that you’ve mapped moisture, cracks, contaminants, and weak spots, decide whether localized repairs will restore performance or if a full resurfacing is warranted.
Patch small cracks, level low spots, and treat contamination when damage is limited.
Choose resurfacing when widespread delamination, chronic moisture, severe unevenness, or multiple repairs would compromise new flooring.
Factor cost, time, and long-term durability into your choice.
Step-by-Step Smoothing Methods (Primary How-To Framework)
Before you start smoothing, you’ll take care of safety, clear the area, and prep the substrate so everything’s stable.
First you’ll clean and degrease the slab, then grind out small high spots with the right tools and grit progression or use shot blasting/scarifying when heavy profiling is needed.
Finally, you’ll fill cracks and joints with appropriate materials and application methods to produce a uniform surface.
Preparation: safety, clearing, and substrate preparation
Safety comes first: put on eye protection, a dust mask or respirator rated for silica, ear protection, and gloves before you touch the floor.
Clear the area, remove loose debris, and inspect the slab for cracks, delamination, or moisture issues. Prepare substrate by marking repairs and planning ventilation.
- Remove furniture and fixtures
- Identify and mark defects
- Guarantee ventilation and access
Step 1 Cleaning and degreasing the surface
Start by removing all dust, loose particles, and residues so the cleaning agents can reach the concrete. Sweep and vacuum thoroughly.
Then apply a concrete cleaner or degreaser to oil spots and stains. Scrub with a stiff brush, let dwell per product instructions, then rinse and extract residue.
Allow the slab to dry completely before any repair or smoothing steps.
Step 2 Grinding for small irregularities (technique, tools, grit progression)
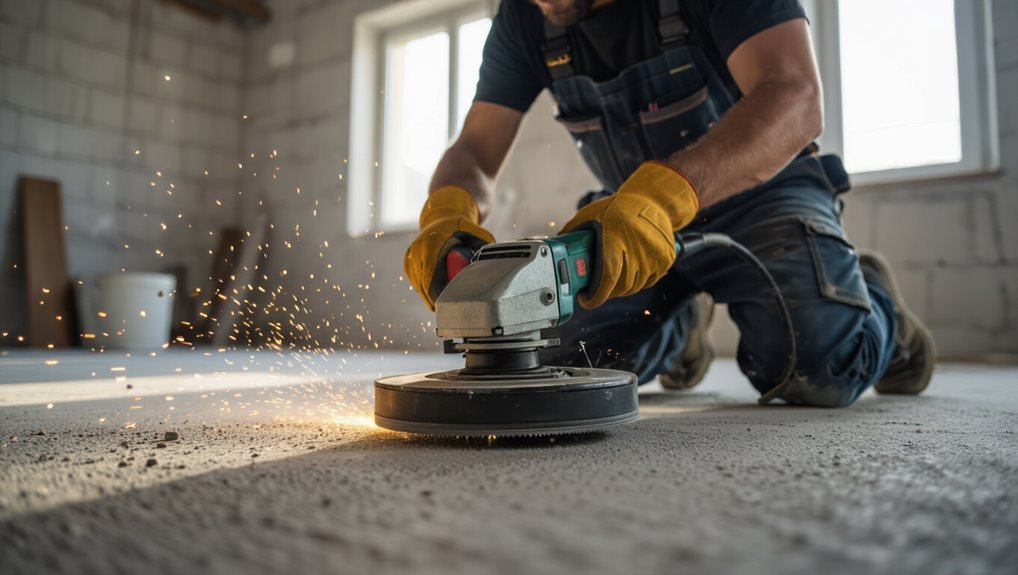
Grab a floor grinder or angle grinder with a diamond cup wheel and work methodically across the slab to remove small high spots, thin paint, or rough patches that cleaners and fillers can’t fix.
Keep a steady pace, overlap passes, and progress from coarse (30–40 grit) to medium (60–80) to fine (100–200) pads.
Vacuum debris and inspect frequently.
Step 3 Shot blasting and scarifying for heavy profiling (when to use)
If your grinder can’t remove deep laitance, heavy coatings, or a rough trowel pattern, you’ll use shot blasting or scarifying to achieve aggressive profiling; these mechanical methods remove millimeters of concrete quickly and create the rough, open texture needed for new overlays or coatings.
Choose shot blasting for uniform surface removal and minimal dust control; use scarifiers for fast, localized cutting of thick residues or ridges.
Step 4 Filling cracks and joints (materials and application methods)
Once the surface is profiled and loose material removed by shot blasting or scarifying, you’ll address cracks and joints before any patching or overlay.
Clean debris and dust, widen hairline cracks with a chisel if needed, then use epoxy or polyurethane injection for structural cracks.
For joints, install foam backer rod and seal with elastomeric sealant.
Follow manufacturer cure times.
Step 5 Self-leveling underlayment application (mixing, priming, pour technique)
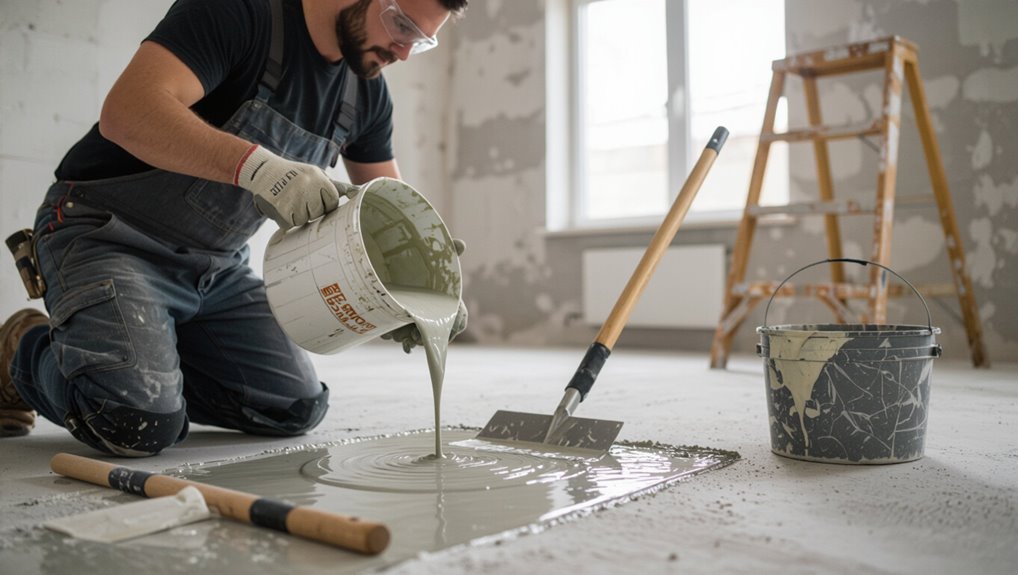
Start by thoroughly priming the prepared concrete so the self-leveling underlayment will bond evenly; follow the primer manufacturer’s mixing ratio and apply it with a roller or low-pressure sprayer, letting it tack up to the recommended time.
Mix underlayment per bag instructions to a lump-free consistency, pour from one side, spread with a gauge rake, and use a spiked roller to release air and guarantee a smooth, level surface.
Step 6 Trowel-applied cementitious overlays and microtoppings (when preferred)
After the self-leveling underlayment has cured and you’ve confirmed a flat base, you can apply a trowel-applied cementitious overlay or microtopping where a thinner, more decorative or repair-focused finish is preferred.
Mix per manufacturer directions, use a steel or magnesium trowel for thin coats, work quickly to feather edges, and create desired texture.
Sand lightly between coats if needed.
Step 7 Curing, drying time, and moisture mitigation before installing finish flooring
Because proper curing and moisture control determine whether your new smoothing layer will perform long-term, you’ll need to follow drying times and mitigation steps before laying finish flooring.
Check manufacturer cure times, measure moisture with a reliable meter, and wait until levels meet flooring specs.
Use vapour barriers, primers, or sealers for high readings, and guarantee consistent ventilation and temperature during cure.
Choosing Tools and Materials
Before you start, pick the right equipment: grinders with diamond tooling and the proper attachments for finish, plus shot blasters or scarifiers when you need heavy removal.
You’ll also need dust-control and vacuum systems, and materials like crack fillers, epoxy or polymer-modified mortars, and self-levelers for repairs and smoothing.
Finally, choose compatible primers, bonding agents, and moisture barriers to guarantee coatings and overlays adhere and last.
Grinding machines, diamond tooling, and attachments
Choosing the right grinding machine, diamond tooling, and attachments will determine how quickly and smoothly your concrete floor comes out.
So match machine size and power to the job and pick diamonds rated for the concrete’s hardness and prep level. You’ll choose tooling by grit, bond, and segment style.
Consider:
- Coarse diamonds for heavy removal
- Medium for leveling and feathering
- Fine for final smoothing and polishing
Shot blasters, scarifiers, and vacuum systems
Shot blasters, scarifiers, and high-efficiency vacuum systems each play a distinct role in preparing and cleaning concrete surfaces, so pick the right combination for the job you’re facing.
Use shot blasters for profiling and removing coatings, scarifiers for heavy texture or thick residues, and vacuums to control dust and debris.
Match machine capacity to surface area and job intensity for efficient, safe prep.
Crack fillers, epoxy, polymer-modified mortars, and self-levelers
Pick materials that match the crack size, substrate condition, and final floor use: small hairline cracks take flexible fillers, active or structural cracks need epoxy or polyurethane, and areas requiring thickness or contour correction call for polymer-modified mortars or self-leveling compounds.
| Material | Use |
|---|---|
| Flexible filler | Hairlines |
| Epoxy/polyurethane | Structural cracks |
| Polymer mortar/self-leveler | Thickness/contours |
Primers, bonding agents, and moisture barriers
Before you pour or patch, you’ll want the right primer, bonding agent, and moisture barrier—each plays a specific role in adhesion and durability.
Choose a primer compatible with your leveling product to improve wetting and reduce porosity.
Use a bonding agent on smooth or contaminated concrete for mechanical and chemical adhesion.
Install a moisture barrier if RH or vapor drive risks finish failure.
Comparison of Smoothing Options (When to Use Each)
You’ll weigh grinding, shot blasting, overlays, and self-levelers based on cost, time, durability, and the type of finish or flooring you plan to install.
Grinding and shot blasting remove defects and profile the slab quickly but vary in cost and dust control, while overlays and self-levelers add material to correct unevenness and change surface properties.
Consider existing slab condition, budget, schedule, and the final floor covering when choosing the right method.
Grinding vs. shot blasting vs. overlay vs. self-leveler
When deciding how to smooth a concrete floor, weigh the surface condition, budget, and end use—each method suits different problems. You’ll pick grinding for flattening and coating prep, shot blasting for heavy profiling, overlays for hiding imperfections, and self-levelers for minor unevenness.
| Method | Best Use | Result |
|---|---|---|
| Grinding | Prep, flatten | Smooth, exposed aggregate |
| Shot blasting | Profile removal | Textured grip |
| Overlay | Repair/cover | New surface |
Cost, time, durability, and suitability by flooring type
Although costs and timelines vary, you’ll usually choose a method by balancing budget, project speed, and how long the finished floor must last. Match method to flooring: grinding for thin finishes, overlays for wear, self-leveler for tile. Consider durability and cure time, then pick.
| Flooring | Best smoothing |
|---|---|
| Vinyl/laminate | Self-leveler |
| Tile/hardwood | Grinding/overlay |
Common Problems, Mistakes, and How to Avoid Them
When you smooth a concrete floor, watch for common mistakes like overgrinding that creates feather edges and using the wrong primer or self-leveler.
Check for trapped moisture—blistering, lifting, or poor adhesion are clear signs—and remedy them by testing and drying the slab before proceeding.
If your leveling compound goes on unevenly, correct it with proper mixing, trowel technique, and spot-sanding or reapplication as needed.
Overgrinding or creating feather edges causes and fixes
If you grind too aggressively or stop leveling before the slab is supported, you’ll create feather edges—thin, fragile ridges that chip, crack, and defeat your work.
Prevent them by feathering connections onto solid substrate, stop where concrete is full depth, and use a bull float or patching compound to build support.
Repair existing edges with bonded patch and proper tapering before finishing.
Incorrect primer or self-leveler selection prevention
Selecting the wrong primer or self-leveling compound can ruin even a perfectly prepared slab, so you’ll want to match products to your concrete’s porosity, moisture level, and the finish you’re after.
Test porosity with a water droplet, measure moisture with a hygrometer or calcium chloride kit, follow manufacturer charts, and choose primers/self-levelers rated for your substrate and designed flooring to guarantee bond and proper cure.
Trapping moisture and adhesion failure diagnostic signs and remedies
Because trapped moisture silently undermines primers and toppings, you’ll want to recognize signs of adhesion failure early and act fast.
Look for bubbling, blisters, flaking, powdery residue, and sudden peeling.
Test with a moisture meter or plastic sheet.
Remedy by drying, installing a vapor barrier, using a moisture-tolerant primer or epoxy, and removing failed material before recoating to guarantee proper bond.
Uneven application of leveling compound best correction practices
Start by recognizing that unevenly applied leveling compound is usually caused by rushed mixing, inconsistent trowel pressure, or failing to follow the product’s spread-rate guidelines.
Inspect high and low spots, grind ridges, and re-prime porous areas.
Re-mix small batches, use a gauge rake and consistent pressure, feather edges with a trowel, and follow cure times.
Test with a straightedge before installing flooring.
Best Practices and Pro Tips for Long-Lasting Results
Before you start smoothing, run through prep checklists for both surface prep and final installation so nothing gets missed.
Plan the sequence for multi-room or phased work to control moisture, traffic, and curing times, and know the red flags—severe cracks, structural issues, or large level changes—that mean you should hire a pro.
Finally, minimize waste by salvaging removed concrete, using correct mix amounts, and choosing durable finishes that cut future repairs.
Prep checklists before smoothing and before installation
Checklist in hand, you’ll want to verify surface cleanliness, moisture levels, and structural soundness before smoothing or installing any overlay.
Confirm measurements, remove debris, and note repairs. Use this quick checklist to stay organized:
- Test moisture and pH; mark damp areas.
- Repair cracks, delamination, and loose sections.
- Clean, vacuum, and degrease; guarantee full adhesion.
Sequencing work for multi-room or phased projects
When you’re working across multiple rooms or phasing a job, map out a logical sequence that minimizes rework and traffic through finished areas. Tackle high-moisture or problem zones first, then move outward to cleaner, low-traffic spaces so curing and coatings won’t be disturbed.
Stagger tasks—prepping, grinding, patching, priming, and final smoothing—room by room. Use barriers, clear signage, and a realistic timeline to prevent overlaps.
When to hire a pro vs. DIY: red flags and project complexity
Finishing the sequencing and containment plans sets you up to decide whether to tackle the smoothing yourself or call in a pro.
Hire a pro if you see major cracks, active moisture, unevenness over 1/4″, large areas, or need specialized toppings.
DIY works for minor pitting, small repairs, and simple skim coats if you have tools, time, and confidence in surface prep and mixing.
Sustainability and waste reduction tips
Because you’ll likely generate dust, leftover mixes, and packaging, plan for sustainability from the start: choose low-VOC primers and sealers, buy mixes in measured kits to reduce waste, and recycle or return unused materials.
Capture dust with HEPA vacuums, dispose of slurry responsibly, donate surplus tools, and use reusable protective sheeting.
Track waste to improve future projects.
Project Timelines, Costs, and ROI Estimates
You’ll want to know how long each smoothing method takes—grinding and skim coats usually finish in a day or two, while overlays and polishing can take several days to weeks including curing.
Expect wide cost ranges depending on method, surface prep, square footage, and labor, so get estimates and ask what’s included.
Also check how the work affects any flooring warranty and whether the chosen method will extend the slab’s longevity.
Typical timeframes for common smoothing methods
Most smoothing jobs—whether grinding, skim-coating, or pouring a self-leveling compound—follow predictable timelines you can plan around, and knowing those helps you budget time and money.
Small repairs or light grinding take a few hours to a day. Full grinding or multiple skim coats often span one to three days.
Self-leveling pours require drying 24–48 hours before flooring.
Ballpark cost ranges and factors that drive price
Knowing how long each smoothing method takes helps you estimate labor, but cost ranges vary just as predictably and depend on several key factors. You’ll pay based on area, surface condition, materials, and labor rates. Use the table below for quick comparisons:
| Method | Typical Cost/ft² | Key Driver |
|---|---|---|
| Grinding | $1–$3 | Labor time |
| Self-leveler | $2–$6 | Material volume |
| Overlay | $3–$8 | Prep complexity |
Impact on flooring warranty and longevity
When you smooth a concrete floor, the method you choose can affect the warranty on any finish you install and the floor’s long-term durability.
Choose approved preparation for your flooring—manufacturers often require specific profiles, moisture levels, and adhesives.
Improper grinding, overlays, or sealers can void warranties and shorten lifespan.
Invest in correct prep to protect coverage, reduce repairs, and maximize return on installation.
Safety, Regulations, and Environmental Considerations
Before you start sanding or grinding, put on proper PPE and set up dust control to protect your lungs and work area.
Follow local rules for disposing of concrete slurry and contaminated materials so you don’t face fines or environmental harm.
When choosing primers and coatings, pick low‑VOC products and ventilate well to keep indoor air quality safe.
PPE and dust control best practices
Because grinding and polishing concrete kicks up fine silica dust and sends debris flying, you should gear up and control dust at every step to protect yourself and others.
Wear an N95 or P100 respirator, eye protection, hearing protection, and gloves.
Use tools with HEPA-filtered vacuums, wet methods when possible, and seal work areas.
Change filters and clean PPE frequently to prevent exposure.
Disposal of waste and local regulations
While you’re grinding and polishing, plan for proper disposal of slurry, dust, and used filters to stay compliant and protect the environment.
Check local waste rules, hazardous-material lists, and landfill restrictions before you begin.
Bag and label debris, use approved containment, and arrange licensed hazardous or construction-waste pickup when required.
Keep records of disposal and permits to demonstrate compliance if inspected.
VOCs, primers, and indoor air quality guidance
When you choose primers and coatings for a concrete floor, keep VOC levels and ventilation top of mind to protect indoor air quality and meet regulations.
Select low‑ or zero‑VOC products certified by recognized programs, follow manufacturer curing and ventilation instructions, use respirators if needed, and monitor odor.
Notify occupants about drying times and guarantee proper disposal of solvent wastes per local rules.
Frequently Asked Questions
You’ll have common questions about timing, compatibility, and limits when smoothing a concrete floor.
Ask how long concrete must cure before a self-leveler, whether hardwood or laminate can go directly over the surface, and the maximum depth a self-leveling compound can fill.
Also clarify how to treat expansion joints and whether smoothing will fix structural cracks or settlement.
How long must concrete dry before applying a self-leveling compound?
How long should you wait before applying a self-leveling compound to new concrete? You should wait until concrete reaches recommended moisture levels—typically 28 days for standard pours.
Check moisture with a meter or perform a calcium chloride test. Some fast-setting mixes allow earlier application; follow manufacturer specs.
Verify surface is clean, cured, and free of surface laitance before priming and pouring the compound.
Can I install hardwood/laminate directly over smoothed concrete?
Can you install hardwood or laminate directly over a smoothed concrete floor? Yes, but you must guarantee the slab is fully cured, dry, level, and clean.
Use a proper moisture barrier or underlayment recommended for your flooring type and follow manufacturer tolerances for vapor emission and flatness.
For floating floors, an underlayment adds cushioning and moisture protection; glue-down requires compatible adhesives.
What is the maximum depth a self-leveler can fill?
Wondering how deep a self-leveler can go? Most premixed self-leveling compounds handle 1/8″ to 1/2″ per pour.
For larger dips you’ll use feathering products, underlayment mortars, or pour in multiple lifts, letting each cure.
Some specialized formulations accept 1″–2″ in a single application, but always follow manufacturer limits and substrate prep for adhesion and shrinkage control.
How do I handle expansion joints and movement in the slab?
When will you need to honor existing joints instead of covering them?
You should preserve control, isolation, and expansion joints that allow slab movement.
Route and fill with flexible sealant or install appropriate joint profiles before smoothing.
Use backer rod and elastomeric caulks, and maintain clear joint lines under new flooring to prevent buckling, cracking, or adhesive failure.
Will smoothing fix structural cracks or settlement issues?
You should treat movement-allowing joints differently, because smoothing products won’t stop underlying structural problems like settlement or major cracks.
You need to assess causes first—soil, drainage, load—and consult a structural pro for repairs. Use smoothing compounds only after stabilization.
For hairline or non-structural cracks, repair and then level; for active settlement or wide cracks, fix structure, then finish the surface.