What Is the Best Drill Bit for Ceramic Tile? (And How to Use It Right)
You’ll want a diamond- or carbide‑tipped bit for ceramic tile: diamond for frequent work and hard porcelain, carbide for occasional holes or glazed surfaces; glass bits suit tiny smooth holes and HSS for thin, soft tiles. Drill slowly with steady, light pressure, use masking tape or a center punch to stop the bit slipping, and keep the bit cool with water or short bursts to avoid cracking. Keep going below for step‑by‑step tips, troubleshooting, and product picks.
Quick Answer Best Drill Bit for Ceramic Tile
For most ceramic tile jobs you’ll want a carbide-tipped or diamond-tipped bit—carbide for occasional holes in glazed tile and diamond for frequent or hard porcelain.
Choose a masonry/hammer bit only for tile backed by concrete, and use a regular high-speed steel bit only for thin, soft tiles or pilot holes.
Match the bit to the tile hardness and how often you’ll be drilling to avoid cracks and wasted effort.
Short recommendation with use cases
Pick a diamond-tipped carbide drill bit for most ceramic tile jobs—you’ll get fast, clean holes with minimal chipping.
For wall-mounted fixtures, anchors, or plumbing penetrations, use a 3–8 mm bit; for larger anchors or sockets, step up to 10–12 mm.
Keep speed low, use water cooling, and steady pressure.
If you wondered what’s the best drill bit for ceramic tile, this choice covers most needs.
When to choose different bit types
When you’re working on delicate glazed tiles or porcelain, choose a diamond-tipped bit for clean, chip-free holes; switch to a carbide-tipped masonry bit only for backed or unglazed tile where toughness matters more than a perfect finish.
- Diamond: glazed porcelain, fragile edges.
- Carbide: thick, unglazed, backed tile.
- Glass bit: small holes in smooth tile.
- SDS/hammer: only for demolition, never for finished tile.
Understanding Ceramic Tile and Drilling Basics
Ceramic tiles come in different types—glazed, porcelain, and vitrified—each with its own hardness and drilling demands, so you’ll want to match your bit to the material.
The glaze and tile density affect chip risk and bit wear, meaning you should use slower speeds, steady pressure, and the right bit geometry.
Always wear safety glasses, a dust mask, and gloves to protect against shards and dust.
Types of ceramic tile (glazed, porcelain, vitrified)
Tiles come in three common types—glazed, porcelain, and vitrified—and each one drills differently, so you’ll want to know which you’re working with before you choose a bit.
You’ll encounter:
- Glazed: thin glass layer over softer body.
- Porcelain: dense, less porous, tougher.
- Vitrified: highly glass-like, very hard.
- Natural-look variants: mimic stone, vary in composition.
How tile hardness and glaze affect drilling
Because hardness and glaze change how a bit bites into the surface, you’ll need to match your drilling technique and tool to the tile’s properties.
Harder tiles like porcelain resist cutting and need diamond or carbide bits, slower speed, and steady pressure.
Glazed surfaces can chip; start with pilot marks or tape, use proper cooling, and let the bit do the work.
Safety considerations and PPE
Knowing how hardness and glaze affect drilling helps you avoid mistakes, but you also need to protect yourself and others before you start.
Wear proper PPE and control the workspace. Follow these essentials:
- Safety glasses and face shield for chips and dust.
- N95 mask or respirator for silica.
- Cut-resistant gloves and closed-toe shoes.
- Hearing protection and stable clamps for the tile.
Drill Bit Types Compared
When you’re choosing a bit for ceramic tile, you’ll want to compare diamond-tipped (carbide grit) bits, carbide-tipped masonry bits, and specialty carbide tile bits to see which matches your tile and hole size.
We’ll look at how carbide, diamond, and glass bits stack up on durability, cutting speed, and cost.
That comparison will help you pick the most efficient, least damaging option for the job.
Diamond-tipped (carbide grit) bits
If you need a bit that can handle glazed or very hard tiles without chipping, diamond-tipped (carbide grit) bits are your best bet. You’ll get precise, clean holes and longer life than standard bits. Use low speed, light pressure, and water cooling to avoid overheating.
| Feature | Benefit | Tip |
|---|---|---|
| Grit edge | Clean cut | Low speed |
| Durability | Long life | Water cool |
| Cost | Higher | Worth it |
Carbide-tipped masonry bits
Moving from diamond-tipped bits for the hardest glazed tiles, carbide-tipped masonry bits offer a practical, lower-cost option for drilling through ceramic and softer masonry. You can use them for pilot holes, outlet boxes, and tile anchors if you go slow and keep the bit cool.
| Feature | Note |
|---|---|
| Cost | Low |
| Best for | Ceramic, soft masonry |
| Technique | Slow, steady |
| Limitations | Won’t cut hard glaze |
Carbide-tipped tile bits vs. carbide-tipped masonry bits
Think of carbide-tipped tile bits and carbide-tipped masonry bits as cousins that look similar but perform differently: tile bits have a sharper, flatter cutting face designed to score and chip glazed ceramics cleanly, while masonry bits use a broader, more blunt tip meant to gouge softer brick and mortar.
Use tile bits for smooth ceramic holes; choose masonry bits only for rougher substrates to avoid chipping.
Carbide vs. diamond vs. glass bits performance and cost
When you’re picking bits for ceramic tile, the trade-offs between carbide, diamond, and glass (spear/flake) tips come down to speed, hole quality, durability, and cost. You’ll choose carbide for low cost and quick rough holes, diamond for clean durable cuts, and glass bits for cheap soft-tile scoring.
| Bit type | Strength |
|---|---|
| Carbide | Affordable, short life |
| Diamond | Clean, long life |
| Glass | Cheap, basic use |
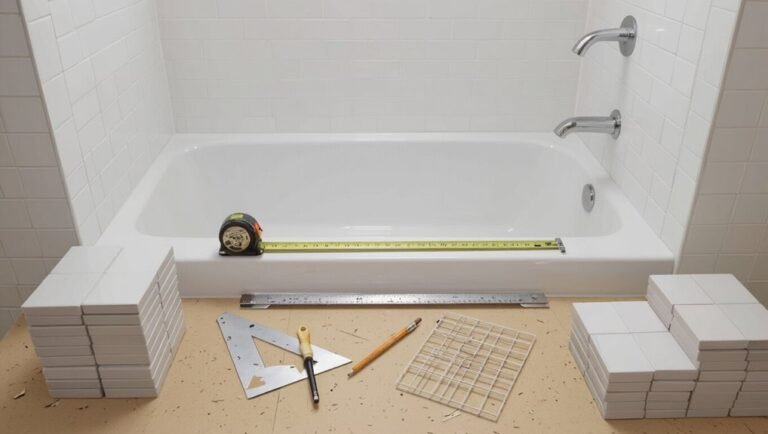
Step-by-Step: How to Drill Ceramic Tile Safely and Effectively
Before you start, gather the right tools and supplies—diamond or carbide bits, drill, tape, backing board, marker, and water source.
Mark the spot, secure the tile with tape or a backing to prevent cracks, then begin the hole slowly with a pilot approach at low speed.
Keep the bit cool by using water or intermittent pauses to prevent overheating and glazing.
Tools and supplies needed
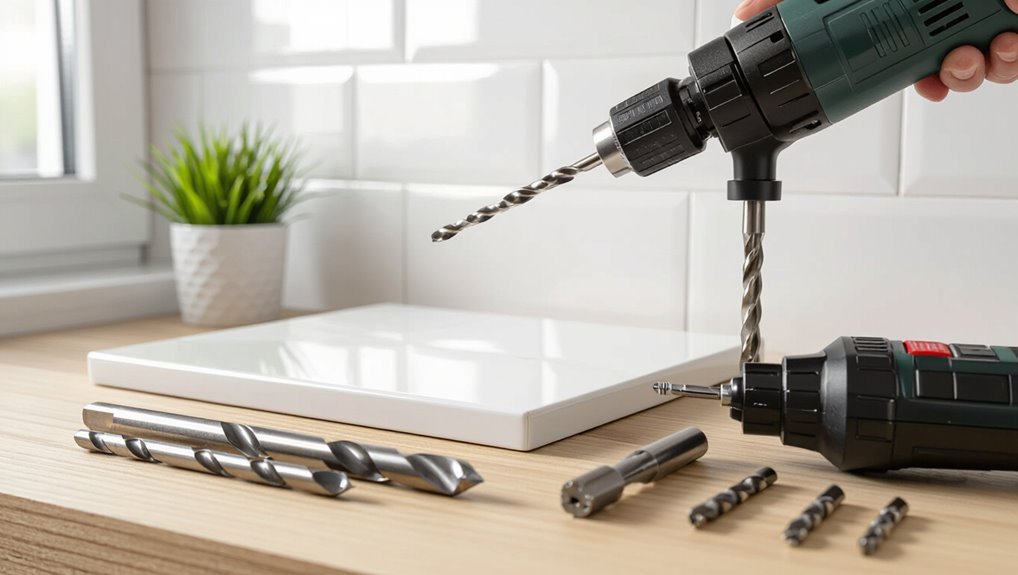
You’ll need the right kit to drill ceramic tile without cracking it: a variable-speed drill, carbide-tipped or diamond-tipped masonry bits sized to your anchor or screw, masking tape, a center punch or carbide-tipped marker, a spray bottle of water or a small bucket for cooling, safety glasses and gloves, and painter’s tape or a rubber pad to steady the bit.
- Drill and bits
- Cooling spray/bucket
- Safety gear
- Marking/steadying tools
Step 1 Marking and preparing the tile
Start by marking the exact spot you need to drill with a pencil or a carbide-tipped marker. Then apply a small square of masking or painter’s tape over the mark to keep the bit from wandering and to protect the glaze.
Confirm alignment with adjacent tiles or fixtures, remeasure if needed, and clear dust.
Use a center punch or light scribe on the tape for a precise starting point.
Step 2 Securing the tile and setup (using tape, backing)
While you’re working on a stable surface, clamp or brace the tile so it can’t shift—use non-slip pads, double-sided tape, or a workbench vise with protective jaws to avoid cracking the glaze.
Add masking tape over the mark to prevent chipping, and place a sacrificial wood backing beneath the tile to support exit edges.
Check alignment, then secure everything before drilling.
Step 3 Starting the hole: pilot approach and low speed
1. Position the bit on your mark, hold the drill perpendicular, and apply gentle pressure.
Start at the lowest speed to let the bit bite without skidding. Once the pilot indentation forms, maintain steady, light pressure and keep speed low to prevent cracking.
Pause if you feel heat buildup or chatter, then resume carefully until you’ve established the pilot hole.
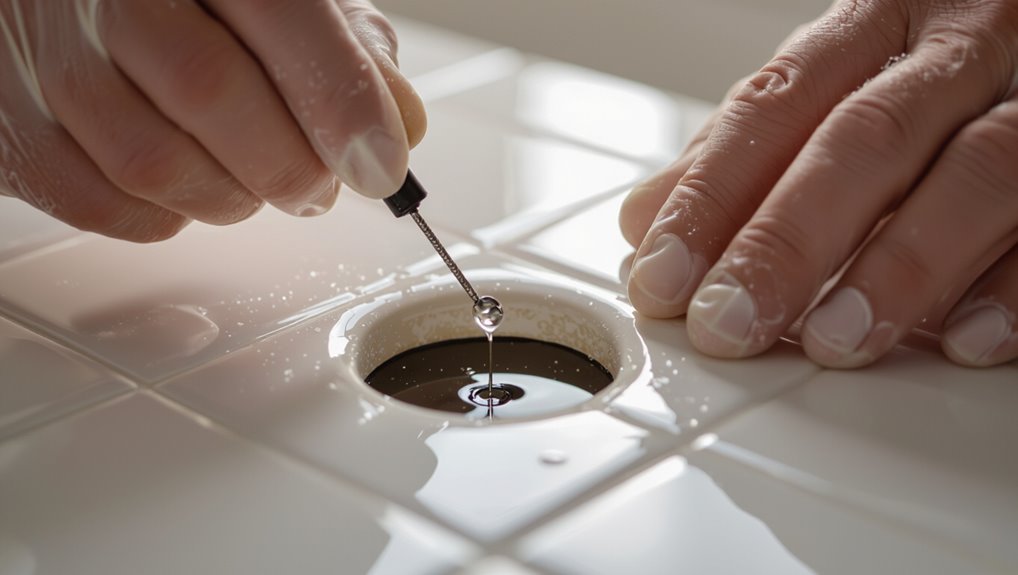
Step 4 Cooling and lubrication techniques (wet vs. dry)
Because drilling generates heat that can crack glaze and dull bits, you’ll need to keep the bit and hole cool—either with continuous water feed (wet) or intermittent cooling (dry with breaks).
You’ll choose based on tile, bit, and access.
Tips:
- Wet: steady stream or sponge drip.
- Dry: short drilling bursts.
- Pause to clear debris.
- Avoid overheating.
Step 5 Finishing the hole and cleaning edges
After cooling and clearing debris, finish the hole by removing any glaze chips and smoothing the cut edges so the tile won’t crack or snag.
Use a small diamond file or sanding sponge, working gently from the glazed side toward the hole.
Clean dust with a damp cloth, inspect for microcracks, and touch up rough spots.
Seal if needed before mounting fixtures.
Choosing the Right Drill Bit Size and Drill Type
Start by matching the drill bit diameter exactly to the anchor or fixture so the hole grips properly and won’t crack the tile.
Choose a corded drill for consistent power or a high-torque cordless for portability, and set speed low to medium to prevent overheating.
Never use hammer mode on ceramic—it’s for masonry and will shatter the glaze.
Matching bit size to anchor/fixture
Matching the drill bit size to your anchor or fixture is essential for a secure hold and to avoid cracking the tile. You’ll match anchor diameter, tile thickness, and substrate.
Use these steps:
- Check anchor package for recommended bit size.
- Choose a carbide or diamond bit that matches that diameter.
- Dry-fit anchor before final drilling.
- Drill slowly with steady pressure.
Corded vs. cordless drills and speed/torque considerations
While both corded and cordless drills will bore through tile when paired with the right bit, you’ll want to weigh power, runtime, and control: corded drills deliver consistent high RPMs and torque for tougher substrates and longer jobs, whereas modern cordless models offer portability and enough speed for most tile work but can taper off under heavy load.
Choose a drill with variable speed, stable torque, and comfortable handling to maintain steady pressure and avoid overheating the bit.
Hammer mode: when to avoid it
If you’re drilling ceramic tile, don’t use hammer mode — the rapid percussive action can crack or shatter the glaze and substrate even when the bit is sharp.
Use a rotary drill with variable speed, steady pressure, and a carbide or diamond-tipped bit.
Reserve hammer mode for masonry only; on tile, it risks breakage, oversized holes, and ruined fixtures.
Take it slow and cool the bit.
Common Problems and How to Fix Them
You’ll run into a few common problems when drilling ceramic tile, but you can fix most of them with the right technique.
Learn what causes cracked tiles and how to rescue or replace them, stop bits from slipping or skidding, and troubleshoot overheating or dull bits.
I’ll also show quick fixes for misaligned holes so you can clean up mistakes without starting over.
Cracked tile causes and rescue methods
Cracked tiles are usually the result of impact, improper installation, or movement beneath the surface, and you can often save the situation without replacing the whole floor.
Assess crack depth; for hairline cracks, clean and inject clear epoxy, then buff.
For larger breaks, remove tile carefully, salvage intact pieces, level substrate, and reset with thinset and matching grout.
Bit slipping or skidding prevention and correction
When a drill bit slips on ceramic, it doesn’t just waste time—it risks chipping the tile or gouging the glaze, so you need to stop skidding before you start drilling.
Place a strip of masking tape over the mark, use a center punch or pilot dimple, start at low speed with light pressure, and keep the drill perpendicular.
Replace worn bits promptly.
Overheating and bit dulling troubleshooting
Even if you’ve stopped the bit from skidding, overheating and dulling can still ruin a hole and the tile finish.
Stop periodically, cool the bit with water or a damp cloth, and use light pressure at low speed. Replace worn bits or re-sharpen diamond tips.
Avoid forcing the drill; let the abrasive do the work to prevent glazing and cracks.
Misaligned holes corrective options
If a hole ends up off-center, you’ve got a few practical fixes before deciding to replace the tile: drill a slightly larger, concentric hole and use a decorative escutcheon or oversized anchor; fill the mistake with epoxy or tile repair compound, sand smooth, and re-drill at the correct location; or mount fixtures using surface brackets to hide the error without further tile work.
Best Practices and Pro Tips
To get the most from your drill bits, keep them clean, store them properly, sharpen when needed, and use habits that minimize wear.
Use low to moderate speed, steady light pressure, and short bursts to avoid overheating ceramic.
Replace bits that chip, blunt quickly, or struggle even at proper settings, and call a pro if holes need pinpoint accuracy or the tile keeps cracking.
Extending bit life (storage, sharpening, usage habits)
While you’re focused on choosing the right drill bit for ceramic tile, don’t overlook how you store, sharpen, and use those bits—proper habits can double their life and save you time and money.
- Store bits dry, separated, in labeled cases to prevent chips.
- Sharpen carbide tips with a diamond hone, matching original angle.
- Clean debris after each use to avoid glazing.
- Rotate bits by task; don’t force dull bits—replace when worn.
Speed, pressure, and duration guidelines
Because ceramic tile cracks under sudden heat and stress, you’ll get the cleanest holes by matching drill speed, steady pressure, and short bursts of contact.
Use low RPMs for porcelain, moderate for glazed ceramic. Apply firm, even pressure—don’t force.
Drill in 5–10 second pulses, lift to clear slurry and cool the bit with water. Pause longer if bit warms noticeably.
When to replace a bit or call a pro
1 simple rule will save you time and money: stop using a bit the moment it shows visible wear, glazing, wobble, or starts producing ragged holes, and call a pro if cracks appear in the tile, you hit rebar or plumbing, or the job feels beyond your skill.
Replace dull bits immediately, inspect for chips after each use, and don’t risk damaging tiles or utilities—hire help.
Product Recommendations and Buying Guide
When shopping for tile bits, focus on material, coating, and shank type so you get the right tool for your tile.
I’ll give budget, mid-range, and professional recommendations so you can match performance to price.
Don’t forget accessories like drill guides, templates, and diamond hole saws that make holes cleaner and safer.
Features to look for (material, coating, shank type)
If you want clean, chip-free holes in ceramic tile, focus on the drill bit’s material, coating, and shank type—each determines cutting performance, heat resistance, and how securely the bit fits your drill.
Consider these features when choosing:
- Carbide or diamond tips for hardness and edge retention.
- TiN/TiAlN coatings for heat reduction.
- SDS/hex or round shanks to match your drill.
- Reduced-flute designs for debris clearance.
Budget, mid-range, and professional picks
Choosing the right drill bits comes down to how often you’ll use them and how cleanly you need holes to come out; budget sets serve occasional DIYers, mid-range kits balance durability and value, and professional options prioritize long life and fast cutting. Pick by frequency, tile hardness, and budget.
| Tier | Best for | Typical life |
|---|---|---|
| Budget | Occasional use | Low |
| Mid-range | Regular projects | Moderate |
| Pro | Trade work | High |
Accessories that improve results (drill guides, templates, diamond hole saws)
After picking the right tier of bits for your needs, add accessories that make drilling tile faster, cleaner, and more reliable.
Use a drill guide or template to steady the bit and prevent walk‑off. Choose carbide or diamond hole saws for larger holes; wet diamond variants last longest.
Also consider a centering punch, masking tape, and a low‑speed drill to protect glaze and guarantee precise, chip‑free cuts.
FAQs
You probably have a few quick questions about drilling tile, like whether a regular masonry bit will work or if you need water while drilling.
You’ll also want to know how to cut large holes for pipes, whether drilling weakens the tile, and how long diamond bits last.
I’ll answer each so you can drill confidently and avoid common mistakes.
Can I use a regular masonry bit on ceramic tile?
While a regular masonry bit can sometimes make a hole in ceramic tile, it’s not the best choice because its blunt, twisted tip tends to catch, crack, or chip the glaze; you’ll get cleaner, safer results using a carbide-tipped or diamond-tipped bit designed for tile.
If you must use masonry, go very slowly, keep steady pressure, and accept higher risk of damage compared with proper tile bits.
Do I need to use water when drilling tile?
Do you need water when drilling tile? You don’t always, but water helps.
For porcelain or glazed ceramic, a steady trickle or spray cools the bit, reduces dust, and prevents glazing from cracking. Use a wet sponge, spray bottle, or drip feed while drilling slowly without hammer action.
Dry drilling risks overheating, dulling bits, and chipping tiles—so keep bits cool.
How do I drill large holes for pipes or fixtures?
If you need a big hole for a pipe or fixture, use the right tool and take it slow: a carbide-tipped hole saw or diamond core bit mounted on a variable-speed drill will cut cleanly through ceramic or porcelain when you’re patient, keep the bit cool with water, and avoid hammer action.
Clamp a backing block, mark center, start at low speed, and let the bit do the work.
Will drilling weaken my tile permanently?
Making a hole for a pipe or fixture won’t automatically ruin your tile, but improper technique can cause chips, cracks, or weakened edges.
If you use the right bit, steady low speed, cooling water, and light pressure, the damage stays minimal.
Reinforce edges with backing if needed and avoid over-drilling; a proper hole leaves the tile structurally sound for normal use.
How many holes can a diamond bit make before replacement?
Wondering how many holes you can drill with a diamond bit before replacing it?
It depends on material, bit quality, hole size, and cooling. On glazed ceramic, a quality wet diamond bit can make dozens to a few hundred holes.
You’ll know it’s time to replace when cutting slows, edges glaze instead of cutting, or the bit overheats despite proper water cooling.