How to Remove Vinyl Flooring Adhesive From Any Surface Effectively
You can remove vinyl flooring adhesive effectively by softening it, scraping in thin layers, and finishing with the right solvent and cleanup. Start by identifying the subfloor and testing a small area, then protect surfaces, ventilate, and wear PPE. Use heat or hot water to soften, score and lift with a putty knife or floor scraper, then apply an appropriate solvent, agitate gently, and rinse or neutralize. Follow disposal rules and call a pro for large, hazardous, or stubborn jobs to learn more.
Fast Way to Remove Vinyl Flooring Adhesive
For a fast, effective fix, you can soften the adhesive with a heat gun or steam and scrape it away with a putty knife.
Call a pro if the adhesive covers large areas, won’t budge after treatment, or releases noxious fumes.
If you’re unsure about underlying subfloor damage or hazardous materials, don’t hesitate to get expert help.
One-sentence summary of the simplest effective method
Warm the adhesive with a heat gun or hair dryer, then scrape it away with a stiff putty knife while wiping residue with mineral spirits for a fast, effective removal.
You’ll soften the glue, lift it in thin passes, and clean lingering tack with a solvent-soaked rag; this simple technique shows how to remove vinyl flooring adhesive quickly, safely, and with minimal surface damage when you work methodically.
When to call a pro (quick indicators)
If the adhesive won’t soften after repeated heat-and-scrape attempts, call a pro—stubborn, tar-like residues, old mastic, or glue that’s bonded into concrete usually need commercial strippers, grinders, or chemical treatments a contractor can apply safely.
Call a professional when you see extensive staining, fumes you can’t tolerate, damaged subfloor risks, persistent residue after DIY steps, or when project scope, time, or safety exceed your skills.
Basic Understanding What Vinyl Flooring Adhesive Is and Why It Bonds
You’ll run into several adhesive types—acrylic, solvent-based, pressure-sensitive, and epoxy—each with different bond strengths and removal quirks.
How the glue behaves depends on the surface—concrete, plywood, tile, or subfloor all absorb and hold adhesives differently.
Take safety seriously, since fumes, VOCs, and proper disposal methods vary by product and can affect how you remove them.
Types of vinyl flooring adhesives (acrylic, solvent-based, pressure-sensitive, epoxy)
When you start removing vinyl flooring adhesive, it helps to know the major types you’ll encounter—acrylic, solvent-based, pressure-sensitive, and epoxy—because each bonds differently and needs a specific removal approach.
Acrylic cures to a plastic-like film, solvent-based softens with chemical strippers, pressure-sensitive sticks like tape, and epoxy forms a rigid, cross-linked bond requiring mechanical or chemical breakdown.
How adhesive behaves on different surfaces (concrete, plywood, tile, subfloor)
Because adhesives interact with substrates at a microscopic level, the same vinyl glue can behave very differently on concrete, plywood, tile, or a finished subfloor.
You’ll find concrete soaks and mechanically locks many adhesives. Plywood absorbs and weakens waterborne glues. Glazed tile prevents penetration so adhesives sit on the surface. Finished subfloors with sealers resist bonding—each needs different removal approaches.
Safety and environmental considerations (fumes, VOCs, disposal)
Different substrates not only change how adhesive bonds, they also affect the risks you’ll face during removal.
You’ll encounter fumes and VOCs from old adhesives; ventilate, use respirators rated for organic vapors, and wear gloves and eye protection.
Contain dust and debris, avoid open burning, and follow local hazardous-waste rules for disposal.
Use low-VOC solvents when possible to minimize exposure and environmental impact.
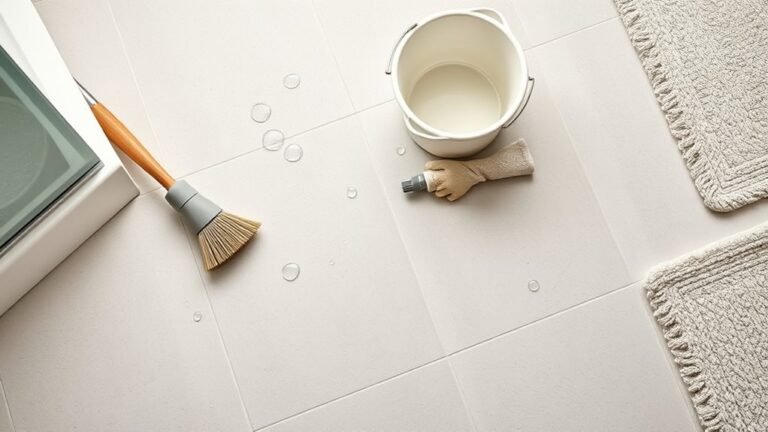
Tools and Materials You’ll Need
You’ll need a few sturdy tools—scrapers, a heat gun, an oscillating tool or floor stripper—to remove old adhesive efficiently.
Pick chemical removers (citrus, solvent, alkaline, or specialty adhesive dissolvers) based on the adhesive type and weigh their pros and cons.
Wear gloves, eye protection, and a respirator as needed, and make sure the area is well ventilated.
Essential tools (scrapers, heat gun, oscillating tool, floor stripper)
Preparation starts with the right tools: a sturdy scraper and putty knife for manual removal, a heat gun to soften stubborn adhesive, an oscillating multi-tool with a scraper blade for faster mechanical stripping, and a chemical or floor stripper for the toughest residue.
Also gather safety gear—gloves, eye protection, respirator—and a stiff-bristle brush, drop cloths, and a shop vacuum to collect debris and dust.
Chemical removers and their pros/cons (citrus, solvent, alkaline, adhesive dissolvers)
Once you’ve got your scrapers and safety gear ready, it’s time to pick a chemical remover that fits your situation. You’ll choose citrus for mild residue, solvents for tough glue, alkaline for old adhesive, or commercial dissolvers. Weigh effectiveness, surface safety, and cleanup.
| Type | Strength | Surface note |
|---|---|---|
| Citrus | Mild | Safe |
| Solvent | Strong | Risky |
| Alkaline | Moderate | Porous |
Personal protective equipment and ventilation requirements
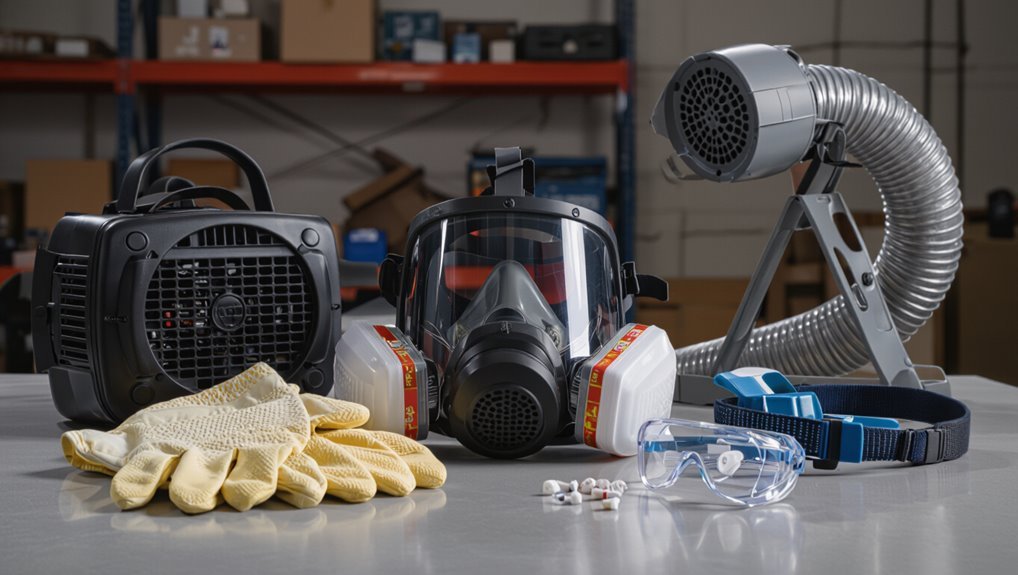
Anyone working with adhesive removers and scraping tools should wear proper personal protective equipment and guarantee good ventilation to avoid inhaling fumes or getting chemicals on skin and eyes.
You’ll need reliable PPE and airflow before starting.
- Wear nitrile gloves, chemical-resistant goggles, and a respirator (P100/organic vapor).
- Open windows, use fans, or run an exhaust.
- Keep a first-aid kit and eye wash nearby.
Preparation Before You Start
Before you start, you’ll want to identify the floor type and the kind of adhesive so you can choose the right remover and technique.
Test a small, inconspicuous patch to check for damage and how well the adhesive loosens.
Clear the room and tape off or cover adjacent surfaces to protect them from chemicals and debris.
Assessing the surface and adhesive type
Because different adhesives and substrates react to removal methods, you should start by identifying both the vinyl’s adhesive type and the condition of the subfloor.
Inspect for residue color, texture (rubbery, brittle, tar-like) and any remaining backing.
Note substrate material—wood, concrete, tile—and look for damage, moisture, or paint.
Record findings so you choose compatible solvents and tools.
Testing a small area and patch test for damage
When you’re ready to proceed, test a small, inconspicuous area to confirm your chosen removal method won’t harm the subfloor or surrounding finishes.
Apply the adhesive remover, wait the recommended dwell time, then gently scrape.
Check for discoloration, swelling, or softened material. If damage appears, stop and try a milder solvent or a different technique.
Record successful methods and times for full removal.
Clearing the room and protecting adjacent surfaces
If you’ll be removing vinyl from the whole room, clear out furniture, rugs, and wall hangings so you have unobstructed access and won’t risk gouging or staining belongings.
Next, seal vents and doorways, cover baseboards and adjacent floors, and set up a disposal area.
- Tape plastic to walls
- Lay rosin or drop cloths
- Move small items to sealed bins
Step-by-Step Removal Methods
Now you’ll work through four practical removal methods so you can pick the one that fits your situation.
You’ll start with mechanical techniques, try heat-based options, consider chemical solvents, and use a combination approach for the toughest adhesive.
Follow each step carefully to stay safe and protect your subfloor.
Method A Mechanical Removal (no chemicals)
Start by softening the old adhesive and scoring it so you can lift it more easily.
Then use hand scrapers or a floor machine with the right blades, working safely and keeping a steady rhythm.
Finish by sanding any stubborn residue and vacuuming thoroughly to leave a clean surface.
Step 1: Softening and scoring the adhesive
Step 1 loosens the bond so you can scrape without tearing the subfloor: heat the adhesive gently with a putty knife-friendly heat gun or a hot water pad.
Then score it in a grid with a utility knife so the scrub and pry tools can bite in.
Work small areas, reheat stubborn spots, keep blade angles shallow, and wipe softened residue with a rag as you go.
Step 2: Using scrapers and floor machines safely
When the adhesive’s been softened and scored, grab a rigid floor scraper or a long-handled push scraper and work in short, controlled passes so you don’t gouge the subfloor; keep the blade angle shallow, maintain firm footing, and take breaks to clear debris and check progress.
Use protective gloves, eye protection, and knee pads.
If using a powered floor machine, start slow, keep dust containment, and follow manufacturer safety guidelines.
Step 3: Sanding and vacuuming residue
Move over the scraped areas with a floor sander or handheld orbital sander fitted with coarse-grit sanding paper to remove remaining adhesive ridges.
Then follow with a finer grit to smooth the subfloor; keep the sander moving to avoid gouges, work in the direction of the wood grain (if present), and vacuum frequently to clear dust so you can see progress and prevent clogging the abrasive.
Then vacuum thoroughly, wipe with a damp cloth, inspect for spots, and repeat light sanding if any residue remains.
Method B Heat-Based Removal
For heat-based removal, you’ll use a heat gun or steamer to soften the adhesive and make it easier to lift.
Once it’s softened, scrape the adhesive away with a putty knife or scraper, working in small sections.
After scraping, let the area cool and finish with a thorough cleanup to remove residue.
Step 1: Using a heat gun or steamer
Step 1: Heat the adhesive to soften it so you can scrape it off more easily—use either a handheld heat gun set to low–medium or a fabric steamer for gentler, broader heat.
Hold the tool several inches away, move continuously to avoid scorching, and wear heat-resistant gloves and eye protection.
Test a small area first and monitor the surface temperature closely.
Step 2: Scraping softened adhesive
Once the adhesive is warm and pliable, start scraping it away with a rigid putty knife or floor scraper held at a low angle so you lift residue rather than gouge the subfloor.
Work in small sections, reheat stubborn areas, and use firm, steady strokes.
Collect lifted adhesive on a disposable scraper or rag, and pause to clear debris so your blade stays effective.
Step 3: Cooling and cleanup
After you’ve scraped up the softened adhesive, let the floor cool so any remaining residue firms slightly—this makes it easier to pick up without smearing.
Once cool, vacuum or sweep debris, then wipe with a damp cloth and a mild solvent or adhesive remover suited to your surface.
Rinse with clean water, dry thoroughly, and inspect for spots; repeat targeted cleaning if needed.
Method C Chemical Removal
For chemical removal, you’ll start by matching a solvent to the type of adhesive so you get effective softening without damaging the subfloor.
Apply the solvent per the label, let it dwell for the recommended time, and use appropriate agitation (scraper or brush) to lift the adhesive.
Finish by neutralizing any chemical residue and thoroughly rinsing the area before drying.
Step 1: Choosing the right solvent for your adhesive type
Step 1: identify the adhesive—because the solvent you choose depends on whether you’re dealing with pressure-sensitive adhesive (PSA), cutback adhesive, epoxy, or a rubber-based glue.
Check texture, residue color, and age.
Use solvent charts: citrus or low-VOC for PSA, ketone or alcohol blends for cutback, specialized epoxy removers for epoxy, and aromatic solvents for rubber-based glues.
Test first.
Step 2: Application, dwell time, and agitation techniques
Now that you’ve identified the adhesive and chosen an appropriate solvent, you’ll apply it in a way that maximizes penetration and minimizes surface damage.
Work in small sections, saturate the adhesive evenly, and let the solvent dwell per manufacturer time—usually 5–20 minutes.
Agitate gently with a plastic scraper or nylon brush, repeating application for stubborn spots, and always monitor surface reaction.
Step 3: Neutralizing and rinsing residue
1. After chemical dwell, neutralize with the recommended solution (often baking soda or a manufacturer’s neutralizer).
Apply sparingly, let it react briefly, then scrub gently with a nonabrasive pad.
Rinse thoroughly with clean water, blotting and repeating until no residue or smell remains.
Dry the area completely to prevent reactivation or staining, and ventilate until odors dissipate.
Method D Combination Approach for Stubborn Adhesive
If adhesive is especially stubborn or old, you’ll often need to combine heat, scraping, and a chemical solvent to get it up.
Start by softening the glue with a heat gun or steamer, scrape away what lifts, then apply a solvent to break down the remaining residue and finish scraping.
Work in small sections and follow safety instructions for heat and chemicals.
When to combine heat + scraper + chemical
Apply heat, scrape, then treat with solvent when adhesive’s softened but still stubborn—this combo gives you control and speeds removal on tough spots.
Use heat to loosen adhesive without scorching the substrate, scrape gently to lift layers, then apply a compatible solvent to dissolve residue.
Stop when residue thins, ventilate, wear gloves, and test solvents on a hidden area first.
Example sequence for best results
Start by working in small sections so you can control heat, scraping, and solvent application without letting adhesive cool or the substrate overheat.
Heat the adhesive gently, scrape softened residue with a rigid scraper, then apply a low‑odor solvent and let it dwell briefly.
Wipe away loosened adhesive, repeat heat‑scrape‑solvent cycles as needed, then clean residue with detergent and rinse.
Surface-Specific Guidance
Different surfaces need different techniques, so you’ll use one approach for concrete, another for plywood or wood subfloors, and different care for ceramic, stone, or painted/finished surfaces.
I’ll point out which solvents, tools, and precautions work best for each material to avoid damage.
Follow the surface-specific tips to finish the job safely and efficiently.
Removing adhesive from concrete
Concrete is durable but porous, so removing vinyl adhesive from it takes patience and the right approach to avoid damaging the slab.
Start by scraping and vacuuming dust, then test a small area with mechanical methods—floor grinder or rotary scarifier—before using a citrus or soy-based adhesive remover.
Rinse thoroughly, neutralize residue, and let concrete dry fully before any new flooring installation.
Removing adhesive from plywood and wood subfloors
Tackle adhesive on plywood and wood subfloors carefully, because wood is softer and more moisture-sensitive than concrete—use gentler mechanical methods, low-solvent removers, and spot testing to avoid delamination or swelling.
Start with scraping and hand sanding, avoid heavy grinders, blot solvents instead of flooding, dry promptly, and seal or reglue damaged spots.
Wear respiratory and skin protection when using chemical cleaners.
Removing adhesive from ceramic tile and stone
Start by evaluating the tile or stone surface and the type of adhesive—ceramic and natural stone can handle more aggressive mechanical methods than wood, but they’re still sensitive to scratching, staining, and chemical etching, so pick tools and solvents accordingly.
Test a small area. Use plastic scrapers, gentle heat, and solvent wipes suited to stone.
Rinse thoroughly and neutralize chemicals to avoid etching.
Removing adhesive from painted or finished surfaces
When working on painted or finished surfaces, you’ll need to be extra careful because solvents and scrapers can damage the finish; test in an inconspicuous spot first and proceed with the gentlest methods that remove adhesive without stripping paint or varnish.
Use a soft plastic scraper, mild adhesive remover or soapy warm water, dab gently, blot residue, rinse, and dry.
If needed, lightly buff with a microfiber cloth.
Troubleshooting Common Problems and Mistakes
Don’t use the wrong solvent or you could harm yourself or the floor—look for warning signs like strong fumes, staining, or a sticky residue that won’t lift.
Avoid overheating or aggressive scraping, which can scorch or gouge the substrate, and be prepared to use different methods for black mastic or deeply embedded adhesive.
For stubborn spots and ghosting, I’ll recommend targeted chemicals, mechanical options, and safe refinishing steps you can try next.
Mistake: Using the wrong chemical risks and signs
Although a stronger solvent might seem like a quick fix, using the wrong chemical can damage subfloors, emit toxic fumes, or ruin nearby finishes.
You should test in an inconspicuous spot, check manufacturer guidelines, and use PPE.
Watch for discoloration, softening, or lingering odors. If you see bubbling, staining, or material breakdown, stop immediately and switch to a gentler remover or seek professional advice.
Mistake: Overheating or damaging substrate
If you crank up heat or keep a scraper too hot, you can easily warp, scorch, or delaminate the subfloor beneath the adhesive.
Don’t overheat—use moderate heat and short bursts, test a small area, and keep the tool moving.
Protect delicate substrates with a heat shield or plastic scraper, and stop immediately if you see discoloration, bubbling, or softening.
Dealing with deeply embedded adhesive or black mastic
When you encounter deeply embedded adhesive or old black mastic, expect a tougher, slower removal process that usually needs stronger solvents, mechanical abrasion, or a combination of both.
Test solvents on a hidden area first, work in small sections, and use scrapers, floor grinders, or rotary tools with appropriate pads.
Wear respirator protection, ventilate well, and dispose of residue per local regulations.
How to handle stubborn spots and ghosting
Because some adhesive spots stay behind no matter how thoroughly you scrape, you’ll need targeted tactics for stubborn residues and ghosting to restore a clean, uniform floor.
Reheat with a heat gun or iron over a cloth, apply citrus or solvent-based remover, gently agitate with a nylon scrub pad, and wipe clean.
Repeat spot treatments and neutralize solvent before refinishing.
Prevention and Best Practices for Future Installations
To avoid another sticky removal job, choose removable adhesives and installation methods that let you lift flooring later without scraping.
You should also prep and level surfaces thoroughly to prevent adhesive bonding problems down the line.
Finally, clean up spills immediately and store leftover adhesives in sealed containers so they don’t harden or contaminate future projects.
Choosing removable adhesives and installation methods
If you want future removal to be straightforward, pick adhesives and installation methods designed for temporary or low-tack bonds—peel-and-stick tiles with pressure-sensitive adhesive, releasable VHB tapes, or loose-lay systems let you change flooring without excessive scraping or solvents.
Test adhesive compatibility with your subfloor, choose products labeled removable, follow manufacturer temperature and dwell recommendations, and document installation for easier future removal.
Surface preparation tips to minimize future adhesive issues
When you prepare the subfloor correctly, you’ll cut down on problems like poor adhesion, bubbling, and lingering residue later on.
Clean thoroughly, remove old adhesive, and repair cracks or high spots.
Dry and level surfaces before applying primer or moisture barrier.
Sand glossy finishes for better bite, test compatibility with your adhesive, and follow manufacturer specs to prevent future removal headaches.
Proper cleanup and storage of adhesive materials
Start by wiping excess adhesive off tools and surfaces right after use so it doesn’t cure into a stubborn mess; clean blades, trowels, and containers with the solvent the manufacturer recommends, then seal lids tightly to prevent evaporation and contamination.
Label containers with product and date, store upright in a cool, ventilated area away from heat and children, and dispose of rags and waste per local regulations.
Cleanup, Disposal, and Post-Removal Care
Once the adhesive’s up, you’ll need to handle waste and contaminated rags safely—follow local hazardous-waste rules and double-bag soaked materials.
Next, prep the floor for new covering by thoroughly cleaning, leveling low spots, and applying primer or a skim coat where needed.
If residue remains that can’t be removed, seal or encapsulate it with an appropriate primer or barrier before installing the new flooring.
Safe disposal of adhesive waste and contaminated rags
Dispose of adhesive waste and contaminated rags carefully to protect yourself, others, and the environment.
Bag soaked rags in metal containers or fire-resistant bags, label them, and store outdoors until disposal.
Check local hazardous-waste rules; many adhesives count as hazardous.
Don’t dump solvents or adhesive residues down drains.
Wear gloves when handling waste, and wash hands after transfer.
Final surface preparation for new flooring (priming, leveling)
With adhesive waste and contaminated materials handled and removed, turn your attention to preparing the substrate so new flooring will bond and lay flat.
Inspect for residue, damage, and moisture. Sand or scrape uneven spots, fill cracks and low areas with appropriate leveller, then prime porous or smooth surfaces per manufacturer instructions.
Allow full cure before installing new flooring to guarantee adhesion and longevity.
When to seal or encapsulate residual adhesive
Wondering whether you should seal or encapsulate leftover adhesive before installing new flooring? You should when residue risks bond failure, releases odors, or can’t be fully removed without damage.
Use an appropriate primer or encapsulant compatible with both substrate and new flooring. Test adhesion in a small area, follow manufacturer cure times, and guarantee the surface is clean, dry, and dust-free before installation.
Cost, Time, and When to Hire a Professional
Expect time and cost to vary widely by method and room size — for example, a small bathroom might take a few hours with hand scraping, while a large living area could take a day or more with chemical or mechanical removal and cost accordingly more.
You should consider hiring a pro if you find stubborn adhesive over a large area, damaged subflooring, or if chemicals and machines feel beyond your comfort level.
A contractor can also save time and prevent costly mistakes when warranties, moisture barriers, or structural issues are involved.
Estimated time and cost ranges by method and room size
How long and how much it’ll cost to remove vinyl adhesive depends on the method you choose and the room size:
| Method | Small (100 ft²) | Large (400 ft²) |
|---|---|---|
| Heat/scrape | 1–3 hours, $20–$60 | 4–8 hours, $80–$200 |
Chemical/steam | 2–6 hours, $40–$120 | 6–12 hours, $150–$400 |
Expect higher costs for stubborn residue; consider pro help for big jobs.
Signs that the job requires a professional contractor
Those time and cost ranges give you a baseline, but certain conditions mean you should hire a pro instead of tackling the job yourself.
Hire a contractor if adhesive covers large areas, contains unknown chemicals or asbestos, or if subfloor damage or unevenness needs repair.
Also call a pro if you lack time, proper tools, or experience; they’ll guarantee safe, efficient removal and proper disposal.
FAQs
You probably have a few quick questions before you start, like whether you can remove adhesive without chemicals and if the subfloor will be damaged.
You’ll also want to know how long chemical removers take, whether eco-friendly products actually work, and what to do if the adhesive might contain asbestos or other hazards.
I’ll answer each of these so you can choose the safest, most effective method.
Can I remove vinyl adhesive without chemicals?
Wondering if you can ditch harsh chemicals when removing vinyl adhesive? Yes — mechanical and heat methods work well.
Use a floor scraper, putty knife, or oscillating tool to lift softened glue. Apply a heat gun or steam to loosen residue, then scrape and wipe with warm soapy water.
Test a small area first, work patiently, and dispose of debris responsibly.
Will adhesive removal damage my subfloor?
Although removing adhesive can risk surface damage, careful methods usually protect the subfloor. You should test methods on a small area, choose nonabrasive tools, and use appropriate cleaners to avoid gouging or swelling.
For plywood or concrete, control moisture and pressure; for wood, avoid excessive scraping. If unsure, consult a flooring pro to prevent permanent harm.
How long does chemical adhesive remover take to work?
How long will a chemical adhesive remover take to work? It depends on product strength, adhesive age, and layer thickness.
Most commercial removers soften adhesive within 10–30 minutes; heavy or multiple layers may need several applications and 1–2 hours per session.
Always follow manufacturer instructions, test a small area, and reapply or scrape as needed until the residue loosens enough for safe removal.
Are there eco-friendly adhesive removers that actually work?
If you prefer greener options after using a chemical remover, there are eco-friendly adhesive removers that actually work for many vinyl jobs.
Look for citrus-based, soy, or biodegradable solvent blends labeled low-VOC. You’ll need more dwell time and elbow grease than with harsh solvents, but they’ll soften residue safely.
Test first on a hidden spot, follow instructions, and ventilate the area.
What if the adhesive contains asbestos or hazardous materials?
When you suspect the adhesive may contain asbestos or other hazardous materials, stop work immediately and don’t try to remove it yourself; disturbing the material can release dangerous fibers or toxins.
You should:
- Contact a licensed inspector or asbestos professional to test and assess.
- Follow their containment, removal, or abatement recommendations.
- Hire certified contractors for any disturbance, disposal, and clearance testing.