How to Install Vinyl Flooring on Stairs With Nosing: Full Walkthrough
You can install vinyl on stairs with nosing by prepping solid, level treads, measuring each riser and tread accurately, and acclimating planks beforehand. Cut and dry-fit pieces, apply the manufacturer’s adhesive, press and roll each plank, then fit a matching nosing profile secured with adhesive and countersunk fasteners. Work one stair at a time, wipe excess glue, and let adhesives cure. Follow tips for safety and maintenance below to guarantee a durable, slip-resistant finish and learn full step-by-step guidance.
Can You Install Vinyl Flooring on Stairs with Nosing?
Yes—you can install vinyl on stairs with nosing, but it’s a bit more involved than flat floors.
Expect a moderate time commitment, some added material cost for bullnose pieces and adhesive, and basic to intermediate DIY skills (or a pro if you’re unsure).
With careful measuring and proper tools, you’ll get a durable, finished look.
Short summary of feasibility, time, cost, and skill level
If you’re comfortable with basic carpentry and have the right materials, installing vinyl on stairs with nosing is definitely feasible for a confident DIYer; it typically takes a weekend for a straight run of 8–12 steps, costs $100–$400 in materials (plus nosing pieces), and requires moderate skill for accurate cutting, adhesive application, and secure fastening.
- Feasibility: practical DIY
- Time: weekend
- Cost: $100–$400
- Skill: moderate — learn how to install vinyl flooring on stairs with nosing
Basic Understanding What Is Vinyl Stair Nosing and Why It Matters
Think of stair nosing as the finished edge piece that meets the tread and riser — it comes in vinyl, aluminum with vinyl inserts, and glued-on or screw-down profiles that work with vinyl flooring.
You’ll use nosing to protect high-wear edges, improve slip resistance, and extend the life of your vinyl-covered stairs.
Picking the right type makes installation cleaner and gives your stairs a safer, more professional finish.
Definition of stair nosing and types compatible with vinyl
Stair nosing is the trim that finishes the front edge of each step and protects high-wear areas where treads meet risers. Choosing the right type for vinyl matters for safety, durability, and appearance.
You’ll pick from vinyl, aluminum, or rubber nosing, plus integrated profile, overlap, and flush styles. Match profile to stair thickness and vinyl thickness for a secure, neat fit.
Benefits of using nosing on vinyl-covered stairs (safety, durability, finish)
Because nosing defines the edge where tread meets riser, it plays an essential role in safety, durability, and the overall finish of vinyl-covered stairs.
You’ll reduce slip risk with rounded or textured nosing, protect vulnerable edges from wear, and create a clean junction that hides cuts and adhesive.
Proper nosing also improves visual continuity, making the staircase look professional and longer-lasting.
Tools, Materials, and Measurements You’ll Need
Before you start, gather the right tools—cutters, a saw, adhesive and a notched trowel, plus measuring tools—and lay out the materials: vinyl planks, stair nosing profiles, underlayment, screws, and the adhesive specified for your product.
You’ll also need to measure each stair precisely, recording riser height, tread depth, overhang/run, and the required nosing length for every step.
With accurate measurements and the proper tools and supplies, you’ll avoid costly mistakes and guarantee a snug, professional fit.
Required tools (cutters, saws, adhesive, trowel, measuring tools)
Gather the right tools so your vinyl stair project goes smoothly:
you’ll need a utility knife with fresh blades or a vinyl cutter for precise trims, a jigsaw or circular saw for cutting rigid nosing and tread pieces, a notched trowel and recommended adhesive for secure bonding, a straightedge and tape measure for accurate layout, and a set of clamps or weights to hold pieces while the glue sets.
Use a scraper, chalk line, level, and safety gear.
Materials list (vinyl planks, stair nosing profiles, adhesive, underlayment, screws)
A concise materials list keeps your vinyl stair installation efficient and reliable: you’ll need the vinyl planks or tiles matched to your tread size and thickness, stair nosing profiles sized for your tread and riser configuration, the manufacturer-recommended adhesive (or double-sided stair tape for floating systems), an underlayment or anti-squeak membrane if required, and the appropriate fasteners—trim screws or staples—for securing nosing and junctions.
Also gather connecting strips, cleaner, and spacers.
How to measure stairs accurately (riser, tread, overhang, run, nosing length)
Since accurate measurements make the difference between a snug fit and costly re-cuts, start by measuring each stair individually: record the tread depth (front to back), riser height (bottom to top), overhang or bullnose projection, total run (distance from top to bottom along the treads), and the nosing length required for each step.
- Use a tape measure.
- Note left/right variations.
- Sketch and label.
- Double-check before cutting.
Preparation Inspecting and Preparing Stairs before Installation
Before you lay any vinyl, you’ll inspect the stairs for loose boards, squeaks, and level issues and make necessary repairs.
Then clean, sand, and prime the treads for good adhesive bonding, remove old coverings and hardware, and guarantee the subfloor is dry and dust-free.
Finally, acclimate your vinyl planks in the room and organize materials so installation goes smoothly.
Structural inspection and repairs (loose boards, squeaks, level)
When you inspect the stair structure, focus on loose boards, squeaks, and levelness because these issues will compromise vinyl adhesion and your safety.
Tighten or replace loose treads and risers, add screws into joists, and use shims to correct uneven steps.
Secure squeaky spots with construction adhesive or additional fasteners.
Recheck with a level and address any remaining movement before proceeding.
Surface cleaning, sanding, and priming for adhesive
Now that the structure is solid, get the surfaces spotless so the vinyl will bond properly.
Sweep and vacuum to remove dust, then degrease with a mild cleaner.
Sand glossy spots and rough edges with 120–150 grit for adhesion, vacuum again, and tack-rag.
Apply manufacturer-recommended primer to bare wood or porous areas, let cure fully, and check for smooth, dry surfaces before laying adhesive.
Removing old coverings and hardware
Start by stripping away any old coverings and loose hardware so you can see the stair structure clearly and work safely.
Remove nails, staples, tack strips, and adhesive residue with pliers, pry bar, and scraper. Pull out screws and patches, replace damaged treads or risers, and guarantee fasteners sit flush.
Vacuum debris and inspect for rot or structural issues before proceeding.
Acclimating vinyl planks and organizing materials
Before you lay a single plank, let the vinyl acclimate in the stair area for at least 48 hours so it adjusts to the room’s temperature and humidity; this prevents gaps, buckling, and uneven seams after installation.
During that time, gather tools: utility knife, straightedge, adhesive, spacers, hammer, pry bar, measuring tape, chalk line, nosing pieces, and safety gear.
Organize by step for smooth workflow.
Step-by-Step Installation Guide
Now you’ll follow a clear step-by-step installation guide that starts with planning the layout and cutting a template for each stair.
You’ll then prepare any required underlayment, dry-fit and trim vinyl planks for risers and treads, apply adhesive, and fix the vinyl in place.
Finish by fitting the appropriate stair nosing—overlapping, separate nosing pieces, or L-shaped—working in the correct sequence for a secure, professional result.
Step 1 Planning layout and cutting a template for each stair
Step 1 focuses on planning the layout and cutting a template for each stair so you get accurate, consistent pieces that fit snugly.
Measure tread depth, riser height, and nosing profile for each step. Trace templates from cardboard or kraft paper, mark overlaps and seam locations, then transfer patterns to vinyl.
Cut precisely, label each piece, and keep templates for reference.
Step 2 Installing underlayment or backer if required
With your templates and cut pieces ready, check whether your stairs need an underlayment or backer to create a smooth, stable surface—some vinyl types and uneven treads will require it.
Remove dust, loose material, and old adhesive.
Cut backerboards or foam underlayment to fit each tread and riser. Secure with recommended screws or adhesive, ensuring seams are tight and surfaces level before proceeding.
Step 3 Cutting and dry-fitting vinyl planks for risers and treads
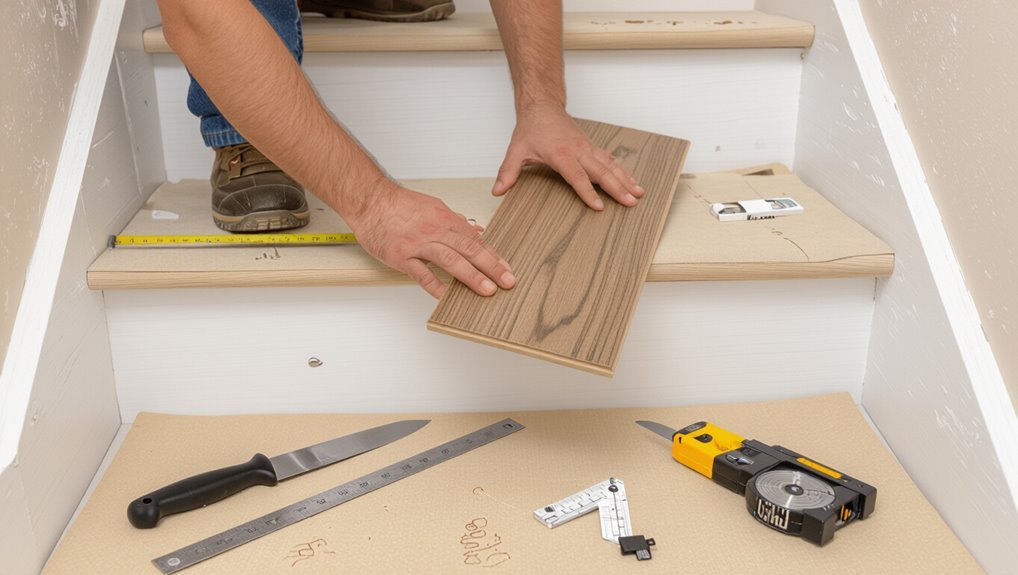
Measure each riser and tread carefully, then transfer those dimensions to your vinyl planks and cut them slightly oversized so you can trim for a snug fit.
Dry-fit each piece, checking alignment with nosing and adjacent planks. Shim or mark where small adjustments are needed, trim progressively for precise edges, and label pieces for each step to keep installation organized and efficient.
Step 4 Applying adhesive and fixing vinyl to tread and riser
Now that your pieces are trimmed and dry-fit, you’re ready to glue them down.
Apply manufacturer-recommended adhesive with a notched trowel to the tread and riser, working one stair at a time.
Press vinyl firmly, roll with a hand roller, and smooth seams.
Use clamps or temporary weights at edges if needed.
Wipe excess adhesive immediately and allow proper cure before proceeding.
Step 5 Installing stair nosing: types (overlapping, nosing pieces, L-shaped) and sequence
After the adhesive has cured, you’ll install stair nosing to protect edges and create a finished look; choose from overlapping, pre-formed nosing pieces, or L-shaped profiles based on your vinyl type and stair construction.
Start at the top tread, work downward so seams align and junctions stay tight. Match nosing style to tread thickness, trim to fit, and dry-fit before final attachment.
Step 6 Securing nosing with adhesive and mechanical fasteners (where applicable)
Secure the nosing by bonding it with the appropriate adhesive and, where the manufacturer or local code recommends, adding mechanical fasteners for long-term stability.
Apply adhesive evenly, press nosing into position, then drive recommended screws or nails through predrilled holes into the tread/subframe.
Countersink fasteners slightly, fill holes if needed, and wipe excess adhesive immediately to guarantee a neat, secure installation.
Step 7 Rolling and clamping for adhesion and seam finishing
Start by rolling each tread and riser firmly to activate the adhesive and flatten seams; use a 100–150 lb (45–70 kg) floor roller for the tread and a hand roller for tight areas.
Then clamp nosing edges with spring or bar clamps, spacing evenly to maintain pressure while adhesive cures.
Check seams for gaps, re-roll as needed, and wipe excess adhesive immediately.
Step 8 Trimming, caulking, and finishing edges
Before you trim the excess vinyl, put on a sharp utility knife and a straightedge so you can make clean, controlled cuts; work slowly along the nosing and edges to avoid nicking the tread or riser.
Trim flush, apply a thin bead of color-matched caulk where vinyl meets riser and nosing, smooth with a wet finger, let cure, then reinstall molding or nosing clips for a tidy, durable finish.
Variations and Special Cases
You’ll face a few special cases that change how you measure and cut vinyl on stairs.
Open-riser steps, curved or irregular treads, and the choice between pre-formed stair nosing or custom-wrapped nosing each require different techniques and tools.
I’ll explain practical options and tips for handling each one.
Installing on open-riser stairs
When dealing with open-riser stairs, you’ll need to plan for both visible edges and the gaps between treads so the vinyl looks seamless and holds up to foot traffic.
Measure each tread and riser individually, seal edges to prevent moisture and dirt, and finish exposed undersides with matching or complementary trim.
Use strong adhesive and mechanical fasteners where needed for durability.
Stairs with curved or irregular treads
Open-riser stairs call for extra edge work, but curved or irregular treads ask for a different set of skills: careful templating and flexible materials.
You’ll trace each tread, make cardboard templates, and transfer curves to vinyl. Use thinner, pliable vinyl and score slowly for clean bends.
Allow extra adhesive time, clamp or weight curves while drying, and trim precisely for snug fits.
Using pre-formed stair nosing vs. custom-wrapped nosing
If you want a faster, more uniform finish, pre-formed stair nosing gives you a ready-made profile that just tucks and screws into place; if you need a seamless look or exact color match, custom-wrapped nosing lets you wrap the vinyl over the nose for a continuous surface. Choose pre-formed for speed and durability, custom-wrapped for seamless aesthetics and precise matching.
| Option | Speed | Aesthetic |
|---|---|---|
| Pre-formed | Fast | Visible joint |
| Custom-wrapped | Slower | Seamless match |
Common Problems and How to Fix Them
You’ll run into a few common issues like wrinkling, bubbling, or gaps—usually caused by moisture, poor adhesive coverage, or temperature changes—and you can often fix them by reheating and re-adhering or replacing affected planks.
If the nosing lifts or squeaks, check fasteners and adhesive, tighten or re-glue the nosing, and add screws or shims where the tread meets the riser.
For visible seams or color mismatch, trim and re-seam, apply seam sealer, or replace mismatched pieces to restore a uniform look.
Wrinkling, bubbling, and gaps causes and fixes
When vinyl on stairs wrinkles, bubbles, or pulls away, it’s usually due to moisture, improper adhesive coverage, or temperature changes that weakened the bond; diagnosing the cause quickly helps you pick the right fix.
Remove affected pieces, dry substrate, and check for contamination.
Reapply recommended adhesive evenly, press with a roller, weigh while curing, and trim edges to eliminate gaps for a smooth, secure finish.
Nosing lifting or squeaking diagnosis and repair
Nosing that lifts or squeaks on stairs usually signals a loose fastener, degraded adhesive, or movement in the substructure that lets the tread shift under load.
Inspect fasteners, adhesive bond, and subfloor for rot or gaps.
Tighten or replace screws, inject construction adhesive under the nosing, and shim or sister joists if movement persists.
Test after each fix to confirm silence and stability.
Visible seams or color mismatch remedies
If seams or color differences stand out on your stair vinyl, they’re usually caused by poor seaming, mismatched planks, or uneven fading; you can often fix them without ripping out the whole installation.
Clean seams, reheat and roll tight with a seam roller, trim and realign planks, use color-matching markers or fillers for minor discoloration, and replace only affected pieces when necessary.
Best Practices, Tips, and Safety Considerations
You’ll want to make precise cuts and tight joints to keep each stair looking professional and safe.
Choose the right adhesive and follow curing times, control moisture to extend the floor’s life, and wear proper safety gear when handling tools and glue.
Keep respirators, gloves, eye protection, and steady clamps on hand to protect yourself and guarantee accurate installation.
Tips for precise cuts and clean joints
Because tight seams and accurate cuts make the difference between a pro look and a DIY eyesore, take time to measure twice and cut once when fitting vinyl on stairs.
Use a sharp utility knife, straightedge, and fine-tooth saw for nosing. Score repeatedly for clean breaks, trim gradually, test fit pieces, and sand or file edges lightly to guarantee joints sit flush without gaps or overlaps.
Adhesive selection and curing times
When choosing an adhesive for vinyl stair treads and risers, match the product to your vinyl type and traffic levels so the bond holds under repeated foot traffic and temperature changes.
Select pressure-sensitive or urethane adhesives per manufacturer recommendations, verify open and cure times, and work within pot life.
Allow full cure before heavy use, ventilate during application, and wear gloves to avoid skin contact.
Preventing moisture and extending lifespan
Alongside choosing the right adhesive and allowing full cure, controlling moisture is key to keeping vinyl stairs looking and performing their best.
Keep humidity stable, seal risers and nosing edges, and use waterproof underlayment where needed.
Wipe spills immediately, guarantee proper ventilation, and address leaks fast.
Regularly inspect seams and re-seal or replace worn nosing to extend lifespan and prevent damage.
Safety gear and safe handling of tools and adhesives
While installing vinyl on stairs, prioritize protective gear and careful tool handling to avoid injuries and respiratory or chemical exposure.
You should use proper PPE, ventilate the area, and follow manufacturer instructions for adhesives and power tools.
- Wear gloves, eye protection, and a respirator
- Keep a fan or open windows for ventilation
- Store adhesives sealed and upright
- Use sharp blades and cut away from yourself
Cost, Time Estimates, and When to Hire a Pro
You’ll want a clear cost picture before you start, including typical material costs per stair and what pros charge for labor.
Plan on roughly 15–30 minutes per stair for prep and installation if you’re experienced, or longer for tricky steps and finishes.
If your stairs are uneven, have complex profiles, or you don’t have the right tools or time, it’s usually smarter to hire a professional.
Typical material and labor cost breakdown
Expect to spend between $8 and $25 per stair for materials and an additional $40 to $100 per stair for professional installation, depending on vinyl quality, stair complexity, and regional labor rates.
DIY costs mainly include vinyl, nosing, adhesive, underlayment, and fasteners.
Pros add labor, disposal, and possible stair prep charges.
Get multiple quotes and itemized estimates to compare true value.
Time estimates per stair and total job
A single straight stair with standard riser and tread usually takes a DIYer about 20–30 minutes to prep and install vinyl, while a pro can do it in 10–15 minutes; curved, open-riser, or boxed stairs add considerable time per step.
Plan roughly 3–6 hours for a 12-step straight run DIY, plus drying and trim time. Factor extra for landings and stair nosing.
Indicators it’s time to hire a professional
When stairs are damaged, unusually shaped, or part of a busy household, hire a pro—because the right installer saves time, prevents costly mistakes, and guarantees the nosing and adhesive meet code and safety standards.
You should hire a pro if costs for tools and materials rival labor, your timeline is tight, or you lack experience with precise cuts, adhesive application, or complex nosing profiles.
Maintenance and Care for Vinyl Stairs with Nosing
Keep your vinyl stair nosing looking and performing its best with simple routine cleaning and quick stain removal using a mild cleaner and soft mop.
You’ll want to do periodic inspections to catch loose nosing, gaps, or small plank damage and make minor repairs before they worsen.
Replace the nosing or planks when wear, lifting, or structural damage compromises safety or the repair would be impractical.
Routine cleaning and stain removal
Start by sweeping or vacuuming the stairs regularly to remove grit that can scratch the vinyl and wear down the nosing; you should do this at least once a week in normal traffic and more often in high-traffic areas.
Wipe spills promptly with a damp microfiber cloth and mild detergent. For stains, use a soft brush and vinyl-safe cleaner, then rinse and dry to prevent residue.
Periodic inspections and minor repairs
Regularly inspect your vinyl-covered stairs and nosing at least once a season to catch loose edges, lifting seams, or worn nosing before they become safety hazards.
Tighten loose fasteners, reapply adhesive to small lifts, and press seams with a roller.
Replace torn stair tape and tighten slippery areas with non-slip treatments.
Document repairs and monitor recurring trouble spots for prompt attention.
When to replace nosing or planks
Knowing when to replace stair nosing or individual vinyl planks hinges on visible wear and performance: if edges are frayed, seams lift repeatedly, nosing shows grooves or loss of grip, or planks crack, buckle, or no longer bond to the substrate, you should replace them to keep the stairs safe and looking right.
Replace any piece that compromises traction, structural integrity, or sealing to prevent accidents and moisture damage.
FAQ
Got questions? You’ll find answers here on gluing vinyl to wood stairs, recommended nosing overlap, slip resistance, painting or refinishing options, and expected lifespan of a vinyl stair installation.
Read on for clear, practical guidance.
Can vinyl be glued directly to wood stairs?
If your wood stairs are flat, clean, dry and structurally sound, you can glue vinyl directly to them—but proper preparation and the right adhesive are essential to get a lasting bond.
Sand glossy surfaces, fill gaps, and vacuum debris.
Use a high-quality pressure-sensitive or contact adhesive recommended for vinyl and wood.
Apply evenly, press firmly, and allow proper curing to prevent lifting and wrinkles.
How much overlap should the nosing have on the tread?
You’ll want the nosing to overhang the tread by about 1/8 to 3/16 inch—enough to cover the edge and protect the vinyl without creating a trip hazard.
Aim for consistent overlap across all steps. Use a straightedge to mark and trim the nosing, then secure it firmly.
Small gaps at the back are fine; avoid excessive forward projection that could catch toes.
Will vinyl nosing slip or become slippery?
Wondering whether vinyl nosing will become slippery over time? It can if improperly selected or installed — smooth, glossy nosing and accumulated dirt reduce traction.
Choose textured, slip-resistant nosing rated for stairs, keep surfaces clean and dry, and install securely to prevent movement.
For extra safety, add non-slip tapes or adhesive grit strips where foot traffic is highest.
Can I paint or refinish vinyl nosing?
Curious whether you can paint or refinish vinyl nosing? You can refresh its look, but proper prep matters: clean thoroughly, scuff lightly with fine sandpaper, and use a primer designed for vinyl or plastics.
Choose a durable, flexible paint or coating rated for floors. Test in an inconspicuous spot first, and avoid slippery glossy finishes—opt for a low-sheen, textured topcoat for traction.
How long does a vinyl stair installation last?
How long will vinyl stairs hold up? You can expect 10–25 years depending on quality, traffic, installation, and maintenance.
High-grade vinyl with proper adhesive and nosing under heavy use may last toward the upper end; budget options wear sooner.
Clean spills promptly, avoid abrasive tools, and replace damaged nosing or treads early to extend lifespan and keep stairs safe and attractive.