How to Install Laminate Flooring for Beginners: Free PDF Guide Included
You can install laminate flooring yourself in a weekend even as a beginner by prepping the subfloor, laying underlayment, and clicking or gluing planks together while keeping 1/4″–1/2″ expansion gaps. Measure accurately, stagger joints, cut around obstacles, and finish with trim and thresholds. Use proper tools, wear safety gear, and leave 10%–15% extra material for waste. Expect a 200–300 sq ft room to take 1–2 weekends and save on labor—keep going to get the full step-by-step PDF guide.
Can a Beginner Install Laminate Flooring?
Yes — you can install laminate as a beginner and expect a finished room in a weekend or two with modest material costs, though complex layouts or high-end products can add time and expense.
If you’re comfortable with basic tools and careful measurements, DIY will save money and work well for straightforward rooms.
Hire a pro if the subfloor needs major prep, the room has many cuts/obstacles, or you want a flawless finish without the learning curve.
Short summary of outcome and time/cost expectations
If you’re comfortable with basic tools and patient with instructions, you can install most laminate floors yourself and save several hundred dollars in labor. A typical 200–300 sq ft room takes a motivated beginner about 1–2 weekends to complete, including prep, and materials run roughly $1–4 per sq ft while professional installation often adds $1–3 per sq ft.
You’ll get a durable, attractive floor. Use the how to install laminate flooring for beginners pdf for step-by-step timing, material lists, and tips to avoid mistakes; expect cleanup and minor adjustment time after laying boards.
When to hire a pro vs DIY
Wondering whether you should tackle laminate flooring yourself or call a pro? You can if you’re comfortable with measuring, cutting, and using basic tools, have time, and your subfloor is even.
Hire a pro for complex layouts, moisture issues, uneven subfloors, stair installations, or if you need fast, guaranteed results.
Be honest about your skills to avoid costly mistakes.
What Is Laminate Flooring and Why Choose It?
Laminate flooring is a layered product with a decorative top, a durable wear layer, and a stable core that clicks together for floating installs.
You’ll find it’s usually cheaper and more scratch- and moisture-resistant than hardwood, though it can lack the authentic look and refinishing options of wood and the waterproof resilience of some vinyl or tile.
It’s a great choice for high-traffic areas, living rooms, and bedrooms, but pick waterproof-rated boards for kitchens or basements.
Laminate flooring basics (construction, wear layer, core)
Think of laminate flooring as a layered sandwich designed for durability and easy care: a decorative top layer mimics wood or stone, a tough wear layer resists scratches and stains, a high-density fiberboard (HDF) core provides stability, and a backing layer adds moisture resistance and balance.
You’ll pick wear-layer thickness for traffic, choose HDF density for strength, and check backing quality for installation sites.
Pros and cons compared to hardwood, vinyl, and tile
Because it mimics real wood or stone at a lower cost, you’ll often choose laminate when you want the look without the upkeep of hardwood. It’s durable, scratch-resistant, and easier to install than hardwood or tile, but less water-resistant than vinyl and not refinishable like wood.
| Benefit | Hardwood | Vinyl |
|---|---|---|
| Cost | Higher | Lower |
| Durability | Refinishable | Waterproof |
| Installation | Harder | Easier |
Best use-cases and rooms for laminate
Most homes benefit from laminate in high-traffic, low-moisture areas like living rooms, hallways, bedrooms, and home offices because it gives you durable, attractive flooring without hardwood’s cost or vinyl’s plastic look.
You’ll also use it in basements with proper underlayment, rentals, kids’ and pet areas, and DIY projects where quick installation, low maintenance, and scratch resistance matter most.
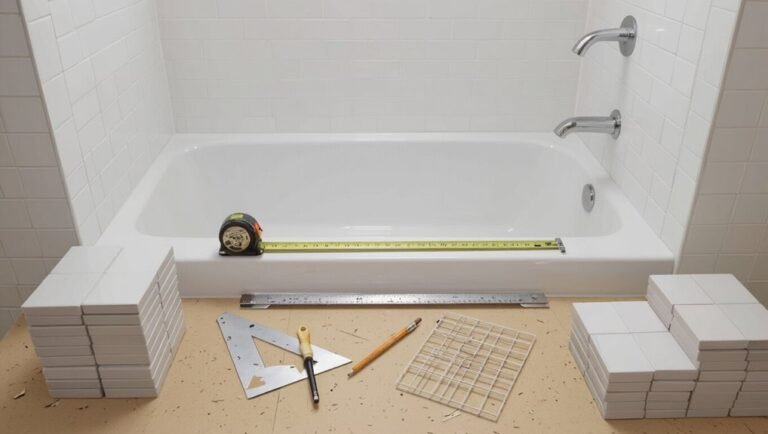
Tools, Materials, and Preparations
Before you start, gather a clear list of mandatory and optional tools and the materials you’ll need, plus a simple method for calculating plank quantities with a waste allowance.
Check your subfloor type and condition to confirm it’s flat, dry, and compatible, and allow your laminate and underlayment to acclimate in the room for at least 48 hours while you prepare the site.
With tools, materials, subfloor checks, and storage sorted, you’ll avoid surprises and keep the installation running smoothly.
Full tool list (mandatory vs optional)
You’ll need a mix of mandatory and optional tools to get laminate flooring installed efficiently and correctly; mandatory items cover cutting, fitting, and underlayment, while optional tools speed the job or improve finish.
- Tape measure, utility knife, spacers, pull bar (mandatory)
- Saw (circular/jigsaw) (mandatory)
- Underlayment, vapor barrier (mandatory)
- Tapping block, mallet, knee pads (optional)
Material checklist and how to calculate needed quantity with waste allowance
With your tools gathered, next list the materials you’ll need and figure how much to buy so the job runs smoothly. Measure room area, add 10%–15% waste for cuts and pattern matching, and include underlayment, trim, adhesive, and transition strips. Buy extra boards of the same lot for color match.
| Item | Quantity | Notes |
|---|---|---|
| Boards | Area +10–15% | Round up |
| Underlayment | Area | Seams taped |
| Trim | Perimeter | Measure |
| Adhesive | Tubes | Optional |
| Thresholds | Count | Doorways |
Subfloor types and condition requirements

Start by identifying the subfloor type—plywood, OSB, concrete, or existing vinyl—because each has specific flatness, moisture, and fastening requirements you’ll need to meet before installing laminate.
Make certain it’s clean, dry, level within 3/16″ over 10′, and structurally sound.
Repair squeaks, replace damaged panels, fix high spots, and install a moisture barrier on concrete or over problematic vinyl before proceeding.
Acclimation, storage, and site preparation steps
Before you lay a single plank, let the flooring acclimate in the room where it will be installed for 48–72 hours, keeping the boxes unopened and stacked no more than four high so air can circulate.
Clear the room, remove baseboards, repair and level the subfloor, install underlayment per manufacturer specs, and maintain stable temperature and humidity during storage and installation.
Quick Planning and Layout Decisions
Start by measuring the room and calculating how many full and partial planks you’ll need so you can plan cuts and minimize waste.
Choose your installation direction—usually along the longest light source or room length—as it affects appearance and how seams line up.
Account for expansion gaps, thresholds, junctions, and any special layouts like herringbone, diagonal, or staggered patterns before you start.
Measuring room dimensions and calculating plank runs
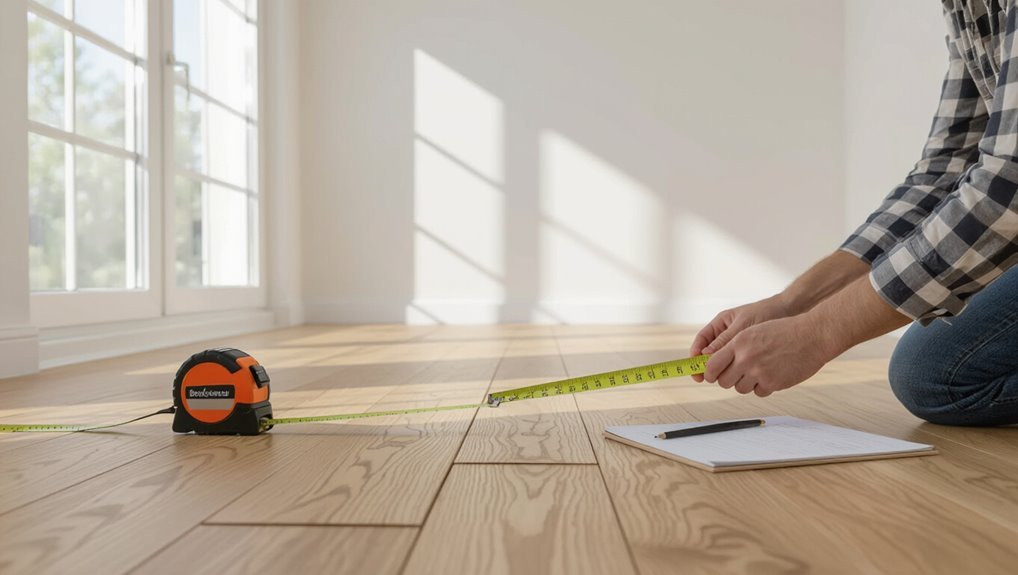
Measure the room carefully and you’ll avoid nasty surprises once the first row of planks is down.
Use a tape measure to get length and width, note alcoves and doorways, then calculate total square footage.
Divide room width by plank width to see if end pieces will be at least the manufacturer’s minimum.
Sketch a layout and round up for waste.
Direction of installation and why it matters
When you decide which way the planks will run, you’re setting the visual flow and structural behavior of the floor—so choose deliberately.
Run planks parallel to the longest light source or main room axis to emphasize space and hide seams.
Consider traffic patterns and subfloor joins; laying perpendicular to joists can add stability.
Plan starter rows to minimize narrow edge cuts.
Expansion gaps, thresholds, and transitions
Because laminate expands and contracts with temperature and humidity, you’ll need consistent expansion gaps at all perimeter walls, around pipes, and at fixed objects to prevent buckling.
Use spacers for uniform gaps (typically 1/4″–1/2″), install thresholds at doorways, and choose connector strips for height differences or different flooring types.
Cover gaps with baseboards or quarter-round, not adhesive.
Special layouts: herringbone, diagonal, and stagger patterns
Although special layouts demand a bit more planning, herringbone, diagonal, and stagger patterns can dramatically change a room’s look and feel. So decide on your pattern before cutting any boards.
Measure carefully, snap chalk lines for alignment, and dry-fit rows to visualize seams. Allow extra waste for angled cuts, choose consistent orientation, and work from a focal point to maintain symmetry and balance.
Step-by-Step Installation Guide (Beginner-Friendly)
Now that you’ve planned the layout, it’s time to walk through the installation in clear, manageable steps.
You’ll start by preparing and testing the subfloor, then roll out underlayment or a vapor barrier if needed.
Next, mark your starting line and plan the first and last rows.
You’ll also learn safe cutting techniques for accurate planks.
Finally, you’ll practice the proper methods for locking click‑lock boards or using glue where required to secure the floor.
Step 1 Prepare the subfloor: cleaning, leveling, and moisture testing
Before you lay a single plank, get the subfloor clean, flat, and dry—those three things determine whether your laminate will look and perform well.
You’ll:
- Sweep and vacuum thoroughly, removing debris and adhesive.
- Repair dips and high spots with patch or sanding.
- Check level with a long straightedge; shim or level as needed.
- Test moisture with a meter and address high readings.
Step 2 Install underlayment and vapor barrier (when required)
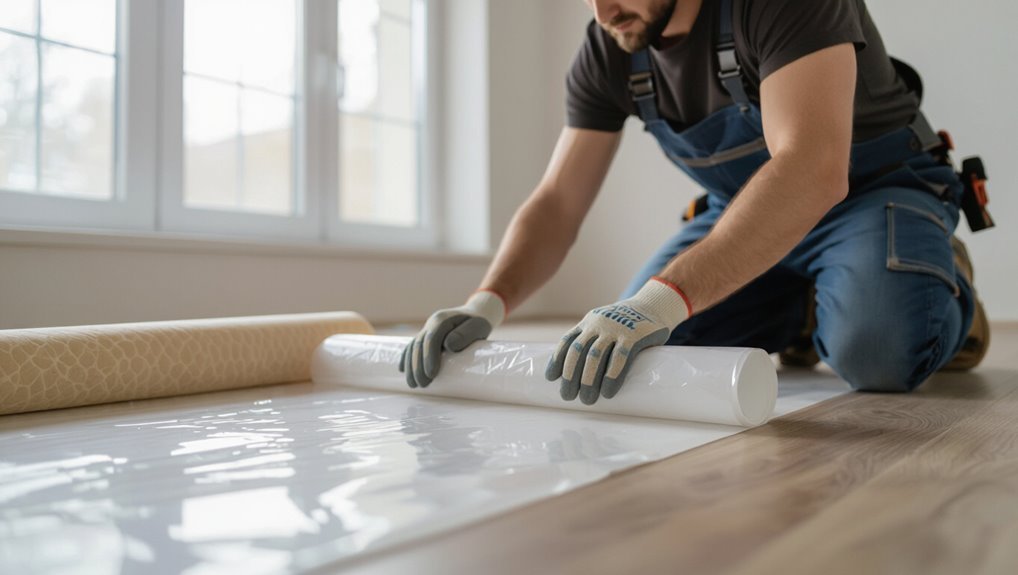
Roll out the underlayment and lay a vapor barrier where required to protect the laminate from moisture and to cushion for a quieter, more comfortable floor.
Trim to fit, butt seams tightly, and tape vapor-barrier edges. Run underlayment perpendicular to the boards if recommended.
Smooth wrinkles, keep barrier continuous in moisture-prone areas, and maintain expansion gaps at walls.
Secure edges but don’t fasten through the flooring.
Step 3 Plan first and last rows; mark starting line
Start by planning the layout of your first and last rows so you won’t end up with awkwardly narrow pieces against the walls. Measure the room’s width, decide which direction the boards will run, and mark a straight starting line across the subfloor that keeps your first row parallel to the longest wall or main sightline.
Check plank widths along both edges, adjust for expansion gaps, and snap the chalk line.
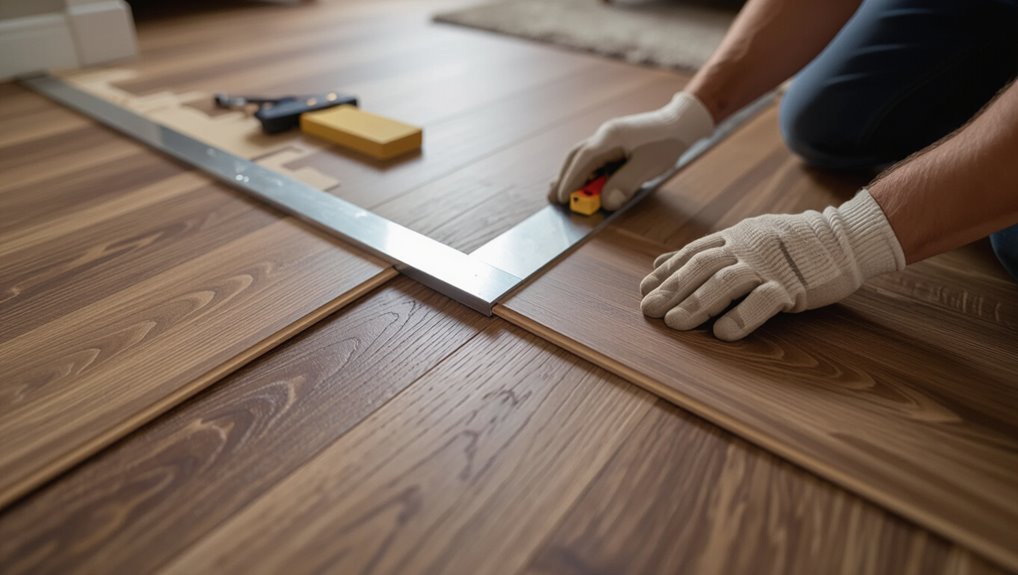
Step 4 Cutting planks safely and accurately (saw choices and tips)

You’ll need the right saw and a steady hand to cut planks safely and accurately—choose a tool that matches the cut type, your comfort level, and the laminate thickness.
Measure twice, mark clearly, then use a pull saw or jigsaw for curved cuts, a circular saw or miter saw for straight cuts.
Secure planks, wear eye and hearing protection, and cut slowly to prevent chipping.
Step 5 Locking planks together: techniques for click-lock and glue options

When the subfloor’s prepped and your first row’s laid, lock each plank to the next by angling the tongue into the groove and snapping down firmly for click‑lock systems, or apply a thin bead of recommended flooring glue for glued seams and press together with even pressure.
Stagger end joints, tap with a block to close gaps, wipe excess glue immediately, and check alignment.
Step 6 Working around obstacles: vents, doorways, and cabinets

6 key obstacle types — vents, doorways, cabinets, pipes, corners, and threshold changes — will slow you down if you don’t plan for them; measure and mark each obstacle before cutting, and tackle them one at a time so your layout stays square and gaps stay within the recommended expansion space.
Cut vent openings with a jigsaw, scribe around pipes, undercut door casings, and fit planks tightly to cabinet bases, leaving expansion gaps.
Step 7 Installing transitions, reducer strips, and baseboards
Step 7 finishes the job by adding connectors, reducer strips, and baseboards so your floor looks complete and can expand without trouble.
Install junction pieces at doorways and threshold changes, using adhesive or screws per manufacturer.
Fit reducer strips where laminate meets lower surfaces.
Nail or glue baseboards, leaving the expansion gap uncovered.
Caulk seams and touch up trim for a clean, professional finish.
Step 8 Final inspection, cleaning, and curing time
Before you finish, do a thorough final inspection to catch any loose boards, gaps, or visible damage—then clean the surface and allow the flooring to cure per the manufacturer’s recommendations.
Tighten or refit any loose pieces, fill minor gaps with matching putty, and vacuum then mop with a damp, manufacturer-approved cleaner.
Restrict heavy traffic and furniture for the specified curing period.
Common Problems and How to Fix Them
You’ll run into a few common issues—gaps, buckling, cupping, noisy or creaky planks, uneven seams or height differences, and moisture damage—and you’ll need to spot the cause before you fix them.
I’ll show simple diagnostic steps and practical remedies for each problem, plus preventive measures to avoid future trouble.
Follow these tips and you can usually correct issues without ripping out the floor.
Gapping, buckling, and cupping causes and remedies
When gaps, buckling, or cupping show up in your laminate floor, they’re usually signaling problems with moisture, improper acclimation, or incorrect installation; recognizing the cause lets you choose the right fix.
- Check moisture: use a meter, fix leaks, dry subfloor.
- Re-acclimate planks before install.
- Confirm correct expansion gaps and adhesive/locking technique.
- Replace warped boards, repair damaged underlayment.
Noisy/creaky planks diagnosis and solutions
If your laminate floor starts to creak or squeak as you walk, it’s usually a sign of movement between planks, between the flooring and subfloor, or loose fasteners.
Diagnosing the exact source lets you apply the right fix. Walk slowly to locate noise, press joints, check undercuts and underlayment, tighten connections, add shims near gaps, and use powdered graphite or silicone lubricant for minor rubbing points.
Uneven seams and height differences corrective steps
Creaks often point to movement, but uneven seams and height differences come from misaligned planks, improper subfloor prep, or inconsistent underlayment thickness — and they need a different approach.
Start by isolating affected boards, remove and inspect tongues and grooves, level the subfloor with patch or sanding, replace warped planks, and guarantee uniform underlayment.
Reinstall with proper tapping and expansion gaps.
Moisture damage and preventive fixes
Because laminate swells and delaminates from trapped moisture, you’ll want to address both sources and signs quickly to avoid costly repairs.
Check for cupping, soft spots, stains, or buckling. Fix leaks, improve ventilation, and use a vapor barrier underlay.
Replace damaged planks promptly and seal exposed edges. Maintain humidity between 35–55% and clean spills immediately to prevent recurrence.
Best Practices, Tips, and Shortcuts for Beginners
You’ll save hours by using the right time-saving tools and layout techniques, like a pull bar, spacers, and a chalk line.
Wear knee pads, gloves, and eye protection, and use safe lifting and cutting practices to protect your body.
Finish by following simple maintenance steps—cleaning with a damp mop, using floor protectors, and controlling moisture—to keep your laminate looking good for years.
Time-saving tools and techniques
1 simple set of time-saving tools and a few smart techniques will cut your install time dramatically and reduce mistakes.
Use efficient tools and methods to keep momentum and accuracy.
- Tapping block and pull bar for fast, tight joints.
- Quality underlayment with moisture barrier.
- Spacer wedges and a good saw for quick cuts.
- Chalk line for straight rows and fewer corrections.
Safety tips and ergonomics
While laying laminate, protect your body and workspace to prevent injuries and costly mistakes:
wear knee pads, safety glasses, and gloves; use proper lifting techniques and a dolly for heavy boxes.
Keep blades sharp and cut away from yourself.
Maintain a clear, well-lit work area, secure loose boards, and take regular breaks to avoid strain.
Use ear protection with power tools.
Maintenance advice to extend life of laminate
If you want your laminate floor to look great for years, follow a few simple maintenance habits:
Wipe spills immediately, use a damp (not wet) mop with a manufacturer-approved cleaner, place mats at entries, use felt pads under furniture, avoid abrasive tools and steam cleaners, trim pet nails regularly, control humidity between 35–65%, and inspect seams periodically to catch issues early.
Materials and Product Comparison
Now you’ll compare brands, AC ratings, wear layers, and warranties so you pick a durable, cost-effective option for your traffic and budget.
You’ll also choose the right underlayment—soundproofing, moisture barrier, or foam—based on whether you’re installing over concrete, subfloor, or in a humid room.
Together these decisions determine long-term performance and comfort.
Comparing brands, AC ratings, wear layers, and warranties
Start by focusing on what matters most: durability, appearance, and long-term value. You’ll compare brands by AC rating, wear layer thickness, and warranty terms; pick higher AC for high traffic, thicker wear for longevity, and clear warranty coverage.
| Brand | AC Rating | Warranty |
|---|---|---|
| A | AC3 | 15 years |
| B | AC4 | 25 years |
| C | AC5 | Lifetime |
Selecting underlayment types by subfloor and room
After you’ve picked a durable plank and checked warranty terms, you’ll need the right underlayment to protect that investment and match your subfloor and room conditions. Choose foam for level, dry plywood; cork for sound in apartments; and vapor-barrier for concrete basements. Compare options:
| Subfloor | Best Underlayment | Why |
|---|---|---|
| Plywood | Foam | Cushion, leveling |
| Concrete | Vapor barrier | Moisture protection |
Mistakes to Avoid
You’ll avoid costly headaches if you know the top 10 newbie mistakes—like improper underlayment, incorrect expansion gaps, and poor acclimation—and how to prevent them.
Pay attention to warning signs that a repair won’t cut it, such as warped boards, persistent buckling, or widespread water damage.
If you spot those issues early, you’ll save time and money by choosing full replacement when necessary.
Top 10 newbie mistakes and how to prevent them
Ever wondered why so many DIY laminate installs hit snags? You’ll avoid common errors by planning, acclimating planks, keeping tight joints, and maintaining expansion gaps.
Prevent miscuts, poor subfloor prep, wrong underlayment, and rushed tapping. Follow these priorities:
- Measure twice, cut once
- Acclimate materials
- Prep the subfloor
- Maintain expansion gaps
When a repair becomes a replacement warning signs
If damage keeps spreading despite spot fixes—cupping, chronic gaps, weak clicks, or water stains that reappear—you should call the job a replacement, not another repair.
Don’t waste time patching failing planks or hiding moisture sources. When multiple rows bow, underlayment degrades, or joints won’t lock, plan a full replacement.
It saves money, prevents mold, and restores structural integrity.
Cost Estimate and Timeframe
To plan properly, you’ll want a clear cost breakdown—materials, necessary tools, and labor if you hire help.
Expect a single room to take a day or two, while multiple rooms or complex layouts can stretch into a week or more.
I’ll outline typical price ranges and realistic timelines so you can budget and schedule the job.
Typical cost breakdown (materials, tools, labor if hired)
One clear way to plan your laminate-flooring project is to break costs into three buckets: materials, tools/consumables, and labor (if you hire help). You’ll budget per square foot for planks, add one-time tool purchases or rentals, and estimate labor hourly if needed. Use this quick reference:
| Item | Typical cost |
|---|---|
| Materials | $1–$5/ft² |
| Tools | $30–$200 |
| Labor | $35–$70/hr |
Expected timeline for single-room and multi-room projects
While your exact schedule will depend on room size and prep needs, you can generally expect a single bedroom or living room to take a weekend (8–16 hours) from empty room to finished floor.
Whereas multiple rooms or complex layouts often stretch over several days to a week; factor in subfloor repairs, acclimation of the planks (usually 48–72 hours), and finishing tasks like trim and junctions when you plan your timeline.
Plan shorter sessions for straightforward installs; add buffer days for repairs, adhesive curing, and unexpected delays so you don’t rush finish work or damage the new floor.
FAQ
You probably have a few quick questions before you start, so let’s cover common concerns like installing over existing floors and whether underfloor heating works with laminate.
You’ll also want to know how long laminate lasts, how to repair damaged planks, and how big an expansion gap to leave.
Finally, we’ll address whether laminate’s suitable for bathrooms or basements and what precautions to take.
Can laminate be installed over existing flooring?
If your existing floor is level, dry, and securely attached, you can often install laminate right over it—saving time and demolition.
You’ll need a smooth, rigid surface: low-pile carpet, vinyl, or tile can work if firmly bonded and even.
Remove loose trim, use an appropriate underlayment, and make certain doors clear the new height.
Check manufacturer guidelines before proceeding.
How long does laminate last and how to repair damaged planks?
Because laminate combines a durable wear layer with a sturdy core, it typically lasts 10–25 years depending on traffic and care; when planks do get damaged, you can often replace or repair individual boards without redoing the whole floor.
For scratches, use a repair kit or filler; for broken or swollen planks, release and swap them, keeping spare planks and matching finish.
Is underfloor heating compatible with laminate?
Replacing damaged planks is often straightforward. Many homeowners also wonder whether they can pair laminate with underfloor heating.
You can use laminate over suitable electric or hydronic systems if the product’s manufacturer approves it. Confirm the system provides even, controlled heat, keep surface temperatures below manufacturer limits, and use an appropriate underlay rated for heating.
Follow installation guidelines to avoid warping.
How much expansion gap is required?
How much space should you leave around your new laminate?
You’ll typically leave a 1/4 to 1/2 inch (6–12 mm) gap at walls and fixed objects for standard plank widths.
Wider rooms or long runs may need up to 3/4 inch.
Follow manufacturer specs, spacing at thresholds, and use spacers during installation so the floor can expand and contract freely.
Can I install laminate in bathrooms or basements?
If you’re thinking about putting laminate in a bathroom or basement, know that standard laminate isn’t fully waterproof and can be risky in high-moisture areas.
You can install water-resistant or waterproof laminate, use proper underlayment, seal edges, and guarantee good ventilation and a vapor barrier over concrete.
For persistent dampness, choose true waterproof flooring like vinyl or tile to avoid damage and mold.