How Much Does It Cost to Install Engineered Flooring in 2025?
You’ll typically pay $3–$12 per sq. ft. to install engineered flooring in 2025, with most jobs falling between $800 and $6,000 depending on room size. Costs rise with premium species, glue-down or nail installations, subfloor repair, moisture mitigation, and trims. DIY work, off-season scheduling, and shopping sales can trim expenses. Get three itemized bids and factor 10% waste for materials. Keep going to see detailed methods, room examples, and contractor tips.
How Much Does It Cost to Install Engineered Flooring?
You’ll typically pay between about $3 and $12 per sq. ft. for engineered flooring installation, which translates to roughly $200–$600 for a small room, $600–$1,800 for a medium room, and $1,800–$4,000+ for larger spaces.
Your final bill will depend on factors like material grade, subfloor prep, removal of old flooring, and regional labor rates.
Keep those variables in mind as you compare quotes so you can spot what’s driving any higher or lower estimates.
Typical national cost range (per sq. ft. and per room)
Expect to pay roughly $3 to $12 per square foot for engineered flooring installation nationwide, with most homeowners falling between $4 and $8 per sq. ft.; that translates to about $300–$1,200 to install flooring in a typical 10×12 room once materials and labor are included.
When budgeting, ask contractors how much to install engineered flooring in your home and factor in modest regional variation.
Average total cost examples (small, medium, large rooms)
To help you budget, here are typical total costs for engineered flooring by room size:
A small room (100 sq ft) typically runs $800–$1,200 installed;
a medium room (250 sq ft) about $2,000–$3,000;
a large room (500 sq ft) roughly $4,000–$6,000.
These examples include materials and basic labor, giving you realistic ballpark figures to plan your project.
Cost factors that can raise or lower the estimate
While the baseline cost gives you a starting point, several clear factors can push your engineered flooring estimate up or down; knowing them helps you plan and avoid surprises.
Room size, subfloor condition, and installation method directly affect labor.
Material grade, finish, and plank width change material cost.
Additional expenses include removals, moisture mitigation, changes, and trim.
Seasonal demand and contractor rates also vary totals.
What Is Engineered Flooring and Why Choose It?
Engineered flooring is made of a real hardwood veneer bonded over layered plywood or HDF, giving you the look of solid wood with added stability.
You’ll find it’s more moisture- and temperature-tolerant than solid hardwood and looks higher-end than laminate, so it’s a smart middle ground for many budgets.
Use it in living rooms, bedrooms, and even basements or kitchens where solid wood might warp.
Definition and construction of engineered flooring
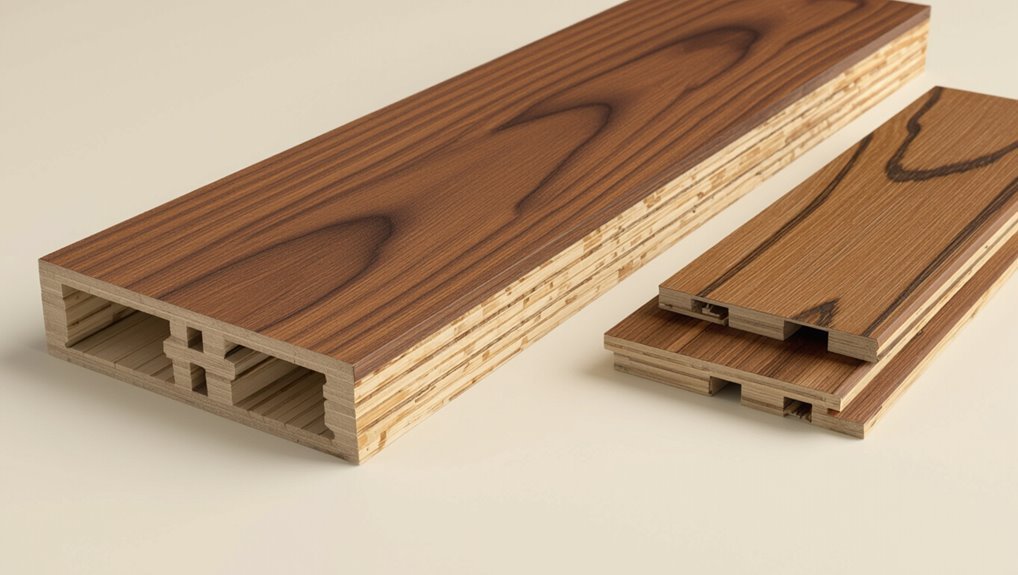
Think of engineered flooring as a smartly built layered floor that gives you the look of solid hardwood with added stability and moisture resistance.
You get a top hardwood veneer bonded to cross‑grained plywood or HDF core layers. That construction minimizes warping, allows thinner real wood surfaces, and supports various installation methods—glue, nail, or click‑lock—so you can install it over different subfloors.
Benefits vs. solid hardwood and laminate
Because it combines a real hardwood surface with a stable, layered core, engineered flooring gives you the visual warmth of solid wood with greater resistance to moisture, temperature changes, and cupping.
You’ll get easier installation, better dimensional stability over concrete or radiant heat, and often lower cost than solid hardwood.
Compared with laminate, it offers authentic look, refinishability, and longer lifespan.
Common uses and suitable rooms
Many homeowners choose engineered flooring for rooms where moisture, temperature swings, or subfloor constraints make solid hardwood risky.
You’ll find it ideal for kitchens, bathrooms with proper installation, basements, and sunrooms. It’s also great for high-traffic living areas and bedrooms where stability and comfort matter.
You can install it over radiant heat systems and uneven subfloors with fewer issues than solid wood.
Cost Breakdown Materials, Labor, and Additional Expenses
You’ll want to break costs into clear categories: material prices by grade and species, labor rates by installation method (glue, float, nail), and any subfloor work or removal fees.
Don’t forget underlayment, adhesives, trims, and connector pieces, plus finishing costs like sanding or staining if required.
Knowing each line item helps you compare bids and avoid surprise expenses.
Material costs by grade and species
When comparing engineered flooring, you’ll find that species and grade drive most of the upfront material cost: oak and hickory tend to sit in the midrange, maple and exotic species cost more, and lower grades with more knots or color variation are cheaper than clear, select grades. You’ll choose based on look and budget.
| Species | Grade | Typical cost |
|---|---|---|
| Oak | Select | $$ |
| Maple | Clear | $$$ |
Installation labor costs (by method: glue, float, nail)
After you pick the species and grade, installation method becomes the next major cost driver—glue-down, floating, and nail-down installs each carry different labor rates, time requirements, and prep work. You’ll pay more for glue-down’s meticulous adhesive work, less for quick floating installs, and mid-range for nail-down’s skill.
| Method | Typical labor |
|---|---|
| Glue | High |
| Float | Low |
| Nail | Medium |
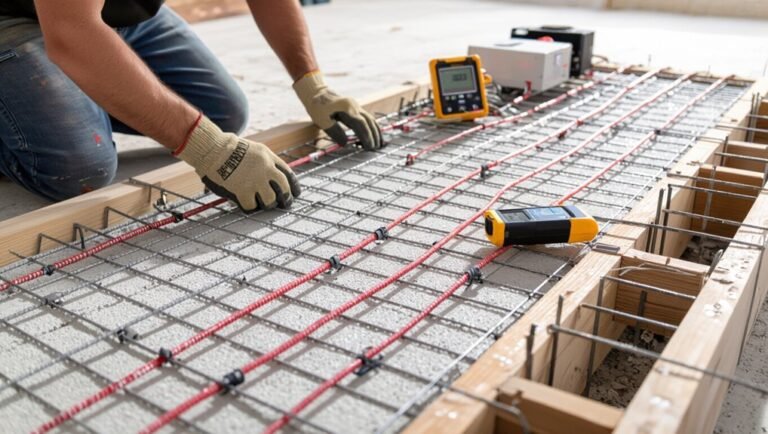
Subfloor preparation, removal, and disposal fees
Because a sound subfloor is the foundation for any engineered flooring, you should budget for prep, removal, and disposal as distinct line items: materials like underlayment and leveling compounds, labor for tearing out old flooring and repairing joists or ply, and hauling fees or dumpster rental for waste.
Expect costs for moisture mitigation, localized plywood replacement, fasteners, and skilled labor to guarantee a flat, stable substrate.
Underlayment, adhesives, trims, and transition pieces
If you want a durable, comfortable engineered floor, budget for underlayment, adhesives, trims, and connector pieces as separate line items since each affects performance and finish.
Materials like foam or cork underlayment, sound-reducing layers, and the correct adhesive add cost, while trims and connectors (T-molds, reducers, thresholds) complete the installation and prevent gaps or trip hazards.
Expect materials to range $0.50–$3/ft², labor $0.20–$1/ft².
Finishing, sanding, and staining (if applicable)
When you choose finishing, sanding, or staining for engineered flooring, plan costs for materials, labor, and possible extras so you won’t be surprised at the end; materials like sealers, stains, abrasives, and finish coats typically run $0.50–$3.50/ft².
Professional sanding and finishing labor adds $1–$3/ft², and expect extra charges for dust containment, floor repairs, or multiple finish coats.
You should budget for dry time, touch-ups, and warranty-safe products.
Price Ranges by Installation Type and Room Size
You’ll see different price ranges depending on whether the floor’s floated, glued, or nailed, with each method offering clear cost trade-offs and installation pros and cons.
I’ll give example costs for each method and note which works best for bedrooms, living rooms, kitchens, and basements.
That way you can compare typical per-room prices and pick the approach that fits your budget and space.
Floating installation cost examples and pros/cons
Several common room sizes and installation types affect the cost of floating engineered-flooring installs, and knowing these examples helps you budget accurately.
For a 150 sq ft bedroom expect $600–$1,200 materials plus $200–$400 labor; a 300 sq ft living room runs $1,200–$2,400 materials and $400–$800 labor.
Pros: quick, DIY-friendly, cushioned.
Cons: less stable in high-moisture areas.
Glue-down installation cost examples and pros/cons
Because glue-down installs bond the boards directly to the subfloor, they usually cost more upfront but give you a firmer, more stable floor—ideal for high-traffic or moisture-prone areas.
You’ll pay roughly $4–$8 per sq ft installed for typical rooms; complex prep or moisture barriers raise that to $7–$12.
Pros: stability, sound reduction, moisture resistance.
Cons: longer install, harder repairs.
Nail/staple installation cost examples and pros/cons
Nail- or staple-down installs typically run a bit less than glue-down jobs, averaging about $3–$6 per sq ft for standard rooms and $5–9 per sq ft when you factor in joist reinforcement or subfloor repairs.
Large or oddly shaped rooms may push costs toward $7–10 per sq ft because installers need more time and materials.
You’ll get faster installs, easier repairs, and better floor breathing, but noise and subfloor limits apply.
Cost per room: bedroom, living room, kitchen, basement
1 room type you’ll want to price out separately is the bedroom, since smaller, rectangular spaces typically cost less to install than large, open areas; expect bedrooms to fall near the low end of each installation range.
Living rooms cost more for larger layouts and shifts.
Kitchens add expense for underlayment and moisture barriers.
Basements require vapor barriers and subfloor prep, raising costs further.
Regional and Market Factors Affecting Prices
Where you live has a big impact on what you’ll pay, since labor rates and material costs can vary widely between regions.
You should also watch supply chain shifts, tariffs, and raw material trends that can push prices up or down.
Ultimately, seasonal demand and local contractor availability will affect scheduling and rates, so plan accordingly.
Geographic labor and material price differences {map?}
Because labor rates and material costs vary widely across regions, the same engineered flooring job can cost you much more in one city than another.
You’ll pay higher labor in metro areas with strong demand and stricter licensing. Material markups change by region, influenced by local competition and transport.
Get multiple local quotes, compare installer warranties, and factor travel or staging fees into your budget.
Supply chain, tariffs, and raw material trends
Local labor and distribution differences aren’t the only things that drive your final bill—global supply chains, tariffs, and raw material trends can shift pricing quickly and unevenly across regions.
You’ll see costs rise with wood shortages, freight delays, or increased import duties. Manufacturers pass higher resin, veneer, and plywood prices to buyers, while bottlenecks create localized spikes until supply stabilizes.
Seasonal demand and contractor availability
When peak renovation seasons hit—usually spring and summer, you’ll face higher prices and longer wait times because more homeowners and contractors are busy, and installers often book weeks or months out.
Plan ahead, lock in quotes, and be flexible on start dates. Off-season projects often cost less and get faster scheduling.
Local labor shortages or busy regions can still extend timelines, so confirm availability early.
Choosing Materials to Meet Your Budget
You can match engineered flooring to your budget by choosing from basic planks with thin veneers up to premium wide planks and exotic species with thick veneers.
Mid-range options give a good balance of durability and cost, while premium boards and upgraded finishes raise the price but often extend longevity.
Don’t forget that longer warranties and specialty finishes will increase upfront cost but can save you money over time.
Budget options: engineered planks and thin veneers
If you’re balancing style and cost, engineered planks and thin veneers give you real value: they mimic solid hardwood’s look while using less expensive materials and thinner wear layers, so you can get a durable, attractive floor without overspending.
You can picture:
- narrow planks warming a small living room
- gray veneers modernizing a kitchen
- a low-profile hallway runner that hides wear
Mid-range choices: balance of durability and cost
Finding the sweet spot between toughness and price means picking materials that give you lasting performance without blowing your budget.
You’ll favor 3⁄8–1⁄2″ veneers on stable cores, mid-grade hardwood species, and enhanced wear layers. These choices resist daily wear, offer decent refinishing potential, and keep costs moderate.
Aim for reputable brands, solid warranties, and installer expertise to maximize lifespan and value.
Premium options: wide plank, exotic species, thick veneer
For a truly high-end look, opt for wide-plank boards, exotic species, and thicker veneers that deliver dramatic grain, deeper color, and superior longevity.
You’ll pay more for rarer woods, extra-wide widths, and thicker top layers, but you’ll get better stability, refinish potential, and visual impact.
Choose selectively to balance statement aesthetics with installation and material costs.
How warranty and finish affect price
While a sleek finish and long warranty can raise the upfront cost, they often save you money over time by reducing maintenance and replacement needs.
You’ll pay more for factory-applied urethane, UV-cured coatings, or thicker wear layers, but they resist scratches and moisture.
Extended warranties cover repairs or replacements, lowering lifetime expense.
Balance upfront price with expected durability and your home’s traffic.
Step-by-Step Installation Planning and Cost-Saving Strategies
Start by measuring your rooms and calculating material needs so you don’t overbuy.
Check the subfloor and prep requirements, then choose an installation method and get multiple quotes to compare costs.
Schedule work to reduce labor rates and downtime, and consider cost-savers like DIY tasks, buying on sale, or reusing existing materials.
Step 1 Measure and calculate required materials accurately
1. You’ll measure each room, add 10% for waste, and calculate planks needed. Follow this quick numeric checklist:
- Room length × width = area (sq ft).
- Add 10% waste for cuts and pattern.
- Subtract fixed built-ins; round up plank counts.
This prevents surprise costs and guarantees accurate purchasing for your engineered flooring project.
Step 2 Evaluate subfloor and prep needs
2 key checks will save you time and money before laying engineered flooring: inspect the subfloor for levelness and moisture, and identify any repairs or underlayment needed.
Measure high and low spots, test for dampness with a meter or tape method, and note squeaks, loose boards, or rot.
Plan corrective actions—patch, shim, or install vapor barrier—so installation proceeds smoothly.
Step 3 Select installation method and get quotes
With your subfloor issues identified and corrected, you can decide how the flooring will be installed and begin collecting quotes.
Compare floating, glue-down, and nail-down methods for suitability, durability, and cost.
Request itemized bids from at least three installers, include labor, materials, underlayment, and disposal.
Ask about warranties, timeline, and any extra fees before choosing the best value.
Step 4 Schedule work to minimize labor rates and downtime
Once you’ve picked an installer and method, schedule the work to cut labor rates and downtime by grouping tasks, choosing off-peak days, and planning access, deliveries, and drying times so crews can work continuously.
Doing this reduces hourly charges, avoids rush premiums, and gets your space back in use sooner.
Confirm timeline, secure permits, set clear start/end points, and communicate changes promptly to prevent delays.
Cost-saving tips: DIY options, buying sales, reuse existing materials
If you’re aiming to cut the overall cost of engineered flooring, you can save considerably by doing some work yourself, buying during sales, and reusing suitable materials from the existing floor; each approach has trade-offs, so plan which combo fits your skills, timeline, and desired finish.
Do prep and underlayment DIY, buy clearance planks, salvage trim or underlay, and hire pros for tricky cuts or moisture issues.
Common Mistakes and Costly Problems to Avoid
Don’t underestimate subfloor repairs or moisture problems, because they can wreck your new floor and spike costs.
Make sure you pick the right plank thickness and finish for the room, account for expansion gaps and changes, and avoid hiring unlicensed or underinsured installers.
Addressing these issues up front will save time and money.
Underestimating subfloor repairs and moisture issues
Because subfloors and moisture control are often out of sight, you can easily underestimate the repairs needed before installing engineered flooring—and that mistake raises both costs and risk of failure.
Inspect for rot, unevenness, and vapor barriers. Test moisture levels, fix leaks, and level or replace damaged subflooring.
Skipping these steps leads to cupping, adhesive failure, and costly replacements down the road.
Choosing wrong plank thickness or finish for room use
When you pick planks that are too thin or a finish unsuited to the room’s traffic and moisture, you’ll pay more in repairs and replacements than you saved at purchase; thicker wear layers and durable finishes match heavy use and damp spaces better.
Choose plank thickness and finish based on expected foot traffic, pets, and humidity.
Incorrect choices mean scratches, delamination, and costly premature replacement.
Hiring unlicensed or underinsured installers
If you hire unlicensed or underinsured installers, you could end up paying far more than the quoted price for repairs, delays, or liability claims.
You’ll want verifiable licenses, references, and proof of insurance before work starts. Without them, shoddy workmanship or accidents can leave you footing uninsured medical bills, replacement costs, or legal fees.
Ask for documented credentials and a clear contract.
Failing to account for expansion gaps and transitions
Although it might seem minor during installation, skipping proper expansion gaps and shifts leads to buckling, loud creaks, and uneven seams as your engineered flooring responds to humidity and temperature changes.
You should leave recommended perimeter gaps, use connector strips between rooms and surfaces, and account for door clearances.
Ignoring these prevents movement and voids warranties, forcing costly repairs or full replacement.
Best Practices and Maintenance to Protect Your Investment
To protect your investment, start with proper acclimation and installation so boards settle correctly and gaps or buckling don’t become costly problems.
Stick to recommended maintenance and cleaning routines—gentle cleansers, quick spills cleanup, and felt pads under furniture will extend the floor’s life.
Know the signs that mean it’s time to refinish or replace so you can budget for those costs before damage worsens.
Proper acclimation and installation practices
When you bring engineered flooring into your home, let the boards acclimate in the installation room for at least 48–72 hours so they adjust to your home’s temperature and humidity; this step prevents gaps, cupping, and buckling later on.
Inspect subfloor for level, moisture, and cleanliness. Install recommended underlayment, follow manufacturer fastening or floating guidelines, stagger joints, and maintain recommended expansion gaps.
Recommended maintenance and cleaning routines
If you want your engineered flooring to stay attractive and last decades, follow a simple maintenance routine that focuses on preventing moisture damage, abrasive wear, and dents.
Wipe spills immediately, use a damp (not wet) microfiber mop, and vacuum with a soft-brush attachment.
Place mats at entries, use felt pads under furniture, trim pet nails, and avoid harsh cleaners or steam mops.
When to refinish or replace engineered floors
Although engineered floors resist wear better than solid wood, you’ll eventually face the choice to refinish or replace based on surface wear, depth of the top veneer, and structural issues like cupping or delamination.
Inspect wear patterns: shallow scratches and finish wear mean refinishing; deep gouges, veneer under 2–3mm, persistent moisture damage, or widespread cupping call for replacement to protect structure and resale value.
Comparison: Engineered Flooring vs. Alternatives (Costs and Value)
When you compare engineered flooring to solid hardwood, you’ll weigh upfront cost against stability and refinishing potential.
Against laminate and luxury vinyl, you’ll consider durability, appearance, and lower installation expense.
Think about lifecycle costs and resale value to decide which option gives you the best long-term return.
Engineered vs. solid hardwood
Because engineered and solid hardwood share a similar look but differ under the surface, you should weigh performance, cost, and long-term value before choosing. Engineered suits moisture-prone areas and often costs less to install; solid can be refinished more times and may add resale prestige. Compare expected lifespan, refinishing, and budget.
| Factor | Quick note |
|---|---|
| Moisture resistance | Engineered better |
| Refinishing | Solid superior |
| Cost | Engineered usually cheaper |
| Resale value | Solid may edge out |
Engineered vs. laminate and luxury vinyl
1 clear choice for many homeowners is engineered hardwood when you want real wood appearance with better stability than solid planks, but laminate and luxury vinyl (LVP/LVT) compete strongly on price, durability, and waterproofing. You’ll choose based on budget, moisture exposure, and desired look.
| Feature | Best for |
|---|---|
| Appearance | Engineered |
| Waterproofing | LVP/LVT |
Lifecycle cost comparison and resale value
Although initial purchase and installation often grab your attention, lifecycle costs and resale impact tell the fuller story: engineered hardwood typically carries higher upfront and refinishing costs than laminate or luxury vinyl, but it can boost home resale value and age gracefully when well maintained.
On the other hand, LVP/LVT and laminate offer lower long-term maintenance and replacement expenses that appeal to budget-conscious buyers and renters.
You’ll weigh longevity, repairability, and market preferences to choose flooring that balances total cost over time and maximizes resale appeal in your local market.
How to Get Accurate Quotes and Choose a Contractor
When getting quotes, make a checklist that lists materials, prep work, timelines, cleanup, warranties, and any potential extra charges so each bid is apples-to-apples.
Ask contractors about their experience with engineered flooring, request references and proof of insurance and licensing, and verify reviews or past work before they start.
Compare bids by line-item, negotiate on scope or materials rather than price alone, and get the final agreement in writing.
What to include in an installation quote checklist
Need a reliable comparison of bids? You’ll want a clear checklist so each quote covers the same scope.
Include:
- Materials: grade, brand, quantity, finish.
- Preparation: subfloor repairs, removals, moisture testing.
- Services: installation method, trim, disposal, timeline, warranties.
Use this to spot omissions, compare costs apples-to-apples, and guarantee contractors commit to specified materials and services.
Questions to ask contractors and verification steps
Now that you’ve got a checklist to compare bids, you’ll want to ask targeted questions and verify credentials so the lowest price doesn’t cost you later.
Ask about experience with your floor type, warranty details, timeline, cleanup, and subcontractors.
Request proof of license, insurance, references, and recent photos of similar jobs.
Confirm payment schedule and written guarantees before signing.
How to compare bids and negotiate price
Anyone can get overwhelmed by multiple bids, but you’ll make the best choice by comparing apples to apples: check scope details, materials, timeline, labor vs. materials breakdown, and any exclusions so bids are directly comparable.
Ask contractors to clarify discrepancies, get written revisions, and request a small discount or bundled items.
Choose the contractor with clear communication, solid references, and a fair, documented price.
Case Studies and Real-World Examples
Now let’s look at three real projects so you can see how choices affect price and schedule.
You’ll get a budget bedroom install with costs and timeline, a mid-range living room remodel showing materials and pricing, and an upstairs kitchen job that includes moisture mitigation.
Use these examples to compare what your own project might require.
Example 1 Budget bedroom install: costs and timeline
In this budget bedroom example, you’ll see how a DIY-friendly engineered flooring install can keep costs low while still delivering a durable, attractive result:
You’ll replace 120 sq ft of carpet with click-lock planks, spend about $600 on materials, $150 on underlayment and tools, and allocate a weekend for prep, install, and trim.
Expect minor gaps and fast savings.
Example 2 Mid-range living room remodel: costs and materials
Where the budget bedroom example showed how a weekend and basic tools can stretch a small sum, this mid-range living room remodel scales up expectations: you’ll cover about 300–400 sq ft, choose higher-grade engineered planks with a thicker wear layer, and factor in professional installation.
Expect material costs around $6–9/sq ft, labor $3–6/sq ft, plus trim and disposal, totaling roughly $2,700–$6,000.
Example 3 Upstairs kitchen remodel with moisture mitigation
Because kitchens upstairs face more moisture and temperature swings than living rooms, you’ll want engineered flooring with a robust core and a thicker wear layer plus a moisture barrier and professional prep.
You’ll choose waterproof or high-density plywood core planks, a 4–6mm wear layer, and underlayment with vapor control.
Expect higher labor for prep, flashing, and door adjustments to protect warranties and performance.
FAQ
Got questions? You’ll learn typical timelines for a 300 sq. ft. room, whether engineered floors work in basements or bathrooms, and if they boost resale value.
We’ll also cover common warranties and whether you can install over existing flooring.
How long does installation typically take for a 300 sq. ft. room?
Wondering how long it takes to install engineered flooring in a 300 sq. ft. room?
Typically, a pro crew can finish in one day (6–8 hours) for straightforward installs using floating or click-lock planks.
Glue-down or nail-down methods, subfloor prep, or complex layouts add time, possibly stretching to two days.
Expect cleanup and acclimation instructions afterward.
Is engineered flooring suitable for basements and bathrooms?
If you need a wood-look floor in damp areas, engineered flooring can often be a good choice since its plywood or HDF core gives it more dimensional stability than solid hardwood.
You should choose water-resistant finishes and proper underlayment, guarantee a moisture barrier and floating or glued installation per manufacturer guidelines, and avoid constant standing water.
Routine maintenance keeps it durable in basements and bathrooms.
Will engineered flooring increase my home’s resale value?
Will engineered flooring boost your home’s resale value? It often does—buyers appreciate durable, attractive floors that mimic hardwood.
You’ll likely recoup some or most of your investment in mid-to-upscale markets, especially with quality installation and neutral styles.
Presentation matters: maintain boards, match finishes to the home’s character, and document materials to reassure potential buyers during showings and inspections.
What warranties should I expect and what do they cover?
Along with resale appeal, you’ll want to understand the warranties that come with engineered flooring so you know what’s covered if something goes wrong.
Expect separate structural, finish, and sometimes moisture warranties. Structural covers core separation or delamination, finish covers wear-through and staining limits, and moisture covers specific humidity or spill damage per manufacturer terms.
Keep receipts, follow installation and maintenance guidelines to keep claims valid.
Can I install engineered flooring over existing flooring?
Wondering whether you can lay engineered flooring over your current floors?
You can often install it over existing wood, vinyl, or tile if the surface is flat, dry, and secure.
Remove loose materials, repair uneven spots, and follow manufacturer guidelines for underlayment and moisture barriers.
Avoid layering over carpet or damaged substrates to prevent instability and voided warranties.
Appendix Quick Reference Tables and Cost Calculator Inputs
To help you plan and compare costs, the appendix includes a cost-per-sq-ft quick reference table broken down by region and installation method.
You’ll also find a concise materials checklist to use when getting quotes.
Finally, the inputs for a simple DIY cost calculator are listed so you can estimate your total project cost quickly.
Cost-per-sq-ft quick reference table by region and method
When you’re comparing installation options, this quick-reference table gives per‑square‑foot cost ranges by region and method so you can plug realistic numbers into your budget and the cost calculator. Use it to estimate labor, materials, and total installed cost before you request quotes.
| Region | Floating/Click | Glue/Staple |
|---|---|---|
| Northeast | $4–$8 | $6–$12 |
| South/Midwest | $3–$7 | $5–$10 |
Materials checklist for quotes
Start with a simple checklist of the materials your installer will quote so you can compare bids apples-to-apples:
- Engineered planks (type, grade, pack count)
- Underlayment & moisture barrier (rolls, thickness, vapor specs)
- Trim, connectors, adhesives, fasteners, waste allowance
You’ll use this to spot omissions, confirm quantities, and guarantee each quote covers identical materials and finishes.
Inputs for a simple DIY cost calculator
If you want a quick DIY cost calculator, list the essential inputs you’ll plug in: room dimensions and layout, chosen plank size and price per box, underlayment type and cost, trim and junction pieces, fasteners or adhesive, estimated waste percentage, and labor hours or your hourly rate if you’re hiring help.
- Sketch room and mark cuts.
- Count boxes plus waste.
- Add underlayment, trim, labor.