How to Clean Vinyl Floors: Remove Dirt and Stains Without Damage
You can keep vinyl floors clean without damage by sweeping or vacuuming grit, then mopping with a damp microfiber mop and a mild, pH‑neutral cleaner or diluted dish soap. Blot spills quickly, use a soft brush for embedded dirt, and tackle scuffs with a melamine eraser or gentle scrubbing paste. Avoid bleach, ammonia, abrasive pads, and standing water. Follow a regular maintenance routine and simple stain tips—continue for practical step‑by‑step guidance and prevention advice.
How to Clean Vinyl Floors: and What to Expect
You can safely remove most dirt and stains with a gentle mop, warm water, and a pH-neutral cleaner to avoid damage.
For tougher spots, spot-treat with a soft cloth and a mild cleaner or use a recommended vinyl stain remover, but don’t scrub hard or use abrasive tools.
Quick maintenance (sweeping and mopping weekly) will keep floors looking good, while deep-cleaning is only needed for built-up grime or after spills.
Direct answer safest, fastest way to remove dirt and stains without damage
Start by sweeping or vacuuming to remove loose grit.
Then mop with a pH-neutral vinyl cleaner or a mild dish soap solution for quick, safe dirt removal without harming the finish.
For spots, blot spills immediately, use a soft cloth and diluted cleaner, and gently scrub stubborn stains with a soft-bristled brush.
If you’re asking how can I clean vinyl floor, this method works fast and safely.
When to deep-clean vs. quick maintenance
After quick sweeping and mopping for everyday dirt, decide how deep a clean needs to be by checking for embedded grime, persistent stains, dullness, or traffic-area buildup that regular maintenance won’t remove.
If you spot those signs or haven’t cleaned thoroughly in months, deep-clean with a gentle cleanser, soft scrub, and rinse.
Otherwise stick to routine dusting, damp mopping, and spot treatment.
Understanding Vinyl Flooring: Types, Vulnerabilities, and Common Stains
Vinyl comes in sheet, plank, and tile formats with different finishes and textures that change how dirt and spills behave and how you should clean them.
You’ll run into common contaminants like dirt, grease, scuffs, ink, and pet stains, and some surfaces hide grime more than others.
Be careful: abrasives, harsh chemicals, and too much water can permanently damage vinyl.
What is vinyl flooring? (sheet, plank, tile)
Flooring choices matter because vinyl comes in several distinct forms—sheet, plank, and tile—each made and installed differently and each reacting to spills, scrapes, and wear in its own way.
Sheet vinyl is a continuous roll, good for moisture resistance. Planks mimic hardwood and click or glue down. Luxury vinyl tile (LVT) offers rigid, tile-like pieces.
You’ll choose by installation, durability, and appearance.
Finish types and surface textures that affect cleaning
Because the finish and surface texture determine how dirt, spills, and scuffs behave, you’ll want to identify them before you clean.
Smooth, glossy vinyl wipes easily but shows scratches; embossed or matte textures hide wear and trap grit, needing softer tools and more agitation.
Wear layers, urethane coatings, and residential versus commercial grades affect chemical tolerance and recommended cleaning frequency.
Common contaminants and stains (dirt, grease, scuffs, ink, pet stains)
Although different finishes react differently, you’ll usually deal with a handful of recurring contaminants: everyday dirt and grit, oily grease, scuff marks from shoes and furniture, ink and dye stains, and pet-related messes like urine and tracked litter.
You’ll remove each with targeted methods: sweep or vacuum, use mild degreaser, a soft eraser or microfiber, spot-treat ink, and neutralize pet odors promptly.
What can damage vinyl floors (abrasives, harsh chemicals, excessive water)
Knowing how to remove stains helps, but you also need to prevent damage in the first place.
Avoid abrasive scrubbers and steel wool that scratch the wear layer. Don’t use bleach, ammonia, or solvent-based cleaners that fade or soften vinyl.
Wring mops thoroughly and mop up spills fast—excess water can seep seams, warp backing, and promote mold.
Use gentle, pH-neutral cleaners instead.
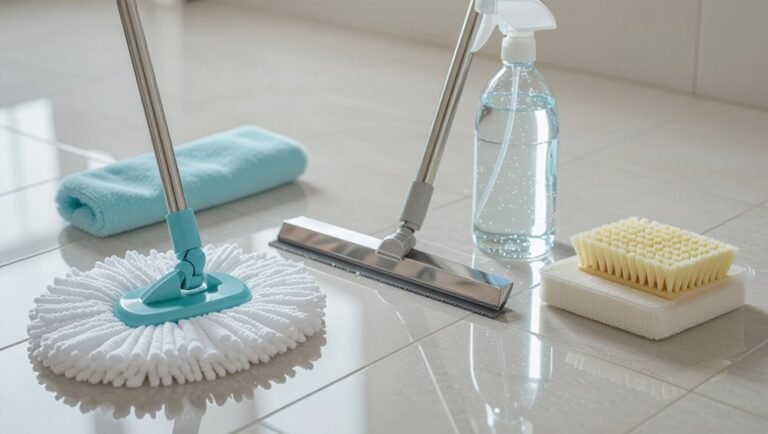
Essential Tools and Safe Cleaning Products
You’ll want a few basic tools—microfiber mop, soft-bristled brush, bucket, and a gentle vacuum or broom—plus safe cleaners like mild dish soap, white vinegar solutions (properly diluted), or commercial vinyl formulas.
Avoid abrasive pads, ammonia, bleach, or solvent-based products that can strip or warp the finish, and always test-spot new cleaners in an inconspicuous area first.
I’ll also cover exact dilution guidelines and how to choose the right product for your vinyl.
Recommended tools and equipment
Gathering the right tools makes cleaning vinyl floors faster and helps avoid damage, so start with a soft-bristle broom or microfiber dust mop, a nylon scrub brush for stubborn spots, a flat mop with a removable microfiber pad, and a bucket for mixing solutions.
You’ll also want:
- Microfiber cloths
- Rubber squeegee
- Soft-bristled attachment for vacuums
- Protective gloves
Safe household cleaners and homemade solutions
Although commercial vinyl cleaners work well, you can safely use simple household products for regular maintenance and spot cleaning: mild dish soap diluted in warm water, a white vinegar solution (no more than 1 cup per gallon), and baking soda paste for stubborn stains.
Use them sparingly, test first in a hidden spot, and rinse thoroughly.
- Diluted dish soap
- Vinegar solution
- Baking soda paste
- Microfiber mop
Cleaners and products to avoid
Because vinyl is durable but not indestructible, you should avoid harsh chemicals and abrasive tools that can strip the finish or cause permanent damage.
Don’t use bleach, ammonia, oil-based cleaners, or scouring pads. Instead, choose pH-neutral products and soft mops.
- Bleach
- Ammonia
- Oil-based solvents
- Steel wool or scouring pads
Test-spotting and dilution guidelines
Before you apply any cleaner broadly, always test-spot a hidden area so you can see how the product and dilution affect the vinyl’s color and finish.
Use a 1:10 dilution for concentrated cleaners as a starting point. Wait 10–15 minutes, dry and inspect.
If safe, proceed; if not, try milder dilution or a different product.
Record successful ratios for future use.
Step-by-Step Daily and Weekly Cleaning Routine
Start by pre-cleaning: sweep or vacuum to remove loose dirt and grit so you don’t scratch the vinyl.
For daily care, you’ll use a quick mop with a mild cleaner and a damp (not soaking) microfiber—use gentle strokes and change water when it gets dirty.
Once a week do a deeper clean with the correct solution concentration and short dwell time, then dry and buff the floor for a streak-free shine.
Step 1 Pre-clean: removing loose dirt and grit
1. You start by removing loose dirt and grit to prevent scratches and wear.
Use gentle tools and work systematically so debris doesn’t spread.
- Dry mop or broom sweep
- Vacuum with soft-brush setting
- Corner and baseboard detail with brush
- Shake out mats outside
Finish before wet cleaning to protect the finish and extend floor life.
Step 2 Daily quick mop method (products, technique)
Keep your vinyl looking fresh with a quick daily mop that uses minimal water and a gentle cleaner so you don’t dull the finish or warp seams.
Fill a bucket with warm water and a few drops of pH-neutral floor cleaner. Wring a microfiber mop until damp, not wet.
Mop in straight lines, rinse mop often, and air-dry quickly to prevent streaks.
Step 3 Weekly deeper clean (solution concentrations, dwell time)
After your daily quick mop, schedule a weekly deeper clean to remove buildup and restore shine; this uses a slightly stronger but still vinyl-safe solution and a bit of dwell time to loosen grime before rinsing.
Mix 1/4 cup mild detergent or vinyl cleaner per gallon warm water.
Apply, let sit 5–10 minutes, agitate stubborn areas with a soft brush, then rinse thoroughly.
Step 4 Drying and buffing for shine
Once the floor’s been rinsed, dry it promptly with a clean microfiber mop or towel to prevent streaks and water spots.
Then buff lightly in small sections with a dry microfiber pad or soft cloth to restore shine and remove any remaining film.
Work with the grain, overlap passes, and change or wash pads when soiled.
Finish by checking for missed spots and ventilating to speed drying.
Removing Specific Stains and Problem Areas
When you tackle specific stains, use the right tools and products for each job: a melamine eraser or soft scrub for scuffs and rubber heel marks, a degreaser for oil and grease, and safe solvents for ink, marker, and paint with proper ventilation and spot testing.
For pet urine, use an enzymatic cleaner and follow with neutralizing and thorough drying to remove odor and prevent staining.
For deep-set dirt in seams and grout lines, target the areas with a stiff brush, a concentrated cleaner, and careful rinsing to lift trapped grime.
Scuff marks and rubber heel marks method and tools
Scuff marks and rubber heel marks are common on vinyl, but you can usually remove them with a few simple tools and gentle techniques.
Use a soft cloth, melamine sponge, or rubber eraser; dampen lightly with water or mild detergent. Rub gently in one direction, rinse, and dry.
For stubborn marks, try isopropyl alcohol sparingly, testing first in an inconspicuous spot.
Grease and oil stains degreasing approach
Grease and oil can soak into vinyl’s surface and leave dark, slippery spots, so you’ll want to tackle them promptly with the right degreasing approach.
Blot excess, avoid scrubbing hard, then apply a mild degreaser or dish soap solution. Let it sit briefly, agitate gently with a soft brush, rinse with clean water, and dry.
Repeat for stubborn residue.
Ink, marker, and paint spots safe solvents and precautions
If you’ve handled grease and oil, you’ll find ink, marker, and paint require different care because solvents vary in strength and can harm vinyl if misused.
Test any solvent (rubbing alcohol, acetone-free nail polish remover, commercial vinyl cleaner) in an inconspicuous spot.
Blot, don’t rub. Work gently with a soft cloth, rinse area afterward, and ventilate.
Stop if finish dulls.
Pet urine and odor removal enzymatic cleaners and neutralizing steps
When pet urine soaks into vinyl or the seams, it can leave persistent stains and odors that surface cleaners won’t eliminate.
So you’ll need an enzymatic cleaner to break down the proteins and neutralize the smell.
Blot excess moisture, apply according to label, let dwell fully, then blot and rinse.
Finish with a neutralizer or baking soda to absorb residual odor and air-dry.
Deep-set dirt in seams and grout lines targeted cleaning technique
After you’ve treated urine and neutralized odors, tackle deep-set dirt in seams and grout lines with a targeted approach that loosens trapped grime without harming the vinyl.
Use a soft nylon brush and a mild pH-neutral cleaner, scrub gently along seams, rinse with a damp microfiber, and dry thoroughly.
For stubborn deposits, apply a paste of baking soda and water briefly, then rinse and dry.
Water stains, discoloration, and adhesive residue
Water stains, discoloration, and adhesive residue each need a different, gentle approach so you can remove them without damaging vinyl.
For water stains, dry and buff with a microfiber cloth; use a 1:1 white vinegar-water mix for persistent marks.
For discoloration, try a baking soda paste, rinse well.
For adhesive, soften with citrus-based remover, scrape gently with a plastic putty knife, then clean.
Stain Removal Comparison Table
To make stain cleanup faster, you’ll find a quick reference table that lists common stain types, the recommended removal method, and any risk to your vinyl.
Use it to match the stain you’re facing with the safest, most effective approach.
Refer to the risk column first if you’re unsure, so you don’t accidentally damage the floor.
Quick reference table: stain type vs. recommended method and risk
Use this quick-reference table when you need an immediate matchup of common vinyl stains, the easiest removal method, and any associated risks so you can act fast and avoid damage. Refer to the table, then follow the brief tips below.
| Stain → Method | Risk/Notes |
|---|---|
| Grease: dish soap | Residue if not rinsed |
| Ink: rubbing alcohol | Test first; can dull finish |
DIY Cleaning Recipes and Application Instructions
You can make a gentle all-purpose cleaner with warm water, a few drops of dish soap, and a cup of white vinegar—use about 1 teaspoon soap per gallon and test a small area first.
For greasy spots, try a paste of baking soda and water or a spray of equal parts water and rubbing alcohol to lift residue without harming vinyl.
Save stronger commercial products for stubborn stains or when a manufacturer specifically recommends them.
Gentle all-purpose homemade cleaner (ingredients, ratios)
Although vinyl’s finish is tough, a mild homemade cleaner keeps it looking fresh without risking damage, and you’ll only need a few simple ingredients and precise ratios to make one.
Mix 1 gallon warm water, 1/4 cup white vinegar, and 1 teaspoon liquid dish soap.
Use a microfiber mop, wring well, and rinse with clear water to avoid residue.
Natural degreaser and spot remover recipes
When tough grease or sticky spots show up, reach for simple natural degreasers you can mix at home that cut grime without harming vinyl.
Try a paste of baking soda and water for scuffs, a 1:1 solution of rubbing alcohol and water for oil-based stains, or a few drops of dish soap in warm water for general greasy buildup.
- Test in an inconspicuous area.
- Apply gently with a soft cloth.
- Rinse and dry thoroughly.
- Repeat sparingly for stubborn spots.
When to use commercial specialized products
Wondering whether to reach for a store-bought cleaner or stick with a homemade mix? Use commercial specialized products when stains resist DIY solutions, when floors have factory finishes that require pH-balanced care, or when manufacturer warranty mandates specific cleaners.
Follow label instructions, test in an inconspicuous spot, wear gloves, and guarantee proper ventilation. Store products safely and dispose of leftovers per local guidelines.
Mistakes to Avoid When Cleaning Vinyl Floors
Watch out for common mistakes that can actually damage your vinyl, like using abrasive scrubbers or harsh chemicals that strip the finish.
Don’t soak the floor or leave it wet for long, because over-wetting and poor drying can warp seams and weaken adhesives.
Follow gentle methods and quick drying to keep your vinyl looking its best.
Common cleaning errors that cause damage
Although vinyl is durable, a few common cleaning mistakes can cause stains, scratches, or premature wear, so you should use the right products and techniques.
- Using bleach or ammonia-based cleaners that strip finish.
- Letting standing water seep into seams and edges.
- Dragging heavy furniture without protective pads.
- Using dirty mops or vacuum wheels that grind grit into the surface.
Why abrasive tools and harsh chemicals ruin finish
Because vinyl’s wear layer is thin and designed to protect a printed pattern—not to withstand scrubbing or strong solvents—you’ll quickly dull or strip the finish if you reach for abrasive pads or harsh chemicals.
You should use soft mops and mild cleaners instead. Abrasives create micro-scratches that trap dirt and ruin sheen, while solvents remove protective coatings, causing permanent discoloration and vulnerability.
Over-wetting and improper drying consequences
If you drench vinyl floors or leave them damp, water can seep into seams and under seams, causing adhesive failure, warping, and swelling that look like permanent damage.
You should use a damp mop, not a soaked one, wipe spills immediately, and dry with microfiber or fans.
Prompt drying prevents mold, stains, and lifted edges, preserving appearance and lifespan.
Prevention, Maintenance, and Best Practices
To keep your vinyl looking its best, start with simple protective measures like mats at entrances, felt pads under furniture, area rugs in high-traffic zones, and curtains or UV film to control sunlight.
Stick to a routine care schedule—sweeping, damp mopping, and spot-treating—to extend the floor’s life.
Adjust frequency and cleaning intensity for seasonal changes and busy areas to prevent wear before it happens.
Protective measures: mats, felt pads, rugs, and sunlight control
When you protect vinyl with the right mats, felt pads, rugs, and window coverings, you’ll prevent scratches, staining, and fading before they start.
Use entrance mats to trap grit, felt pads under furniture legs, low-pile rugs in high traffic, and UV-blocking curtains or film to limit sun damage.
Follow these measures to keep vinyl looking new.
- Entrance mats
- Felt pads
- Low-pile rugs
- UV window protections
Routine care schedule for longevity
A simple weekly routine will keep your vinyl floors looking their best and prevent costly repairs down the road.
Sweep or vacuum to remove grit, mop with a manufacturer-approved cleaner, and spot-treat spills immediately.
Monthly, inspect seams and high-use areas for wear and address scuffs promptly.
Keep furniture pads clean and replace them as needed to minimize abrasion and maintain finish longevity.
Seasonal and high-traffic care adjustments
Seasonal changes and heavy use demand small adjustments to your weekly routine to keep vinyl resilient and attractive.
In winter, use mats to trap grit and wipe snow melt to prevent salt damage.
In summer, limit sun exposure with blinds to avoid fading.
For high-traffic zones, vacuum daily, mop lightly, and rotate rugs or furniture pads to distribute wear evenly.
Repair, Restoration, and When to Call a Professional
You can usually handle small scratches and lifted seams yourself with a repair kit, vinyl adhesive, and a few careful steps.
If damage is widespread, warped, or the floor keeps failing, call a pro to assess restoration versus full replacement.
Expect DIY fixes to be inexpensive and quick, while professional work can take days and vary widely in cost depending on scope.
Minor repairs: scratch and seam fixes (materials and steps)
Minor scratches and small seam gaps are often fixable with a few simple tools and a little care, and knowing when to attempt repairs yourself can save time and money.
For scratches, clean, buff lightly, then apply a vinyl repair kit or colored filler and smooth with a putty knife.
For seams, clean, apply seam sealer, press edges together, wipe excess, and let cure.
When to consider professional restoration or replacement
If your scratch fixes or seam seals aren’t holding up, it’s time to weigh whether a professional restoration or full replacement will save you time and money.
Call a pro when damage is widespread, discoloration won’t come out, planks are lifting, or subfloor issues exist.
Professionals can assess structural problems, match materials, and perform durable repairs you likely can’t achieve with DIY methods alone.
Cost and timeline expectations
Expect repair costs and timelines to vary widely based on damage extent, materials, and whether you hire a pro or do it yourself.
Minor fixes and spot cleaning can take an hour or two and cost under $50 in supplies.
Patch or plank replacement may run $100–$500 and take a day.
Full restoration or replacement can cost $500–$3,000+ and require several days to a week.
Frequently Asked Questions (FAQ)
You probably have a few quick questions about caring for vinyl, like whether steam mops are safe or how often to deep-clean.
You’ll also want to know if vinegar harms the surface, how to tackle yellowing or stubborn stains, and which eco-friendly cleaners work.
I’ll answer each one clearly so you can keep your floors looking their best.
Can I use a steam mop on vinyl floors?
Wondering whether a steam mop’s safe for your vinyl floors? You can use one on well-sealed, glued or solid vinyl, but avoid on peel-and-stick or unsealed plank floors—high heat and moisture can warp adhesive and layers.
Test a small hidden area first, use low steam settings, and keep the mop moving. Stop if you see bubbling, discoloration, or lifting.
How often should I deep-clean vinyl floors?
How often you should deep-clean vinyl floors depends on traffic and visible buildup: aim for a thorough deep clean every 1–3 months for typical homes, more often in high-traffic or pet households, and less often (every 4–6 months) in low-traffic areas.
Between deep cleans, do weekly light cleaning to remove grit and spills, and spot-treat stains promptly to prevent buildup.
Will vinegar damage vinyl floors?
Curious whether vinegar will harm your vinyl floors? You can safely use a diluted solution (one cup white vinegar to a gallon of warm water) for routine cleaning.
Avoid undiluted vinegar, strong acids, or prolonged soaking, which can dull or weaken the surface.
Test a hidden spot first, mop sparingly, and rinse with clean water to prevent residue.
How to remove yellowing or permanent stains?
If vinegar and gentle mopping won’t lift persistent discoloration, you’ll need targeted steps for yellowing or permanent stains.
Test a mild bleaching solution (diluted hydrogen peroxide) in an inconspicuous spot. Apply sparingly, let sit briefly, then rinse thoroughly.
For adhesive or ink, use isopropyl alcohol cautiously. Always blot, never scrub aggressively, and follow with neutral pH cleaner and full rinse.
Are there eco-friendly cleaners safe for vinyl?
Want eco-friendly cleaners that won’t harm your vinyl? You can use mild options: a few drops of dish soap in warm water, white vinegar diluted (1 cup per gallon) for routine cleaning, or baking soda paste for spot scrubs.
Avoid harsh acids, bleach, or oil-based products.
Test any new cleaner in an inconspicuous spot first to verify no discoloration or surface dulling.