How to Drill Through Ceramic Tiles Without Cracking Them
You can drill through ceramic tiles without cracking them by planning the location, taping the spot, and using the right bit (carbide for glazed, diamond for porcelain). Use a variable-speed drill at low RPM, apply light steady pressure, and start with a small pilot hole. Keep the bit cool with water, support the tile from behind, and back the bit out slowly to clear slurry. Follow these steps and you’ll avoid chips and learn more practical tips next.
How to Drill Through Ceramic Tiles Without Cracking Them (+ Hook)
You can avoid cracks by using the right bit, slow speed, steady pressure, and a guide to keep the drill from wandering.
Follow a simple best-practice checklist—mark, score, cool, and back off periodically—to get clean holes every time.
If the tile is very thin, decorative, or you need only light fixtures, consider adhesives or anchors instead of drilling.
Best practice summary
If you’re planning to drill through ceramic tile, follow a few proven steps and you’ll avoid cracks, shattered edges, and wasted time.
First, ask how do I drill ceramic tiles, pick the right carbide or diamond bit, mark and tape the spot, start slow with a pilot hole, keep cooling, and use steady pressure.
Finish with proper cleanup and sealants.
When to drill ceramic tiles vs. alternatives
When a fixture needs a secure, permanent mount, drilling into ceramic tile makes sense—but for quick fixes, renters, or delicate surfaces you’ll want alternatives.
Decide based on permanence, tile type, and landlord rules. Consider these options:
- Adhesive hooks for light loads.
- Suction mounts for smooth surfaces.
- Toggle bolts into grout for medium loads.
- Relocatable brackets for renters.
Understanding Ceramic Tiles and Why They Crack
Ceramic tiles are basically clay and minerals fired into a hard body and usually topped with a glassy glaze, so their brittle structure and surface hardness directly affect how you drill them.
When you drill, the common failures are cracking, chipping, or delamination where glaze separates from the body, each linked to how force and heat are applied.
Tile thickness, glaze type, and the strength of the substrate under the tile all change the risk, so you’ll need to match technique and tools to those factors.
What ceramic tiles are made of and how that affects drilling
Tiles are made from clay, minerals and water that get shaped, fired and often glazed, and those materials determine how they handle drilling and why they crack.
You’ll find porcelain is denser and harder, requiring diamond or carbide bits and slower feeds, while ceramic body and glaze hardness, porosity and brittleness affect heat buildup and vibration.
Match bit type and speed.
Common failure modes when drilling tiles (cracking, chipping, delamination)
Knowing the material differences helps explain how and why failures happen during drilling.
You’ll face three common modes: cracking from excessive pressure or impact, chipping at the glaze edge from blunt bits or lateral force, and delamination where layers separate because of heat, vibration, or poor bonding.
Recognize symptoms early, stop, and adjust speed, support, or tooling to prevent escalation.
How tile thickness, glaze, and substrate influence risk
Because thickness, glaze type, and the backing beneath the tile all change how stress is distributed, you’ll need to evaluate each factor before drilling.
Thicker tiles resist cracking but need slower, steadier pressure. Hard glazes chip less but can fracture if brittle; soft glazes dull bits.
Weak or hollow substrates amplify vibration, so support or backer reinforcement reduces risk and improves hole quality.
Tools and Materials You Need
You’ll want the right drill—preferably a variable-speed unit (use hammer mode only on thick, durable tiles) —and the correct bits, like carbide or diamond-tipped for glazed ceramic and masonry bits for softer tile.
Gather accessories such as masking tape, a guide bit or spacer, lubricant and a vacuum to control dust and improve accuracy.
Don’t forget safety gear: goggles, gloves and a dust mask.
Recommended drill types and why (variable-speed, hammer vs. regular)
Power tools matter when you’re drilling ceramic tile: pick a variable-speed drill so you can start slow and build up speed as the bit bites, and avoid hammer‑action unless you’re working through thick masonry behind the tile.
- Use variable-speed for control.
- Choose cordless for maneuverability.
- Prefer brushed or brushless motors for reliability.
- Skip hammer mode to prevent cracking.
Best drill bits for ceramic tiles (carbide, diamond-tipped, masonry)
When drilling ceramic tile, pick a bit that matches the glaze and backing—carbide-tipped bits cut through glazed surfaces, diamond-tipped bits grind clean holes with minimal chipping, and masonry bits only work when you’re also penetrating a concrete or cement substrate. Choose diamond for hard porcelain, carbide for common tiles, masonry for substrate.
| Bit type | Best use |
|---|---|
| Carbide | Glazed tile |
| Diamond | Porcelain |
| Masonry | Concrete backing |
| Size tip | Match fixture |
Essential accessories (masking tape, guide bit, spacer, lubricant, vacuum)
Although the right drill bit matters, a few simple accessories make the job clean, safe, and far easier—masking tape to mark and prevent slipping, a guide bit or pilot to start holes straight, spacers to keep fixtures aligned, lubricant to reduce heat and dust, and a vacuum to capture debris.
- Masking tape for grip
- Guide/pilot bit
- Spacer/alignment shim
- Lubricant and vacuum combo
Safety gear (goggles, gloves, dust mask)
Since flying ceramic shards and fine dust are an unavoidable part of drilling tile, you should gear up with safety glasses, cut-resistant gloves, and a dust mask before you start.
Pick snug goggles (wraparound if possible), gloves that let you feel the drill, and an N95 or better mask.
Replace damaged gear, keep a first-aid kit handy, and clear bystanders.
Step-by-Step Drilling Process
Before you start drilling, plan the exact spot and check for pipes or wiring behind the tile.
Protect the surface with masking tape or a template, then begin a slow pilot hole with low speed and gentle pressure.
Once the pilot’s set, progress to the full-size bit using cooling, pecking, and a backing support, then finish the hole cleanly and remove debris.
Step 1 Planning the hole location and checking behind the tile
When you’re planning the hole location, mark the spot carefully and double-check what’s behind the tile so you don’t hit pipes, wires, or wall studs.
Use these quick checks before drilling:
- Scan with a stud finder for studs or pipes.
- Trace plumbing/electrical lines from fixtures.
- Tap tiles to locate hollow areas.
- Measure from edges and joints for safe placement.
Step 2 Marking and protecting the tile surface (masking tape and templates)
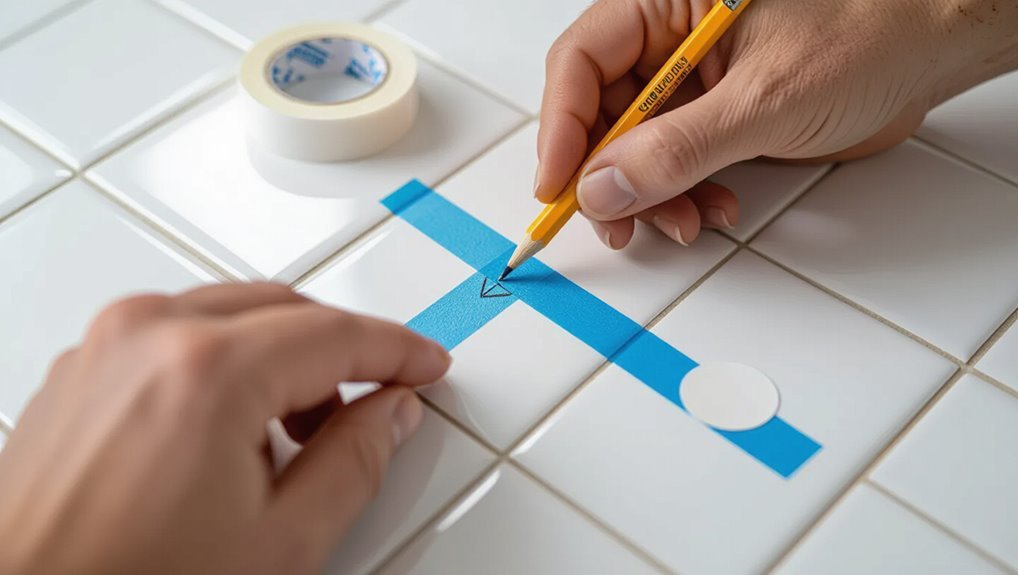
If you want clean, crack-free holes, mark the spot precisely and protect the glaze with masking tape or a template before the bit ever touches the tile.
Use two crossed tape strips or a purpose-made sticky template, then mark center with a pencil or awl through tape.
The tape prevents slipping and chipping, keeps the drill bit aligned, and helps catch ceramic dust.
Step 3 Starting the pilot hole slowly (low speed, gentle pressure)
Start the bit at the marked spot and run the drill on the lowest speed with only light, steady pressure so the tip can score the glaze without cracking it.
Keep the drill perpendicular, pause if the bit skates, and don’t force it. Maintain a firm grip, breathe, and let the bit create a shallow pilot groove—this controlled start prevents chips and keeps the hole accurate.
Step 4 Progressing to full-size hole using correct bit and techniques (cooling, pecking, backing support)
With a shallow pilot groove in place, switch to the full-size bit—preferably a carbide-tipped masonry bit, diamond core, or a proper tile bit matching your final diameter—and resume drilling at low speed with steady, light pressure.
Cool the bit periodically with water, use short pecking motions to clear slurry, and support the tile from behind to prevent blowout.
Take breaks to avoid overheating.
Step 5 Finishing the hole cleanly and removing debris
Once the bit breaks through, slow your drill and back it out slowly while keeping the bit spinning to clear slurry; this prevents chipping and sudden pull-through.
Clean the hole with a damp rag or soft brush, remove fragments, and vacuum dust.
Deburr edges gently with fine sandpaper or a ceramic file.
Wipe dry, inspect for cracks, and apply sealant if the fixture requires a watertight finish.
Techniques for Different Tile Types and Situations
You’ll need different approaches depending on whether you’re working with glazed ceramic, hard porcelain, or delicate mosaic tiles.
Pay special attention when drilling near edges, grout lines, or seams, and adjust your technique for the substrate beneath—cement board, drywall, or concrete.
For larger openings like sink or pipe penetrations, use the right hole saw or core bit and take it slow to avoid cracking.
Drilling glazed ceramic vs. porcelain vs. mosaic tiles
Although the basic drilling steps stay similar, glazed ceramic, porcelain, and mosaic tiles each demand different bits, speeds, and pressure to avoid cracking or chipping.
Use carbide-tipped bits for glazed ceramic at moderate speed and light pressure.
For dense porcelain, choose diamond or continuous-rim bits, slow speed, steady cooling.
For thin mosaic, use smaller diamond bits, very low pressure, and frequent cooling to prevent breakage.
Drilling near edges, grout lines, and seams
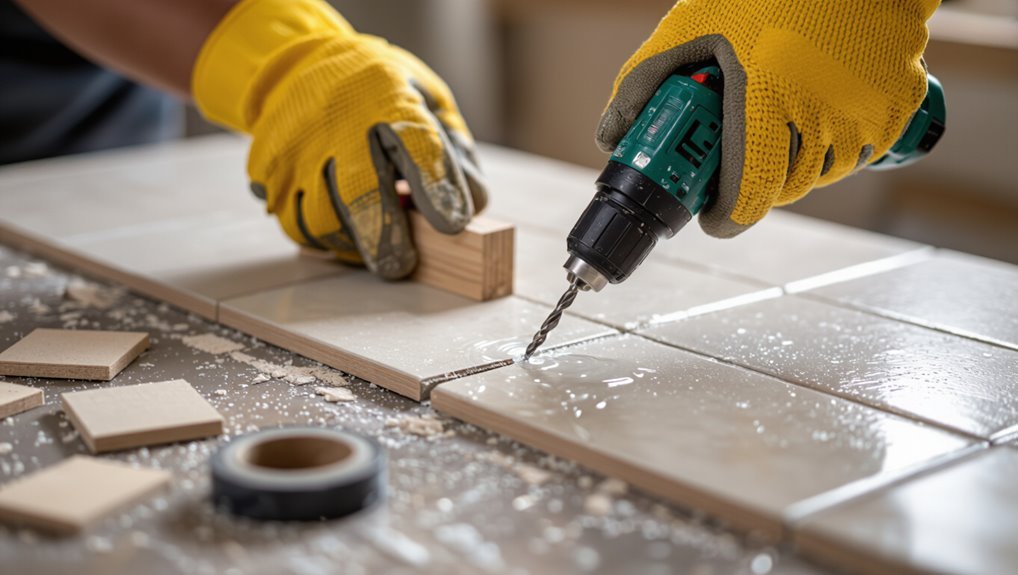
Drilling within a few inches of an edge, grout line, or seam needs extra care because the tile is weaker there and more prone to cracking; use slower speeds, lighter pressure, and smaller or specialty bits (diamond or carbide) to reduce stress and avoid overcutting into the joint.
Support the tile from below, mark precisely, start with a pilot or guide hole, and keep the drill steady and level.
Drilling through tile into wall substrate (cement board, drywall, concrete)
Begin by identifying the substrate behind the tile—cement board, drywall, or concrete—because each one changes the bit, speed, and pressure you should use.
For cement board use carbide or masonry bits at moderate speed with steady pressure.
For drywall a high-speed masonry or carbide bit works gently.
For concrete use a masonry bit or hammer drill, slower, firm pressure, and frequent breaks to avoid overheating.
Making larger holes (sinks, pipes) hole saw and core bit methods
When you need a big opening for a sink drain or pipe, using a carbide-tipped hole saw or a diamond-core bit gives cleaner, faster results than small drill bits; choose a pilot bit for guidance, match the bit type to your tile (carbide for ceramic, diamond for porcelain or glazed surfaces), and support the surrounding tile so you don’t crack it.
| Tool | Tile Type | Tip |
|---|---|---|
| Hole saw | Ceramic | Carbide pilot |
| Core bit | Porcelain | Diamond grit |
Common Mistakes and How to Avoid Them
Don’t press hard or run the drill at top speed, or you’ll crack the tile; use the proper bit for the material and keep speed low.
Support the tile from behind to prevent blowout and always mark and wear safety gear before you start.
Follow these simple precautions and you’ll avoid most common mistakes.
Applying too much pressure or high speed
Although pushing harder or cranking up the drill speed might seem like a quick fix, doing either increases the chance of cracking the tile or overheating the bit.
You should let the drill do the work: use steady, gentle pressure, moderate RPMs, and pause to cool the bit with water.
Move deliberately, keep the angle steady, and check progress often to avoid stress fractures.
Using the wrong bit for the tile material
If you pick the wrong bit for your tile—say a standard masonry bit instead of a diamond or carbide-tipped one—you’ll waste time, ruin the bit, and likely crack the tile.
Choose a bit rated for glazed ceramic. Match bit type to tile hardness, use a pilot mark, drill slowly with coolant, and replace worn bits promptly. Proper bits reduce chipping and improve accuracy.
Not supporting the tile from behind
Choosing the right bit is only part of the job; you also need to support the tile from behind when you drill. If you don’t, the tile can flex and crack as the bit breaks through.
Hold a scrap board or a folded towel firmly behind the drilling area, apply steady pressure, and drill slowly. That backing absorbs force and prevents breakage.
Ignoring safety and marking steps
When you skip basic safety steps or rush marking your drill points, you increase the chance of injury and mistakes that ruin the tile; take a moment to wear eye protection, gloves, and a dust mask, and mark exact drill locations with a pencil and tape before you start.
You should clamp or support the tile, double-check measurements, and use masking tape to prevent bit wander and reduce chipping.
Prevention, Tips, and Best Practices
Before you start, test your technique on spare tiles so you can adjust speed, pressure, and bit choice without risking the real work.
Use backing support and clamps to keep the tile steady, cool the bit with water or a wet sponge to prevent cracking, and keep lubricant flowing for cleaner cuts.
If the tile is large, glazed, or the hole position is critical, don’t hesitate to call a professional instead of forcing a DIY job.
Pre-drilling tests on spare tiles
Because tiles vary in glaze, thickness, and hardness, you should always practice on spare pieces first to avoid cracking or wasted time on the real wall.
Test drill at the desired speed and pressure, try different bits, and note splash or glaze chipping.
Mark hole placement, time how long cooling takes, and adjust technique until holes are clean and consistent before tackling installed tiles.
Using backing support and clamps
One simple but essential step is to back the tile with a scrap board or plywood and clamp it firmly so the drilled bit has support and the glaze can’t flex and crack.
Position clamps to avoid pinching the tile edge, use nonmarring pads, and keep steady pressure. Support prevents vibration, reduces chipping, and lets you drill straight holes with lower risk of fracturing the tile.
Cooling and lubrication methods (water, wet sponge)
With the tile supported and clamped, keep the drill bit cool and lubricated to prevent overheating and premature wear. Use water or a wet sponge to reduce friction and flush debris.
Tips:
- Drip water onto the bit consistently.
- Hold a damp sponge against the tile near the hole.
- Pause often to re-wet.
- Avoid flooding electrical tools; use battery or GFCI protection.
When to call a professional vs. DIY
If you’re comfortable with basic tools and the hole is small, straight, and away from edges or plumbing, you can usually handle drilling ceramic tiles yourself; however, call a professional when the job involves large-diameter holes, tiles near fragile fixtures, unknown wiring or pipes behind the wall, expensive or antique tiles, or when you lack the right tools or steady technique.
Otherwise, proceed cautiously with proper bits, pilot holes, slow speed, cooling, and clamps.
Tools Comparison Cheat Sheet
You’ll get a clear, side-by-side look at common bit types (carbide, diamond-tipped, and masonry) and what each is best suited for.
I’ll also list recommended drill models across budget ranges so you can pick one that matches your needs and wallet.
Use this cheat sheet to save time and avoid buying the wrong tools.
Quick comparison of bit types and recommended uses
Choosing the right drill bit makes the job faster and prevents cracked tiles, so here’s a concise cheat sheet comparing common bit types and their best uses.
| Bit Type | Best For | Feeling |
|---|---|---|
| Carbide-tipped | Glazed ceramic | Confident |
| Diamond | Porcelain | Secure |
| Masonry | Thin tile | Cautious |
| High-speed steel | Soft tile | Practical |
Recommended drill models by budget
Here’s a compact guide to drill models across three budgets so you can match performance to your tile project without overspending: affordable options for occasional DIYers, midrange picks for regular home maintenance, and pro-level tools for heavy-duty jobs.
- Bosch PSB 500W — light, budget-friendly.
- Makita HP1630 — reliable midrange power.
- DeWalt DCD796 — cordless pro performance.
- Hilti SF 8M-A22 — heavy-duty, long-lasting.
Troubleshooting Common Problems
If a tile cracks while you’re drilling, you’ll learn when a simple repair will do and when the tile needs replacing.
If the bit slips, you’ll get quick tips to regain control and re-mark your spot so holes stay accurate.
You’ll also find easy ways to manage dust and remove stubborn adhesive residue.
If the tile cracks repair options and when to replace
When a drilled tile cracks, you’ve got a few practical repair routes depending on the size and location of the damage:
For hairline cracks, seal with clear epoxy or cyanoacrylate and sand flush once cured.
For larger chips, fill with color-matched epoxy or replace the tile.
If cracks compromise waterproofing or structural integrity, replace the tile to avoid leaks and further damage.
If the bit slips how to regain control and re-mark
A slipped bit can quickly undo careful marking and crack the tile, so it’s important to stop, assess, and fix the issue before continuing.
Lift the drill, clear debris, and inspect the mark. Re-center using a small piece of masking tape and a new pencil dot or awl.
Apply light pressure, start at low speed, and keep the drill perpendicular to regain control.
Dealing with dust and adhesive residue
Once dust and adhesive build up around the hole, you’ll lose visibility and your bit can overheat or wander off course.
Stop drilling periodically, clear debris with a vacuum or brush, and wipe adhesive with a damp cloth or mild solvent safe for the tile. Let surfaces dry before resuming.
Inspect the hole frequently to prevent clogging and maintain steady, controlled drilling pressure.
FAQ
You’ll get quick answers to common concerns like whether a regular bit will cut it and how to prevent glaze from chipping.
You’ll also learn safe practices for drilling on finished walls with hidden plumbing or wiring, the proper drill speed, and techniques for very small or very large holes.
If you’ve got a specific situation, ask and we’ll cover the best tool and method.
Can I drill ceramic tile with a regular drill bit?
Wondering if a regular drill bit will do the job? You can’t use standard wood or metal bits on glazed ceramic—they’ll skid, dull quickly, and may crack the tile.
Use a carbide-tipped masonry or diamond-tipped bit designed for tile.
Drill slowly, apply light steady pressure, keep the bit cool, and let the tool do the work to reduce risk of damage.
How do I avoid chipping the tile glaze?
If you want to keep the glaze intact, take a few simple precautions: use a carbide or diamond-tipped bit, start with a small pilot hole, and tape the spot to prevent splintering.
Drill slowly with steady, light pressure and keep the bit cool by pausing or using water.
Support the tile from behind and avoid sudden changes in speed or angle to prevent chipping.
Is it safe to drill tiles on a finished wall with plumbing/electrical behind?
How close is that pipe or wire behind the tile — and is drilling worth the risk?
You should locate hidden services with a reliable stud/metal/AC detector, consult plans if available, and mark safe zones.
If you suspect plumbing or wiring, shut off water and power, use a depth-limited drill or hire a pro.
When in doubt, don’t drill—it’s safer to relocate fixtures.
What speed should I use on my drill for ceramic tile?
What speed should you run your drill at when cutting ceramic tile?
Use a low to medium speed—roughly 600–1,500 RPM—for porcelain and hard tiles; softer ceramic can tolerate slightly higher RPM.
Slow speed prevents overheating, reduces chipping, and keeps the diamond or carbide bit effective.
Apply steady pressure, keep the bit cool with water, and let the tool do the work.
How do I drill very small or very large holes in ceramic tile?
Need a tiny hole or a massive one?
For very small holes, use a carbide or diamond-tipped micro bit, clamp a guide like masking tape, drill slowly with light pressure and coolant.
For large holes, use a diamond hole saw with a pilot bit, run at low speed, keep water cooling, and support the tile to prevent flexing.
Go slow and steady.
Useful Visuals and Resource Links
You’ll want clear diagrams showing drill bit types, drill angles, and clamp/stop setups plus photos of each step and common mistakes.
Include links to reputable how-to articles and manufacturer pages, and embed a couple of concise video tutorials that demonstrate technique and safety.
These visuals and resources will help you avoid errors and build confidence before you start drilling.
Suggested diagrams and photos to include in a how-to guide
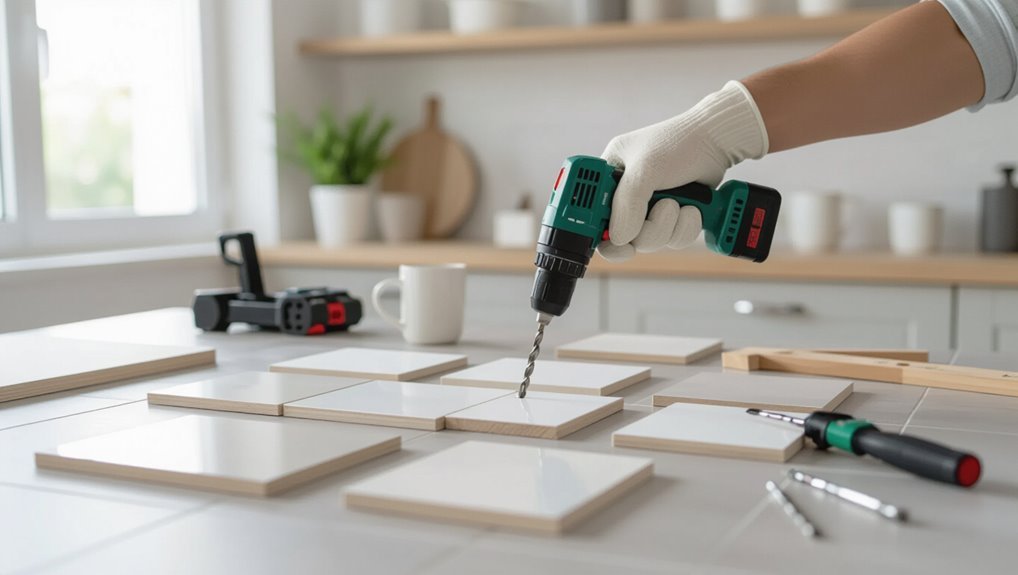
Good visuals make a drilling guide far easier to follow, so include clear diagrams and step-by-step photos that show tool setup, tile marking, drilling at the right angle, and how to manage dust and coolant.
Add close-ups of drill bits and pilot points, a cross-section showing pressure and depth, images of clamps and backing support, and before/after shots to confirm successful, crack-free holes.
Further reading and video tutorials
Interested in learning more or seeing these steps in action? Check trusted resources and videos that show techniques, tool choice, and safety.
Follow these quick picks:
- Manufacturer drill-bit tutorials (step-by-step)
- Tile-cutting and scoring demo videos
- Safety gear and setup guides
- Photo galleries of common mistakes and fixes
Use these to reinforce skills and avoid cracking tiles.