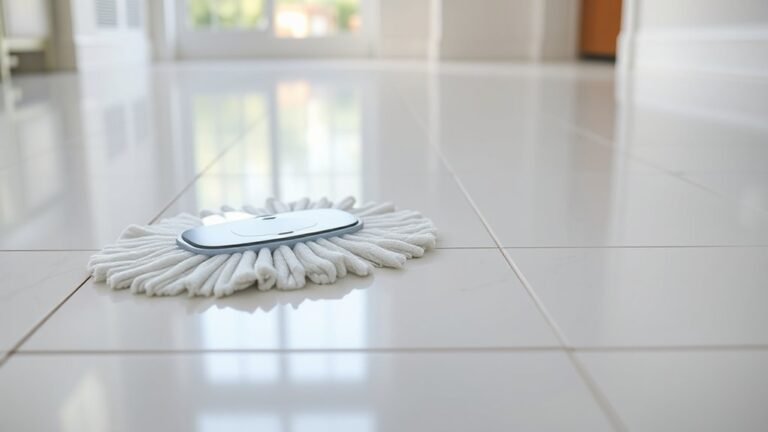
How to Clean Rubber Car Floor Mats and Remove Stubborn Grime
You’ll start by removing the mats and shaking or vacuuming loose debris, then rinse them with a hose. Spray a pH‑neutral cleaner or degreaser, let it sit 5–10 minutes, and scrub grooves with a stiff nylon brush or a smaller firm brush for tight spots. Rinse thoroughly, air dry completely, and reinstall once no moisture remains. For stubborn grease or odors use citrus degreasers, enzymatic cleaners, or a pressure washer cautiously—keep going and you’ll find detailed tips and fixes.
Best Way to Clean Rubber Car Floor Mats
For the quickest, most effective clean, you’ll rinse the mats, scrub with a mild detergent and stiff brush, then rinse and air-dry.
Plan on about 20–30 minutes total per pair, using a hose, bucket, brush, and all-purpose cleaner or dish soap.
You’ll end up with mats that look refreshed, smell clean, and won’t trap dirt or moisture.
Short summary of recommended method
When your rubber mats look grimy, pull them out, shake off loose debris, then hose them down; scrub with a soft brush and a mild detergent, rinse thoroughly, and let them air-dry before reinstalling.
For quick how to clean car floor mats rubber guidance: focus on gentle scrubbing, avoid harsh solvents, target grooves, repeat rinsing, and finish by checking for trapped dirt so your mats stay clean and functional.
Time, tools, and expected results
Although you can clean a single mat in about 10–15 minutes, plan 30–60 minutes for all mats so you won’t rush the rinsing and drying steps; gather a hose or bucket, soft-bristled brush, mild detergent, microfiber towels, and a drying rack or clean area.
Expect mats to look like new—deep grooves may retain stains that need a second pass but the rubber should be clean, flexible, and odor-free when finished.
- Mud-splattered mat
- Soap suds and brush
- Hose rinsing grime away
- Laid flat to dry
Why Clean Rubber Car Floor Mats? Benefits and Risks of Neglect
You should clean your rubber mats regularly because trapped dirt and moisture can cause odors and harbor bacteria that affect health.
Letting grime, road salt, or harsh chemicals build up can degrade the rubber and shorten the mats’ lifespan.
Using the wrong cleaners or scrubbing too hard can also cause cracks or discoloration, so it pays to know proper care.
Health, odor, and appearance impacts
Comfort and safety depend a lot on clean floor mats: neglect lets trapped dirt, moisture, and food particles breed bacteria and mold that can aggravate allergies, trigger respiratory irritation, and create persistent, unpleasant odors.
You’ll also notice stained, dull mats that make your car look neglected and smell musty.
Regular cleaning preserves a healthier cabin, fresher air, and a sharper interior appearance.
Damage risks from grime, chemicals, and improper cleaning
When grime and trapped moisture sit on rubber mats, they don’t just look bad—they start to degrade the material, causing cracks, stiffness, and loss of grip that can compromise safety.
You risk accelerated wear from road salts, oils, and acidic spills.
Harsh cleaners or scrubbing can strip protective coatings and embrittle rubber.
Clean gently with appropriate cleaners to preserve flexibility and traction.
Understanding Rubber Mat Types and Materials
You’ll want to know whether your mats are universal rubber liners or molded OEM pieces, since fit and construction change how they trap dirt.
Check surface textures, grooves, and backing—those features affect how grime collects and how easily water and cleaners rinse away.
That matters because different materials and textures need different cleaning methods and products to avoid damage and get them truly clean.
Universal rubber vs. molded OEM mats
Although both types are meant to protect your car, universal rubber mats and molded OEM mats differ in fit, material quality, and performance.
Universal mats are affordable, cut-to-fit, and made from thinner, flexible rubber that’s easy to clean but may shift.
Molded OEM mats use thicker, precisely shaped compounds that resist wear and stay put, offering superior long-term protection and a tailored look.
Textured surfaces, grooves, and backing differences
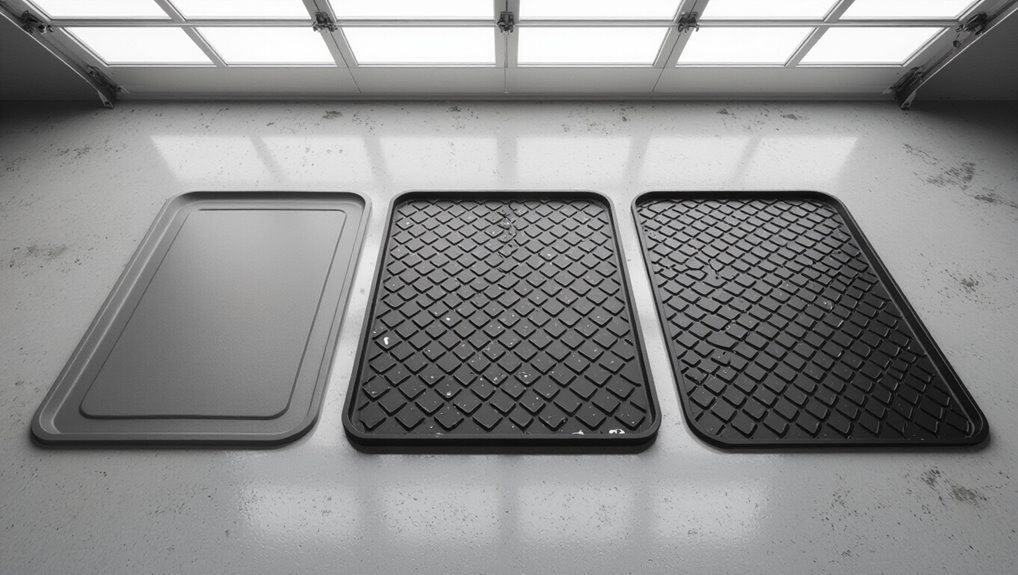
Because different textures, groove patterns, and backing materials affect grip, dirt capture, and water management, you should match mat design to your driving conditions and priorities.
Choose deep, channelled grooves for wet or snowy climates to trap water; shallow, fine textures suit daily city use and easier debris removal.
Backing types—rubber nibs, foam, or textured rubber—impact slip resistance and fit.
How material affects cleaning methods and product choice
Those texture and backing choices also determine which cleaning methods and products will work best.
You’ll choose mild soap and soft brush for smooth, pliable rubber to avoid scratching. Heavier, molded mats handle stiffer brushes and degreasers.
Foam-backed or delicate liners need gentle cleaners and air drying. Avoid petroleum-based solvents on vinyl blends, and always test products on a hidden spot first.
Tools and Supplies You’ll Need
Before you start cleaning, gather a stiff brush, a soft-bristle brush or toothbrush, a hose, and microfiber cloths to scrub and rinse effectively.
Pick a cleaner that suits your mats—pH-neutral soaps for regular cleaning, a degreaser for oil and grime, or a simple DIY mix of dish soap and water for light jobs.
Don’t forget gloves, eye protection, and towels or a rack to speed safe drying.
Essential tools (brushes, hose, microfiber cloths)
You’ll only need a few basic tools to get rubber mats clean: a stiff brush for scrubbing, a hose or bucket for rinsing, and microfiber cloths for drying and finishing touches.
- Stiff nylon brush — scrub grooves and edges.
- High-pressure hose or bucket — blast or pour away grime.
- Microfiber towels — blot and polish surfaces.
- Soft detailing brush — reach seams and textured areas.
Recommended cleaners (pH-neutral, degreasers, homemade options)
Now that you’ve got the brushes, hose, and towels ready, pick the right cleaner to match the mess and your mats.
pH-neutral cleaners are gentle and safe for regular use, degreasers handle oily stains and heavy grime, and simple homemade mixes (mild dish soap and water, or a vinegar-and-water solution for mild odors) work well for light cleaning.
- Sudsy dish soap foam
- Citrus degreaser spray
- Neutral pH mat cleaner
- Vinegar-water rinse
Protective gear and drying aids
Grab a pair of chemical-resistant gloves and eye protection so you can work confidently with degreasers and concentrated cleaners.
Also wear a mask if fumes bother you.
Have microfiber cloths, a stiff brush, and a plastic scraper handy.
For drying, use clean towels, a quick air blower, or hang mats in a ventilated area; avoid direct heat to prevent warping.
Step-by-Step: Deep-Cleaning Rubber Car Floor Mats (Primary Method)
Start by taking the mats out of your car and shaking or tapping them to remove loose dirt.
Give them an initial rinse to loosen surface grime, then spray a diluted cleaner and let it sit for the recommended dwell time.
Use a stiff brush to scrub grooves and textured areas, rinse thoroughly, and inspect for any remaining spots before reinstalling.
Step 1 Preparation: remove mats and shake out loose debris
Take the mats out of the car and set them on a flat surface where you can work—doorways, a driveway, or a garage floor all work.
Shake each mat vigorously to dislodge crumbs and grit. Tap edges and fold corners.
Check grooves and remove stubborn bits with a gloved hand or brush.
- Flip
- Tap
- Fold
- Inspect
Step 2 Initial rinse to loosen dirt
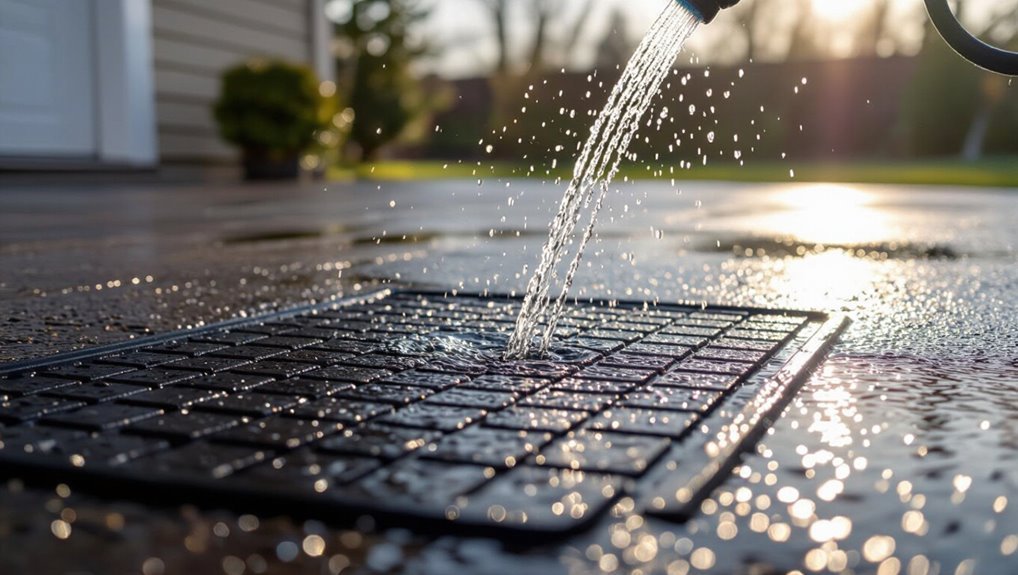
Now rinse each mat with a steady stream of water to loosen dirt and rinse away the dust you shook out.
Hold mats at a slight angle so water carries debris off, aiming the spray along grooves and edges.
Rotate and flip mats to reach both sides.
Continue until runoff looks clear and large particles are gone, preparing mats for cleaning.
Step 3 Apply cleaner: dilution and dwell time guidelines
3. Mix a mild detergent or dedicated rubber mat cleaner with water per label—usually 1:10 to 1:20 for light soil, stronger for heavy grime.
Apply evenly with a spray bottle or soft brush, saturating crevices. Let it dwell 5–10 minutes but don’t let it dry.
Keep away from strong acids or undiluted bleach to avoid rubber damage.
Step 4 Agitation techniques for grooves and textured areas
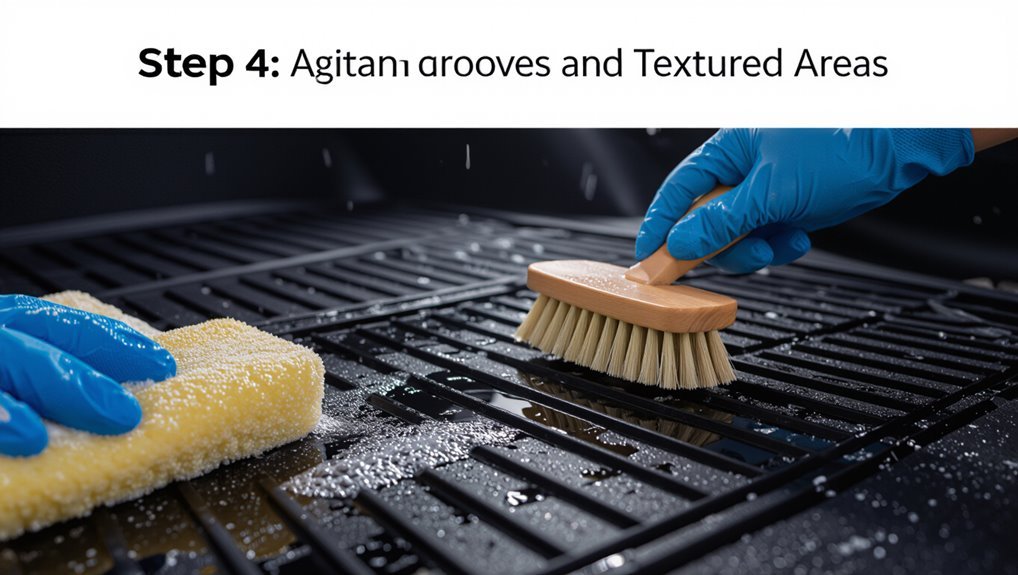
Scrub stubborn dirt from grooves and textured areas with a small, firm brush so the cleaner really gets into crevices.
Use a toothbrush or detailing brush, angling bristles along patterns and pressing firmly but not harshly. Work in short, overlapping strokes, loosening trapped grit.
For deep channels, switch to a nylon pick or soft plastic scraper to dislodge compacted debris without damaging the mat.
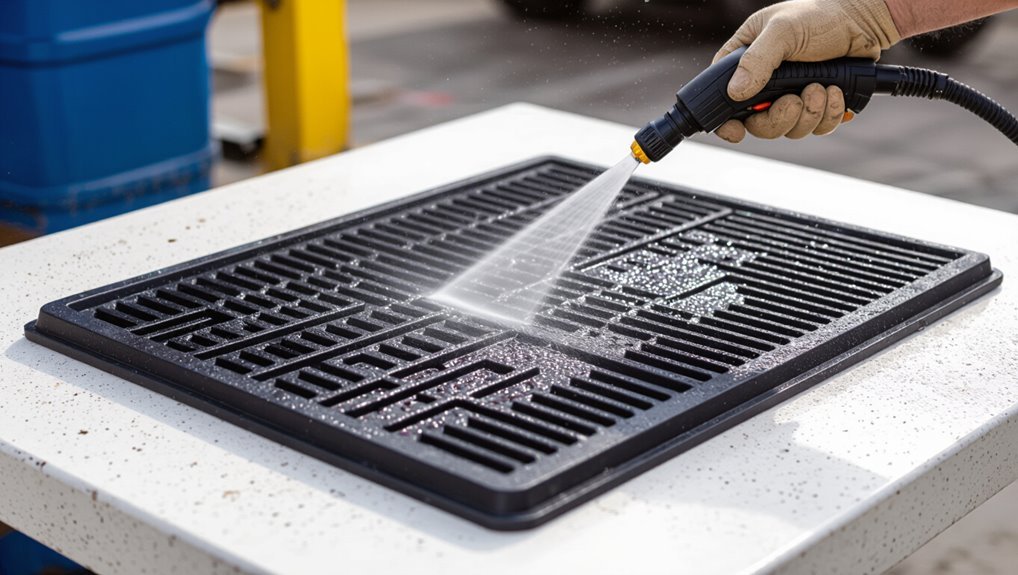
Step 5 Rinse thoroughly and inspect for remaining grime
Rinse each mat with a steady stream of water—preferably from a hose with a spray nozzle—working from one edge to the other so dirt flows away instead of settling back into grooves.
Check both sides and fold edges to expose trapped debris.
Repeat targeted rinses on stubborn spots, use a soft brush if needed, and confirm all soap and grime are gone before moving to the next step.
Step 6 Drying and reinstallation tips to prevent odors and mold
After rinsing, let the mats dry completely before you reinstall them so moisture can’t linger and cause odors or mold.
Hang them in sunlight or a well-ventilated area, flip periodically, and wipe crevices.
Make certain the vehicle’s carpet is dry before returning mats.
Use baking soda or odor eliminator if needed, and wait until both mats and interior are bone-dry to prevent mildew.
Removing Stubborn Grime, Stains, and Odors (Advanced Techniques)
When basic washing won’t cut it, you’ll need targeted tactics for grease, oil, and tar removal plus specific scrubbing patterns and tools to lift ground-in dirt and salt.
Use enzymatic cleaners and UV inspection for mildew or urine odors, and consider a pressure washer only at safe, low settings to avoid damage.
I’ll walk you through effective products, techniques, and exact pressure recommendations.
Grease, oil, and road tar removal methods
Tackle grease, oil, and road tar with targeted solvents and a bit of elbow grease—these contaminants won’t come out with just soap and water.
Use a citrus or solvent-based degreaser, apply briefly, agitate with a nylon brush, then blot and rinse.
For tar, try a dedicated tar remover or rubbing alcohol, test a hidden spot first, and dry thoroughly to prevent residue.
Ground-in dirt and salt stains: scrubbing patterns and tools
Start by loosening compacted dirt and salt with a stiff nylon brush and a quick spray of a vinegar-and-water solution to break down mineral deposits; you’ll save time and avoid rubbing grit deeper into the rubber.
Work in short, circular strokes, then switch to cross-hatching for edges. Rinse frequently, blot excess water, and dry mats flat.
Use a toothbrush for crevices.
Mildew and urine odor elimination (enzymatic cleaners and UV tips)
Although rubber mats resist water, mildew and urine odors can soak into seams and textured grooves, so you’ll need targeted treatments to fully remove microbes and their smells.
Use an enzymatic cleaner to break down organic residue—apply, agitate into grooves, let dwell per label, then rinse.
Finish by drying in sunlight or using a UV lamp to neutralize remaining microbes and odors.
When to use pressure washers and safe pressure settings
If enzymatic cleaners and sun or UV drying haven’t fully removed set-in grime or stubborn stains, a pressure washer can finish the job—but you need to use it carefully.
Use 1,200–1,800 psi with a 25°–40° nozzle, keep at least 12 inches distance, and test a corner first.
Avoid plastic components and excessive dwell time to prevent warping or surface damage.
Quick-Clean Routine for Maintenance (Fast Options)
For quick upkeep, you can do simple daily or weekly wipe-downs with a damp cloth and mild cleaner to stop dirt from building up.
Pair a fast interior vacuum with targeted spot-cleaning for crumbs and fresh stains between full washes.
Keep a portable cleaner or on-the-go kit in the car so you can tackle messes immediately.
Daily and weekly wipe-down steps
A quick daily wipe and a slightly deeper weekly pass keep your rubber mats looking sharp and prevent grime from building up.
You’ll move faster and avoid tough buildup by staying consistent: wipe with a damp microfiber daily; scrub grooves weekly with soft brush and mild soap; rinse and dry thoroughly; replace mats only when completely dry.
- Damp microfiber swipe
- Brush grooves
- Rinse away suds
- Air-dry fully
Interior vacuum + spot-clean combo
After your daily wipe and weekly scrub, pair a quick interior vacuum with targeted spot-cleaning to keep mats and surrounding carpet looking sharp between deeper sessions.
Vacuum mats and carpet edges, then inspect for spills or stains. Blot fresh spots with a microfiber towel and a mild cleaner, scrub stubborn areas with a soft brush, and finish by rinsing and drying to prevent residue and odors.
Portable cleaners and on-the-go kits
When you’re on the go, portable cleaners and compact kits let you tackle spills and grime in minutes without hauling out buckets or hoses; grab a pump sprayer, small brush, and microfiber towel to spot-treat mats, or use a cordless extractor for tougher wet messes.
Carry a concentrated cleaner, disposable wipes, and a small squeegee. Work quickly, rinse lightly, and air-dry mats before reinstalling.
Comparison: Commercial Cleaners vs. DIY Solutions
You’ll want to weigh effectiveness, cost, and safety when choosing between commercial cleaners and DIY mixes.
For greasy mats a solvent-based commercial cleaner often works best, while baking soda or vinegar can tackle odors and mild dirt on a budget.
Below are quick product picks and tips matched to each problem type so you can pick the right approach.
Effectiveness, cost, and safety comparison
Although both commercial cleaners and DIY solutions can lift dirt and restore rubber mats, they differ noticeably in effectiveness, cost, and safety. You’ll find commercial products work faster but cost more and may irritate skin; DIY mixes are cheaper and gentler but need more effort.
| Commercial | DIY |
|---|---|
| Faster | Satisfying |
| Stronger | Gentle |
| Pricier | Affordable |
| Risky | Safe |
Best product picks by problem type (grease, odor, general)
Having weighed speed, cost, and safety, it’s time to match cleaners to specific problems: grease, odor, and routine grime.
For grease use a citrus degreaser or concentrated commercial engine degreaser; DIY: baking soda paste plus dish soap.
For odor pick enzyme sprays or odor eliminators; DIY: vinegar soak then air-dry.
For general cleaning, mild all-purpose cleaner or diluted castile soap works well.
Common Mistakes and How to Avoid Them
Don’t use harsh solvents that can degrade the rubber — choose mild cleaners instead.
Avoid drying mats in direct sun or with high heat, which can warp them.
Store and reinstall mats properly so they lie flat and don’t shift under the pedals.
Using harsh solvents that degrade rubber
When you reach for a quick cleaner, be careful: many common solvents like acetone, paint thinner, or undiluted brake cleaner will strip oils from rubber, causing it to dry, crack, or lose its texture.
Don’t use harsh chemicals; choose mild soap, water, or dedicated rubber cleaners. Test any product on a hidden spot first, rinse thoroughly, and let mats air dry.
Overheating or direct sunlight drying risks
If you leave rubber mats in direct sun or blast them with high heat to speed drying, you’ll risk warping, fading, or causing the material to become brittle.
Instead, dry mats in a shaded, well-ventilated spot at ambient temperature. Rotate them occasionally for even drying, avoid heaters or hairdryers, and wait until they’re fully dry before using to prevent premature deterioration.
Improper storage and reinstallation mistakes
Although rubber mats seem simple to replace or store, mistakes during storage or reinstallation can shorten their life and compromise fit and safety.
Don’t fold, crease, or store mats where heat or chemicals warp them.
When reinstalling, align anchors and trim excess debris so mats sit flat and can’t slide.
Check fasteners and test pedal clearance before driving.
Prevention and Best Practices to Keep Mats Clean Longer
To keep your rubber mats lasting and looking good, you’ll adopt simple seasonal habits like rinsing off winter salt and shaking out summer mud.
Use a rubber-safe conditioner or protectant occasionally to prevent cracking and make future cleaning easier.
Store spare mats flat in a cool, dry place and replace them when they show deep cracks or permanent warping.
Seasonal care (winter salt, summer mud)
When seasons change, you’ll face different messes—salt and slush in winter, mud and pollen in summer—so prepare your rubber mats with simple preventive steps that make cleaning faster and extend their life.
Shake and hose mats weekly during wet seasons, wipe salty residue promptly to prevent corrosion, use liners for heavy-duty outings, and let mats dry fully before reinstalling to avoid mildew and odors.
Protective treatments and conditioners for rubber mats
One simple step you can take is applying a rubber-specific protectant to your mats, which helps repel dirt, UV rays, and everyday wear so they stay cleaner longer.
Apply evenly after cleaning and drying, avoid oily dressings, and buff excess. Reapply every few months or after heavy use.
This preserves flexibility, prevents cracking, and makes future cleaning faster.
Storing spare mats and when to replace them
After you’ve cleaned and treated your mats, keep a set of spares on hand so you can swap them in during messy trips or while the originals air out.
Store spares flat in a cool, dry place away from sunlight to prevent warping.
Inspect mats regularly for cracks, deep gouges, or worn treads and replace them when they no longer protect the carpet or slip securely.
Troubleshooting: What to Do If Cleaning Doesn’t Work
If stains still won’t budge after scrubbing, try a stronger cleaner or a gentle plastic-safe abrasive and test in an inconspicuous spot first.
If you’re left with sticky residue or a dull surface, rinse thoroughly and consider a rubber conditioner to restore finish.
When damage, persistent odors, or deep staining remain, it’s time to consult a professional detailer or replace the mat.
Persistent stains that won’t budge
When stubborn stains ignore your usual scrubbing, don’t toss the mats—try targeted troubleshooting steps that can save them.
Identify stain type (oil, dye, tar), pretreat with a suitable solvent or degreaser, let it sit, then agitate with a stiff brush. Rinse and repeat.
For deep-set discoloration, consider gentle mechanical cleaning or a commercial rubber-safe stain remover, testing first.
Sticky residue or surface dulling after cleaning
Sometimes cleaning leaves a tacky film or a dull finish on your rubber mats, and you’ll want to clear that up quickly to restore appearance and grip.
Rinse thoroughly with clean water, then wipe with a diluted vinegar solution (1:4 vinegar to water) to remove residues.
Dry completely in sunlight. If dullness persists, apply a silicone-free rubber restorer sparingly and buff.
When to consult a professional or replace the mat
Even after rinsing, vinegar wiping, and trying a silicone-free restorer, you may still face issues that home methods can’t fix — like deep cracks, embedded odors, warped shapes, or worn anti-slip backing.
If damage affects safety or fit, get a pro assessment or replace the mat.
Professionals can deodorize, rebind edges, or repair backing, but replacement is safer for structural failures.
Frequently Asked Questions
You’ve probably got a few quick questions—like whether bleach or vinegar will harm rubber, if pressure washers are safe, or how often you should deep-clean.
You’ll also want to know whether conditioners make mats slippery and if a washing machine is okay.
Below are concise answers to each concern.
Can I use household bleach or vinegar on rubber mats?
Wondering whether you can use household bleach or vinegar on rubber mats?
You shouldn’t use straight bleach; it’s too harsh and can discolor or degrade rubber.
Diluted white vinegar (50/50 with water) is safer for light cleaning and deodorizing, but test a hidden spot first.
Rinse thoroughly and dry to prevent residue; for heavy grime, use a dedicated rubber cleaner instead.
Are pressure washers safe for rubber floor mats?
How hard can a pressure washer be on rubber mats? You can use one, but keep pressure moderate (around 1200–1900 PSI) and maintain a 12–18 inch distance.
Use a wide fan nozzle, avoid concentrated jets on seams or edges, and test a small area first.
High pressure can warp, delaminate, or force water into backing, so proceed cautiously.
How often should I deep-clean my rubber mats?
When should you deep-clean your rubber mats?
You should deep-clean them every 3–6 months under normal use, or more often if you track mud, salt, pet hair, or spills.
Deep-clean after heavy seasonal messes—winter salt or after outdoor activities.
Regular quick rinses and vacuuming between deep cleans will keep mats effective and prolong their life.
Will rubber conditioners make mats slippery?
If you deep-clean regularly, you might also consider a rubber conditioner to keep mats looking fresh and flexible—but you’ll want to know whether it makes them slippery.
Proper conditioners formulated for rubber are non-greasy and won’t create hazardous slipperiness when applied sparingly and allowed to fully dry.
Avoid silicone-heavy products; test a small area first and wipe off excess to maintain traction.
Can I put rubber mats in the washing machine?
Curious whether you can toss rubber car mats into the washing machine? You generally shouldn’t.
Agitation, heat, and detergents can warp, crack, or strip any protective coatings. If a machine is your only option, use a gentle cycle, cold water, and no strong detergent, but hand-washing with a brush, mild soap, and hose rinse is safer and preserves mat shape and grip.