How to Remove Vinyl Floor Glue From Any Surface
You can remove vinyl floor glue from almost any surface by matching the adhesive type to the right mix of heat, mechanical scraping, and solvents while protecting the substrate and yourself. Start by identifying the glue (water‑based, solvent‑based, or pressure‑sensitive), test a small area, then soften with a heat gun or steamer and scrape with a sharp scraper. Use appropriate solvent sparingly, ventilate, and wear PPE. Keep going for tips on surface‑specific methods and safety.
How to Remove Vinyl Floor Glue From Any Surface and Overview
Here’s a quick overview to help you tackle vinyl floor glue: you’ll get the most effective methods at a glance, guidance on when a DIY approach works versus when to call a pro, and a concise safety and prep checklist.
Use the right technique for the surface—wood, concrete, or tile—to save time and avoid damage.
Follow the safety steps and know your limits before you start.
Direct Quick Answer: Most Effective Methods at a Glance
When you need to remove vinyl floor glue fast, pick the method that matches the surface, adhesive type, and how much time you have—heat or solvent for small spots, mechanical scraping for thick layers, and chemical strippers for stubborn, widespread residue.
For quick guidance on how to remove vinyl floor glue: use a heat gun or adhesive remover for small areas, a scraper for bulk, and a commercial stripper for heavy, cured residue.
When to DIY vs. When to Call a Professional
Now that you know the fastest options—heat, scraping, and chemical strippers—decide whether to tackle the job yourself or call a pro based on three factors: the adhesive type and how stubborn it is, the substrate under the vinyl (wood, concrete, or tile), and your comfort with tools and chemicals.
DIY if residue’s light, substrate is forgiving, and you’re confident; hire pros for heavy adhesive, delicate floors, or large areas.
Safety and Preparation Checklist
1 clear safety rule: protect yourself and the room before you touch any adhesive.
Wear gloves, respirator, and eye protection; ventilate the area; test a small spot. Prepare tools and disposal bags.
- PPE: gloves, respirator, goggles
- Ventilation: open windows, fans
- Containment: drop cloths, waste bags
Understanding Vinyl Floor Glue: What It Is and Why It’s Hard to Remove
You’ll run into several adhesive types—acrylic, pressure-sensitive, and solvent-based—each formulated differently and requiring different removal methods.
How strongly they bond depends on the surface—wood, concrete, tile, metal, or laminate—and on factors like age, heat exposure, porosity, and any previous treatments.
Knowing those variables will help you choose the right tools and solvents for effective removal.
Types of Adhesives Used for Vinyl Flooring (Acrylic, Pressure-Sensitive, Solvent-Based)
Because vinyl flooring relies on different adhesives for installation, knowing which type you’re dealing with makes removal far easier. Acrylic is water-based, bonds firmly, and often needs heat or solvent. Pressure-sensitive sticks yet peels with steady force. Solvent-based cures hard and resists water; solvents or mechanical scraping usually work.
| Type | Key trait | Removal hint |
|---|---|---|
| Acrylic | Water-based | Heat/solvent |
| Pressure-sensitive | Tackiness | Peel/slow pull |
| Solvent-based | Chemical cure | Solvent/scrape |
How Adhesives Bond to Different Surfaces (wood, concrete, tile, metal, laminate)
Knowing the adhesive type helps, but how well glue actually sticks comes down to the surface it’s applied to.
On wood it soaks into grain and bonds mechanically; concrete’s porous texture grabs adhesives deeply.
Smooth tile and metal rely on surface energy—adhesives may bead or cling depending on finish.
Laminate’s sealed layer limits penetration, so glue often adheres to the surface film rather than the substrate.
Factors That Affect Removal Difficulty (age, heat, porosity, previous treatments)
When you start pulling up vinyl adhesive, several factors determine how stubborn it’ll be: age and exposure to heat make glue harder and more brittle.
Porous substrates like concrete soak and lock in residues, and previous treatments—sealants, primers, or multiple layers of adhesive—can create chemical or physical bonds that resist solvents and scraping.
You’ll assess substrate porosity, adhesive age, heat history, and past coatings to choose technique.
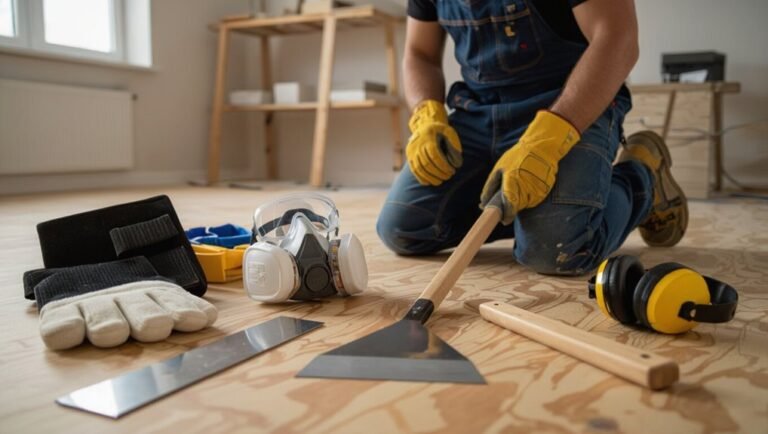
Tools and Materials You’ll Need
Before you start, gather the right tools so the job goes smoothly: scrapers, a sturdy putty knife, a heat gun or floor buffer, and optional sanders or oscillating tools for stubborn spots.
Stock chemical products like adhesive removers, mineral spirits, or citrus-based solvents, and have poultice materials on hand for porous surfaces.
Don’t forget protective gear—gloves, a respirator, eye protection—and plan for good ventilation.
Basic Tools (scrapers, putty knife, heat gun, floor buffer)
You’ll need a handful of basic tools to strip vinyl adhesive efficiently: a stiff scraper or floor scraper for large areas, a putty knife for edges and tight spots, a heat gun to soften stubborn glue, and a floor buffer for mechanical removal and cleanup.
Choose sturdy, comfortable handles and replace dull blades. Wear gloves and eye protection, and test the heat gun carefully to avoid scorching the substrate.
Chemical Products (adhesive removers, mineral spirits, citrus-based solvents)
Reach for the right chemical products—adhesive removers, mineral spirits, and citrus-based solvents—to dissolve stubborn vinyl glue quickly and safely.
Use them sparingly, test a small area, and follow manufacturer directions. Apply, wait, then scrape.
Recommended choices:
- Commercial adhesive remover
- Mineral spirits for resilient residues
- Citrus-based solvent for gentler lifting
Rinse residue and dry thoroughly.
Protective Gear and Safety Supplies (gloves, respirator, eye protection, ventilation)
Because chemical solvents and scraping can kick up fumes and debris, you should suit up with proper protective gear: chemical-resistant gloves, a respirator with appropriate cartridges, eye protection, and good ventilation.
Also wear long sleeves and sturdy shoes. Check respirator fit and cartridge type for organic vapors.
Keep a fan or open windows to dilute fumes, and have a spill kit and first-aid supplies nearby.
Surface-Specific Accessories (sanders, oscillating tools, poultice materials)
With your protective gear on, pick tools matched to the floor type and glue: orbital sanders and coarse-grit discs work well on plywood or concrete, while an oscillating multi-tool with a carbide scraper blade helps remove stubborn adhesive in corners or around trim.
Use adhesive poultices—solvent-soaked rags or clay packs—for sensitive surfaces, and soft scrapers, plastic shims, and hand-held grinders as needed.
Step-by-Step Removal Procedures
Before you start, you’ll test a small area to identify the adhesive type and check the subfloor.
You’ll prepare the space with ventilation, protective coverings, and safe access.
Then you’ll follow mechanical, chemical, or combined methods—like heat plus a scraper or solvent plus scraping—based on what the test shows.
Step 1 Test and Assess the Adhesive and Surface
Start by testing small areas to identify the adhesive type and how it reacts to removal methods.
Scrape gently with a putty knife, try a solvent on a hidden patch, and note texture, color, and hardness.
Check the substrate for damage or finish sensitivity.
Record what softens or resists, so you can choose appropriate tools and cleaners without harming the surface.
Step 2 Prepare the Area Safely (ventilation, patch protection)
1. You’ll ventilate the room—open windows, run fans, and use a respirator if solvent fumes are present.
Protect adjacent surfaces with drop cloths and painter’s tape; cover vents and doorways to prevent dust spread.
Move furniture and test a small hidden spot for sealers.
Keep a fire extinguisher nearby when using flammable products and store chemicals safely.
Step 3 Mechanical Removal Methods
Now you’ll start the mechanical removal stage, where you’ll use scrapers and hand tools to lift soft glue and chip away stubborn spots.
If the adhesive’s hardened, you’ll apply heat with a heat gun or steamer to soften it before scraping.
For large areas or tough residue, you’ll bring in power tools like a floor buffer, oscillating tool, or sander and use them carefully to avoid damaging the subfloor.
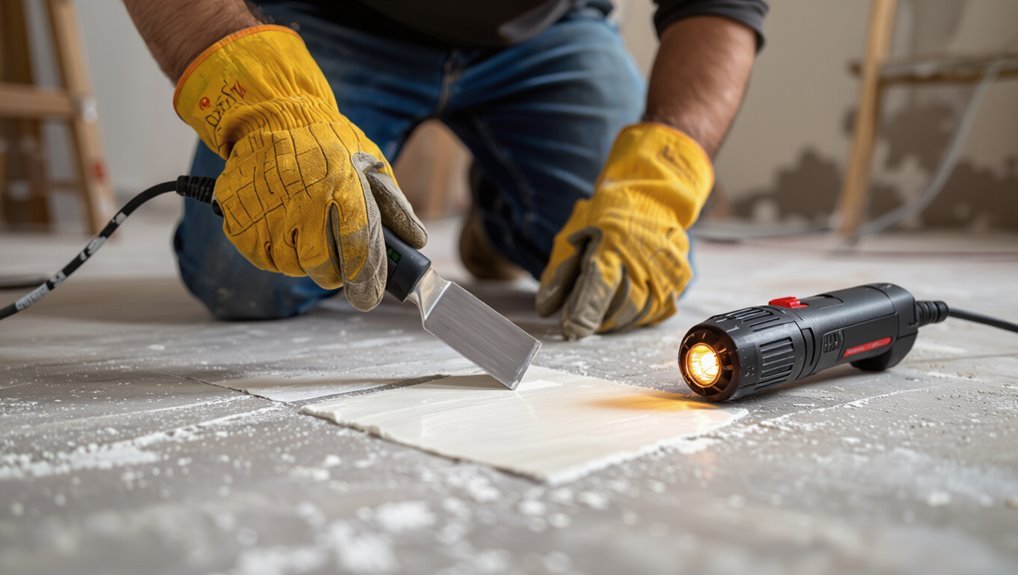
Using Scrapers and Manual Tools
Grab a sturdy floor scraper and get ready to tackle the adhesive mechanically—this method’s best when heat and solvents haven’t loosened the glue enough or when you’re dealing with small, stubborn patches.
Use a sharp razor or chisel at a low angle, apply steady pressure, and work in short strokes.
Keep blades fresh, protect the substrate, and clean residue with a stiff brush.
Using Heat (heat gun or steamer) to Soften Glue
If scraping doesn’t lift the adhesive cleanly, apply heat to soften the glue before you work.
Use a heat gun on low-medium, hold 6–8 inches away, and move constantly to avoid scorching.
For large areas or delicate surfaces, use a steamer.
Once softened, scrape gently with a putty knife.
Wipe residue with mineral spirits and ventilate the space while you work.
Using Power Tools (floor buffer, oscillating tool, sander) when and how
Step 3 brings power tools into play: a floor buffer, oscillating tool, or sander can speed removal of stubborn vinyl adhesive when scraping and heat haven’t done the job.
Wear PPE, test a small area, and choose the mildest tool first.
Use coarse grit or scraper attachments, work with steady passes, avoid gouging substrate, and vacuum debris frequently to prevent dust and heat buildup.
Step 4 Chemical Removal Methods
Now you’ll move on to chemical methods, starting with picking a solvent that matches the type of adhesive so you don’t damage the subfloor.
Follow manufacturer instructions and use proper PPE while applying adhesive remover, working in small sections and letting it sit just long enough to loosen the glue.
After removal, neutralize the area per product guidance and thoroughly clean any residue before refinishing or installing new flooring.
Choosing the Right Solvent for Adhesive Type
Because different adhesives respond to different chemicals, you should match the solvent to the glue type before you start applying anything. Identify residue: water-based, solvent-based, or pressure-sensitive. Pick appropriate remover: water/alkaline cleaners, acetone/methylene chloride alternatives, or citrus/adhesive removers. Test small area first.
| Glue Type | Solvent | Note |
|---|---|---|
| Water-based | Alkaline | Mild |
| Solvent-based | Acetone | Strong |
| Pressure-sensitive | Citrus | Gentle |
Applying Adhesive Remover Safely and Effectively
Start by ventilating the area and donning proper PPE—gloves, eye protection, and a respirator rated for organic vapors—so you’re protected before any chemicals touch the floor.
Test remover on a hidden spot, apply sparingly with a brush or rag, let dwell per instructions, and work small sections.
Agitate gently with a plastic scraper, reapply if needed, and dispose of contaminated materials safely.
Neutralizing and Cleaning Residue
After you’ve removed the bulk of the adhesive, neutralize and clean the residue to prevent lingering tackiness and chemical damage.
You’ll use a neutralizing solution, mild detergent rinse, and clean water to finish the job. Mix manufacturer-recommended neutralizer or diluted vinegar, apply, scrub gently with a soft brush, then rinse with mild detergent and plenty of water.
Dry thoroughly.
Step 5 Combination Approaches (heat + scraper, solvent + scraper)
Combining heat or solvent with a sturdy scraper speeds up stubborn vinyl glue removal by softening adhesive before you pry it away.
Use a heat gun or hair dryer on low, move constantly, then scrape with a rigid plastic or metal scraper at a shallow angle.
For solvent use, apply briefly, let it penetrate, then scrape.
Wipe residue and repeat as needed.
Step 6 Final Surface Preparation (sanding, etching, patching) for Re-flooring
Prepare the subfloor so your new flooring will sit flat and adhere properly: sand high spots, etch or clean concrete, and patch holes or gouges until the surface is smooth and level.
Remove dust, vacuum, and wipe with a tack cloth. Use appropriate primers or bonding agents for porous surfaces.
Let patches cure fully, recheck flatness, and follow manufacturer specs before installing new flooring.
Surface-Specific Guides and Tips
Different surfaces need different approaches, so you’ll want to adjust your tools and solvents for concrete, wood (finished or raw), tile and porcelain, laminate or vinyl subfloors, and even metal or appliances.
Start by identifying the substrate and testing a small, hidden spot before using stronger chemicals or scrapers.
Follow the surface-specific tips that match your floor to avoid damage and speed up cleanup.
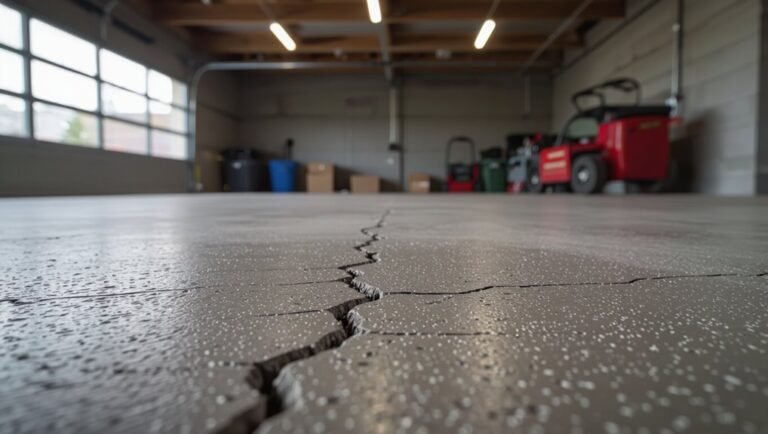
Removing Glue from Concrete Floors
When you’re tackling vinyl adhesive on concrete, start by evaluating the glue’s type and how firmly it’s bonded—water-based mastic will behave very differently from solvent-based adhesive or epoxy.
For thin residues, try hot water and a stiff brush or a floor scraper.
For stubborn or solvent-based glue, use a concrete-safe adhesive remover, follow PPE guidance, then neutralize and rinse thoroughly.
Removing Glue from Wood Floors (finished and unfinished)
Because wood (finished or unfinished) reacts to moisture and abrasion, you’ll choose methods that protect the surface while removing the adhesive.
Test a small area first. For finished floors, soften glue with a low-heat iron and scrape gently with a plastic scraper, then clean with a mild solvent safe for finishes.
For unfinished wood, use minimal solvent, blot, and sand lightly if needed.
Removing Glue from Tile and Porcelain
Shifting from wood to hard, impervious surfaces like tile and porcelain means you can use stronger solvents and mechanical methods without worrying about warping or finish damage.
Use a citrus or acetone-based adhesive remover, test grout edges first, apply, then scrape gently with a plastic or metal scraper.
For stubborn residue, heat with a hair dryer and repeat, then clean with a mild detergent.
Removing Glue from Laminate and Vinyl Subfloors
Tackle glue on laminate and vinyl subfloors with caution: these surfaces resist moisture and swelling, but their thin wear layer and welded seams can be damaged by harsh solvents or aggressive scraping.
Work slowly using a plastic scraper, gentle heat from a hairdryer, and a mild adhesive remover recommended for vinyl.
Test a hidden spot first, wipe residue with a damp cloth, and dry thoroughly.
Removing Glue from Metal and Appliances
Start by identifying the metal or appliance finish—stainless steel, painted metal, chrome, or enamel—and choose a method that won’t harm that surface.
Test solvent like isopropyl alcohol or adhesive remover in an inconspicuous spot. Gently scrape with plastic tools, apply solvent, wipe with microfiber, then rinse and dry.
For painted finishes, avoid harsh abrasives and strong solvents to prevent damage.
Eco-Friendly and Low-Toxicity Options
You can try natural solvents and simple homemade mixes—citrus-based cleaners, vinegar, and baking soda can soften some vinyl adhesives without harsh fumes.
These non-toxic methods are safer for indoor use and the environment, but they’re slower and less effective on heavy-duty glues.
Use eco-options first on small or sensitive areas, and switch to stronger commercial removers when adhesive won’t budge.
Natural Solvents and Homemade Remedies (citrus, vinegar, baking soda)
When you prefer low-toxicity methods, natural solvents like citrus oil, white vinegar, and baking soda can break down vinyl adhesive without harsh chemicals; they’re not always as fast as commercial removers, but they’re safer for indoor use and easier to dispose of.
- Apply citrus oil, let sit, scrub gently.
- Use diluted vinegar, blot and peel.
- Make a baking soda paste, rub, rinse.
Pros and Cons of Non-Toxic Methods
While non-toxic methods won’t always match the speed of commercial removers, they give you a safer, more eco-friendly way to tackle vinyl glue that’s kinder to indoor air and easier to dispose of; you’ll trade some time and elbow grease for lower chemical exposure, reduced odor, and fewer disposal concerns.
| Method | Pros | Cons |
|---|---|---|
| Citrus solvent | Low toxicity | Slower |
| Vinegar | Cheap, available | Less potent |
| Baking soda paste | Gentle | Labor-intensive |
When eco-options work and when stronger chemicals are needed
If your vinyl adhesive is old, thin, and only lightly tacky, eco-friendly options will usually do the job—citrus solvents, vinegar, or a baking soda paste can soften residue enough that you can scrape it away with a putty knife and some elbow grease;
but for thick, industrial adhesives or large areas you’ll likely need a stronger commercial stripper or a heat gun to avoid endless scrubbing.
Test first, wear gloves, ventilate.
Common Problems, Mistakes, and How to Avoid Them
When removing vinyl glue, you’ll want to avoid common mistakes that can damage the floor or harm you.
Don’t use excessive heat or harsh scrapers, pick solvents compatible with your subfloor, and always use proper ventilation and PPE.
If residue or stains persist, try targeted solvents, gentle scraping, and spot testing before treating the whole area.
Mistake: Using Excessive Heat or Aggressive Tools risks and prevention
Because it’s tempting to speed things up, you might crank up a heat gun or grab a metal scraper—moves that can easily damage subfloors, warp vinyl, or release toxic fumes.
Instead, work slowly with moderate heat, plastic scrapers, and a razor where safe. Test a small area first, wear protection, ventilate, and stop if the surface shows stress.
Mistake: Choosing the Wrong Solvent damage examples
Anyone can grab the first solvent they find, but choosing the wrong one can stain, soften, or permanently etch your subfloor and surrounding surfaces.
Test solvents on a hidden patch first: mineral spirits may darken plywood, acetone can dissolve vinyl-backed tiles, and citrus removers might lift finishes.
Pick a product labeled safe for your substrate and follow manufacturer directions to avoid irreversible damage.
Mistake: Inadequate Safety Measures ventilation and PPE guidance
If you skip proper ventilation and personal protective equipment, you’ll expose yourself to harmful fumes and chemical contact that can cause headaches, respiratory irritation, or skin burns.
Always work with windows open, fans blowing outward, and a respirator rated for organic vapors.
Wear chemical-resistant gloves, eye protection, and long sleeves.
Don’t eat, drink, or smoke near the work area to avoid contamination.
Troubleshooting Stubborn Residue and Stains
When glue won’t budge or leaves dark stains, you’ll need targeted troubleshooting rather than brute force — different adhesives and surfaces demand different approaches.
Test solvents on an inconspicuous spot. Use a scraper at low angle, heat for softening, or solvent-specific products for rubbery or epoxy residues.
Blot stains, don’t rub. If damage appears, stop and consult a pro to avoid permanent surface harm.
Prevention and Best Practices for Future Flooring Jobs
When you install or remove flooring, think ahead to minimize adhesive residue by using recommended primers, release agents, or low-residue adhesives.
Follow installation best practices—proper trowel size, even adhesive spread, and clear manufacturer instructions—to make future removal quicker and cleaner.
Dispose of leftover adhesive and contaminated rags per local hazardous-waste rules to protect yourself and the environment.
How to Avoid Adhesive Residue When Removing Vinyl
Plan ahead to prevent stubborn adhesive residue by choosing the right materials, using proper installation techniques, and preparing the subfloor before laying vinyl.
When removing vinyl, work slowly with a heat gun or adhesive solvent approved for your floor, scrape at shallow angles, and clean frequently with recommended cleaners.
Test solvents in an inconspicuous area and ventilate well to protect finishes and health.
Best Practices for Installing Flooring to Make Future Removal Easier
If you want future removal to go smoothly, install flooring with removable-friendly choices and techniques from the start: use low-VOC, releasable adhesives or click-lock systems, lay a proper underlayment that protects the subfloor, and keep detailed records of materials and layout for later reference.
Mark seams and junctions, avoid permanent glue when possible, and document fastening methods so you or contractors can remove materials with minimal damage.
Proper Disposal of Adhesive Waste and Rags
You’ve reduced future headaches by choosing removable-friendly materials and documenting your installation; now think about how you’ll handle the leftover adhesive and contaminated rags to protect health and the environment.
Follow these steps:
- Seal wet adhesive and rags in metal or labeled hazardous bags.
- Use approved disposal sites or hazardous-waste pickups.
- Replace rags with reusable, launderable options to cut waste.
Cost, Time Estimates, and When to Hire a Pro
Expect time to vary by surface and method—scraping a plywood subfloor might take a few hours, while glued vinyl on concrete can take days with chemicals or grinding.
DIY supply costs are usually a few dozen to a few hundred dollars, whereas hiring a pro can run several hundred to over a thousand depending on square footage and prep needs.
If the glue’s stubborn, the area is large, or you lack the right tools and ventilation, you should hire a professional.
Typical Timeframe by Surface and Method
While removal times vary by surface and method, most DIY jobs on small areas take a few hours to a couple of days. Larger rooms or stubborn glue can stretch the process to several days or a weekend.
Expect 1–3 hours for smooth tile, half a day to a day for concrete with solvents, and a day to several days for porous wood or layered adhesive.
Hire pros for persistent, safety‑risk jobs.
Cost Range: DIY Supplies vs. Professional Service
Breaking the job into DIY supplies versus professional service helps you budget realistically: a typical DIY kit (scrapers, adhesive remover, pads, PPE) runs $30–$200 depending on tool rentals, while hiring pros usually costs $2–$6 per square foot for labor and disposal—often more for stubborn adhesive or tricky substrates.
So small rooms can be $100–$500 DIY or $300–$1,200 pro.
Allocate time: DIY weekends, pros finish faster.
Signs You Should Hire a Professional
Need help deciding whether to DIY or call a pro?
If the glue covers large areas, involves hazardous adhesives, or sits on delicate surfaces, hire a pro. They’ll quote costs and time—typically a half-day to full-day plus labor—so weigh that against your schedule and comfort.
Call a professional when removal risks damage, requires special tools, or you lack time or confidence.
Frequently Asked Questions (FAQ)
You probably have quick questions before you start, like whether you can remove vinyl glue without chemicals or if adhesive removers will harm your subfloor.
You’ll also want to know how to clean adhesive from a new wood floor, whether a heat gun is safe on your surface, and how to dispose of used remover and contaminated rags.
Read on for clear, practical answers to each concern.
Can I remove vinyl glue without chemicals?
Although some adhesives are stubborn, you can often remove vinyl floor glue without harsh chemicals by using heat, scraping, and mechanical abrasion; these methods work best on water-based or older adhesive residues.
Apply a heat gun or iron with a cloth to soften glue, scrape with a floor scraper or putty knife, then sand or use a stiff brush for residue.
Clean with warm soapy water.
Will adhesive removers damage my subfloor?
If you pick the right remover and follow the instructions, adhesive solvents won’t usually harm common subfloors like plywood, concrete, or OSB; however, strong solvents, prolonged contact, or aggressive scraping can soften, discolor, or warp some materials.
Test a small, hidden area first, use recommended dwell times, ventilate, and wipe residue promptly.
For delicate substrates, choose water-based or citrus removers.
How do I remove adhesive from a newly installed wood floor?
Wondering how to get fresh adhesive off a newly installed wood floor? Act quickly: blot excess with a clean cloth.
Then use a damp cloth and mild dish soap to lift residue. For stubborn spots, apply a small amount of citrus-based adhesive remover on a cloth.
Test in an inconspicuous area, gently rub, and wipe clean.
Dry thoroughly to prevent moisture damage.
Is it safe to use a heat gun on all surfaces?
Can you safely use a heat gun on any surface? No—heat guns can damage vinyl, laminate, engineered wood, plastics, and some finishes.
Test a hidden spot, keep the gun moving, use lower settings, and hold it several inches away.
Use heat-resistant gloves and eye protection.
For delicate or unknown materials, choose chemical removers or mechanical methods instead of heat.
How should I dispose of used adhesive remover and contaminated rags?
After you finish using heat or chemicals to remove glue, plan for safe disposal of leftover adhesive remover and any contaminated rags.
Check local hazardous waste rules; many solvents are household hazardous waste.
Store rags in a metal container with a tight lid to prevent unintentional combustion.
Don’t pour solvents down drains.
Take materials to a designated disposal site or follow municipal pickup guidelines.