How to Install Vinyl Sheet Flooring Without Bubbles or Seams
You can install vinyl sheet flooring without bubbles or visible seams by thoroughly prepping a flat, dry subfloor, acclimating sheets for 24–48 hours, and dry-fitting them to align patterns and seams. Use the manufacturer-recommended adhesive—wet-set for full bond or pressure-sensitive for repositioning—apply it evenly, then lay and roll the sheet firmly with a flooring roller to expel air. Heat-weld or seam-tape joins and trim precisely for a seamless look; keep going to learn step-by-step tips.
Can You Install Vinyl Sheet Flooring Without Bubbles or Seams?
Yes—you can install vinyl sheet flooring without bubbles or visible seams if you follow proper surface prep and seam techniques.
Use a smooth, clean subfloor, apply adhesive evenly, and roll seams with a seam roller for tight joins.
With careful measuring and tension during installation, you’ll get a flat, seamless-looking finish.
Direct, concise recommendation and expected results
You can install vinyl sheet flooring with minimal bubbles and nearly invisible seams if you prepare the subfloor properly, use the right adhesive and tools, and work methodically—expect a smooth, professional-looking surface when you follow manufacturer recommendations, control temperature and humidity, and take time to squeegee out air as you lay the sheet.
Follow steps:
- Clean and level
- Choose adhesive
- Roll and squeegee
- Trim and seam-weld
Mastering how to vinyl sheet flooring yields durable, seamless results.
Basic Understanding What Vinyl Sheet Flooring Is and Why Bubbles/Seams Happen
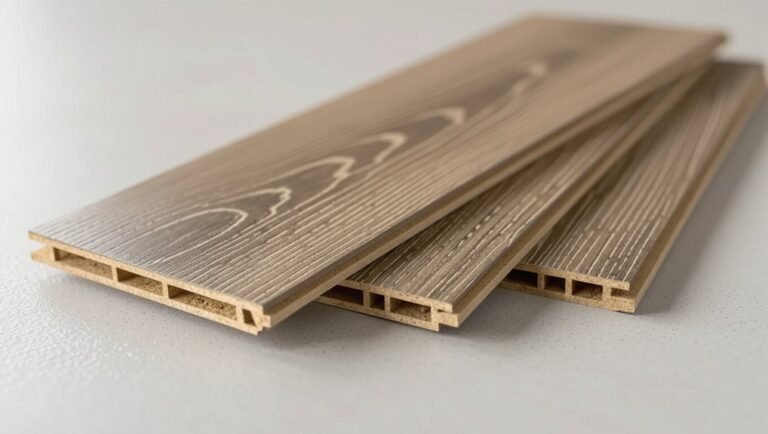
Vinyl sheet flooring is a flexible sheet made of PVC or layered composites available in cushioned, fiberglass-reinforced, and luxury vinyl varieties. You’ll want to pick the type that suits traffic and subfloor conditions.
Bubbles, wrinkles, and visible seams usually come from trapped air, moisture, temperature changes, poor adhesive choice, or mistakes in cutting and seaming.
Your subfloor preparation, room temperature during installation, adhesive method, and careful technique all directly affect whether the floor lays flat and seams stay invisible.
What is vinyl sheet flooring (materials and common types)
Flooring made from flexible, layered plastic sheets combines durability and affordability, and it comes in several common types you’ll want to know before installing.
You’ll find homogeneous (single-layer, uniform wear), heterogeneous (printed design with wear layer), cushioned vinyl (foam-backed for comfort), and luxury vinyl sheet (thicker, realistic textures).
Materials include PVC, plasticizers, and protective wear layers tailored for traffic and moisture resistance.
Common causes of bubbles, wrinkles, and visible seams
Because sheet materials expand, shift, and react to their environment, bubbles, wrinkles, and visible seams usually trace back to a few predictable issues you’ll want to check first.
You’ll often find problems from trapped air during smoothing, improperly trimmed or overlapped edges, contamination like dust or debris, moisture beneath the sheet, or movement from heavy traffic and furniture stressing seams.
How subfloor, temperature, adhesive, and installation technique affect results
When the subfloor, room temperature, adhesive choice, and your installation technique don’t work together, you’ll see problems like bubbles, wrinkles, and visible seams.
You must prep a smooth, dry subfloor, acclimate vinyl to room conditions, pick adhesive suited to substrate and climate, and use proper smoothing, stretching, and seam rolling.
Small shortcuts cause lasting defects; follow each step precisely.
Tools, Materials, and Preparations You Need
Before you start, gather the essential tools—a straightedge and utility knife for cuts, a flooring roller for smoothing, and seam sealer for finishing joins.
Pick the right materials too: adhesive, seam tape, primer, and any underlayment suited to your subfloor.
Don’t forget safety gear and a cleared, well-ventilated workspace so you can work accurately and safely.
Required tools (cutting tools, rollers, seam sealer, etc.)
Tools matter: you’ll need a few cutting implements (a utility knife with sharp blades, a straightedge or T-square, and heavy-duty shears), a 100–150 lb flooring roller, seam sealer and applicator, a knee pad or knee kicker, a pry bar and hammer for removing trim, a tape measure and chalk line, a notched trowel if using adhesive, and cleaning supplies to prep the subfloor.
- Measure precisely
- Cut cleanly
- Roll thoroughly
- Seal seams tightly
Recommended materials (adhesives, seam tape, primers, underlayment options)
Although your tools get the work done, the right materials make the installation last: choose an adhesive formulated for vinyl sheet (pressure-sensitive or full-spread as recommended by the manufacturer), quality seam tape and sealer sized for your vinyl type, a primer for porous or challenging subfloors, and an underlayment that matches your subfloor and traffic needs (foam for comfort, cork for sound, or an approved plywood/underlayment for leveling).
Use manufacturer-approved products, buy extra seam tape, allow proper cure times, and match VOC and moisture specifications to avoid failures.
Safety equipment and workspace setup
A few basic safety items and a well-organized workspace will keep your vinyl sheet installation efficient and accident-free: Guarantee good lighting, ventilation, and clear floor space.
Wear gloves, knee pads, eye protection, and a dust mask. Keep tools organized and cords out of the way.
Follow these essentials:
- Gloves
- Knee pads
- Eye protection
- Dust mask
Pre-Installation Steps Preparing the Subfloor for a Bubble-Free, Seamless Look
Before you lay any vinyl, inspect and repair the subfloor—level high spots, patch low areas, and test for moisture so you won’t trap problems under the sheet.
Clean and prime the surface for proper adhesion, then acclimate the vinyl and stabilize room temperature to prevent shrinkage or bubbles.
Finally, measure and plan the sheet layout to minimize seams and guarantee a smooth, continuous look.
Inspecting and repairing subfloor (leveling, patching, moisture testing)
When you’re preparing to lay vinyl sheet flooring, thoroughly inspect and repair the subfloor so the finished surface stays flat, bonded, and free of bumps or bubbles.
Check for uneven areas, loose boards, or gaps; sand high spots and use a leveling compound for dips.
Patch cracks and nail or screw down squeaky sections.
Test moisture with a meter and address excess before installing.
Cleaning and priming the surface for adhesion
Start by removing all dust, dirt, grease, and loose debris so the adhesive can bond evenly to the subfloor.
Sweep, vacuum, and degrease stubborn spots with manufacturer-approved cleaner. Allow drying, then sand glossy areas and vacuum again.
Apply a compatible primer per instructions, using a roller for uniform coverage.
Let primer cure fully before laying vinyl to guarantee strong, even adhesion and prevent bubbles.
Acclimating the vinyl sheet and controlling room temperature
After the primer has cured, let the vinyl sheet sit in the room where it will be installed for at least 24–48 hours so it can relax to the same temperature and humidity as the space.
Keep heating or cooling steady—avoid large swings. Maintain 65–85°F and moderate humidity.
Check seams for waviness before adhering; if sheet feels tight or curled, extend acclimation until it lies flat.
Measuring and planning sheet layout to minimize seams
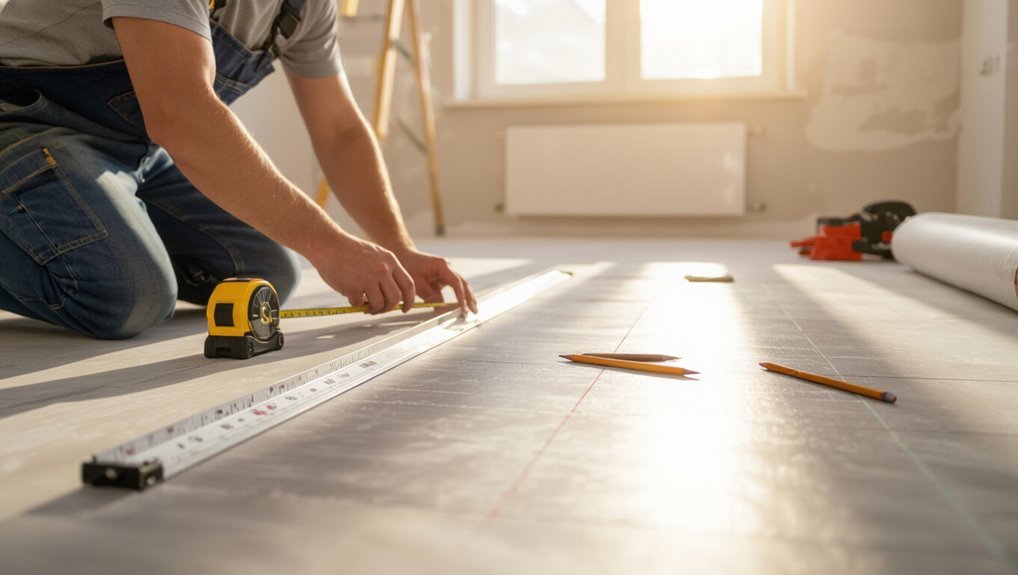
A careful layout will save you time and help hide seams, so measure the room and vinyl precisely before cutting.
Map seam locations to fall in low-traffic areas and across doorways when possible. Allow extra material for trimming, align patterns and directional grain, and plan joins toward the longest run.
Mark cut lines and test-fit sheets dry before adhesive application.
Step-by-Step Installation Process
Now you’ll follow a precise step-by-step installation process that starts with dry-fitting the sheet, marking layout lines, and cutting the vinyl so seams match.
Next you’ll choose and apply the correct adhesive (noting open time and trowel size or whether to use pressure-sensitive glue), then position the sheet and smooth it with a roller to remove air.
Finally you’ll create invisible joints by hot-welding or using seam tape, depending on the job and your equipment.
Step 1 Dry-fit and mark layout lines
Dry-fit the vinyl sheets across the room to check patterns, seams, and how pieces meet walls and doorways before you cut or glue anything.
Walk the layout, smooth wrinkles, and align seams with least visibility.
Use a chalk line to mark reference lines from center or main focal points.
Note obstacle locations and trim allowances so installation proceeds accurately and confidently.
Step 2 Cutting the sheet accurately and allowing seams to match
Measure carefully and cut with steady hands so seams meet cleanly and patterns align across the room.
Transfer layout lines to the sheet, allow 3–4 inches extra for trimming, and score with a sharp utility knife using a straightedge.
When joining two pieces, butt edges tightly or use a paper seam iron technique to guarantee pattern continuity.
Trim after dry-fitting for a precise final fit.
Step 3 Applying adhesive: open time, trowel size, and wet vs pressure-sensitive methods
Once your sheet is trimmed and dry-fitted, it’s time to spread adhesive—pick the right open time and trowel size for the product and subfloor so the sheet bonds evenly.
Check manufacturer specs for open time, temperature, and trowel notch.
Use wet-set for full adhesion or pressure-sensitive for repositioning.
Apply adhesive evenly, avoid puddles, and work within the recommended working time.
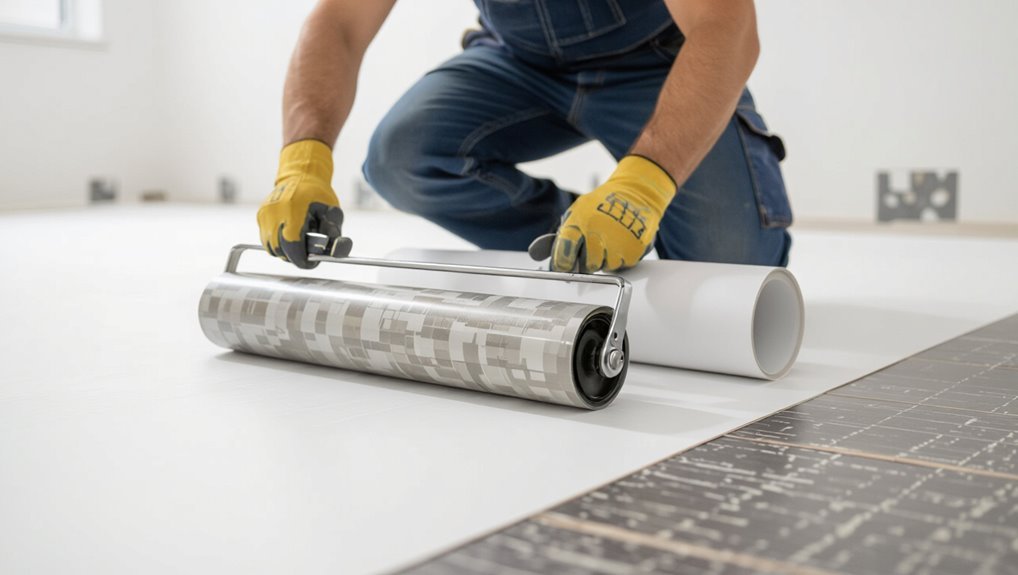
Step 4 Positioning the sheet and smoothing to remove air (technique with roller)
Lift the sheet carefully and lay it into the adhesive, aligning seams and edges as you go so it sits exactly where you planned.
Starting from the center, roll outward with a 50–100 lb flooring roller, using overlapping passes. Keep steady pressure, pause to lift and reposition any trapped air, and trim excess.
Work methodically to guarantee full contact and a smooth, bubble-free surface.
Step 5 Creating and welding seams for invisible joints (hot-welding vs seam tape)
Before you join the sheets, plan your seam layout and choose a method—hot-welding or seam tape—based on traffic, moisture exposure, and the manufacturer’s recommendations.
For hot-welding, trim a uniform groove, use the correct nozzle and rod, and practice steady speed for a flush bead.
For seam tape, align edges tightly, apply adhesive tape beneath, heat-activate if required, and roll firmly for a discreet, durable joint.
Step 6 Trimming edges, finishing transitions, and cove molding
After you finish seams, you’ll move on to trimming edges, finishing thresholds, and installing cove molding to give the floor a clean, professional look.
Trim excess vinyl with a sharp knife against a straightedge, leaving a hairline gap for expansion.
Fit junction strips at doorways, secure them per manufacturer instructions, and install cove base molding, nailing or adhesive-setting it snugly for a sealed perimeter.
Step 7 Rolling and final adhesion checks after installation
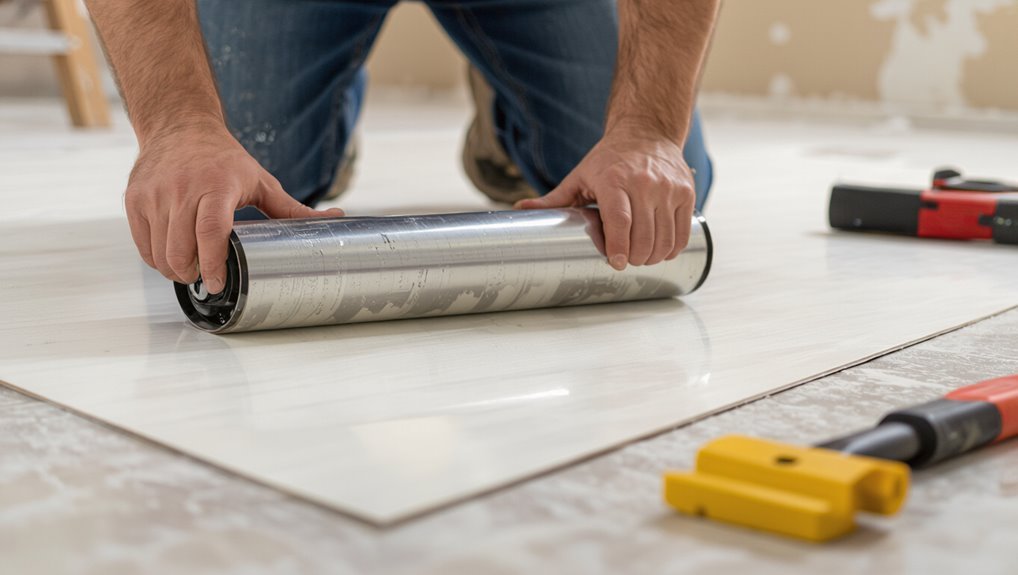
Grab a 100-pound (45 kg) flooring roller and roll the entire vinyl surface in overlapping passes to press the sheet into the adhesive and expel trapped air.
After rolling, inspect seams and edges for lift or gaps. Spot-roll any lifted areas, add adhesive where needed, and smooth bubbles with a needle for tiny blisters.
Re-roll and clean residue for a secure, finished floor.
Seam Techniques Compared
When you join sheets, you’ll choose between heat-welding for a nearly invisible, water-tight seam or seam tape/adhesive for a quicker, lower-cost fix.
Heat-welding is best for high-moisture areas and long runs but usually requires a professional tool and skill, while tape or adhesive works well for small rooms or DIY installs.
We’ll compare pros, ideal uses, and when it’s worth hiring a pro versus doing it yourself.
Heat-welding seam method (advantages, when to use)
If you need the most watertight, durable seam for commercial or wet-area installations, heat-welding is the method to choose: it fuses vinyl sheets together so the joint becomes as strong and water-resistant as the surrounding floor.
You’ll use a hot-air gun or welding rod to melt the factory groove, creating a continuous bond. It’s ideal where longevity and moisture resistance matter most.
Seam tape and adhesive seam method (advantages, when to use)
For many residential and light-commercial jobs, seam tape and adhesive seams give you a quick, reliable way to join vinyl sheets without specialized heat-welding tools.
You’ll use pressure-sensitive tape or solvent-based adhesive to bond edges, keeping seams low-profile and water-resistant.
Choose this when traffic is moderate, budget or access limits welding, and seams aren’t exposed to heavy rolling loads or constant moisture.
Professional vs DIY considerations for seams
Although both pros and confident DIYers can produce tight, durable seams, their approaches and risk tolerances differ markedly. You’ll weigh tool access, time, cost, and finish expectations. Pros use hot welding and precise seams; DIYers often use seam tape or adhesive and practice on scraps.
| Skill | Tool Needs | Cost |
|---|---|---|
| Pro | Hot welder | High |
| DIY | Tape/adhesive | Low |
| Hybrid | Rent tools | Medium |
Troubleshooting Common Problems and How to Fix Them
You’ll run into a few predictable issues—small bubbles or blisters, wrinkles and large air pockets, visible or gapped seams, and occasional adhesion failures or edge lifting.
For each, you can follow specific diagnostic steps to identify the cause and targeted repairs like puncturing and re-rolling bubbles, re-stretching or heating wrinkles, reseaming and reapplying adhesive, or cleaning and re-bonding lifted edges.
Start by evaluating the size and location of the problem so you can pick the right fix and avoid making it worse.
Small bubbles and blisters causes and repairs
Leaning on poor adhesion, trapped moisture, or temperature shifts, small bubbles and blisters in vinyl sheet flooring usually show up within days or weeks of installation and can grow if you don’t address them.
Press flat with a roller, or inject a tiny amount of adhesive under the blister then roll.
For moisture issues, dry subfloor and replace affected vinyl if adhesive failed.
Wrinkles and large air pockets corrective steps
Smooth out wrinkles and large air pockets in vinyl sheet flooring as soon as you spot them to prevent tearing, uneven wear, and trip hazards.
Peel back the sheet to the wrinkle, apply adhesive evenly, and press the vinyl down while smoothing outward with a roller.
For large pockets, cut a small relief slit, release trapped air, then glue and roll to secure.
Visible or gapped seams repair and reseaming strategies
Fix visible or gapped seams as soon as you notice them to keep your floor watertight and looking professional.
Clean the seam, remove debris, and dry thoroughly. Use a seam sealer or vinyl adhesive beneath edges, press joints together, and roll firmly.
For larger gaps, trim and reseam with overlap or replace the affected section. Wipe excess glue and let cure fully.
Adhesion failures and edge lifting remediation
After sealing seams, watch for spots where the vinyl starts to lift at edges or won’t stick down at all—adhesion failures are a common follow-up issue and can let moisture and dirt under the sheet.
You should:
- Clean substrate and remove old adhesive.
- Re-prime with compatible primer.
- Apply pressure-sensitive adhesive evenly.
- Roll edges and trim excess; allow full cure before traffic.
Mistakes to Avoid During Installation
Don’t skip subfloor prep or moisture testing, since trapped moisture or uneven surfaces will ruin the install.
Make sure you use the correct adhesive and apply it the right way, and don’t rush layout, cutting, or acclimation.
Pay careful attention to seam technique and roll seams thoroughly to avoid gaps and future failures.
Skipping subfloor prep or moisture testing
If you skip proper subfloor prep or skip moisture testing, you’ll likely face bubbling, warping, or adhesive failure down the line—problems that can ruin a new vinyl sheet floor and force costly repairs.
Always clean, level, and repair the substrate, remove old adhesives, and test moisture with a reliable meter.
Address any dampness or unevenness before laying the sheet to guarantee lasting results.
Using wrong adhesive or incorrect application technique
When you pick the wrong adhesive or apply it improperly, the vinyl won’t bond correctly and you’ll see lifting, bubbles, or seams that open up.
Check manufacturer recommendations for adhesive type and trowel size. Apply evenly, following open time and flash-off instructions.
Avoid overworking the glue or leaving dry spots. Test a small area first to confirm adhesion before completing the room.
Rushing layout/cutting or improper acclimation
Because vinyl needs time to settle and careful cuts, rushing the layout or skipping acclimation creates problems you’ll see later: warped seams, gaps at walls, and panels that don’t lie flat.
Take time to unroll and let the sheet rest in the room for at least 24–48 hours, measure twice, cut once, and trim gradually.
Patience prevents costly rework.
Poor seam technique or inadequate rolling
Often installers underestimate how much proper seam work and rolling affect a vinyl floor’s appearance and durability.
You need to align seams precisely, trim excess, and use the right seam sealer. After adhesive sets, roll seams firmly with a weighted flooring roller to expel air and guarantee bond.
If you skip careful rolling or rush seams, you’ll get gaps, lifting, and visible lines.
Best Practices and Pro Tips for a Professional Finish
To get a professional finish, you’ll want to control temperature and humidity and time your work so adhesives set properly.
Use correct tool techniques — consistent rolling pressure, clean bevel trims, and proper hot-welding or seam-sealing methods — to prevent bubbles and visible seams.
If the job looks complex, know when to hire a pro and ask about their vinyl experience, warranties, and examples of similar installations.
Optimal environmental conditions and timing
While you’ll want to lay vinyl when temperatures are steady, aim for a room temperature between 65–85°F (18–29°C) and relative humidity of 40–60% for best results; this range lets the vinyl relax, adhesives cure correctly, and seams settle without gaps or buckling.
Schedule installation after HVAC has been running 48 hours, acclimate rolled material 24–48 hours, and avoid drafts or direct sunlight during curing.
Tool techniques (proper rolling pressure, bevel trimming, welding tips)
Start by mastering the tools—your roller, bevel trimmer, and heat welder will determine whether seams disappear or stand out.
Use steady, even pressure with a 100–150 lb floor roller to seat adhesive and expel air.
Trim bevels flush for tight joints, then weld with consistent heat and speed.
Cool and roll welded seams to fuse and flatten.
When to hire a pro and what to ask them
If the seams still look uneven after you’ve rolled, trimmed, and welded—or if your room has complex cuts, stairs, or multiple door thresholds—it’s smart to call a pro.
You’ll want clear answers about timeline, warranty, prep, and costs. Ask for references, examples of similar jobs, written estimates, and warranty terms.
- References
- Written estimate
- Previous work photos
- Warranty details
Cost, Timeframe, and When to Choose Alternatives
You’ll usually spend more on labor than materials for a vinyl sheet install, though affordable sheets and adhesive keep total costs lower than many alternatives. A typical room can be done in a day or two.
Consider vinyl sheet when you need a water-resistant, seamless surface on a budget or for large, simple rooms; choose luxury vinyl planks or tiles if you want a more realistic wood or tile appearance, easier repairs, or a higher-end look.
In the next section we’ll break down typical material vs. labor costs and time estimates so you can compare options.
Typical cost breakdown (materials vs labor) and time estimates
Expect to spend roughly 30–60% of the total on materials and the rest on labor, though exact numbers depend on product grade, room complexity, and local rates.
For a typical 200–300 sq ft room, budget $3–8/sq ft materials and $2–6/sq ft labor; total install usually takes 1–2 days for prep and 1 day for installation.
Plan extra for repairs.
When vinyl sheet is the right choice vs luxury vinyl planks or tiles
With materials and labor usually making up different portions of the total, weigh cost and installation time when choosing between vinyl sheet and luxury vinyl planks or tiles. You’ll pick sheet for large rooms, quick installs, and lower material cost; choose planks or tiles for realism and easier repairs.
| Feature | Vinyl Sheet | LV Planks/Tiles |
|---|---|---|
| Cost | Low | Higher |
| Install speed | Fast | Slower |
| Repair | Harder | Easier |
| Appearance | Simple | Realistic |
FAQ Frequently Asked Questions
You’ll find answers here to common concerns like how long to wait before using the floor, whether you can install over existing flooring, and when seams will show.
I’ll also explain seam welding lifespan, how to prevent bubbles in humid or cold conditions, and when a bubble can be repaired without replacing the whole sheet.
Use these FAQs to decide the best approach for your project and troubleshoot issues quickly.
How long should I wait before using the floor after installation?
A newly installed vinyl sheet floor typically needs 24 to 48 hours before you walk on it.
Wait at least that long for adhesive to set and seams to bond.
Keep traffic light for a full 72 hours if heavy furniture or appliances will be moved back.
Avoid wet cleaning for a week and follow manufacturer guidelines for temperature and curing to guarantee lasting results.
Can I install vinyl sheet flooring over existing vinyl or other floors?
If your new vinyl sheet just finished curing, you might be tempted to lay another layer right away, but installing vinyl over existing flooring requires care.
You can install over sound, level vinyl, linoleum, or plywood if you remove loose trim, repair damage, and clean thoroughly.
Don’t install over cushioned backing, thick adhesive residue, or water-damaged substrates; those need removal or remediation first.
Will seams always be visible, and how long do welded seams last?
Wondering whether seams will show? You’ll often see a faint line where sheets meet, but proper seam matching, tight cutting, and heat welding make seams nearly invisible.
Welded seams last many years—commonly 10–25 years—depending on traffic and maintenance. With correct installation and seam adhesive or weld, seams stay stable and water-resistant, minimizing lifting or visible gaps over time.
How do I prevent bubbles if I must install in a humid or cold environment?
Because moisture and low temperatures make adhesives cure slowly and trap air, you’ll need to control the environment and your technique to prevent bubbles when installing vinyl sheet flooring in humid or cold conditions.
Work only when room and subfloor temps meet manufacturer specs, use moisture barriers, acclimate the sheet, apply adhesive evenly, roll firmly with a weighted roller, and allow extended cure time before traffic.
Can I repair a bubble without replacing the entire sheet?
A small bubble doesn’t mean you have to replace the whole sheet—many can be fixed with a few simple steps.
Pop the bubble with a tiny pin, press air toward the cut, and apply vinyl adhesive under the lifted area with a syringe or thin nozzle.
Smooth with a roller, wipe excess, and weight the spot until cured.
Larger bubbles may need patching.
Quick Checklist Before You Start
Before you begin, make a quick checklist of materials, confirm your measurements, and check the room conditions.
You’ll need the vinyl sheet, adhesive, trim, and proper tools on hand.
Make sure the subfloor is clean, dry, and at the right temperature for installation.
Pre-installation checklist (materials, measurements, environment)
1 quick checklist will save you time and prevent costly mistakes: gather your materials, confirm measurements, and assess the room environment before you lay any vinyl sheet.
Check inventory, room prep, and conditions so installation’s smooth. Follow this four-point guide:
- Vinyl sheet + adhesive
- Tape measure, straightedge, utility knife
- Clean, dry, level subfloor
- Temp 60–85°F, humidity moderate