What Goes Under Laminate Flooring? Underlayment Options Explained
You should always install underlayment beneath laminate flooring—usually foam, cork, felt, rubber, or a combo with a vapor barrier—based on your subfloor and moisture risk. It cushions and evens minor imperfections, cuts impact and airborne noise, and allows the floating floor to expand. Use a 6‑mil polyethylene barrier over concrete or damp areas. Pick denser or sound‑rated pads for heavy traffic or multi‑story installs, and check manufacturer specs for warranty. Keep going to learn which option fits your room.
What Goes Under Laminate Flooring Quick Answer
The quick answer: you’ll usually put a foam or cork underlayment under laminate.
Which type you choose depends on your subfloor (plywood, concrete), moisture levels (vapour barrier needed on concrete), and sound or cushioning preferences.
Pick the right one for those conditions and your floor will perform better.
One-sentence direct answer
If you’re installing laminate, put a moisture barrier (if needed for concrete) and a cushioning underlayment—usually foam or cork—under the planks to protect against dampness, reduce noise, and even out minor subfloor imperfections.
In short: what goes under laminate flooring is a thin moisture membrane where required plus a foam or cork underlayment to cushion, soundproof, and level the floor.
When the quick answer varies (subfloors, moisture concerns, sound)
Because your subfloor type, moisture risk, and sound needs differ, what you put under laminate changes too: choose foam for basic cushioning over plywood, moisture-resistant underlayment with a vapor barrier for concrete, and dense cork or rubber if you need better sound reduction.
Match thickness and compressibility to your laminate’s tolerance, and always follow manufacturer and installation guidelines for best performance.
Basic Understanding Why Underlayment Matters
You’ll want underlayment because it protects your laminate from moisture, cushions the surface, reduces noise, and evens out minor subfloor imperfections.
Laminate interacts with both the underlayment and subfloor as a floating system, so the right pad affects stability and wear.
Whether your subfloor is plywood, OSB, concrete, or existing vinyl will help determine which underlayment performs best.
Functions of underlayment (moisture barrier, cushioning, sound reduction, level compensation)
While it’s easy to focus on the boards themselves, the underlayment plays four essential roles that keep your laminate floor performing and feeling right: it blocks moisture, cushions foot traffic, reduces noise, and evens out minor subfloor imperfections.
You’ll choose based on your space and priorities.
- Moisture barrier: protects from dampness
- Cushioning: softens steps
- Sound reduction: cuts impact/airborne noise
- Level compensation: hides small bumps
How laminate flooring interacts with subfloor and underlayment
When your laminate floor sits on top of a subfloor, the underlayment becomes the mediator that keeps both layers working together; it lets the floating planks expand and contract, cushions foot traffic, and shields the laminate from moisture rising through the subfloor.
You’ll rely on proper underlayment to stabilize seams, reduce noise, improve comfort, and prevent minor subfloor imperfections from telegraphing through the laminate.
Common subfloor types (plywood, OSB, concrete, existing vinyl)
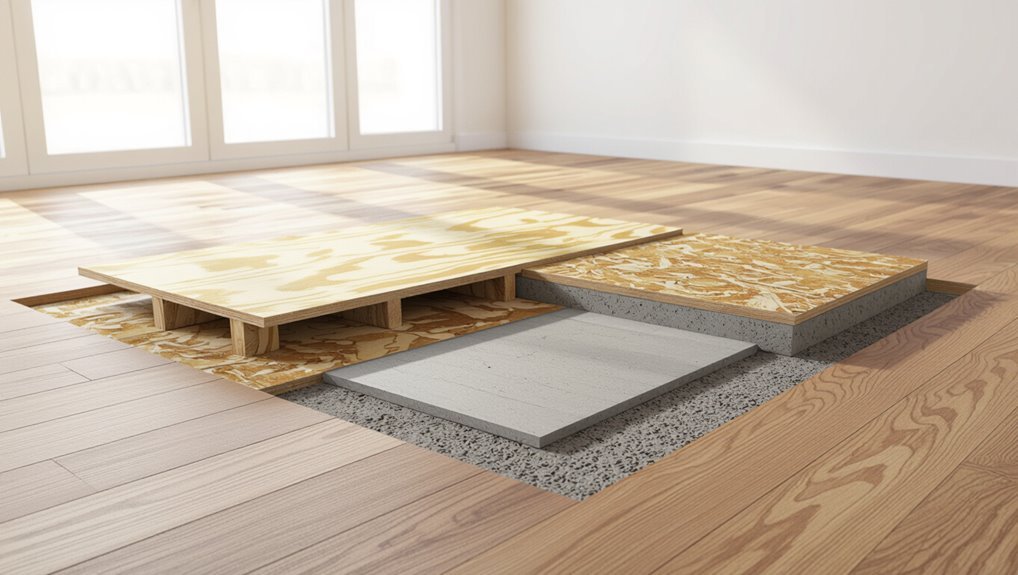
Different subfloor materials—plywood, OSB, concrete, and existing vinyl—each demand specific underlayment choices because they affect moisture, flatness, and fastening.
You’ll choose based on rigidity, moisture risk, and whether you need sound or vapor control. Match underlayment to substrate for longevity and warranty compliance.
- Plywood: stable, minimal vapor barrier
- OSB: needs moisture protection
- Concrete: requires vapor barrier
- Vinyl: level and compatible underlayment
Underlayment Options Explained (Primary Comparison)
Now you’ll compare common underlayment types so you can pick what suits your floor and budget.
I’ll cover foam (standard), felt, cork, rubber, and combination options with built-in vapor barriers, noting their features and ideal uses.
Use this comparison to match sound control, moisture protection, and cushioning to your project.
Foam underlayment (standard) features and best uses
Foam underlayment is the most common, budget-friendly base for laminate floors, and it gives you basic cushioning, minor sound reduction, and moisture protection in one lightweight roll or pad.
You’ll find it easy to install, compatible with most click-lock planks, and ideal for level subfloors and low-traffic rooms.
Choose closed-cell foam if moisture is a concern.
Felt underlayment features and best uses
While felt underlayment costs a bit more than basic foam, it delivers superior sound deadening, added thermal insulation, and a durable cushion that stands up to heavier foot traffic.
You’ll often see it recommended for bedrooms, living areas, and multi-story installations where noise control matters.
You’ll appreciate its moisture-resistant options, compatibility with most laminate types, and improved longevity—ideal when you want quieter, warmer floors.
Cork underlayment features and best uses
Cork underlayment combines natural resilience and eco-friendly appeal, giving you excellent sound absorption, moderate thermal insulation, and a stable cushion that resists mold and mildew without chemical treatments.
You’ll find it ideal for living areas, bedrooms, and multi-story homes where noise reduction matters.
It’s compatible with most laminate planks, easy to cut and install, and provides long-lasting, low-maintenance performance.
Rubber underlayment features and best uses
Durability sets rubber underlayment apart: it delivers dense, long-lasting support that dampens impact noise, resists moisture, and stands up to heavy use.
You’ll appreciate its superior sound isolation and cushioning under laminate in high-traffic rooms.
It’s ideal over uneven subfloors, around appliances, and in basements.
Install it where you need resilience and noise reduction without adding bulk or sacrificing stability.
Combination underlayments with built-in vapor barrier features and best uses
Rubber underlayment shines where durability and sound control matter, but sometimes you also need moisture protection—this is where combination underlayments with built-in vapor barriers come in.
You’ll get cushioning, improved acoustics, and a factory-applied moisture layer that speeds installation and reduces seams.
Use them over concrete or in basements where moderate vapor resistance is needed, avoiding situations that require full polyethylene sheeting.
Vapor/moisture barriers (polyethylene sheeting) when required
When you’re installing laminate over concrete or in a damp basement, you’ll often need a dedicated vapor barrier—usually 6-mil polyethylene sheeting—to stop ground moisture from reaching the flooring.
You lay sheets with overlaps sealed by tape, run them up walls a few inches, and seal seams. This prevents swelling, mold, and adhesive failure; always follow manufacturer moisture and installation guidelines.
Soundproofing underlayments (acoustic) performance and rating metrics
Soundproofing underlayments are rated by a few key metrics you’ll want to understand before choosing one: STC (airborne sound), IIC (impact sound), and ΔIIC (improvement over bare subfloor).
Look for laboratory-tested values, frequency range coverage, and installation conditions.
Also consider material thickness, density, and long-term compression resistance—these affect real-world performance more than marketing claims.
Flooring-specific manufacturer underlayments when to use
Because manufacturers design underlayments to match specific flooring systems, choosing a flooring-specific underlayment can simplify installation and protect your warranty while optimizing performance for that product.
Use these when your laminate maker specifies one, when moisture barriers, sound ratings, or pad thickness are required, or when you want guaranteed compatibility.
Follow manufacturer guidelines and keep installation records to preserve warranty coverage.
Underlayment not required situations and exceptions
Although underlayment improves comfort and performance in many installs, you don’t always need it for laminate flooring—especially on smooth, level subfloors like concrete or plywood and in dry, low-traffic areas.
If the manufacturer permits direct installation, skip underlayment to save cost and thickness.
Exceptions: sound control, moisture barriers, radiant heat, or uneven surfaces still require appropriate underlayment for protection and warranty compliance.
Choosing the Right Underlayment Decision Guide
Start by identifying your subfloor type and condition so you know what preparation or barrier you’ll need.
Then assess moisture risk and climate, weigh sound, comfort, and thermal priorities, and match underlayment thickness and R-value to your laminate’s specs.
Finally, verify manufacturer warranty requirements and local codes before you buy or install.
Step 1 Identify your subfloor type and condition
- You need to identify your subfloor type and its condition before picking underlayment. Inspect surface, thickness, flatness, and cleanliness. Note any squeaks, loose boards, or damage.
- Plywood or OSB: check for rot or delamination
- Concrete: look for cracks or unevenness
- Existing vinyl: confirm stability
- Particleboard: beware of weakness and moisture sensitivity
Step 2 Assess moisture risk and climate considerations
Because moisture can wreck laminate from below, you need to evaluate both vapor and liquid risks before choosing underlayment.
Check crawlspace or concrete slab moisture levels with a meter, consider local humidity and seasonal changes, and identify flood or spill exposure.
Where moisture’s likely, pick a vapor barrier or waterproof underlayment; in drier settings, breathable options often suffice.
Step 3 Decide on sound, comfort, and thermal priorities
Once you’ve ruled out moisture issues, turn your attention to how the floor should feel and sound—do you want quieter rooms, softer underfoot, or better heat retention?
Decide which matters most: acoustic reduction for noise-sensitive spaces, cushioning for comfort in living areas, or a modest thermal boost for mildly cooler rooms.
Prioritize one or two to narrow suitable underlayment types.
Step 4 Match underlayment thickness and R-value to laminate specs
Now that you’ve set priorities for sound, comfort, and warmth, it’s time to match those needs to measurable underlayment specs.
Check your laminate’s recommended underlayment thickness and maximum compression tolerance.
Choose an R-value that meets your climate and subfloor heat loss.
Balance thickness for cushioning and stability—too thick can impair locking systems; too thin sacrifices insulation and sound control.
Step 5 Check manufacturer warranty requirements and local codes
Before you lock in an underlayment, verify the laminate manufacturer’s warranty requirements and local building codes to avoid voiding coverage or failing inspections.
You’ll confirm approved materials, moisture barriers, vapor retarder needs, and installation methods. Follow specs precisely and keep documentation.
- Check approved underlayment types
- Confirm moisture/vapor requirements
- Note thickness and fastening rules
- Keep warranty paperwork accessible
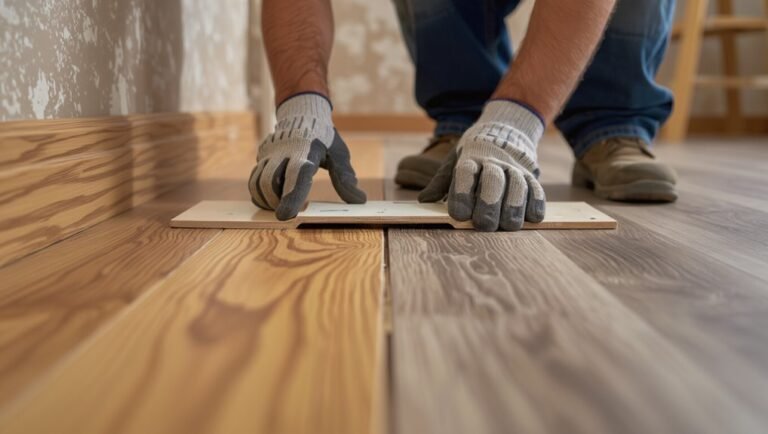
Installation Steps What Goes Under Laminate (Step-by-Step)
Before you snap planks together, you’ll want a quick checklist to prep the subfloor—clean, level, and repair any problem spots.
Then lay a vapor barrier on concrete, roll out and seam the underlayment (foam, felt, or cork) with proper overlaps and tape, and note how to handle changes, doorways, and thresholds.
Gather common tools and materials—utility knife, tape, straightedge, hammer, spacers, and adhesive or transition strips—so you’re ready to work efficiently.
Prep the subfloor (cleaning, leveling, repairs) quick checklist
1 essential step in a successful laminate installation is prepping the subfloor: you’ll clean thoroughly, check for levelness, and make any necessary repairs so the underlayment and planks sit flat and stable.
- Sweep and vacuum debris, dust, and adhesive residue
- Patch holes and cracks with floor patch compound
- Sand high spots and grind down bumps
- Check with a straightedge; shim or self-level as needed
Laying vapor barrier on concrete step-by-step
Laying a vapor barrier on concrete is a straightforward but critical step to prevent moisture from damaging your laminate—start by rolling out a continuous sheet that covers the entire floor and up the walls a few inches.
Trim excess, tape edges to walls, and overlap seams per manufacturer instructions. Seal around pipes and drains, smooth wrinkles, and run the barrier slightly up door thresholds before installing underlayment.
Installing roll underlayment (foam/felt/cork) seams, taping, overlaps
When you roll out foam, felt, or cork underlayment over a vapor barrier, align the edges so seams fall along plank joints and not across them to minimize telegraphing and guarantee a flat surface.
Butt seams tightly, trim jagged edges, and secure overlaps per manufacturer instructions.
Tape seams with recommended underlayment tape, avoiding stretches or gaps, and smooth tape for a continuous, stable base.
Handling transitions, doorways, and thresholds
Changes, doorways, and thresholds need careful attention because they’re where different floorings meet and where movement, moisture, and wear concentrate; plan each change before you lay planks, leaving the manufacturer’s recommended expansion gap and selecting the right profile (T-molding, reducer, or threshold) for the height difference and traffic.
Cut underlayment flush at junctions, secure edges, and use transition strips to protect seams and guide movement.
Common installation tools and materials
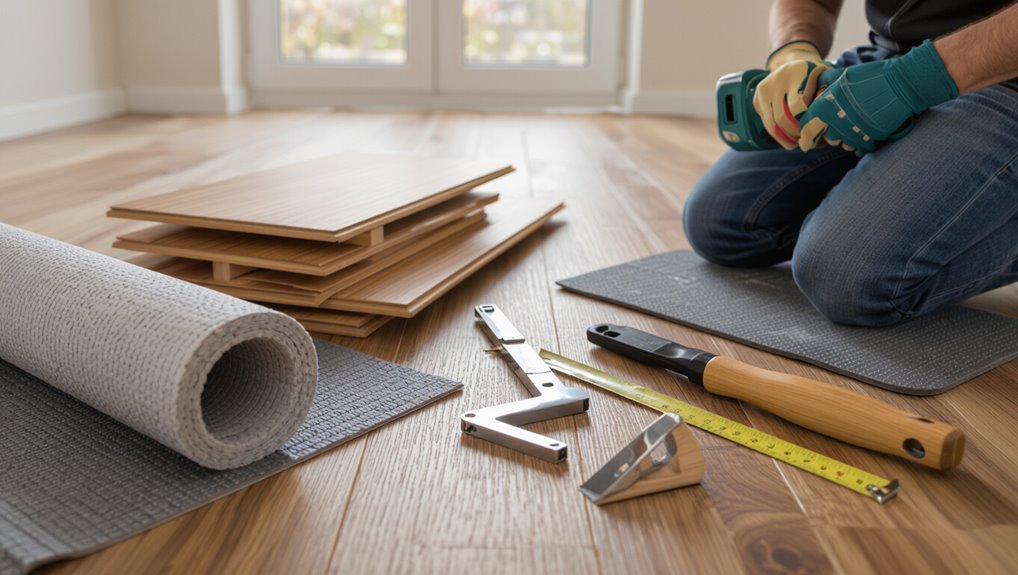
Gather the right tools and materials before you start so the installation goes smoothly: you’ll need a quality underlayment (or vapor barrier if required), a tape measure, spacers, a utility knife, a tapping block and pull bar, a rubber mallet, a jigsaw or miter saw for cutting planks, a straightedge, and adhesive or connector strips where specified by the manufacturer.
- Measure accurately
- Cut safely
- Protect moisture-sensitive areas
- Use proper tapping and pulling tools
Problems, Mistakes, and How to Avoid Them
Don’t skip or use the wrong underlayment — that’s how you get squeaks, warping, and trapped moisture.
Learn to spot failure signs like buckling, hollow spots, or musty smells and how to test for moisture and unevenness.
I’ll also show ways to patch or replace faulty underlayment without tearing out all the laminate.
Common mistakes (no underlayment, wrong moisture barrier, uneven subfloor)
When you skip underlayment, pick the wrong moisture barrier, or install over an uneven subfloor, you’ll quickly see problems like squeaks, warped boards, and premature wear. Addressing these mistakes early saves time and money.
You should:
- Always use appropriate underlayment for your floor type.
- Match moisture barrier to subfloor and climate.
- Level or repair uneven subfloors before installation.
- Test for moisture and correct issues before laying laminate.
Signs of underlayment failure and how to diagnose issues
Even with the right underlayment and a level subfloor, failures can still show up over time — and spotting them early lets you fix small problems before they cause major damage.
Listen for hollow or creaky spots, feel for soft or sagging areas, and look for surface gaps, buckling, or visible seams.
Smell musty odors—moisture often betrays failing vapor barriers.
Repairing or replacing underlayment without ripping out laminate
If you spot underlayment problems under your laminate, you can often repair or replace sections without pulling up the whole floor—saving time and expense—by using targeted access points, patching techniques, and careful seam work.
Cut planks along joints, remove minimal boards, replace damaged underlayment with matching material, tape seams, and reseat boards.
Test for level, moisture, and sound before finishing.
Best Practices and Professional Tips
To get the longest life from your laminate and keep the warranty valid, follow manufacturer specs for underlayment type, moisture barriers, and installation.
We’ll weigh cost versus performance so you know when premium underlayment is worth it and point out eco-friendly or hypoallergenic options.
Finally, you’ll get guidance on when to hire a pro versus tackling the job yourself.
Tips for maximizing lifespan and warranty compliance
When you choose the right underlayment and follow manufacturer guidelines, you’ll protect your laminate from moisture, wear, and structural issues while keeping your warranty intact.
Inspect subfloor for level and dryness, install recommended vapor barrier, and maintain expansion gaps.
Use approved adhesives or fasteners, document materials and receipts, and schedule professional inspections if required to avoid voiding warranty and extend floor life.
Cost vs. performance: when to invest in premium underlayment
You’ve already seen how proper underlayment and adherence to manufacturer rules protect your warranty and extend floor life; now weigh cost against long-term performance to decide if premium underlayment is worth it for your project.
Choose premium when subfloor issues, heavy traffic, sound control, or moisture protection matter; skip it for short-term rentals or low-use rooms where basic underlayment meets requirements.
Eco-friendly and hypoallergenic underlayment options
Because indoor air quality and sustainability often matter as much as price, picking eco-friendly, hypoallergenic underlayments can give you quieter, healthier floors without sacrificing performance.
Choose natural cork, wool, or recycled-fiber pads certified low-VOC and mold-resistant. They reduce allergens, dampen sound, and insulate thermally.
Check certifications (GREENGUARD, OEKO-TEX), thickness compatibility with your laminate, and manufacturer installation guidelines.
Hiring a pro vs. DIY considerations
After choosing an underlayment that balances air quality and performance, decide whether to install it yourself or hire a pro.
You’ll weigh time, skill, and tools against cost and warranty. If you’re confident, DIY saves money; if not, a pro guarantees proper vapor barriers and seams.
- Time and patience
- Tool and skill needs
- Warranty and resale value
- Cost comparison
Comparison Tables and Quick Specs
You’ll find a compact comparison table listing each underlayment’s material, thickness, R-value, moisture protection, sound reduction, and typical cost to help you weigh options at a glance.
Use the quick match guide to pick the best underlayment for your subfloor and room type—concrete, plywood, bathrooms, bedrooms, and high-traffic areas are covered.
These tools make it easy to choose the right balance of insulation, moisture control, and noise reduction for your project.
Underlayment comparison table (material, thickness, R-value, moisture protection, sound reduction, typical cost)
When choosing underlayment for laminate, a clear comparison table lets you quickly weigh material, thickness, R-value, moisture protection, sound reduction, and typical cost so you can match performance to your room’s needs.
| Material | Key Trait | Typical Cost |
|---|---|---|
| Foam | Thin, low R, basic moisture | $0.20/ft² |
| Cork | Moderate R, good sound | $0.80/ft² |
| Rubber | High sound, moisture barrier | $1.50/ft² |
Quick match guide: Best underlayment by subfloor and room type
Because different subfloors and rooms demand different priorities—moisture control over insulation in basements, sound absorption in apartments, or comfort in bedrooms—you’ll want a quick-match guide that pairs common underlayment types with specific flooring conditions and room uses.
| Subfloor | Best Underlayment | Why |
|---|---|---|
| Concrete | Foam + vapor barrier | Moisture control |
| Plywood | Standard foam | Smoothing, cost |
| Apartment | Cork | Sound reduction |
| Bedroom | Felt | Comfort, insulation |
FAQ
You’ll find answers here to common concerns about when underlayment is required and whether you can lay laminate over tile or vinyl without it.
Learn which underlayments work best on basements and concrete, the ideal thickness for floating floors, and how underlayment affects upstairs creaks and noise.
If you’ve got a specific floor or problem, ask and we’ll cover the best options.
Do I always need underlayment under laminate flooring?
Need underlayment for laminate flooring? Not always, but usually.
Underlayment cushions, reduces noise, evens minor subfloor imperfections, and offers moisture protection when needed.
If your laminate has attached underlay or manufacturer says it’s unnecessary for your stable, dry subfloor, you can skip it.
Always follow the floor maker’s directions to keep warranties valid and guarantee long-term performance.
Can I lay laminate over tile or existing vinyl without underlayment?
If your tile or vinyl is level, firmly bonded, and free of loose grout or high ridges, you can often install laminate over it—still, skipping underlayment isn’t always wise.
You’ll save height and work, but you may lose cushioning, sound control, and moisture protection.
Use a thin foam or cork underlayment where manufacturer or subfloor conditions demand it to preserve warranty and performance.
Which underlayment is best for basements and concrete slabs?
Which underlayment works best on concrete slabs and in basements? Use a vapor-barrier underlayment or a combo vapor-and-cushion product specifically rated for concrete.
It prevents moisture wicking, protects laminate, and adds minor cushioning. For damp or cold slabs, choose underlayment with built-in moisture barrier and thermal insulation.
Always verify compatibility with your laminate manufacturer and local moisture conditions before installing.
How thick should underlayment be for floating laminate floors?
Now that you’ve picked an underlayment suited for a concrete basement, you’ll want to choose the right thickness for a floating laminate floor.
Aim for 2–3 mm for standard use; 3–5 mm if subfloor irregularities exist or you want extra comfort.
Thicker underlayments can affect locking systems, so check manufacturer recommendations and avoid overly compressible materials that compromise stability.
Will underlayment reduce creaks and noise in upstairs rooms?
Wondering whether underlayment will cut down creaks and noise upstairs?
Yes — a quality underlayment cushions joints, reduces friction, and dampens impact and airborne sound.
Use thicker, denser acoustic or cork underlayment for better results, and add soundproofing membrane if needed.
It won’t fix structural squeaks from joists; those require tightening or repair before installing laminate.
Useful Resources and Product Recommendations
You’ll want to know how to read underlayment labels and technical specs so you can compare density, R-value, and moisture ratings quickly.
Check reputable retailers and manufacturer sites for buying options, and focus on verified reviews that mention real installation experiences and long-term performance.
I’ll point you to key specs to watch for and trustworthy places to shop next.
How to read underlayment labels and technical specs
Because underlayment performance affects how your laminate looks, sounds, and lasts, it pays to know how to read labels and specs so you can pick the right product for your project.
Check key ratings and terms, confirm compatibility, and note installation limits.
- Thickness and R-value
- Sound-reduction (IIC/SRI) numbers
- Vapor barrier classification
- Manufacturer’s substrate compatibility and warranty
Where to buy and what to look for in product reviews
Now that you know how to read labels and specs, the next step is finding reliable places to buy underlayment and knowing what to watch for in reviews.
Shop big-box stores, specialty flooring retailers, or trusted online brands.
In reviews, check durability, moisture resistance, installation ease, and real-world sound reduction.
- Durability reports
- Moisture performance
- Installation feedback
- Noise reduction tests