How to Clean a Textured Shower Floor and Remove Soap Scum for Good
You can get a textured shower floor spotless by rinsing loose debris, spraying an equal mix of white vinegar and water (or an alkaline soap-scum cleaner for heavy buildup), letting it sit 5–15 minutes, then scrubbing with a stiff nylon brush along the grooves and rinsing repeatedly. Use baking soda paste or diluted hydrogen peroxide on stubborn spots, dry thoroughly, and maintain weekly scrubs plus squeegeeing after showers to prevent return — keep going to learn full steps and tips.
Quick Answer Best Way to Clean a Textured Shower Floor and Remove Soap Scum Fast
For a fast, effective clean, you’ll scrub the textured floor with a mild acidic cleaner (like diluted white vinegar or a commercial bathroom product) and a stiff nylon brush to lift soap scum without damaging the surface.
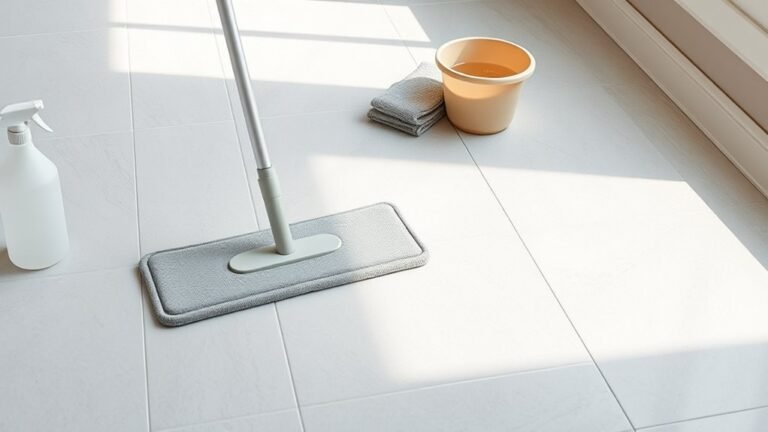
Use a spray bottle, rubber gloves, a scrub brush with a handle, and a microfiber cloth for quick results.
Rinse thoroughly and repeat spot-treatments as needed for stubborn buildup.
One-sentence summary of the most effective method
When you need to remove soap scum fast from a textured shower floor, the quickest effective method is to spray a solution of equal parts white vinegar and water.
Let it sit 10–15 minutes, scrub with a stiff nylon brush, then rinse and dry.
For how to clean textured shower floor properly, repeat weekly, focus on grout lines, and ventilate to prevent residue and mildew buildup.
Recommended products and tools for immediate results
Grab a stiff nylon scrub brush, a pump spray bottle of equal-parts white vinegar and water, a microfiber cloth, and a plastic scraper for immediate, reliable soap-scum removal on a textured shower floor.
Use these items and add targeted cleaners as needed:
- Stiff nylon scrub brush
- Pump spray bottle (vinegar/water)
- Microfiber cloth
- Plastic scraper
- Baking soda or a mild commercial descaler
Why Soap Scum Builds Up on Textured Shower Floors
Soap scum is a mix of soap molecules reacting with minerals in hard water plus body oils and dirt that physically cling to surfaces.
On a textured floor, those grooves and pores catch and hide this residue much more than a smooth tile would, so it builds up faster.
Hard water, oily or cream soaps, poor ventilation, and habits like skipping a rinse all make the problem worse.
What is soap scum (chemical and physical definition)
A thin, filmy residue called soap scum forms when soap molecules react with minerals in hard water and mix with body oils and dirt. It clings especially well to the tiny peaks and valleys of a textured shower floor.
Chemically, it’s insoluble metal salts of fatty acids; physically, it’s a greasy, particulate film that adheres, darkens, and fosters bacterial growth unless removed.
How textured surfaces trap residue differently than smooth surfaces
Because textured floors have tiny peaks, valleys, and pores, they catch and hold mineral deposits, oils, and grime much more readily than smooth surfaces do.
You’ll find residue wedged in grooves where water can’t rinse it away, and brushes often skip over high points. That uneven profile increases surface area and friction, making buildup stick and hiding spots harder to scrub.
Common contributing factors: water type, soap type, ventilation, shower habits
When hard water, greasy soaps, poor ventilation, and certain shower habits combine, they speed up scum buildup on textured floors.
You’ll notice mineral deposits from hard water cling in grooves, fatty soap residues bond with minerals, and steam trapped by poor airflow prevents drying.
Long, hot showers and skipping rinses worsen deposits.
Adjust water softening, soap choice, ventilation, and rinsing to cut buildup.
Safety and Preparation Before You Clean
Before you start cleaning, put on gloves and eye protection and open a window or run the exhaust fan to keep fumes down.
Test any cleaner on a small, hidden patch of the floor to make sure it won’t discolor or damage the texture.
Remove bath mats and drain plugs, then rinse the floor to wash away loose hair and debris.
Protective gear and ventilation recommendations
Although the chemicals and scrubbing can seem routine, you should protect your skin, eyes, and lungs: wear rubber gloves, goggles or a face shield, and a tight-fitting mask or respirator rated for vapors if using bleach or strong cleaners.
Keep windows open and use a fan. Wear long sleeves. Remove contacts. Rinse promptly after exposure.
- Gloves
- Eye protection
- Respirator
- Ventilation
- Long sleeves
How to test cleaners on a small area (spot test)
Now that you’ve suited up and ventilated the space, check any cleaner on an inconspicuous patch of the textured floor to make sure it won’t cause discoloration, surface damage, or finish loss.
Apply a small amount, wait the manufacturer’s suggested time, then blot and rinse.
Inspect for changes in color, texture, or residue. If safe, proceed; if not, choose a milder product.
Prep steps: remove mats, drain plugs, rinse loose debris
Start by clearing the area: take out any mats, remove drain plugs or stoppers, and give the floor a quick rinse to wash away loose hair and soap scum.
Next, scoop trapped debris from the drain, wipe loose gunk with a sponge, and let water flow to flush residues.
This prep prevents clogs and helps cleaners reach textured grooves effectively.
Tools and Cleaners That Work Best on Textured Floors
You’ll want a mix of mechanical tools—stiff brushes, scrub pads, a steam cleaner, and even a toothbrush for grout lines—to loosen dirt from textured grooves.
Pair those with the right chemical cleaner, choosing acidic, alkaline, enzymatic, or simple homemade solutions like vinegar, baking soda, or hydrogen peroxide based on the soil type.
Always match the product and tool to your floor material (tile, stone, acrylic, polymer) to avoid damage.
Mechanical tools: brushes, scrub pads, steam cleaners, toothbrushes
Grab the right tools and the job gets a lot easier: mechanical cleaning—using brushes, scrub pads, steam cleaners, and even a toothbrush—lets you dislodge grime trapped in textured grooves without harsh chemicals.
- Use a stiff nylon deck brush for large areas.
- Choose nonabrasive scrub pads for finish protection.
- Direct steam to loosen buildup.
- Use a toothbrush for seams and corners.
- Rinse and squeegee thoroughly.
Chemical cleaners: acidic, alkaline, enzymatic, homemade solutions (vinegar, baking soda, hydrogen peroxide)
While mechanical action loosens grime, chemical cleaners target the residues stuck deep in textured grooves, and choosing the right type—acidic, alkaline, enzymatic, or a homemade mix—makes a big difference in effectiveness and surface safety. You’ll pick acids for mineral scale, alkalis for soap scum, enzymes for organic buildup, and DIY mixes for gentle, budget-friendly cleaning.
| Type | Best for | Note |
|---|---|---|
| Acidic | Mineral scale | Avoid on stone |
| Alkaline | Soap scum | Rinse well |
| Enzymatic | Organic residue | Gentle |
| DIY | Light stains | Use properly |
Choosing the right product for your floor material (tile, stone, acrylic, polymer)
Choosing the right cleaner and tool depends on what your floor is made of—tile, natural stone, acrylic, or polymer—because each material reacts differently to acids, alkalis, abrasives, and scrubbing methods.
Use pH-neutral cleaners for stone, mild alkaline or vinegar mixes for glazed tile, nonabrasive cleaners and soft brushes for acrylic and polymer.
Always test a small area and avoid bleach on porous surfaces.
Step-by-Step Cleaning Method
Start by rinsing the floor to loosen surface grime.
Then apply your chosen cleaner and let it dwell for the recommended time.
Use a stiff brush to agitate the textured grooves, spot-treat stubborn patches and grout lines as needed, and rinse thoroughly.
Repeat the process for any areas that still look dirty.
Step 1 Rinse and loosen surface grime
1. Wet the textured floor thoroughly with warm water, focusing on corners and grooves.
Use a handheld sprayer or bucket to soften and loosen soap scum and loose debris.
Agitate gently with a soft-bristled brush or microfiber mop to lift grime without damaging texture.
Rinse away loosened residue, repeat where buildup persists, then remove excess water before applying your chosen cleaner.
Step 2 Apply chosen cleaner and let dwell (timing guidance)
Apply your chosen cleaner evenly across the textured floor, targeting stained areas and grout lines.
Then let it sit so it can break down soap scum and mineral deposits.
Check the product label for recommended dwell time—usually 5–15 minutes for mild cleaners, longer for heavy buildup.
Keep the bathroom ventilated and avoid letting cleaners dry completely; reapply to stubborn spots as needed.
Step 3 Agitate textured grooves with recommended brush techniques
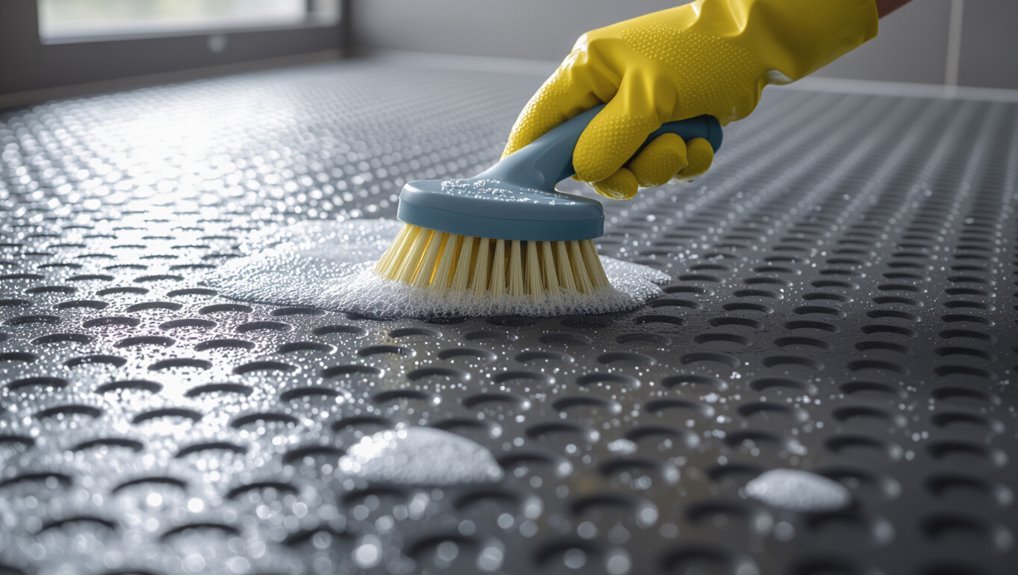
Scrub the textured grooves using short, firm strokes so the bristles reach deep into crevices without damaging the surface.
Work in sections, angling the brush to follow ridges and reverse direction to dislodge trapped residue. Rinse frequently to check progress and avoid redepositing grime.
For corners, switch to a smaller nylon brush and keep motion controlled to protect sealant and finish.
Step 4 Spot-treat stubborn patches and grout lines
Now target stubborn patches and grout lines with focused treatments so they don’t undo your previous work.
Apply a paste of baking soda and water or a commercial grout cleaner to spots, let it sit 5–10 minutes, then scrub grout with a narrow brush or old toothbrush.
For persistent stains, use diluted hydrogen peroxide, test a hidden area first, then scrub and blot dry.
Step 5 Rinse thoroughly and repeat if necessary
Once you’ve treated stubborn spots and flushed away loosened grime, rinse the floor thoroughly with warm water to remove cleaner residue and lifted dirt.
Use a detachable showerhead or several buckets, directing flow to corners and textured areas.
If suds or film remain, repeat treatment and rinsing until water runs clear.
Finish rinsing edges and drain.
Step 6 Dry and inspect for remaining residue
Step 6: Dry the floor with a clean towel or mop, then closely inspect for any remaining residue or streaks.
Use bright light and run your hand over textured areas to feel spots water didn’t reach.
Spot-treat stubborn film with a diluted cleaner, scrub gently, rinse, and dry again.
Repeat until surface feels smooth and looks clear.
Alternative Methods for Tough or Sensitive Floors
If scrubbing and mild cleaners won’t cut it, you can try a steam cleaner—it lifts grime without chemicals but can be risky on some finishes if you overheat them.
You might prefer enzymatic or eco-friendly cleaners designed for sensitive surfaces to avoid damage and harsh residues.
If stains are stubborn or the floor’s finish is compromised, call a professional restoration service to assess and safely restore the surface.
Using a steam cleaner: pros, cons, and technique
A steam cleaner can be a fast, chemical-free way to lift grime from a textured shower floor, and it’s worth considering when scrubbing or bleach feels too harsh for your surface.
You’ll move slowly, keep the nozzle a few inches away, and test a small area first.
Pros: sanitizes, removes soap scum without chemicals.
Cons: not for delaminating or heat-sensitive tiles; use caution.
Enzymatic or eco-friendly cleaners for sensitive finishes
Steam cleaning can work well, but when heat or abrasive methods risk damaging grout, sealants, or delaminating surfaces, you’ll want gentler options.
Choose enzymatic cleaners to break down organic buildup without harsh chemicals, or eco-friendly, pH-neutral formulas safe for sealed finishes.
Test a small area, follow dwell times, rinse thoroughly, and repeat as needed.
These options protect surfaces while removing soap scum effectively.
When to call a professional restoration service
1 clear sign you should call a professional is persistent staining or odors that won’t respond to repeated home treatments.
If grout is crumbling, tiles are loose, or your floor has delicate finishes you fear damaging, hire restoration.
Pros use specialized cleaners, steam, resin repair, and sealants safely.
They’ll assess structural issues, restore appearance, and prevent recurrence, saving time and risk.
Comparison of DIY vs. Commercial Cleaners
You’ll weigh DIY options like baking soda and vinegar against commercial cleaners by comparing effectiveness, cost, and safety.
Think about which works best for greasy buildup, mold, or delicate textured surfaces so you pick the right tool.
In some cases a homemade mix is cheaper and gentler, while tougher stains may call for a commercial product.
Effectiveness, cost, and safety comparison
When weighing DIY solutions against commercial cleaners, consider how well each removes soap scum and mildew from textured surfaces, what they cost over time, and any health or material risks involved. You’ll balance effectiveness, recurring expense, and safety precautions to protect skin and finishes.
| Factor | Notes |
|---|---|
| Effectiveness | Varies by formula |
| Cost | DIY cheaper upfront |
| Safety | Commercial may irritate |
| Durability | Some protect finishes |
Situations where one outperforms the other
Having weighed effectiveness, cost, and safety, you can now look at specific scenarios where a DIY mix beats a store-bought cleaner—and vice versa.
Use DIY for light soap scum, delicate textured floors, and quick spot cleaning—it’s gentler and cheaper.
Choose commercial products for stubborn mildew, heavy mineral buildup, or deep grout cleaning—they’re stronger, faster, and formulated for tough jobs.
Common Mistakes to Avoid When Cleaning Textured Shower Floors
Don’t grab metal brushes or harsh scouring pads that can scratch a textured floor—use soft-bristled tools instead.
Never mix bleach with ammonia or vinegar, and don’t press so hard you wear down grout or finish.
Always spot-test products and follow the manufacturer’s guidelines before treating the whole surface.
Using abrasive tools that damage the surface
Scrubbing with a wire brush or heavy-duty scouring pad can shred the textured surface and leave permanent scratches that trap dirt and grime.
Don’t use metal or overly abrasive tools; they’ll dull finishes and create crevices where soap scum builds.
Use soft-bristled brushes, nylon pads, or nonabrasive scrubbers instead, and test in an inconspicuous spot before treating the whole floor.
Mixing incompatible chemicals (bleach + ammonia/vinegar)
After you stop using harsh tools that can damage the finish, watch what you mix in the sink—combining bleach with ammonia or vinegar can create deadly gases like chloramine or chlorine.
Don’t mix cleaners; use one product at a time, rinse thoroughly, and ventilate the bathroom.
If you need stronger results, choose a compatible cleaner or dilute and test in a well-ventilated area.
Over-scrubbing grout or using too much pressure
If you push too hard or spend too long on grout, you’ll wear it down and widen the joints, which makes tiles less stable and lets water and dirt penetrate more easily.
Use gentle scrubbing with a soft brush, moderate cleaners, and short sessions. Rinse frequently, inspect progress, and stop when grout looks clean—overdoing it creates damage that’s costly to repair.
Skipping spot tests or ignoring manufacturer’s guidelines
When you skip a spot test or ignore the manufacturer’s cleaning instructions, you risk staining, etching, or voiding warranties on your textured shower floor.
Always check labels and test cleaners in an inconspicuous corner for the recommended time. If unsure, contact the manufacturer for approved products.
Following guidelines protects your finish, saves money, and prevents irreversible damage.
Prevention and Long-Term Maintenance Strategies
To keep a textured shower floor looking good, you’ll want simple daily and weekly habits that stop soap scum before it builds up.
Choose low-residue soaps or use a water softener, schedule periodic deep cleans and seasonal maintenance, and know when to seal grout or porous flooring.
I’ll walk you through specific routines, product choices, and sealing steps so you can prevent problems long-term.
Daily and weekly routines to prevent soap scum buildup
Because small daily habits add up, you can greatly reduce soap scum by rinsing and squeegeeing the textured floor after each shower and doing a quick scrub once a week with a mild cleaner or baking soda paste.
- Rinse thoroughly after every use
- Squeegee to remove droplets
- Ventilate to speed drying
- Weekly scrub focused on grout lines
- Dry with a microfiber cloth to finish
Best soaps, shampoos, and water-softening options to reduce residue
Rinse-and-squeegee habits and weekly scrubs cut most residue, but choosing the right soaps, shampoos, and water-softening options will keep buildup from coming back.
Use low-sudsing, soap-free body washes and residue-free shampoos labeled “no film.”
Swap bar soaps for gel cleansers if you get scum.
Install a whole-house softener or a showerhead filter to reduce minerals, and rinse products off promptly.
Periodic deep-clean schedule and seasonal maintenance
When you set a simple deep-clean schedule and follow seasonal maintenance tasks, your textured shower floor will stay cleaner longer and need fewer emergency scrubs.
Every 1–2 months, scrub with a brush and a nonabrasive cleaner; quarterly, tackle grout lines and drains.
In spring and fall, inspect for buildup, adjust product use, and replace worn brushes or mats to prevent recurring soap scum.
Sealing grout and porous flooring: when and how
If you want your textured shower floor to resist stains and moisture long-term, seal grout and any porous tile as soon as the manufacturer’s curing period ends and grout has fully dried—usually 72 hours to a week.
Choose a penetrating sealer, follow label directions, apply evenly with a brush or applicator, wipe excess, and allow full cure.
Re-seal annually or when water stops beading.
Troubleshooting: Stains, Discoloration, and Recurring Soap Scum
You’ll first learn to tell mineral deposits (chalky, hard) from soap scum (filmy, slippery) and mildew (dark, fuzzy) so you can pick the right treatment.
Use targeted fixes—vinegar or descaler for minerals, alkaline cleaners and scrubbing for soap scum, and bleach or mildew removers for mold—and test on a hidden spot.
If a cleaner alters the texture or color, stop immediately, rinse thoroughly, and try a gentler method or consult the manufacturer.
Identifying mineral build-up vs. soap scum vs. mildew
Sometimes a little detective work makes all the difference in deciding how to treat stains on a textured shower floor, because mineral deposits, soap scum, and mildew each look and respond differently to cleaning.
Tap and smell: mineral deposits feel gritty and white, soap scum is filmy and greasy, mildew appears fuzzy or discolored and smells musty.
Test a small area to confirm.
Targeted fixes for discoloration and stubborn mineral deposits
When discoloration or stubborn mineral deposits resist your regular cleaner, switch to targeted treatments that match the residue: acidic solutions dissolve hard-water minerals, alkaline cleaners cut through greasy soap scum, and enzyme or bleach-based products handle organic stains and mildew.
Test in an inconspicuous spot, apply product with a soft brush, let it dwell per instructions, rinse thoroughly, and repeat only as needed.
Steps if cleaning causes visual changes to the surface
If a cleaner alters the look of your textured shower floor, act quickly to stop further damage and assess what’s changed.
Rinse thoroughly, neutralize residues with a mild baking soda paste, and test a hidden area before any further treatment.
For etching or bleaching, consult manufacturer guidance or a professional refinisher.
Document damage for warranty or cleaning-product claims.
Avoid abrasive scrubbing.
FAQ Fast Answers to Common Reader Questions
Got questions? You’ll get quick answers on using vinegar on stone, how often to deep-clean, whether bleach tackles soap scum and harms grout, which brush works best for textured floors, and tips to prevent soap scum with hard water.
Read on for clear, practical guidance.
Can I use vinegar on a textured stone shower floor?
Can you use vinegar on a textured stone shower floor without damaging it?
No—avoid straight vinegar on most natural stone (marble, travertine, limestone) since acid etches.
For sealed stone, diluted white vinegar (one part vinegar to four parts water) can sometimes be used cautiously on stubborn soap scum, but spot-test first and re-seal if needed.
Prefer pH-neutral cleaners for safety.
How often should I deep-clean a textured shower floor?
How often should you deep-clean a textured shower floor? Aim for a thorough deep clean every 1–3 months depending on use and water hardness.
High-traffic or hard-water showers need monthly attention; occasional-use or softened-water showers can stretch to quarterly.
Spot-clean weekly, rinse after each use, and address soap scum or mildew immediately to prevent buildup and preserve texture and grout.
Will bleach remove soap scum and is it safe for grout?
If you notice stubborn soap scum after spot-cleaning, you might reach for bleach—but it’s not the best first choice for soap scum.
Bleach can lighten mold and disinfect, but it won’t dissolve oily soap scum well. It can also degrade grout sealant and discolor porous grout over time.
Use targeted de-greasers or vinegar-based cleaners first; reserve bleach for mold spots, diluted and sparingly.
What brush type is best for textured flooring?
For textured shower floors, pick a stiff nylon scrub brush with a comfortable handle—you’ll get enough abrasion to dislodge grime without tearing grout or wearing down the texture.
Use a brush head sized to your space for control, and choose angled bristles for crevices.
Avoid metal or overly soft brushes. Rinse debris frequently and replace the brush when bristles splay.
How do I prevent soap scum if I have hard water?
Want to keep soap scum from building up in hard-water showers?
Switch to a liquid, sulfate-free body wash or a synthetic detergent cleanser to avoid soap–mineral reactions.
Install a water softener or use a showerhead filter to reduce minerals.
Wipe tiles and floor after each use, squeegee walls, and apply a weekly mild acidic rinse (dilute vinegar) to prevent deposits.