How to Install a Floor Transition Strip Between Any Two Floor Types
You’ll measure the gap and height difference, pick the correct profile (T‑molding, reducer, threshold, etc.), and acclimate materials. Dry‑fit the strip, cut it to length, prepare and level the subfloor, then secure the metal track or adhesive base with screws or glue. Snap or fasten the trim into place, check alignment and expansion clearance, and touch up edges. Follow simple variations for specific floor types below to finish the job like a pro.
How to Install a Floor Transition Strip Between Any Two Floor Types (Quick Answer)
For the fastest, safest install, align a threshold strip over the gap, secure its track to the subfloor, then snap the strip into place for a flush, stable finish.
You’ll only need a tape measure, pencil, drill with bits, screws or adhesive (depending on the strip), a hacksaw or trim cutter, and safety glasses.
Measure, cut to length, fasten the track, and snap the strip in—done.
One-sentence summary of the fastest, safest method
Measure the gap, cut a matching junction strip, and secure it with the included screws or adhesive to quickly and safely join two floor types; this method minimizes tripping hazards, protects edges, and works for most height differences up to about 1/2 inch.
For a fast, reliable result when learning how to install a floor boundary strip, align, level, and fasten the profile precisely.
Quick tool-and-material checklist for a single-install run-through
Now that you’ve got the basic approach down, you’ll want a compact checklist so you can knock out a single-install run-through without hunting for tools mid-job.
Gather these essentials, then work efficiently:
- Threshold strip (trimmed to length)
- Measuring tape and pencil
- Hacksaw or trim cutter
- Drill, screws, and anchors (if needed)
- Construction adhesive or recommended fasteners
Basic Understanding What Is a Transition Strip and Why It Matters
A changeover strip—sometimes called a threshold, reducer, or T-molding—bridges two different floor surfaces.
You’ll use it to cover gaps, accommodate height changes, allow flooring to expand and reduce noise, and finish the look between rooms.
Install one whenever floors need expansion space, heights don’t match, or you want a clean separation between areas.
Definition and common names (threshold, reducer, T-molding)
Modification strips bridge gaps between different floor surfaces, and you’ll usually hear them called threshold, reducer, or T-molding depending on their shape and function.
You’ll use a threshold at doorways, a reducer to step down between heights, and T-molding where two floors meet evenly.
Each name signals profile and placement so you can pick the right one quickly.
Functions: gap cover, height change, movement/acoustic control, aesthetics
Think of a transition strip as a small but essential bridge that hides gaps, eases height differences, controls movement and sound, and finishes the look between floor surfaces.
You’ll cover expansion gaps, create smooth stepdowns or reducers, allow independent flooring movement to prevent buckling and reduce noise transfer, and unify styles—matching material, color, and profile so seams look intentional rather than accidental.
When you must use one: floor expansion, height mismatch, room separation
When your floors change level, meet different materials, or need room definition, you’ve got to install a junction strip to keep everything functioning and looking intentional.
Use one whenever an expansion gap is required, surfaces differ in height, or you want a clear separation between rooms. It prevents buckling, hides edges, improves safety, and gives a neat visual boundary where flooring types meet.
Types of Transition Strips and When to Use Each
You’ll pick different junction strips depending on the height and edge type between floors.
Use T-molding for same-height floors, reducers for a higher-to-lower junction, thresholds or end caps at doorways, stair noses or overlap reducers on exposed edges and steps, and flexible vinyl or carpet junctions where edges are soft or irregular.
I’ll explain when and how to install each one.
T-molding (same height floors)

If your two floors sit at the same height, T-molding provides a clean, durable seam that covers the gap and allows for slight movement between materials.
You’ll choose T-molding for hardwood-to-laminate or tile-to-laminate connections where heights match.
Install by centering the T, fastening the included track, then snapping the profile in place.
It accommodates expansion while creating a neat finish.
Reducer (higher to lower floor)
While T-molding works for floors of equal height, a reducer handles cases where one floor sits higher than another by creating a gentle slope between them.
You use reducers where a thicker floor like hardwood meets thinner flooring like vinyl. They protect edges, hide height differences, and allow smooth changes for foot traffic and wheels.
Install by anchoring the metal track and snapping the profile in place.
Threshold/End cap (doorways, hard-to-hard)
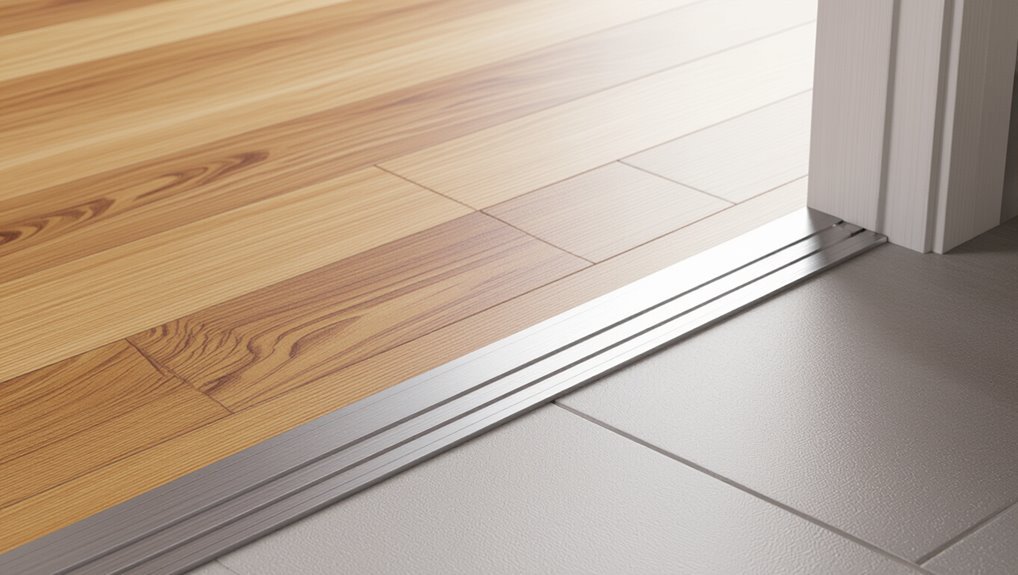
Install a threshold (also called an end cap) where your hard flooring meets another hard surface—typically at doorways—to create a clean, protective edge and cover any minor height or expansion gaps.
You’ll measure the opening, cut the threshold to fit, and secure it with screws or adhesive to the subfloor.
Choose a matching finish for seamless appearance and durability.
Stair nose and overlap reducer (edges, steps)
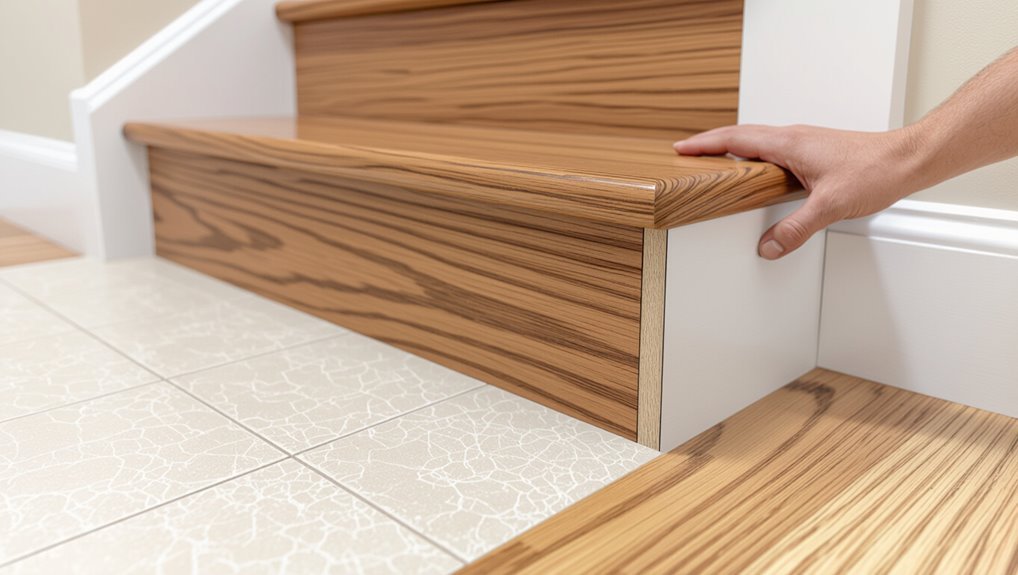
1 simple changeover you’ll often use on stairs is the stair nose, and an overlap reducer works when a finished floor meets a lower surface—both protect edges, hide gaps, and create a smooth, safe profile where floors change elevation.
You’ll fit stair noses to front edges for wear resistance and code compliance, and use overlap reducers where one floor slightly overlaps another to prevent tripping.
Flexible vinyl joiners and carpet transitions (soft or irregular edges)

Because soft edges and irregular surfaces don’t work well with rigid metal strips, flexible vinyl joiners and carpet connections give you a forgiving, low-profile solution that stretches, bends, and tucks to match contours.
You cut to fit, glue or use seam tape, and press edges into place. They hide gaps, prevent fraying, and create a smooth connection without rigid anchoring or complex trimming.
Comparison chart of strip types, materials, pros/cons, and typical use cases
There are several common junction strip types—T-molding, reducer, threshold/overlap, end cap, stair nose, and flexible vinyl—each made from materials like aluminum, wood, PVC, or rubber and suited to specific floor joins; below you’ll find a concise comparison of materials, pros and cons, and typical use cases to help you pick the right strip for your situation.
| Type | Use/Notes |
|---|---|
| T-molding | Joins same-height floors; neat, durable |
| Reducer | Drops to lower floor; smooth shift |
| Threshold | Doorways; covers gaps, seals |
| End cap | Against walls; finishing edge |
Measure and Prepare Pre-installation Checklist
Before you start, measure the gap and height difference between floors and check room moisture/expansion requirements so you pick a strip that fits and won’t buckle.
Choose a material and finish—wood, metal/aluminum, vinyl or PVC—that matches your flooring and traffic needs.
Prep the site by cleaning, leveling the subfloor, removing trim, acclimating materials, and wearing proper protective gear.
How to measure gap, height difference, and room moisture/expansion needs
Start by taking three essential measurements: the gap between the two floor surfaces, the height difference from one side to the other, and the room’s moisture/expansion characteristics so you can choose a connector strip that fits and performs.
Then record:
- Gap width at several points
- Vertical step or taper height
- Subfloor flatness
- Room humidity and seasonal swing
- Expansion allowance needed
Choosing material and finish to match flooring (wood, metal, aluminum, vinyl, PVC)
When you pick a junction strip, match both material and finish to the adjoining floors so the joint looks intentional and performs well; choose wood for hardwood, aluminum or metal for modern or high-traffic areas, and vinyl/PVC for moisture-prone or flexible floors.
Match stain or anodized finish, edge profile, and thickness.
Prioritize durability, slip resistance, and color continuity for a seamless changeover.
Site prep: cleaning, leveling subfloor, removing trim, acclimating materials
After you’ve picked the right strip and finish, prepare the site so installation goes smoothly: clear the work area, give floors a thorough cleaning, and check that the subfloor is level where the pieces will meet.
Remove baseboard or threshold trim as needed, fill low spots with patching compound, sand high areas, and let new materials acclimate in the room for 48–72 hours before fitting.
Safety considerations and protective gear
Before you cut, trim, or fasten anything, put on the right protective gear and take basic safety steps: safety glasses, ear protection for power tools, work gloves, and a dust mask or respirator for sanding or cutting; secure loose clothing and tie back long hair; and make sure the work area is well lit and free of tripping hazards so you can work deliberately and safely.
- Check tool guards and cords
- Clear and mark the work zone
- Use clamps for small pieces
- Ventilate when using adhesives
- Keep a first-aid kit nearby
Step-by-Step Installation Guide (Universal Method with Variations)
Start by dry-fitting the strip, marking its placement, orientation, and any screw slots so you know where to cut and fasten.
Cut and finish the strip to length, choose whether to use adhesive or a metal track for the substrate, and pick the fastening method—screws, nails, adhesive, or snap-in—based on flooring types.
Finally, install and secure the strip, checking height, alignment, and gap control as you go.
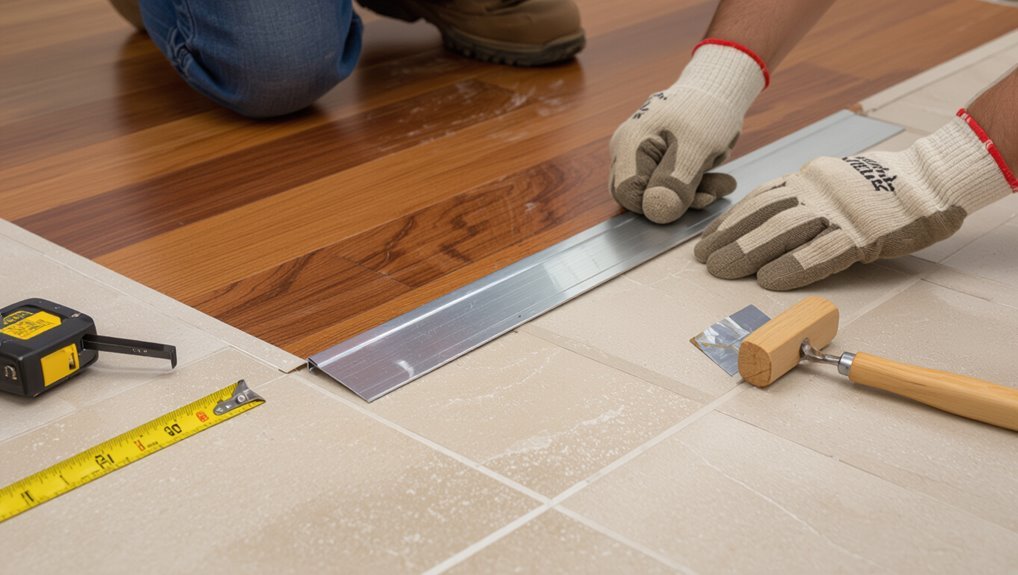
Step 1 Dry-fit and mark placement; confirm orientation and screw-slot locations
Position the changeover strip where it will sit, dry-fit it along the joint, and check that the profile faces the correct direction and the screw slots line up with the floor substrate.
Once aligned, mark slot centers and end positions with a pencil.
Verify the strip sits flush across both surfaces and that any fastening holes avoid joists, underlayment gaps, or loose boards before proceeding.
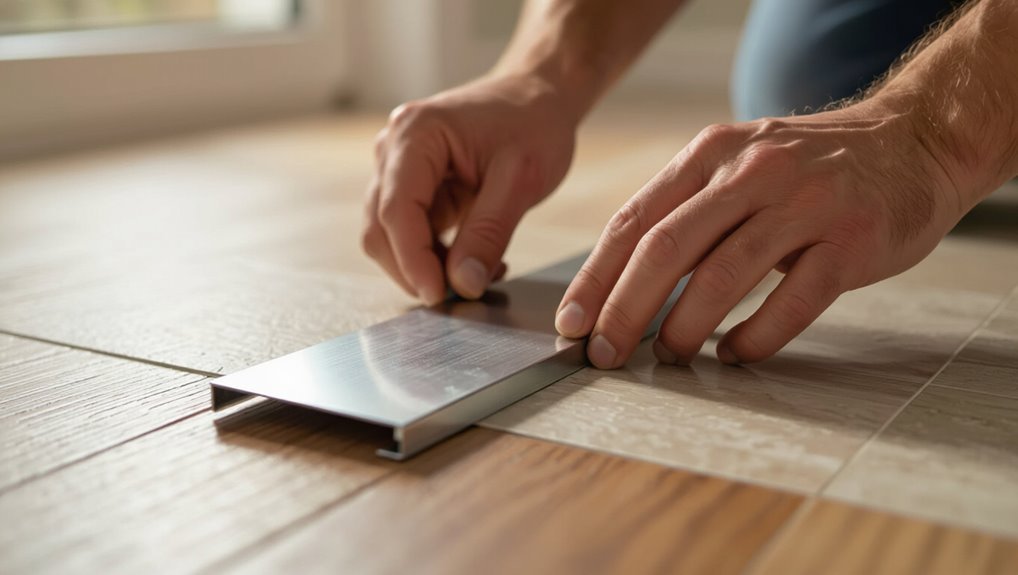
Step 2 Cut the transition strip to length and finish edges (tools and tips)
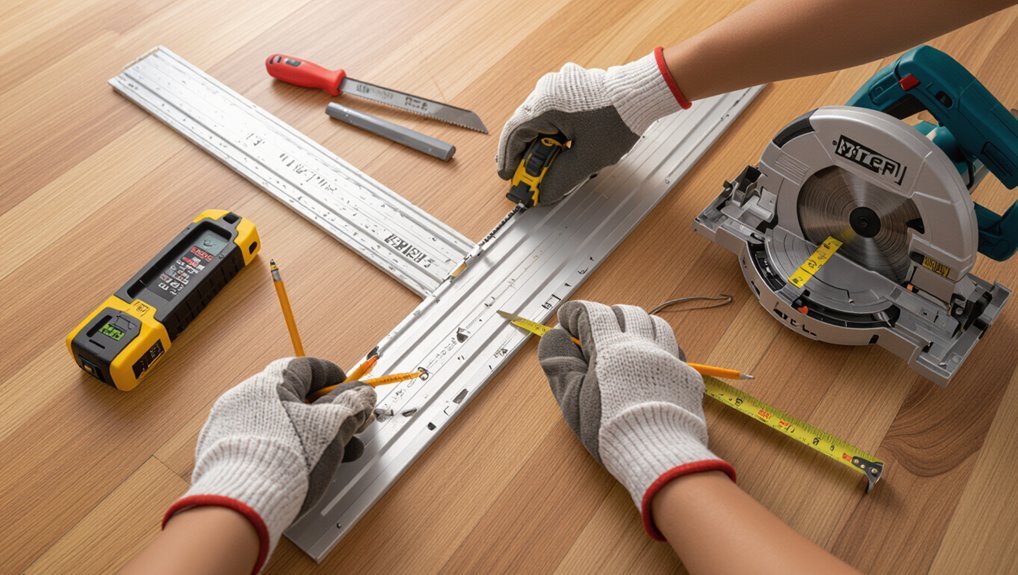
Measure twice and cut once: trim the threshold strip to the marked length using the appropriate saw and blade for the material—hacksaw or miter saw with a fine-tooth carbide blade for aluminum, a carbide-tipped blade for hardwood, and a fine-tooth blade or oscillating tool for vinyl.
File or sand ends smooth, deburr metal, and chamfer edges slightly to prevent catching.
Test fit, adjust, and clean cutting debris.
Step 3 Prepare substrate: adhesive or metal track installation options
Once you’ve confirmed the strip fits, decide whether you’ll bond it directly to the subfloor or mount it to a metal track—each method needs different prep.
Clean surface, remove debris and old adhesive. Level low spots.
Dry-fit track or strip. Apply primer if manufacturer recommends.
Allow adhesive open time per instructions; align carefully before final placement.
Step 4 Fastening methods: track with screws, adhesive, nails, or snap-in systems (when to use each)
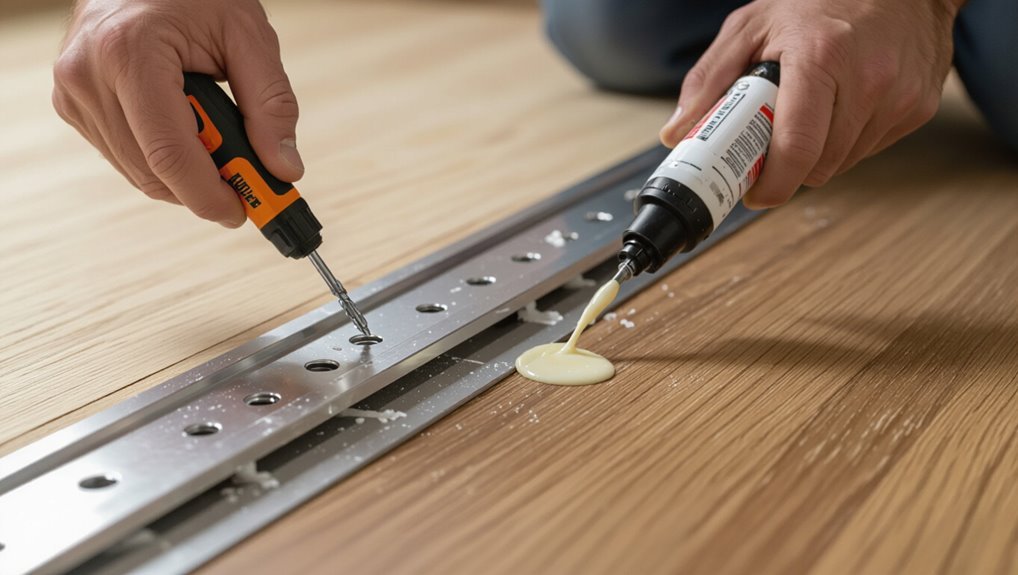
Because different strip types and substrates demand different anchors, choose a fastening method that matches your floor material, traffic level, and manufacturer specs.
Use screw-mounted metal tracks for heavy traffic and concrete or plywood subfloors.
Apply adhesive for glued vinyl or low-traffic areas and where drilling isn’t possible.
Use finish nails for wood-to-wood connections.
Snap-in systems suit floating floors needing removable strips.
Step 5 Install the strip and secure; ensure height/alignment and gap control
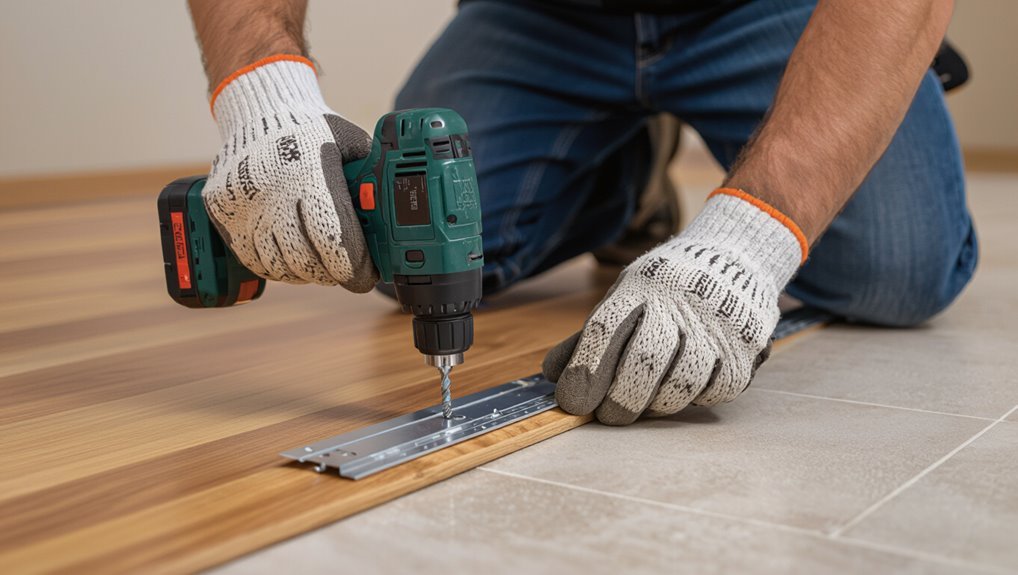
Set the strip in place and fasten it according to the method you chose, checking that the top of the junction sits flush with both floor surfaces and the gap under it stays consistent.
Align ends with installed pieces, tighten screws or press snap-in profiles evenly, and press adhesive-bonded strips firmly.
Confirm no rocking, maintain expansion gap per instructions, and recheck level along the entire length.
Step 6 Finish touches: sealant, trim, color-matching, and cleanup
Finish strong by attending to the small details that make the change look professional and last longer. You’ll seal gaps, trim edges, and blend colors so the shift reads as intentional.
Clean thoroughly. Protect surrounding floors. Consider these final actions:
- Apply bead of flexible sealant
- Trim excess material
- Touch up with matching stain/paint
- Wipe adhesive residue
- Inspect and tighten fasteners
Variations: hardwood-to-tile, laminate-to-carpet, vinyl-to-concrete, and uneven subfloor solutions
When you move from one flooring type to another, the shift method and profile change to match material thickness, movement, and wear — so you’ll pick different strips, adhesives, and prep steps for hardwood-to-tile, laminate-to-carpet, vinyl-to-concrete, or uneven subfloors. Choose reducer, T-molding, threshold, or joining plate; shim or level uneven areas; use proper adhesive and expansion gaps.
| Situation | Solution |
|---|---|
| Hardwood→Tile | Mortar bed, metal threshold |
| Laminate→Carpet | Carpet bar, tapered reducer |
| Vinyl→Concrete | Adhesive strip, moisture test |
Common Problems and How to Fix Them
You’ll run into a few common issues when installing threshold strips, but most have simple fixes.
If gaps are too wide or narrow, resize the strip or add a filler; for height mismatches use shims or a reducer profile.
Re-tighten loose or squeaky strips and let adhesives fully cure, and hide visible seams or color differences with light sanding, staining, or a cosmetic cover.
Gap too wide or narrow resizing and filler strategies
If the gap between your two floors is too wide or too narrow, you’ll need to resize the threshold strip or add a filler to guarantee a secure, neat fit; measure the gap, trim the strip with a hacksaw or file, and test fit.
For gaps still large, cut a thin plywood or MDF shim, glue under the strip, or use matching vinyl/wood filler to hide voids.
Height mismatch after installation shim and reducer adjustments
Although a floor changeover can look right on the surface, height mismatches often show up after installation and cause tripping hazards or gaps.
So you’ll want to address them immediately. Check with a straightedge across both floors, then trim shims or raise the lower floor with thin underlayment.
Use an adjustable reducer or plane the higher edge carefully until surfaces align flush.
Loose or squeaky strips re-fastening and adhesive cures
When a junction strip feels loose or starts squeaking underfoot, it usually means the fasteners have shifted or the adhesive didn’t set properly.
You’ll want to re-secure it before damage spreads. Tighten or replace screws, drive anchors into solid substrate, lift the strip, clean surfaces, apply fresh construction adhesive or epoxy, clamp or weight until cured, then test for movement and noise.
Visible seams or color mismatch sanding, staining, or cosmetic covers
Because junctions sit between different floors and often use different materials or finishes, you’ll notice seams or color mismatches right away.
You can fix most of these issues with sanding, staining, or thin cosmetic covers designed for junctions. Lightly sand edges, match stain samples on scrap, apply stain in thin coats, and seal.
For stubborn contrasts, install a slim metal or wood cover to hide the seam.
Best Practices and Pro Tips
Plan for seasonal expansion and movement so your shift won’t buckle or gap as temperatures change.
Match the strip to your flooring and pick low‑maintenance materials, and know when a pro is worth it—complex thresholds, radiant heat, or structural concerns.
Save money by buying quality, standard sizes, and prepping correctly to avoid costly fixes.
Planning for floor movement and seasonal expansion
Although floors look solid, they expand and contract with temperature and humidity, so you need to allow movement when installing connector strips.
Leave proper expansion gaps per manufacturer specs, use flexible profiles or slotted fasteners, and avoid rigid bonding across dissimilar substrates.
Check seasonal high/low moisture levels, secure but not constrict the strip, and test mobility before finishing to prevent buckling or gaps.
Matching aesthetics and choosing low-maintenance materials
When you pick a connector strip, think of it as a small but visible design element that should tie adjoining floors together rather than call attention to the seam.
Choose finishes that complement both floors—wood grain for hardwoods, brushed metal for modern tiles.
Prefer durable, scratch‑resistant materials like aluminum or PVC with a low‑gloss finish, and seal edges to simplify cleaning and reduce upkeep.
When to call a pro: complex thresholds, radiant heat, or structural issues
If your threshold involves uneven floor heights, built‑in changes, radiant floor heating, or anything that affects subfloor integrity, call a pro—these situations can hide wiring, piping, or load‑bearing concerns that a DIY fix won’t safely address.
A pro evaluates structural ties, heat manifolds, and moisture barriers, recommends appropriate changeover types, secures fastening to avoid thermal damage, and guarantees local code compliance for safety.
Cost-saving tips without compromising durability
Because smart choices up front save you money over the long run, focus on selecting durable materials and installing them correctly the first time.
You’ll avoid replacements and hidden costs. Use these tips:
- Buy quality aluminum or engineered wood inserts.
- Measure twice, cut once.
- Reuse sound underlayment where possible.
- Choose finishes that resist wear.
- Invest in right fasteners and adhesives for longevity.
Tools, Materials, and Estimated Time & Cost
You’ll need a few basic tools—tape measure, saw or shears, drill, screws or adhesive—and I’ll note simple alternatives if you don’t own specialty gear.
I’ll outline common material choices (aluminum, wood, vinyl, brass), typical price ranges and durability so you can pick what’s right for your floor.
Finally, expect time estimates by changeover type and difficulty level so you can plan the job and budget.
Essential tools list and alternatives for DIYers
Gathering the right tools up front makes installing a floor junction strip faster and prevents last-minute trips to the hardware store. You’ll need basics and a few alternatives if you don’t own specialty items:
- Tape measure
- Miter saw or hacksaw (for metal)
- Drill and bits or screwdriver
- Rubber mallet or hammer with scrap wood
- Construction adhesive or screws and anchors
Plan 1–2 hours.
Material options with price ranges and durability expectations
With your tool list ready, next look at material choices so you can match performance and cost to your floor types. You’ll pick wood, aluminum, brass, vinyl, or rubber based on wear, traffic, and budget. Below compares typical price and lifespan to guide selection.
| Material | Price / Lifespan |
|---|---|
| Wood | Moderate / 5–15 yrs |
| Aluminum | Low–Moderate / 10–30 yrs |
| Brass | High / 20–50 yrs |
| Vinyl | Low / 3–10 yrs |
| Rubber | Low / 5–15 yrs |
Typical time estimates by transition type and difficulty level
Estimating time and cost depends on the change type and your skill level: simple reducer or T-molding installs on flat floors often take 30–90 minutes and need basic tools (tape measure, saw, drill, screws, adhesive) with materials costing $10–$50;
threshold strips or nosing where floors meet different heights usually require 1–3 hours plus shims or plywood underlayment and run $20–$100;
complex metal or brass saddle changes, uneven subfloors, or routed/jointed wood pieces can take half a day to a full day, may call for a router, files, epoxy, and anchors, and typically cost $50–$200 in materials.
FAQ
You’ll likely have questions about installing changeover strips over existing flooring, the proper expansion gap to leave, and whether adhesive-only methods hold up long-term.
You’ll also want to know how to match strips to engineered versus solid hardwood and if strips can be reused when you replace flooring.
Below are concise answers to help you decide and proceed with confidence.
Can I install a transition strip over existing flooring without removing anything?
Wondering if you can lay a changeover strip over your existing floor? Yes—often you can, provided the surface is level, clean, and securely fastened.
Use a surface-mount transition or an adhesive-backed profile designed for overlays. Avoid building up too much height that creates a trip hazard.
Check manufacturer recommendations and verify thresholds, door clearance, and flooring stability before proceeding.
What gap size should I leave between floors for expansion?
If you’re overlaying or joining two floor types, leave a consistent expansion gap so each material can move with humidity and temperature changes.
Generally, leave 1/4 inch for engineered wood or laminate, 1/2 inch for solid hardwood, and 1/8–3/16 inch for vinyl.
Check manufacturer specs and local climate considerations; when in doubt, err toward a slightly larger gap to prevent buckling.
Are adhesive-only installations reliable long-term?
Although adhesive-only installations can work well in low-traffic, climate-stable areas, they’re not universally reliable long-term.
You’ll see failures where movement, moisture, or frequent foot traffic breaks bond or lifts edges. Use adhesive-only for temporary or sheltered situations; for durability choose mechanical fasteners or a hybrid method.
Regular inspection and prompt re-bonding can extend lifespan but won’t eliminate risk.
How do I match a transition strip to engineered hardwood vs. solid hardwood?
How should you pick a junction strip that suits engineered hardwood versus solid hardwood?
Choose a strip matching thickness and finish: engineered often sits thinner, so use lower-profile or reducer profiles; solid may need taller nosing or T-mold.
Match wood species and stain for appearance.
Allow movement for engineered floating installations and secure solid wood strips to subfloor per manufacturer recommendations.
Can transition strips be reused if I replace flooring?
After matching profiles and finishes for your new floor, you’ll want to know whether you can reuse the existing strip when you replace flooring.
Often you can if the profile, width, and finish match and the strip isn’t damaged. Remove it carefully to preserve mounting hardware.
If heights, attachment type, or wear don’t align, replace the strip for a secure, neat connection.
Quick Checklist for Final Inspection Before Use
Before you step back and call the job done, run through a quick inspection checklist to confirm the swap strip is secure, level, and damage-free.
- Check that the strip is firmly anchored with no movement.
- Verify the top is flush and level with both floors.
- Make certain screws or clips are tightened and concealed.
- Look for scratches, dents, or gaps.
- Test walking over it to confirm stability and noise-free passage.