How to Install Vinyl Sheet Flooring With Adhesive for a Wrinkle-Free Result
You can get wrinkle-free vinyl sheet flooring by prepping your subfloor, acclimating the sheet, and using the right adhesive and tools. Clean and level the floor, dry-fit and trim the sheet, then apply full-spread or recommended adhesive with the correct notched trowel. Lay and smooth while unrolling, then use a 75–100 lb roller and seam sealer or welds where needed. Work in manageable sections, control temperature and humidity, and follow cure times—keep going to learn detailed tips and troubleshooting.
Can You Install Vinyl Sheet Flooring with Adhesive Without Wrinkles?
Yes—you can install vinyl sheet flooring with adhesive without wrinkles by working slowly, smoothing from the center outward, and using the right adhesive technique.
You’ll need a heavy-duty roller, a notched trowel or recommended adhesive applicator, a utility knife, seam roller, and clean rags or solvent for cleanup.
Prep tools like a straightedge, floor primer, and a weight or knee kicker also help guarantee a flat, wrinkle-free finish.
Short summary of the best approach
You can install vinyl sheet flooring with adhesive and still avoid wrinkles by preparing the subfloor, using the right adhesive and application technique, and working methodically to smooth the sheet as you go.
Follow these core steps for how to install vinyl sheet flooring with adhesive:
- Clean and level the subfloor
- Measure and cut precisely
- Apply adhesive evenly
- Roll from center outward
- Trim and secure edges
Recommended tools and materials for wrinkle-free results
Having the right tools and materials makes wrinkle-free installation far more likely, so gather them before laying adhesive.
You’ll work cleaner and faster with quality gear. Essential items include:
- Notched trowel sized to adhesive specs
- Heavy-duty floor roller (75–100 lb)
- Sharp utility knife and straightedge
- Seam roller and seam sealer
- Primer, adhesive, and clean rags
Basic Understanding What Is Vinyl Sheet Flooring and Why Wrinkles Happen
Vinyl sheet flooring is a continuous, flexible sheet available in types like cushioned, fiberglass-backed, and luxury vinyl, and you’ll choose based on durability and feel.
Wrinkles and bubbles usually come from the material shifting, moisture or irregularities in the subfloor, or errors during cutting and adhesive application.
You’ll generally pick full-spread adhesive for high-traffic or long runs, loose-lay for quick installs on flat surfaces, and peel-and-stick for small or temporary areas.
What vinyl sheet flooring is and common types
Think of vinyl sheet flooring as a continuous, flexible roll of resilient material that covers a room in one seamless layer; it’s made of multiple layers—a printed design layer, a wear layer, and a backing—that together give it durability, water resistance, and a range of looks from stone to wood.
- Homogeneous: single-layer, durable
- Heterogeneous: layered designs
- Cushion-backed: softer underfoot
- LVT-style: luxury visuals
- Heat-weldable: sealed seams
Causes of wrinkles and bubbles (material, subfloor, installation errors)
Now that you know the basic constructions and types, you’ll want to understand why the sheet can wrinkle or trap bubbles once it’s down.
You’ll face issues from materials, subfloors, or technique. Common causes include:
- Temperature-induced expansion/contraction
- Moisture in subfloor
- Uneven or rough substrate
- Improper adhesive application
- Poor smoothing or tacking during installation
When to use adhesive vs. loose-lay or peel-and-stick
1 clear choice you’ll make is how to secure the sheet: full-spread adhesive, loose-lay, or peel-and-stick, and each has trade-offs that affect wrinkle and bubble risk.
Use full-spread adhesive for high-traffic areas and unstable subfloors to minimize movement.
Choose loose-lay for large, flat spaces and easy replacement.
Pick peel-and-stick for small rooms or budget jobs, knowing adhesive strength and wrinkles may vary.
Preparation Assessing and Preparing the Room for a Smooth Installation
Before you lay a single sheet, measure the room and add allowances for seams and any pattern matching so you order enough material.
Check and prep the subfloor—level, test for moisture, and clean thoroughly—and let the vinyl and room sit at the recommended temperature and humidity to acclimate.
Finally, mark your layout, seam lines, and changeover points so installation goes straight and trouble-free.
Measuring and estimating material (allowances for seams and pattern)
Accurate measurements make the difference between a tidy vinyl installation and a wasteful, frustrating job, so take the time to measure methodically and account for seams and pattern repeat.
You’ll calculate coverage, add waste, and plan seams. Consider:
- Measure room length and width precisely
- Map seam locations for least visibility
- Add 10% waste minimum
- Allow extra for pattern repeat
- Round up for cuts and mistakes
Inspecting and preparing the subfloor (leveling, moisture testing, cleaning)
Start by inspecting the subfloor for level, moisture, and cleanliness so you’ll catch problems that can wreck a vinyl installation.
Fix dips or high spots, test moisture, and clean thoroughly. Then address issues using appropriate products.
Follow this checklist:
- Check flatness with a straightedge
- Perform a moisture test
- Remove debris and adhesive residue
- Repair cracks and holes
- Prime porous surfaces
Acclimating the vinyl sheet and room conditions (temperature and humidity)
While your subfloor settles, let the vinyl sheet acclimate in the room where it’ll be installed so it reaches the same temperature and humidity as the space; this prevents shrinking, buckling, or seams that won’t lie flat after installation.
- Keep doors/windows closed for 48–72 hours
- Maintain 65–85°F (18–29°C)
- Hold relative humidity at 35–65%
- Lay sheet flat, unrolled
- Remove packaging materials
Marking layout, seams, and transition points
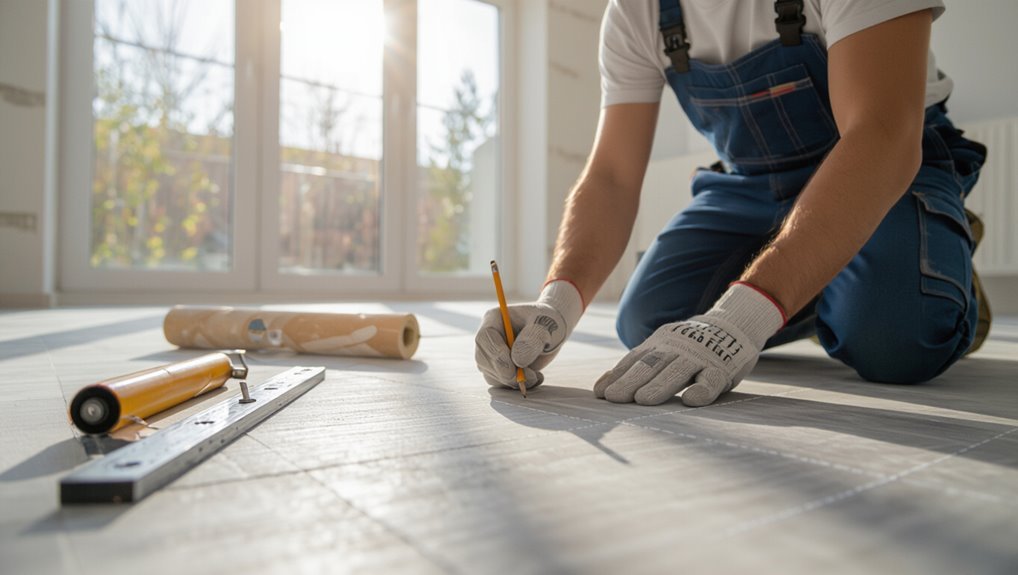
1 clear layout makes the rest of the job go faster and cleaner: mark where sheets will run, where seams will fall, and where changes to other flooring or thresholds will sit so you can cut and plan before adhesive or fasteners go down.
Then snap chalk lines for sheet centers, penciled seam offsets, and junction locations. Verify alignment with doorways and fixed cabinets before trimming or sticking.
Materials, Tools, and Adhesive Selection
Now you’ll choose the right adhesive and gather the tools to get the job done.
Learn which adhesives (pressure-sensitive, full-spread, or loose-lay-compatible) suit different subfloors and traffic levels, and pick essential tools like a notched trowel, seam roller, floor roller, and a sharp utility knife.
Don’t forget safety gear—gloves, knee pads, respirator if needed—and cleanup supplies for adhesive spills and proper disposal.
Types of adhesives for vinyl sheet flooring and when to use each
Adhesives make or break a vinyl sheet installation, so you’ll want to pick the right type for your subfloor, traffic level, and room conditions. Use pressure-sensitive for repositionable installs, wet-set for high traffic, and acrylic for moisture-prone areas. Choose solvent-based only where ventilation and regulations allow.
| Type | Best for | Notes |
|---|---|---|
| Pressure-sensitive | Residential | Repositionable |
| Wet-set | High-traffic | Permanent |
| Acrylic | Moisture areas | Low odor |
| Solvent-based | Industrial | Ventilation required |
Recommended tools and equipment (rollers, trowels, seam rollers, utility knives)
With your adhesive chosen, gather the right tools so you can apply it accurately and finish seams cleanly.
- 3″ or 6″ V-notch trowel for even adhesive spread
- 100 lb floor roller to remove bubbles and guarantee bond
- Seam roller for tight, flat seams
- Sharp utility knife with extra blades for precise cuts
- Straightedge and chalk line for accurate alignment and trimming
Safety gear and cleanup supplies
Before you start spreading adhesive, equip yourself with proper safety gear and cleanup supplies so you can work confidently and handle spills or fumes.
You’ll need personal protection and tools to manage adhesive safely and cleanly:
- NIOSH-rated respirator or mask
- Chemical-resistant gloves
- Safety glasses
- Disposable rags and paper towels
- Solvent and plastic scraper for adhesive removal
Step-by-Step Installation Process (Wrinkle-Free Focus)
Start by dry-fitting the sheet so you can choose single-sheet placement or match seams and make any adjustments before cutting.
Trim the sheet to fit walls and obstacles, then follow adhesive manufacturer instructions for coverage patterns and open time as you apply.
Lay the sheet carefully, align it while smoothing, and finish by rolling with steady pressure to remove wrinkles and trapped air.
Step 1 Dry fit and adjust sheet layout (single sheet vs. seam matching)
Dry-fit the vinyl sheet so you can see how it lays and where seams will fall; doing this lets you assess pattern matching, trim needs, and potential tension points that cause wrinkles.
Walk the sheet, smooth overlaps, and align patterns if using multiple sheets.
Adjust seams toward less visible areas, keep seams straight, and note areas that need extra slack to prevent puckering before adhesive.
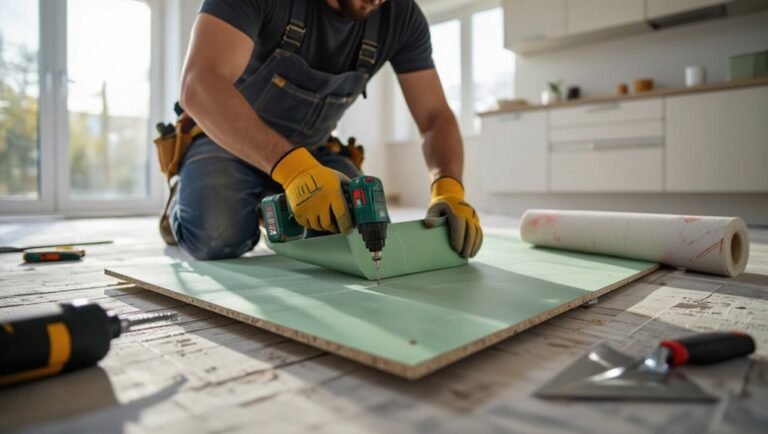
Step 2 Cutting and trimming to fit perimeter and obstacles
With the sheet positioned and seams settled from the previous step, you’ll cut and trim the vinyl so it fits snugly against walls, doorways, and obstacles without pulling or puckering.
Use sharp tools and steady hands to avoid jagged edges.
- Measure twice, cut once
- Score and snap for straight cuts
- Use a utility knife for curves
- Trim excess gradually
- Leave tiny expansion gaps
Step 3 Applying adhesive: techniques, coverage patterns, open time
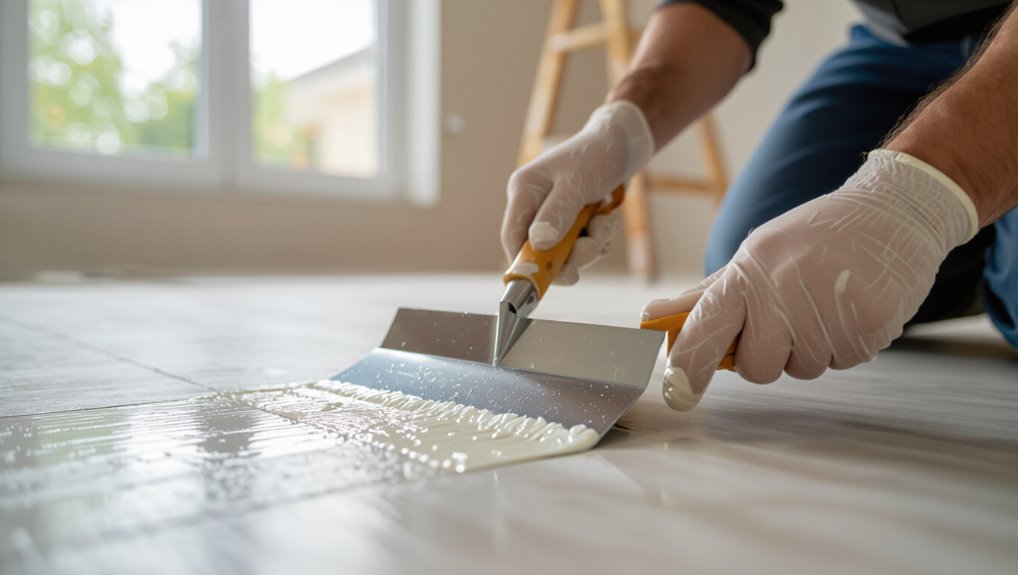
Apply the adhesive methodically to guarantee full contact and eliminate wrinkles: spread it in consistent patterns, follow the manufacturer’s recommended trowel size and coverage rate, and respect the open time so the glue becomes tacky but not dry before you lay the sheet.
Work in manageable sections, comb adhesive evenly, avoid puddles, and check tackiness frequently; adjust technique for temperature and substrate porosity.
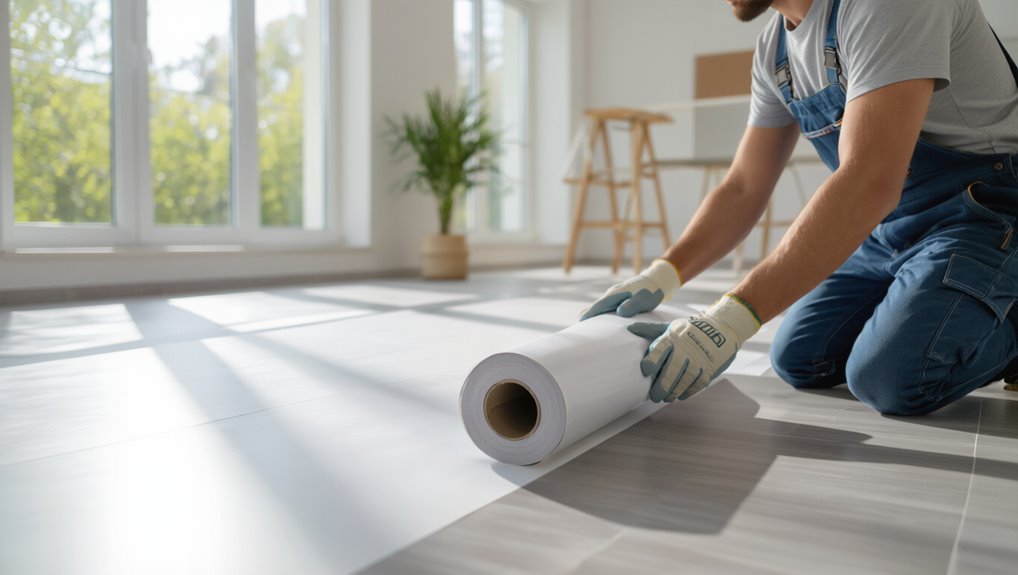
Step 4 Laying the sheet smoothly and controlling alignment
Start at a straight reference line and unroll the sheet slowly, keeping it flat as you work toward the far wall so you can spot and correct misalignment early.
You’ll control alignment and smooth edges by:
- Aligning pattern seams with marks
- Adjusting side-to-side before adhesive sets
- Maintaining equal overhangs
- Checking corners frequently
- Using temporary weights to hold position
Step 5 Rolling and pressure techniques to eliminate wrinkles and trapped air

Roll the floor roller over the vinyl in overlapping passes to press out air and seat the sheet into the adhesive.
Start from the center toward seams and edges, applying steady, even pressure.
Use a smaller hand roller for tight spots and corners.
If you spot bubbles, lift slightly, re-squeegee adhesive, then re-roll.
Repeat passes until the surface lies flat and smooth.
Step 6 Seaming and welding multiple sheets for a continuous finish
When your room requires more than one sheet, align the edges carefully so seams meet with a tight, even gap (usually about 1/16″ to 1/8″) to allow for heat-welding without crowding the joint.
Then:
- Trim edges square and clean seam area
- Use seam sealer where recommended
- Heat-weld per manufacturer instructions
- Press the weld flat with a roller
- Cool and inspect for continuity and strength
Step 7 Trimming, sealing edges, and installing trims/transitions
- You’ll trim excess vinyl, seal edges, and fit trims for a clean, durable finish. Follow these steps:
- Score and trim with a straightedge for precise cuts.
- Apply seam sealer at exposed edges.
- Roll edges to bond adhesive firmly.
- Install connector strips at doorways.
- Fasten base shoe or quarter round to hide gaps.
Check alignment as you go.
Step 8 Curing time, initial traffic, and post-installation checks
Although the adhesive feels set quickly, you’ll need to let the floor cure fully before heavy use; give it the manufacturer’s recommended cure time (typically 24–72 hours) to achieve full bond strength and prevent wrinkles or shifting.
- Keep traffic light for initial 48–72 hours
- Avoid rolling heavy furniture
- Check seams for gaps
- Trim any raised edges
- Clean gently after cure
Common Problems and How to Fix Them
You’ll sometimes see small wrinkles or blisters that you can smooth and patch without redoing the whole floor.
If large wrinkles or shifting occur, you’ll likely need to remove and reinstall the sheet to get proper adhesion and alignment.
Also watch for adhesive failures and stains—clean, reapply adhesive where needed, and use proper primers and sealing to prevent recurrence.
Small wrinkles and blisters identification and repair methods
When small wrinkles or blisters appear in your vinyl sheet flooring, they usually mean trapped air, moisture, or improper adhesion during installation; acting quickly will keep the damage from spreading and make repairs easier.
- Locate and mark affected spots
- Puncture blisters and expel air gently
- Apply adhesive under wrinkle with syringe
- Press smooth with roller or weighted board
- Wipe excess and let cure per adhesive instructions
Large wrinkles or shifting after installation removal and reinstallation options
Spot large wrinkles or shifting early, because they usually mean the sheet wasn’t laid flat, adhesive failed, or the substrate moved — and small fixes won’t hold.
- Assess extent; mark affected area.
- Cut perimeter and lift carefully.
- Remove old adhesive and clean substrate.
- Re-level or repair substrate as needed.
- Reapply adhesive, reposition sheet, roll and weight until cured.
Adhesive failures and staining remediation and prevention
Because adhesive issues and stains can both ruin the look and performance of vinyl sheet flooring, you should tackle them quickly and methodically: identify whether the problem is weakening glue, chemical reaction, or surface contamination, then choose a fix—cleaning, patching, or full re-gluing—based on that diagnosis to prevent recurrence.
- Clean with manufacturer-safe cleaner
- Test solvents in a hidden area
- Remove and reapply adhesive where loose
- Patch small stained sections
- Seal edges to block moisture
Best Practices and Tips for a Professional Finish
To get a truly professional finish, you’ll want simple preventive steps to avoid wrinkles at every stage and techniques for handling long sheets and heated rooms.
Use pattern-matching tips and rolling/weight strategies to keep seams tight and aligned.
If the room is large, the pattern is complex, or wrinkles keep coming back, don’t hesitate to call a pro.
Preventive measures to avoid wrinkles during each phase
While you’re prepping, cutting, and laying vinyl sheet flooring, take deliberate steps at each phase to prevent wrinkles and guarantee a flat, long-lasting finish.
- Smooth subfloor; repair dips and ridges.
- Acclimate sheet to room temperature.
- Measure and cut with allowance for settling.
- Apply adhesive evenly; follow open time.
- Roll seams and full sheet with a weighted roller, working outward from center.
Pro tips for working with patterns, long sheets, and heated environments
When you’re matching patterns, handling long sheets, or working in heated rooms, plan each step so seams line up, tension stays neutral, and the material stays stable.
Follow tight technique to prevent wrinkles and misalignment:
- Align pattern repeats before cutting
- Use temporary weights to control long sheets
- Apply adhesive in sections
- Keep room temperature within manufacturer specs
- Avoid stretching during placement
When to call a professional installer
If matching patterns, managing long sheets, or controlling temperature has you worried about seams or stability, know when it makes sense to call a pro: hire an installer if the room layout is complex (multiple doorways, irregular angles, or stairs), if the sheets are large or need heat welding, if the subfloor has significant imperfections, or if you’re unsure about adhesive types and warranty requirements.
- Save time
- Guarantee flat seams
- Protect warranties
- Fix subfloor issues
- Handle heat welding
Comparison: Adhesive Methods and Their Impact on Wrinkling
When choosing an adhesive method, you’ll weigh full-spread’s strong grip against perimeter-glue’s easier replacement and pressure-sensitive’s repositionability.
Your substrate—concrete, plywood, or existing flooring—changes how well each adhesive bonds and how likely the sheet is to wrinkle.
Knowing substrate conditions and traffic needs helps you pick the adhesive that minimizes movement and creasing.
Full-spread adhesive vs. perimeter-glue vs. pressure-sensitive pros and cons
Although each adhesive method can secure vinyl sheet flooring, they differ markedly in installation technique, risk of wrinkling, and long-term performance. You’ll choose full-spread for maximum stability, perimeter-glue for easier replacement, or pressure-sensitive for repositioning. Match method to traffic and seams, and apply manufacturer’s trowel or transfer guidelines to minimize wrinkles.
| Method | Strength | Wrinkle Risk |
|---|---|---|
| Full-spread | High | Low |
| Perimeter-glue | Moderate | Moderate |
| Pressure-sensitive | Low | Higher |
How substrate type affects adhesive choice and wrinkle risk
Because different subfloors absorb moisture, flex, and texture in distinct ways, you’ll want to match the adhesive to the substrate to control how the vinyl lays and how likely it’s to wrinkle.
- Concrete: use moisture-tolerant full-spread
- Plywood: flexible adhesive to accommodate movement
- OSB: seal before gluing
- Tile: use pressure-sensitive for contours
- Radiant-heat: manufacturer-approved adhesive only
Cost, Timeframe, and Project Planning
You’ll usually finish a small DIY vinyl sheet job in a weekend, while a pro can wrap it up in a day depending on room size and prep.
Estimate costs for materials, adhesive type, and any specialty tools, and factor labor if you hire help.
Before you start, use a concise project-day checklist—room prep, adhesive type confirmed, temperature control, and smoothing tools at hand—to avoid wrinkles.
Typical time estimates for DIY vs. pro installation
When you’re planning a vinyl sheet flooring project, a realistic timeline helps you decide between DIY and hiring a pro: expect a weekend for a small room if you’re experienced, a few days to a week for average DIYers tackling 200–300 sq ft, and one to three days from a pro crew for the same space (plus drying or acclimation time).
- Prep and subfloor checks: 1–4 hours
- Cutting and fitting: 2–6 hours
- Adhesive application: 1–3 hours
- Rolling and seams: 1–2 hours
- Cleanup and trim: 1–3 hours
Cost breakdown: materials, adhesive types, tools, and labor
A clear cost breakdown helps you decide whether to DIY or hire pros and keeps your budget realistic: You’ll weigh material ($1–$5/ft²), adhesive (water-based vs. solvent), tools, and labor. Compare upfront and hidden costs, factor in contingency, and decide based on skill and time.
| Item | Typical Cost | Notes |
|---|---|---|
| Vinyl | $1–$5/ft² | Gauge affects price |
| Adhesive | $20–$80 | Water or solvent |
| Tools | $30–$200 | Rent options |
| Labor | $1–$4/ft² | Varies by region |
Checklist for project day to ensure wrinkle-free results
Before you start laying the sheet, double-check that the room, materials, and schedule are aligned so you can work steadily and avoid wrinkles.
Plan cost, timing, and tasks, then follow this checklist:
- Verify adhesive type and quantity
- Confirm temperature and humidity
- Clear and clean the floor
- Lay out sheet and trim allowance
- Allocate helpers and set milestones
Frequently Asked Questions
You’ll find answers here to common concerns like how long vinyl should acclimate, whether you can install over existing vinyl without wrinkles, and what adhesive open time helps prevent issues.
You’ll also learn how to fix wrinkles that show up weeks later and when heat welding seams is really necessary.
Keep these FAQs in mind before you start so you can avoid mistakes and plan repairs if needed.
How long should vinyl sheet acclimate before installation?
How long should vinyl sheet acclimate before you install it?
You should let sheets sit in the room where they’ll be installed for 48 to 72 hours at normal living temperature (65–85°F) and humidity.
This stabilizes dimensions, reduces expansion or contraction after adhesive sets, and helps prevent wrinkles.
Keep rolls untrimmed, flat, and away from direct sunlight during acclimation.
Can I install over an existing vinyl floor without wrinkles?
Can you lay new vinyl sheet over existing vinyl without ending up with wrinkles? Yes, if the old floor is smooth, firmly bonded, and free of seams, bubbles, or debris.
Clean, sand glossy finishes, and repair any damage. Use a compatible adhesive and roll the new sheet firmly as you set it to guarantee full contact.
Test a small area first.
What adhesive open time is best to prevent wrinkles?
If the old vinyl meets those conditions and you’re ready to glue the new sheet, pay close attention to adhesive open time to avoid wrinkles.
Choose an adhesive with a workable open time of 10–30 minutes for tacky-set products or 30–60 minutes for pressure-sensitive types.
Work steadily within that window, smoothing as you go, and avoid overexposure to air before placement.
How do I repair wrinkles that appear weeks after installation?
Why did wrinkles show up weeks after installation? They usually result from trapped moisture, inadequate adhesive coverage, or temperature shifts causing expansion.
To fix them, lift the affected area, reapply adhesive evenly, roll the sheet firmly, and trim any distorted edges.
Allow proper cure time and control room humidity and temperature to prevent recurrence.
Is heat welding necessary for all seams?
When you’ve smoothed and re-adhered an area, seams often become the next concern—especially where moisture or movement could let dirt in.
You don’t always need heat welding: for low-moisture, low-traffic rooms, seams sealed with a quality seam sealer or tightly butted and glued edges can suffice.
Use heat welding where water resistance and durability are critical, like bathrooms or commercial spaces.