How to Install Bathtub Tiles on Walls: A Clean and Waterproof Finish
You can get a clean, watertight bathtub surround by prepping the wall, installing cement backerboard, and adding a waterproof membrane before you set tile. Measure, snap level lines, and use thin-set mortar with a notched trowel, keeping consistent grout joints and using spacers. Let thinset cure, grout fully, then seal grout and caulk tub seams with silicone. Follow proper waterproofing and maintenance to prevent mold and damage, and keep going to learn tips and common pitfalls.
Can You Tile a Bathtub Wall and What It Takes
You can tile a bathtub wall yourself by prepping the substrate, waterproofing the area, laying tile with proper spacing, and grouting—plan on a weekend for a small patch or several days for a full surround.
If you’re comfortable with basic tiling, waterproofing, and precise cuts, this is a doable DIY; hire a pro if the wall has mold, structural damage, complex plumbing, or you want a flawless finish.
We’ll cover the step-by-step timeline, tools, and when to call in an expert.
Short summary of steps and time estimate
If you’re ready to tackle a bathtub wall, expect a few clear stages: remove old fixtures and damaged tile, prep and waterproof the substrate, lay tile with spacers and thinset, grout and seal, then reinstall trim and fixtures.
For how to install bathtub tiles on walls, plan 1–3 days for prep and waterproofing, 1–2 days for tiling, plus 1–2 days for grout curing and trim—about a week.
Who should attempt this project vs. when to hire a pro
Although tiling a bathtub wall is a doable DIY for many homeowners, it takes steady hands, careful planning, and some familiarity with tools and waterproofing to get professional-looking, long-lasting results.
You should tackle it if you’re comfortable measuring, cutting tile, managing waterproof membranes, and fixing mistakes.
Hire a pro for complex layouts, plumbing moves, uneven substrates, or if you lack time or confidence.
Basic Understanding Why Proper Bathtub Tile Installation Matters
You need proper tile installation to keep water out, prevent mold, and protect the wall and subfloor from long-term damage.
Choose the right tile and backer materials for tub surrounds—ceramic, porcelain, and natural stone each behave differently.
Also follow local building codes and waterproofing standards so your work stays safe and durable.
Water resistance, mold prevention, and structural integrity
Because water constantly challenges bathtub surrounds, proper tile installation isn’t just about looks — it’s about keeping moisture out, stopping mold before it starts, and making sure the wall and floor assemblies stay sound for years.
You’ll use waterproof backer board, continuous membranes, correct flashing, and sealed joints.
Proper slope, ventilation, and routine grout maintenance prevent rot and mold, preserving structural integrity.
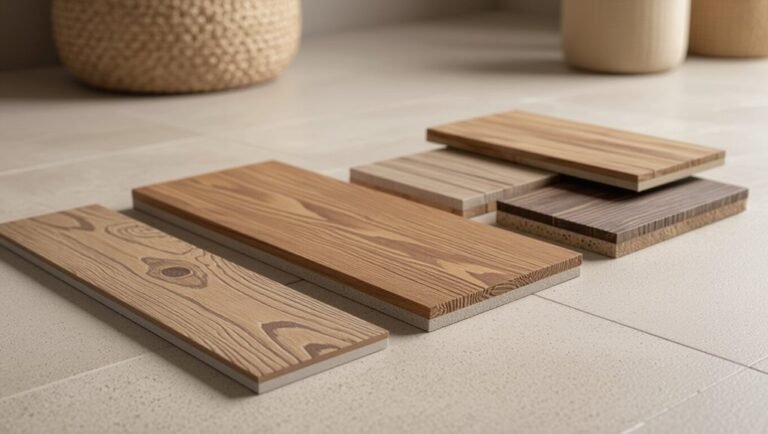
Common tile types and materials for tub surrounds
Tile choice shapes how a tub surround performs and looks, so pick materials that resist moisture, clean easily, and match your budget and style. You’ll often choose ceramic or porcelain for durability, natural stone for luxury (needs sealing), glass for accents, or large-format panels to minimize grout. Consider slip resistance, grout lines, and maintenance before deciding.
| Type | Notes |
|---|---|
| Ceramic | Affordable, versatile |
| Porcelain | Dense, water-resistant |
| Natural stone | Seals required |
| Glass | Accent, reflective |
Building codes and waterproofing standards to know
Choosing the right material is only part of the job; proper installation and waterproofing determine how long your tub surround will last and whether it will stay mold- and leak-free.
You should follow local building codes, use approved backer boards, membrane systems or liquid waterproofing, and slope niches and ledges.
Inspect flashing, use proper fasteners, and get permits or inspections when required.
Tools, Materials, and Preparation Checklist
Before you start tiling, gather the right tools and materials—trowels, spacers, a wet saw, thin-set, grout, waterproofing membrane, and safety gear.
Decide on the substrate (cement board, green board, or backerboard) based on moisture exposure and follow manufacturer recommendations for installation.
Prep the site by removing old materials, securing the substrate, and wearing gloves, eye protection, and a mask.
Tools required
You’ll need a compact set of tools and materials to work efficiently and safely: a notched trowel, tile spacers, a wet saw or tile cutter, a rubber grout float, a level, a tape measure, a hammer and chisel (for old grout or tile removal), appropriate thin-set mortar and grout, waterproofing membrane or sealant, and personal protective equipment like gloves and eye protection.
- Measure and mark precisely.
- Cut tiles cleanly.
- Apply thin-set uniformly.
- Grout and seal neatly.
Materials and consumables required
Gather the right materials and consumables so you can work efficiently and avoid delays: tile adhesive (thin-set) suited to your tile and substrate, grout, a waterproofing membrane or sealant, backer board or cement board if needed, tile spacers, appropriate screws or fasteners, edge trim, and enough replacement tiles to cover cuts and breakage.
- Tiles and trims
- Thin-set and grout
- Waterproofing and sealant
- Spacers, screws, extras
Substrate options and when to use cement board, green board, or backerboard
When your bathtub wall needs a stable, moisture-resistant base, choosing the right substrate makes the job last—use cement board or backerboard where tiles will get direct water exposure, and reserve moisture-resistant gypsum board (“green board”) only for dry, splash-free areas above the splash line.
Use cement board for tub surrounds, thinset directly on backerboard, and green board only above the splash line; seal joints.
Safety gear and site preparation

Before you start, equip yourself with the right safety gear and set up the work area so you can work quickly and safely: wear eye protection, a dust mask or respirator rated for silica, ear protection for power tools, gloves that resist cuts and chemicals, and knee pads.
Clear the bathroom of loose items, cover fixtures and the floor with drop cloths or rosin paper, and guarantee good ventilation and steady lighting.
- Verify tools (wet saw, drill, trowel)
- Gather materials (thinset, grout, spacers, backerboard)
- Seal openings and protect plumbing
- Plan tile layout and access paths
Pre-Installation Assessment and Surface Prep
Before you start tiling, inspect the studs, joists, and existing substrate for rot or movement so you know what needs repair.
Remove old tile and damaged substrate with controlled demolition, then repair framing and confirm drain and plumbing access are correct.
Finally, level and sheath the wall, dry-fit tiles to check layout, and adjust as needed before waterproofing.
Inspecting studs, joists, and existing substrate
Although you might be enthusiastic to start tiling, take time to inspect the studs, joists, and existing substrate so you know exactly what you’re working with; check for rot, mold, warping, or loose fasteners, and confirm framing is plumb and solid.
Verify substrate type, thickness, and flatness, note any gaps or bowing, and mark areas needing reinforcement or moisture barriers before proceeding.
Removing old tile and damaged substrate controlled demolition
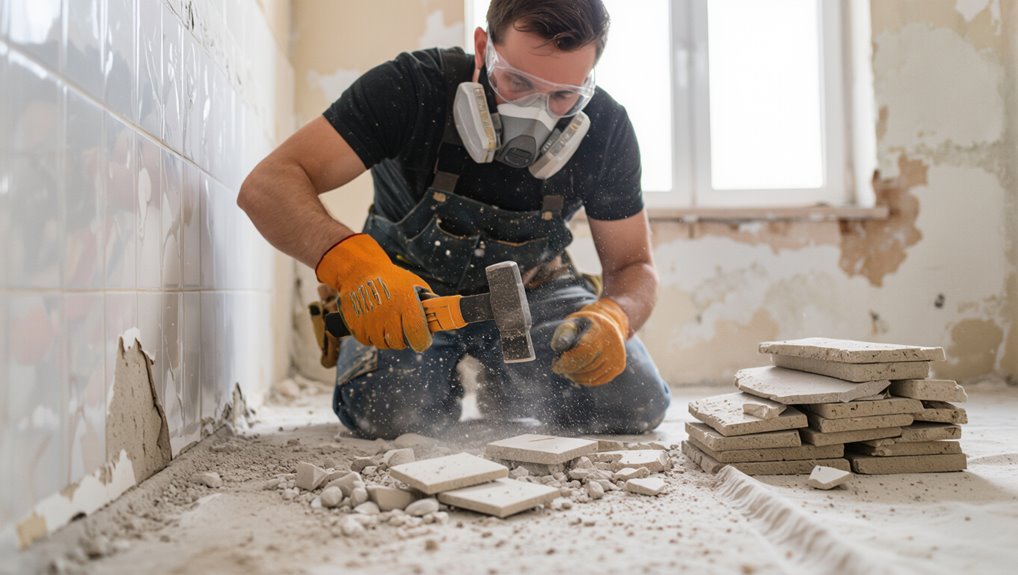
Start by scoring grout lines and chipping away loose tiles so you can expose the substrate and assess damage; work methodically with a hammer, cold chisel, or an oscillating tool to avoid harming surrounding surfaces.
Remove remaining tile, thinset, and backerboard sections that’re soft, moldy, or crumbling.
Bag debris, protect fixtures, and vacuum dust.
Stop at sound, stable substrate for next repairs.
Repairing framing and ensuring proper drain and plumbing access
1 essential step is confirming the framing and plumbing are sound and accessible so your new tile has a stable, watertight foundation.
Inspect studs for rot, replace or sister weakened members, and guarantee blocking supports fixtures.
Verify drain location, pipe clearance, and shutoffs; reposition or extend connections if needed.
Seal around penetrations and test for leaks before proceeding to substrate installation.
Leveling, sheathing, and dry-fitting tiles
Check the subfloor and studs with a straightedge and level to identify high or low spots. Then plane, shim, or sister framing until the surface is flat within 1/8″ over 12″ (or to the tile manufacturer’s tolerance).
Install cement backerboard or appropriate sheathing, screw and tape seams, waterproof joints, then dry-fit tiles, spacers, and trim to confirm layout, cuts, and plumb lines before final adhesive.
Waterproofing and Moisture Management (Critical Step)
Before you lay a single tile, you’ve got to make the area watertight: choose between sheet membrane, liquid-applied, or cementitious systems and follow the manufacturer’s method.
You’ll apply waterproofing step by step on tub walls, pay special attention to flashing, seams, and changes around fixtures, and seal all junctions thoroughly.
As you work, inspect overlaps, coverage thickness, cured seams, and fixture penetrations to catch problems before tiling.
Types of waterproofing: membrane, liquid-applied, and cementitious
When you’re ready to protect the tub area, choose the right waterproofing system—sheet membranes, liquid-applied coatings, or cementitious products—because each handles movement, seams, and substrate differently. You’ll pick membranes for seams, liquid for complex shapes, and cementitious for tile beds. Compare briefly:
| Type | Best use |
|---|---|
| Sheet membrane | Seams, predictable movement |
| Liquid-applied | Complex shapes, continuous barrier |
Step-by-step waterproofing application for tub walls
Start by preparing the substrate so your waterproofing can bond—remove loose material, wipe away dust, and repair any gaps or cracks with an appropriate patching compound.
Choose your system, mix per instructions, apply primer if required, then spread membrane or liquid in even coats.
Let cure fully, inspect for voids, and apply a second coat where specified before tiling.
Flashing, seams, and transitions to shower/tub fixtures

Because water follows the path of least resistance, you’ve got to flash and seal every seam and fixture junction tightly to keep moisture out of the wall assembly.
Fit metal or PVC flashing behind flange edges, backerboard seams, and around valves. Use flexible flashing tape, sealant, and appropriate gaskets.
Laps must shed water; test for gaps before tiling.
Common waterproofing inspection checkpoints
Although it’s tempting to rush, you should inspect waterproofing thoroughly before tiling so small issues don’t become major leaks.
Check for continuous membrane coverage, tight seals at corners and fixtures, proper slope toward the drain, and intact flashing.
Verify seams are bonded, fastener penetrations are sealed, and there’s no moisture behind panels.
Fix defects and retest before tiling.
Tile Layout Planning and Cutting
Measure the space and plan a layout that minimizes cuts so you’ll have full tiles where they’re most visible.
Snap level reference lines and baselines to keep rows straight, then choose the right cutting method—wet saw for straight cuts, nippers or scoring tools for small adjustments.
Mark and cut openings precisely for valves, fixtures, and niches before you start setting tiles.
Measuring and planning a tile layout to minimize cuts
When you plan your tile layout before mixing mortar, you’ll save time and avoid awkward half-tiles in visible spots; start by mapping the tub walls and marking key reference lines like centerlines and high points.
Then dry-fit rows to see where cuts will fall. Measure each run, shift patterns to place narrow pieces behind fixtures, and note cut sizes for efficient sequencing.
Establishing reference lines and level baselines

Start by snapping a straight reference line level to the tub rim or the top row you want to align. Then extend a plumb line from your ceiling down to locate true verticals—this gives you consistent baselines for every wall and keeps tiles square to the floor and between corners.
Mark intersecting layout lines, transfer measurements to adjacent walls, and check corners for squareness before applying adhesive.
Cutting tiles: wet saw, tile nippers, and scoring tools
With your baselines set and corners checked, you’ll move on to cutting tiles to fit edges, fixtures, and trim pieces.
Use the right tool for each cut: wet saw for straight and angled cuts, tile nippers for small curves, score-and-snap for straight lines, and a diamond blade for porcelain.
Stay steady, mark precisely, and wear safety gear.
- Wet saw
- Tile nippers
- Score-and-snap
- Diamond blade
Dealing with openings for fixtures, valves, and soap niches
3 key openings—fixtures, valves, and niches—require you to plan tile layout and cuts precisely so everything lines up and seals properly.
Measure and mock-up each opening, transfer marks to tiles, and cut with a wet saw or hole saw for round pipes.
Fit tiles dry, adjust for grout joints, and use waterproof backing, silicone, and escutcheon plates to finish and prevent leaks.
Step-by-Step Tile Installation
Now you’ll follow a clear sequence: choose and mix the correct mortar or adhesive, butter tiles as needed, and spread mortar on the substrate.
Set each tile with consistent grout joints using spacers, add trim or bullnose pieces where edges meet, and wipe away excess as you go.
Let the installation cure fully before you grout to guarantee a durable bond.
Step 1 Mixing and selecting the right mortar or adhesive
Choose the proper mortar or adhesive before you mix a single batch, because the wrong product will ruin tile adhesion and waste time.
Match mortar type to tile material and substrate (thinset for ceramic/porcelain, modified for moisture, epoxy for glass/metal).
Check pot life, cure time, and manufacturer recommendations.
Measure water precisely, mix to a lump-free consistency, and use within its working time.
Step 2 Applying mortar and buttering tiles
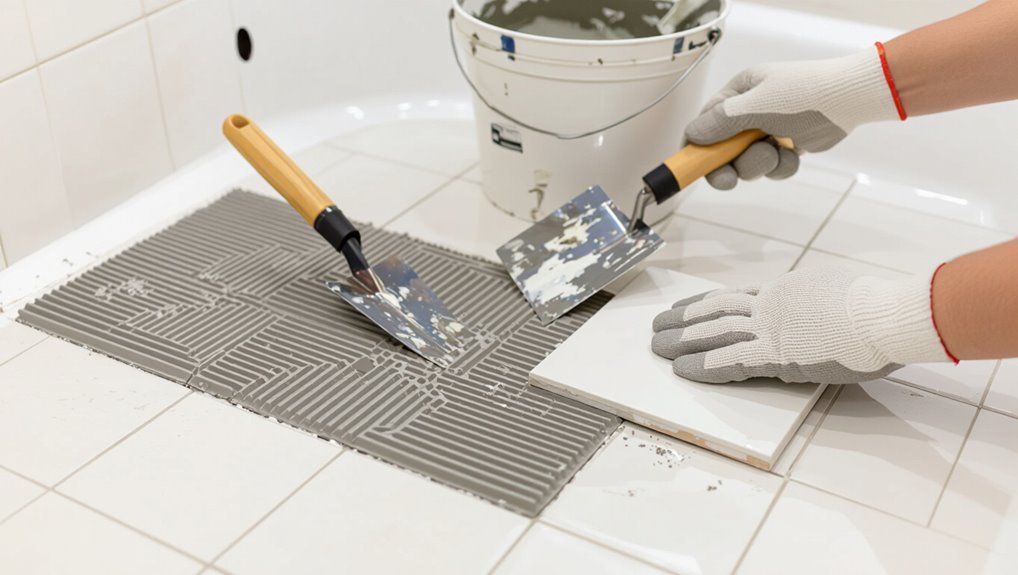
With your mortar mixed to the right consistency, you’re ready to spread it and butter the back of each tile for secure adhesion.
Use a notched trowel to comb mortar on the wall, then slap a thin, even coat on tile backs to eliminate voids.
Work in small sections, press tiles firmly to seat mortar, and remove excess before it skins.
Step 3 Setting tiles, maintaining grout joints, and using spacers
Begin laying tiles from your reference line, pressing each one into the buttered mortar and aligning edges so grout joints stay consistent; use spacers at every corner to lock the gap width and check alignment as you go.
Tap tiles gently with a rubber mallet, remove excess mortar between joints, and periodically step back to verify level and plumb before the mortar skins over.
Step 4 Installing trim pieces, bullnose, and edge treatments
Install trim pieces, bullnose, and edge treatments after the field tiles are set but before final grouting, so you can create clean, finished edges and protect exposed tile edges from chipping.
Measure and cut trims to fit, dry-fit pieces, apply thinset or adhesive, press trims firmly, and verify alignment and consistent reveal.
Clean excess adhesive and let trims bond before grouting.
Step 5 Allowing proper cure time before grouting
After the thinset and trim have had time to set, let the installation cure fully before you grout to avoid shifting tiles or grout failure.
Wait the manufacturer’s recommended cure time—typically 24–72 hours—depending on thinset and humidity.
Keep the area dry and undisturbed, check for firm joints, then remove spacers and clean joints.
Only then mix and apply grout for lasting results.
Grouting and Sealants
Now you’ll pick the right grout—sanded for wide joints, unsanded for narrow ones, or epoxy for maximum water resistance—and mix it to the manufacturer’s specs.
Apply grout cleanly with a rubber float, seal it once cured, and finish tub seams with silicone caulk.
After cleanup, inspect for gaps, high spots, or haze and touch up as needed.
Choosing grout type: sanded vs. unsanded vs. epoxy
Wondering which grout to pick for your bathtub tiles? You’ll balance joint width, durability, and maintenance: sanded suits wider joints and resists cracking; unsanded fits narrow gaps and delicate tiles; epoxy offers ultimate waterproofing and stain resistance but costs more. Visualize choices:
| Type | Best For | Key Trait |
|---|---|---|
| Sanded | Wide joints | Durable |
| Epoxy | Showers/baths | Waterproof |
Proper grout mixing and application technique

When you mix grout correctly, you’ll get a smooth, workable paste that cures strong and resists cracking.
Measure water and powder precisely, add powder to water, and mix to a lump-free consistency.
Let it slake briefly, remix, then apply with a rubber float at a 45° angle.
Force grout into joints, clean excess with a damp sponge before skin forms.
Sealing grout and silicone caulking at tub seams
A properly sealed joint keeps water out of the wall cavity and stops mold and tile damage, so you should seal grout lines and apply silicone at tub seams as the final step.
After grout cures, apply a penetrating grout sealer with a small brush. Then run a continuous bead of mildew-resistant silicone where tile meets tub.
Tool the bead smooth and let it cure fully before using.
Post-grout cleanup and final inspection
After the grout’s set and silicone’s cured, you’ll need to clean any haze, remove excess sealant, and inspect every joint so your work stays watertight and looks professional.
Wipe grout haze with a damp sponge, polish tiles with a microfiber cloth, trim cured caulk for smooth lines, and check for gaps or soft spots.
Touch up or reseal as needed; let everything cure fully before use.
Common Problems and Mistakes to Avoid
Watch for early signs of waterproofing failures like soft spots, mold, or discoloration so you can fix leaks before they ruin the substrate.
Avoid tile lippage, uneven spacing, and misaligned layouts by using proper leveling tools and consistent spacers.
Pick the right substrate and adhesive for wet areas, and finish with careful caulking and grout to keep water out.
Waterproofing failures and how to detect them early
When your waterproofing lets water get past the surface, it doesn’t announce itself—you’re more likely to spot staining, soft spots, or mold before structural damage appears.
Check grout, caulk seams, and corners regularly. Press tiles to detect give, inspect behind access panels, and use a moisture meter near suspect areas.
Fix seals, replace damaged backerboard, and reapply membrane promptly to prevent spread.
Tile lippage, uneven spacing, and misaligned layouts
If you want a professional-looking bathtub finish, you’ll need to avoid lippage, uneven grout joints, and crooked layouts—these issues not only look bad but can trap water and weaken grout over time.
Use spacers, a level, and a straightedge as you set tiles. Check frequently for flatness, correct misalignments immediately, and plan layouts to minimize tiny slivers at edges.
Wrong substrate or adhesive choices
Correcting lippage and alignment won’t save your tiles if the substrate or adhesive is wrong.
You must use a stable, water-resistant backer (cement board or waterproof membrane) and a mortar rated for wet areas and the tile type.
Don’t stick porcelain with thin-set for drywall or install over soft, degraded surfaces.
Test adhesion, prep surfaces, and follow manufacturer specs for lasting bonds.
Poor caulking and grout leading to leaks
Because caulk and grout are your last line of defense, poor application or the wrong products will let water reach the substrate and cause leaks, mold, and tile failure.
Use proper waterproof, mold-resistant grout and silicone caulk at joints. Tool seams smooth, remove excess, and allow full cure.
Inspect and replace cracked grout or shrinking caulk promptly to prevent hidden damage and costly repairs.
Best Practices, Tips, and Maintenance
Keep a simple long-term maintenance routine—wipe tiles after showers, re-seal grout yearly, and check caulk for gaps—so your tub walls stay sound.
Take preventive steps like improving ventilation and fixing leaks promptly to cut mold and water damage.
When you upgrade, consider recessed niches, accent tiles, or built-in shelving to add function and style without compromising waterproofing.
Long-term maintenance routine for tiled tub walls
Plan a simple, regular routine to protect your tiled tub walls from grout stains, mold, and tile damage—small, consistent steps will extend their lifespan and keep the shower looking fresh.
- Wipe tiles after use to remove soap scum and reduce residue.
- Clean grout weekly with a mild cleaner and soft brush.
- Re-seal grout annually where recommended.
- Inspect caulk and replace when cracked to maintain watertight seals.
Preventive steps to reduce mold and water damage
When you take a few proactive steps—good ventilation, proper caulking, and prompt grout care—you’ll dramatically cut the risk of mold and water damage around your tub.
Wipe tiles dry after use, run an exhaust fan or open a window, inspect and recaulk joints annually, and reseal grout as needed.
Fix leaks immediately and keep cleaning products mild to protect surfaces.
Upgrades and design tips (niches, accent tiles, shelving)
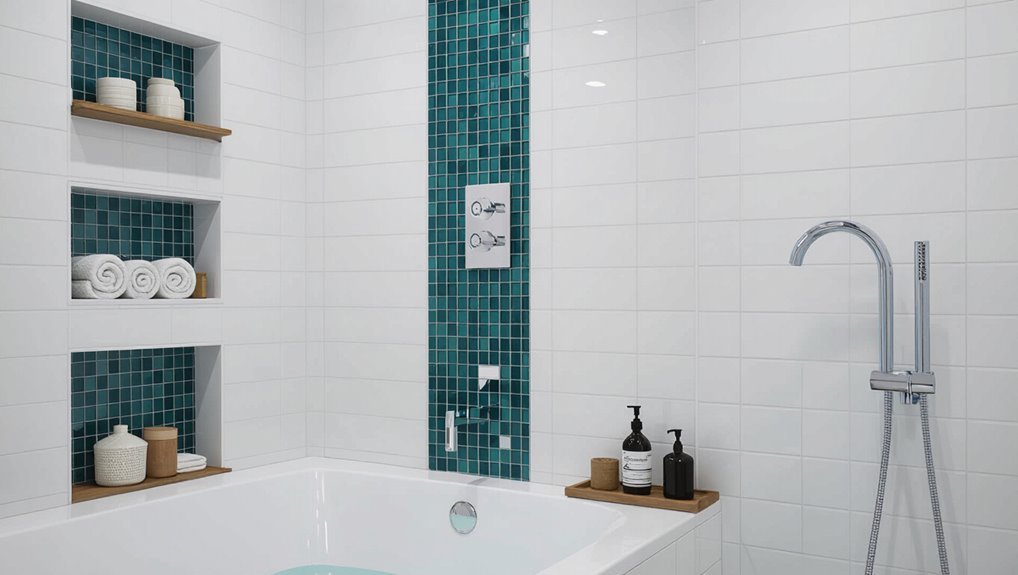
After you’ve handled ventilation, caulking, and grout care, think about how functional upgrades and design choices can both elevate your space and simplify maintenance.
Add a recessed niche for soaps, using waterproof backerboard and slope for drainage.
Use small accent tiles sparingly to hide seams.
Install open or recessed shelving at reachable height with sealed edges.
Choose durable finishes for easy cleaning.
Time, Cost Estimates, and When to Hire a Professional
Plan on a few days to a week for a typical bathtub tile job, with time split between demolition, waterproofing, tiling, grouting, and curing.
Costs vary by tile choice, materials, and whether plumbing or substrate repairs are needed—expect a small DIY job to run low hundreds and a full remodel to hit the thousands.
Call a licensed contractor if you spot mold, major water damage, uneven substrates, or if local code and plumbing work are involved.
Typical project timeline and labor breakdown
Expect a straightforward tub tile job to take anywhere from one long weekend to a week, depending on scope and drying times.
You’ll want to budget both materials and labor accordingly.
Plan:
- demo and prep (1 day)
- waterproofing and backer board (½–1 day)
- tiling (1–2 days)
- grout and seal (1–2 days), plus curing.
If you’re inexperienced or tight on time, hire pros.
Cost factors and budget ranges
When budgeting for a bathtub tile job, consider all the moving parts—materials, labor, waterproofing, and unexpected repairs—since each can swing your total considerably. You’ll weigh tile type, surface prep, and grout quality; expect DIY savings but factor time. Typical ranges vary widely.
| Item | Low | High |
|---|---|---|
| Tiles | $100 | $1,000 |
| Labor | $200 | $1,200 |
| Waterproofing | $50 | $400 |
Signs you should call a licensed contractor
If your bathtub project involves structural repairs, extensive waterproofing, or plumbing rerouting, call a licensed contractor—you’ll save time and avoid costly mistakes.
Hire a pro when work exceeds your skill, permits are required, or water damage is hidden.
Expect accurate time and cost estimates, warranties, and code-compliant results.
For complex tile layouts, heated floors, or tight timelines, professional scheduling prevents delays and surprises.
FAQ Common Questions About Installing Bathtub Tiles
You’ll get clear answers to common questions like how long to wait after grouting, whether you can tile over existing tile, and the best waterproofing for a surround.
You’ll also learn how to prevent mold behind tiles and whether large-format tiles work in a bathtub niche.
Read on for practical guidance so you can avoid mistakes and finish the job right.
How long should I wait to use the tub after grouting?
After grouting, wait at least 24 to 48 hours before using the tub so the grout can cure properly and resist water penetration.
For heavy-duty or epoxy grouts, follow manufacturer guidance—some set faster, some need longer.
Avoid showers or soaking during cure time, keep ventilation on, and check that grout feels hard and dry.
Sealant often needs an additional 24 hours before regular use.
Can I tile directly over existing tile?
Once the grout has cured and you’re thinking about larger updates, you may wonder whether you can tile directly over existing tile.
You can in some cases if the old tile is sound, clean, and well-bonded.
Roughen the surface, use a suitable thinset or bonding primer, and guarantee plumbing and waterproofing behind the tiles remain intact before proceeding.
What is the best waterproofing method for a bathtub surround?
Because a bathtub surround faces constant moisture and occasional water spray, the best waterproofing combines a waterproof membrane behind the tile with properly sealed joints and a sloped substrate at the tub edge.
You should install a bonded membrane or cement-board with liquid-applied membrane, use waterproof backerboard where needed, apply quality sealant at seams, and guarantee flashing at junctions for long-term protection.
How do I prevent mold behind tiles?
If you want to keep mold from growing behind your bathtub tiles, control moisture and stop water from penetrating the assembly in the first place.
Use a continuous waterproof substrate or membrane, seal all joints and penetrations with appropriate caulk, slope fixtures to drain, and ventilate the bathroom.
Inspect grout and caulk regularly, repair cracks promptly, and avoid trapping moisture behind heavy adhesive layers.
Can I install large-format tiles in a bathtub niche?
Wondering whether large-format tiles will work in a bathtub niche? Yes, you can use them, but plan carefully.
Choose tiles that fit the niche dimensions to minimize cuts, use a wet-area rated adhesive and grout, and guarantee substrate is perfectly flat.
Add movement joints at edges to prevent cracking.
For small niches, consider smaller tiles or mosaics for easier installation and drainage.