
How to Clean Floor Tile Grout Without Scrubbing: The Effortless Method
You can restore dingy grout without elbow grease by using steam, no-scrub cleaners, or peroxide-based poultices that loosen grime for easy rinsing. Clear the area, vacuum lines, test a cleaner, then steam each section 2–3 minutes to lift dirt. Apply a contact cleaner or hydrogen peroxide, let it dwell, rinse thoroughly, and dry with fans or a microfiber mop. Seal when dry to protect results—keep going to learn step-by-step tips and troubleshooting.
How to Clean Floor Tile Grout Without Scrubbing Quick Answer
You can refresh grout without scrubbing by applying a no-rinse enzymatic or oxygen bleach solution and letting it work.
Expect about 30–60 minutes of waiting time, a small cost for a store-bought cleaner (usually $5–$20), and minimal physical effort.
This offers a quick, low-effort fix for light to moderate grout discoloration.
One-sentence solution
Skip the elbow grease: spray a baking soda and vinegar paste onto grout, let it fizz and sit for 10–15 minutes, then wipe or rinse away with a damp cloth for clean grout without scrubbing.
You’ll see grime lift with minimal effort; blot stubborn spots, repeat as needed, and dry the area to prevent re-soiling—this simple approach shows how to clean floor tile grout without scrubbing efficiently.
Time, cost, and effort estimate
Plan on about 20–45 minutes for a typical room, around $3–$8 in common household supplies, and only light effort—most of the time is wait-and-wipe rather than scrubbing.
- Prep: 5–10 minutes to sweep and mix solution.
- Apply: 5 minutes to coat grout.
- Wait: 10–25 minutes for dwell time.
- Finish: 5–10 minutes to wipe and rinse; minimal physical effort.
Understanding Grout and Why It Gets Dirty
Grout is the cement-like filler between tiles, usually sold as sanded for wider joints or unsanded for narrow ones, and you’ll want to pick the right type for repairs.
It darkens from mold, mildew, dirt and soap scum that settle into its porous surface.
Be careful with aggressive scrubbing, because abrasion can wear away grout, cause crumbling, and shorten the life of sealers.
What grout is and common types (sanded vs. unsanded)
Think of grout as the thin mortar that fills and bonds the gaps between your tiles; it’s a mix of cement, sand (sometimes), and additives that creates a finished, watertight surface.
You’ll pick sanded grout for wider joints (over 1/8″) because sand adds strength. Use unsanded grout for narrow joints and delicate tile surfaces to avoid scratching and achieve a smoother finish.
Common causes of grout discoloration (mold, mildew, dirt, soap scum)
Dirt, mold, soap scum and mildew are the usual culprits behind discolored grout, and each leaves a distinct kind of stain you’ll need to treat differently.
Dirt grays grout from foot traffic, soap scum creates filmy buildup, and mildew forms fuzzy dark patches in damp areas.
Mold penetrates pores, causing stubborn black or green spots that need targeted cleaning and moisture control.
Why scrubbing can be harmful (abrasion, grout damage, seal failure)
Because grout is porous and relatively soft, aggressive scrubbing can wear away its surface and the protective sealant, making stains come back faster and tiles look uneven.
You risk abrasion that widens pores, loosens particles, and creates microcracks. That damaged grout traps moisture and mold, undermines seals, and shortens lifespan.
Gentle, nonabrasive methods preserve integrity and prevent costly repairs.
Tools and Products You Can Use Without Scrubbing
You can tackle grout without elbow grease by using natural DIY mixes like vinegar, baking soda, or hydrogen peroxide, or by choosing commercial no-scrub cleaners and steam units.
Consider equipment that cuts manual effort—steam mops, handheld steamers, and pump sprayers make application and lift much easier.
Always wear gloves, eye protection, and guarantee good ventilation when using chemicals or steam.
Natural DIY solutions (vinegar, baking soda, hydrogen peroxide)
Three common pantry items—vinegar, baking soda, and hydrogen peroxide—make effective, low-cost grout cleaners you can apply and let work without heavy scrubbing.
- Sprinkle baking soda on grout lines.
- Spray white vinegar until it fizzes; wait 10–15 minutes.
- Dab hydrogen peroxide on stubborn spots; let sit.
- Wipe with a damp microfiber; repeat for deep stains.
Commercial no-scrub grout cleaners and steam cleaners
If you’re short on time or want less elbow grease, commercial no-scrub grout cleaners and steam cleaners can do most of the work for you: no-scrub formulas dissolve dirt and stains with contact time, while steam cleaners lift grime with high-temperature vapor so you just wipe it away.
- Spray no-scrub cleaner, wait per label.
- Wipe residue with microfiber.
- Use steam to loosen deep grime.
- Rinse and dry to prevent streaks.
Equipment that minimizes manual effort (steam mop, handheld steamer, pump sprayer)
Steam-powered and pressurized tools cut down scrubbing by loosening grime so you can wipe it away.
You’ll choose gear that targets grout efficiently and saves time:
- Steam mop — broad coverage, heats and lifts dirt.
- Handheld steamer — precise jets for tight lines.
- Pump sprayer — applies cleaner evenly without effort.
- Microfiber mop — traps loosened grime for easy removal.
Safety gear and ventilation recommendations
Because some no-scrub products release fumes and steamers raise humidity, you should protect yourself and ventilate the area before you start cleaning grout.
Wear sensible PPE and keep airflow steady.
- Nitrile gloves
- Chemical-resistant goggles
- A fitted respirator or mask (P100/NIOSH)
- Open windows, use fans or an exhaust to direct steam outdoors
Effortless Methods: Step-by-Step No-Scrub Techniques
You can tackle grout without scrubbing by using targeted, no-scrub methods like steam cleaning, chemical soaks, or a baking soda and hydrogen peroxide paste left to sit.
Try enzymatic or oxygen-based soaks for organic stains, and reserve a combined approach—steam followed by a no-scrub cleaner—for stubborn spots.
I’ll walk you through each method and when to use them.
Method 1 Steam cleaning
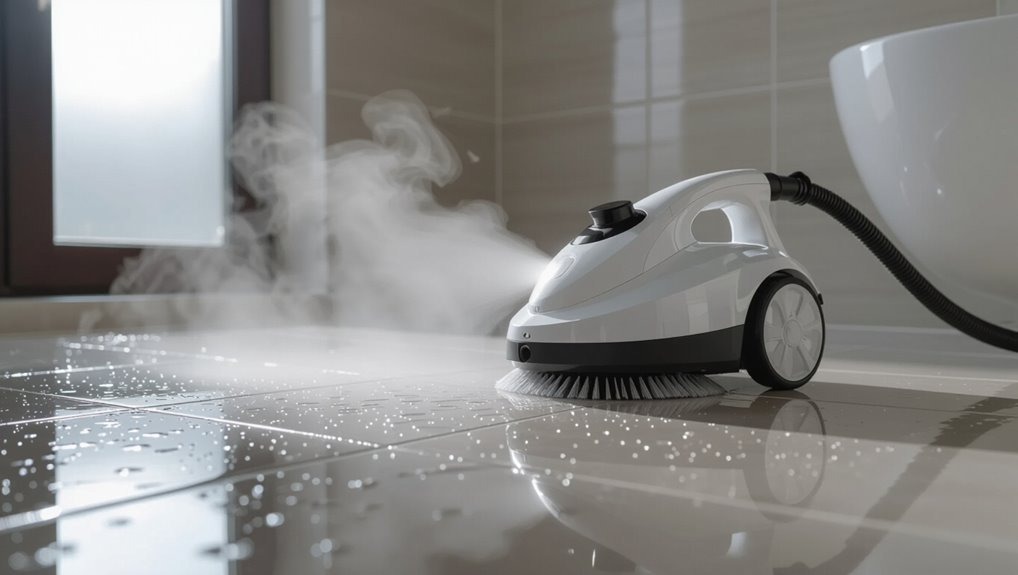
If you want a quick, chemical-free way to revive dingy grout, steam cleaning gets deep into pores and lifts grime without scrubbing.
You’ll move methodically, using a handheld steamer and microfiber pads. Follow these steps:
- Vacuum and mop to remove loose dirt.
- Heat steamer to recommended setting.
- Work in small sections, holding steam briefly.
- Wipe residue with a damp cloth.
Method 2 Chemical soak with no-scrub commercial cleaner
Reach for a no-scrub commercial grout cleaner when you want deep cleaning without elbow grease: these formulas cling to grout, dissolve grime, and let you simply rinse away residues.
You’ll apply, wait per directions, then hose or mop away.
Steps:
- Ventilate area and test small patch.
- Apply liberally along grout lines.
- Let sit the recommended time.
- Rinse thoroughly.
Method 3 Baking soda and hydrogen peroxide paste left to sit
For a natural, low-effort alternative to commercial no‑scrub cleaners, try a paste of baking soda and hydrogen peroxide that works while you’re doing other tasks.
Apply paste along grout lines, let sit 15–30 minutes, then wipe with a damp microfiber. Repeat for stubborn areas.
- Mix 2:1 baking soda:peroxide
- Spread thinly
- Wait 15–30 min
- Wipe clean
Method 4 Enzymatic or oxygen-based cleaner soak
When you want a truly hands-off option, soak the grout with an enzymatic or oxygen-based cleaner and let it lift grime on its own; these formulas break down organic stains and brighten without scrubbing, so you can apply, wait, and rinse.
- Apply generous cleaner to grout lines.
- Let sit 15–60 minutes per label.
- Rinse thoroughly with water.
- Repeat for stubborn areas.
Method 5 Combination approach for stubborn stains (when to combine steam + chemical)
Although steam and chemical cleaners each work well alone, combining them can tackle grout stains that refuse to budge—start with steam to loosen soil, then apply an appropriate cleaner to finish the job without scrubbing.
- Test cleaner on hidden tile.
- Steam grout for 2–3 minutes per section.
- Apply cleaner, wait manufacturer time.
- Rinse and ventilate thoroughly.
Preparing Your Floor for a No-Scrub Clean
Before you start, clear the area and remove loose debris by sweeping or vacuuming so cleaners can reach the grout.
Test any cleaner on a small, inconspicuous spot to make sure it won’t discolor tiles or damage finishes.
Cover nearby surfaces and fixtures—like baseboards, appliances, and metal trim—to protect them from overspray or drips.
Clearing the area and vacuuming/debris removal
Start by removing furniture, rugs, and anything that can trap dirt so you’ve got clear access to the tiles and grout lines.
Sweep loose debris, then vacuum with a crevice tool to pull grit from joints.
Follow this quick checklist:
- Move furniture and small items
- Roll up and remove rugs
- Sweep edges and corners
- Vacuum grout lines thoroughly
Testing cleaners on a small inconspicuous area
Want to make sure your cleaner won’t damage the tile or grout? Test first on a hidden spot. Follow these steps:
- Choose an out-of-sight corner or beneath a cabinet.
- Apply a small amount of cleaner and wait the recommended time.
- Blot with a white cloth and check for color change or residue.
- If safe, proceed with the full treatment.
Protecting surrounding surfaces and fixtures
1 simple step makes the rest of the job easier: shield nearby surfaces and fixtures so cleaner and runoff don’t cause damage.
You’ll prep quickly and avoid stains or corrosion.
- Tape plastic sheeting over baseboards and cabinets.
- Remove rugs and small items.
- Cover drains and vents.
- Protect metal fixtures with painter’s tape and paper.
Post-Cleaning Steps and Finishing Touches
After cleaning, rinse thoroughly to neutralize any cleaner residues so grout won’t attract dirt or discolor.
Use fans and microfiber mops or towels to dry the floor quickly and prevent moisture from seeping back into grout.
If stains or mildew return, repeat treatment as needed—generally every few months for high-traffic areas and less often elsewhere.
Rinsing and neutralizing residues
Although the grout may look clean, you’ll still need to rinse thoroughly to remove cleaning residues that can attract dirt or dull the finish; use clean water and a mop or sponge, changing the rinse water often until it runs clear.
- Fill bucket with fresh water.
- Mop or sponge in straight passes.
- Replace water when cloudy.
- Test a small area for residue-free shine.
Drying techniques to prevent recurrence (fans, microfiber mops)
One straightforward step to prevent grout from re-soiling is to dry the floor promptly and thoroughly; use high-velocity fans to speed evaporation and follow up with a microfiber mop to lift residual moisture and loosened particles without leaving lint.
- Position fans toward wet areas.
- Move mop along grout lines.
- Replace damp microfiber pads.
- Keep airflow until grout feels dry.
When to repeat treatment and frequency recommendations
Because grout conditions and foot traffic vary, you’ll want to tailor how often you repeat treatments based on what you see and feel: high-traffic kitchens and entryways may need a light maintenance clean every 1–2 months and a deeper treatment every 6–12 months, while low-traffic areas can go longer between deep cleans—typically 12–24 months.
Perform spot checks after heavy spills or seasonal humidity changes and reapply sealer as directed when water no longer beads on the grout.
- Monthly wipe-downs for busy areas.
- Deep treatment twice yearly for moderate use.
- Annual or biennial deep clean for low traffic.
- Reseal when water stops beading or stains recur.
Comparing No-Scrub Options
When you compare no-scrub grout options, weigh how much cleaning power you get for the effort required.
Check upfront costs and how long results are likely to last so you won’t be reapplying more than necessary.
Also confirm safety and whether the product is compatible with your tile and grout to avoid damage.
Effectiveness vs. effort
Though no-scrub products promise quick results, you’ll find their performance varies widely depending on stain age, grout type, and product chemistry. You’ll balance convenience against visible lift; fresh, light stains respond best, while deep discoloration may need follow-up. Use realistic expectations and spot-test.
| Product type | Typical result |
|---|---|
| Enzyme sprays | Good on organic stains |
| Oxidizers | Better on mildew |
Cost comparison and lifespan of results
1 important factor to weigh is cost per use versus how long the results actually last. You’ll want options that balance upfront price and reapplication frequency so you spend less over time. Compare products, rented machines, and DIY mixes for value and durability.
| Option | Cost per use | Typical lifespan |
|---|---|---|
| Product spray | $0.50–$2 | 1–3 months |
| Machine rental | $10–$30 | 6–12 months |
| DIY mix | $0.10–$0.50 | 2–6 weeks |
Safety and surface compatibility
Because no-scrub options rely on chemicals or steam instead of elbow grease, you need to check both safety and surface compatibility before you use them. Test products on a hidden spot, wear gloves, and ventilate. Avoid acidic cleaners on natural stone and high heat on vinyl.
| Surface | Recommendation |
|---|---|
| Natural stone | No acids |
| Vinyl | Low heat only |
| Porcelain/ceramic | Safe generally |
Common Mistakes to Avoid
Don’t mix incompatible chemicals like acids and bleach — that can release dangerous fumes and ruin grout.
Don’t rely on a single method for tough stains, and don’t skip spot tests to make sure a cleaner won’t discolor the tile.
After cleaning, seal the grout to protect your work and avoid repeat problems.
Using incompatible chemicals (acid + bleach)
If you mix acidic cleaners (like vinegar or toilet bowl cleaners) with bleach, you’ll create toxic chlorine gas that can irritate or seriously harm your lungs and eyes.
Don’t combine products. Instead:
- Read labels for active ingredients.
- Use one cleaner at a time.
- Ventilate the area well.
- If exposure occurs, leave immediately and seek fresh air or medical help.
Over-reliance on one method for severe stains
When you rely on a single cleaning method for severe grout stains, you’ll often waste time and fail to remove deeply embedded dirt or discoloration.
You should mix approaches and escalate carefully. Consider alternates and precautions:
- Test enzyme cleaners for organic grime.
- Use steam for loosened particles.
- Try oxygen bleach for stubborn discoloration.
- Call a pro before overworking grout.
Skipping spot tests and sealing afterward
Because grout and cleaners vary so much, you should always spot-test before treating the whole floor and seal afterward to lock in results.
Don’t skip these steps or you’ll risk damage or short-lived results.
Quick checklist:
- Test cleaner in an inconspicuous corner.
- Wait full dry time to inspect.
- Proceed only if no discoloration.
- Apply grout sealer per directions.
Prevention, Maintenance, and Best Practices
To keep grout looking good, you’ll want simple daily and weekly habits like sweeping, spot-mopping, and wiping up spills promptly.
Check and reseal grout every 1–3 years (or sooner in high-traffic areas) and use the manufacturer’s directions when applying a sealer.
Stick to pH-neutral cleaners, soft brushes, and nonabrasive tools to protect the grout and finish.
Best daily/weekly maintenance routines to keep grout clean
A few simple habits you follow every day and week will keep grout looking fresh and prevent stubborn stains from forming.
Do quick dry mopping and spot-spray with a pH-neutral cleaner after spills.
Deep-clean weekly with warm water and a microfiber mop.
Rotate mats and air rooms to reduce moisture.
- Daily sweep/dry-mop
- Spot-clean spills
- Weekly microfiber mop
- Air and rotate mats
When and how to reseal grout for long-term protection
When grout starts looking dull or absorbs stains even after regular cleaning, it’s time to reseal it to lock out moisture and dirt; you’ll usually need to do this every 1–3 years depending on traffic and tile type.
- Clean grout thoroughly and let it dry 24–72 hours.
- Test sealer on a small area.
- Apply evenly with a brush or applicator.
- Wipe excess, cure per label, then enjoy lasting protection.
Choosing grout-friendly cleaning products and tools
After resealing, you’ll want cleaning products and tools that protect that new barrier and keep grout looking fresh without damage.
Choose pH-neutral cleaners, soft-bristle brushes, microfiber mops, and gentle steam.
Match product to grout type, test in an inconspicuous spot, and avoid acids or bleach.
Replace worn tools and follow manufacturer instructions to maintain seal and prevent discoloration.
- pH-neutral cleaner
- Soft brush
- Microfiber mop
- Gentle steam
Cost, Time, and Environmental Considerations
You’ll want to compare estimated costs for DIY cleaning versus hiring a professional no-scrub service so you know what fits your budget.
Think about the time investment required for each method—DIY scrubbing can take hours while professional treatments often finish much faster.
Also consider eco-friendly cleaning options and proper disposal of rinse water and used materials to limit environmental impact.
Estimated costs for DIY vs. professional no-scrub cleaning
Although DIY no-scrub grout cleaners can seem cheaper up front, comparing total costs, time, and environmental impact paints a clearer picture of what you’re really paying for.
- DIY cleaner bottle: $8–$20.
- Tools/consumables: $5–$25.
- Professional service: $80–$300 (materials included).
- Eco-friendly options raise costs but lower chemical impact.
Time investment per method
1. You’ll compare time per method so you can plan.
- Prep (10–20 min)
- Product application (5–15 min)
- Dwell time (30–120 min depending on solution)
- Light rinse/finish (10–30 min)
You’ll spend 1–3 hours total for DIY no-scrub approaches;
pros typically finish faster but require scheduling.
Eco-friendly options and disposal guidance
Now that you’ve mapped out time for each cleaning step, consider how your choices affect cost, effort, and the planet.
Choose biodegradable cleaners, reuse microfiber, and avoid harsh chemicals. Dispose rinse water responsibly.
- Low‑cost vinegar solution — safe, slow acting.
- Baking soda paste — inexpensive, minimal runoff.
- Commercial green cleaners — pricier, effective.
- Neutralize and dilute before draining to protect waterways.
FAQ
You’ll find quick answers here to common grout questions, like whether heavy stains can be fixed without scrubbing and if steam cleaning is safe for your tile.
You’ll also learn how often to reseal after a no-scrub clean, whether vinegar or other natural cleaners can cause damage, and when it’s time to call a professional.
Read on for concise guidance tailored to your situation.
Can I clean grout without scrubbing if it’s heavily stained?
Can you remove heavy grout stains without endless scrubbing? Yes—though results vary.
Try targeted chemical grout cleaners, oxygen bleach soaked into grout lines, or a poultice paste to lift deep stains.
Let treatments dwell per instructions, then blot or rinse.
Very stubborn dye or mold may need professional restoration or grout replacement; don’t expect miracles from quick, no-scrub fixes.
Is steam cleaning safe for all tile types?
While steam cleaning can safely sanitize and lift dirt from many sealed hard-surface tiles, it isn’t right for every tile type and grout condition.
Don’t use steam on unglazed, porous, or damaged natural stone (like marble, limestone, travertine) or on loose tiles and weakened grout.
Test a hidden area first, follow manufacturer guidelines, and use lower settings to reduce risk.
How often should I seal grout after a no-scrub clean?
How often should you reseal grout after a no-scrub clean?
Reseal every 1–3 years for high-traffic areas and every 2–5 years for low-traffic spaces.
Check water beading: if water soaks in, it’s time.
Clean and dry grout before sealing, follow product instructions, and spot-test a small area.
Regular inspections prevent stains and prolong the sealant’s effectiveness.
Will natural cleaners like vinegar damage grout or tile?
Even though vinegar’s acidity makes it a popular natural cleaner, you should use it cautiously on grout and some tiles: undiluted or frequent vinegar can etch natural stone (like marble, travertine, or limestone) and gradually wear down grout.
While properly diluted vinegar is usually safe on glazed ceramic and porcelain. Test a hidden spot first, dilute with water (1:1 or more), and rinse well.
When should I call a professional?
When should you call a professional?
Call a pro if grout is crumbling, mold returns despite treatment, large areas need regrouting, or stains penetrate deeply.
Also hire a specialist when tiles loosen, subfloor issues exist, or DIY methods haven’t worked.
Professionals diagnose damage, perform repairs, and use sealants or steam systems safely, saving time and preventing costly mistakes.