How to Clean Concrete Floors and Restore Their Original Look
You can restore concrete floors by first evaluating damage, sweeping grit, and degreasing oil spots, then scrubbing with a pH-neutral cleaner or alkaline degreaser for heavy grease. Use grinders or buffers for deep stains and to smooth surfaces, patch cracks with epoxy or polymer fillers, rinse and neutralize, then apply an appropriate sealer or polish. Maintain with regular dust mopping and spot-cleaning to preserve the finish; keep going to learn step-by-step methods and product tips.
How to Clean Concrete Floors and Restore Their Original Look
You can often restore concrete to a like-new appearance, but full restoration depends on damage depth and surface treatment.
For the quickest results, use a grinder or floor buffer with diamond pads, an industrial vacuum, and a concrete sealer—plan on a few hours to a full day for a garage-sized area.
Expect noticeably improved color and smoothness, though deep cracks or heavy spalling may need patching or professional repair.
Can you fully restore concrete floors?
Wondering whether concrete floors can be fully restored to their original look? You often can’t achieve factory-new perfection, but you can dramatically improve appearance by following how to clean concrete flooring steps, addressing stains, etching, and minor surface damage.
Deep pitting, large cracks, or heavy wear may need professional repair, resurfacing, or replacement for truly original condition.
Summary of the fastest method (tools, time, expected results)
Although full factory-perfect restoration isn’t usually possible, you can quickly get concrete floors looking vastly better by following a focused, high-impact cleaning and minor repair routine.
Gather a stiff broom, push mop, pH-neutral cleaner, degreaser, scrub brush or floor buffer with scrubbing pad, concrete patch, and sealer.
Spend 2–6 hours; expect noticeably cleaner surface, reduced stains, and minor crack repair—not brand-new finish.
Basic Understanding of Concrete Floors
You’re working with a mix of cement, aggregates, and water that hardens into concrete and slowly changes as it reacts with air and traffic.
Over time it stains, dulls, or loses finish because contaminants, wear, and moisture alter the surface and any protective coatings.
Knowing whether your floor is unfinished, sealed, polished, painted, or coated with epoxy helps you pick the right cleaning and restoration steps.
What concrete floors are made of and how they age
Concrete floors are fundamentally a mix of cement, aggregates (like sand and gravel), water, and sometimes additives, and they harden through a chemical process called hydration.
Over time, you’ll notice surface wear, tiny cracks, and color changes as the material reacts to moisture, salts, freeze‑thaw cycles, and traffic.
Proper curing and sealing slow aging, but inevitable physical and chemical changes still occur.
Why concrete stains, dulls, and loses finish
Because moisture, oils, dirt, and everyday wear interact with the surface, your concrete floor will gradually stain, dull, and lose its finish.
Spills penetrate pores, salts and minerals cause efflorescence, and abrasive traffic erodes fine surface textures.
UV light, chemical residues, and improper cleaning products break down binders, so colors fade and shine diminishes unless you address contaminants and protect the surface.
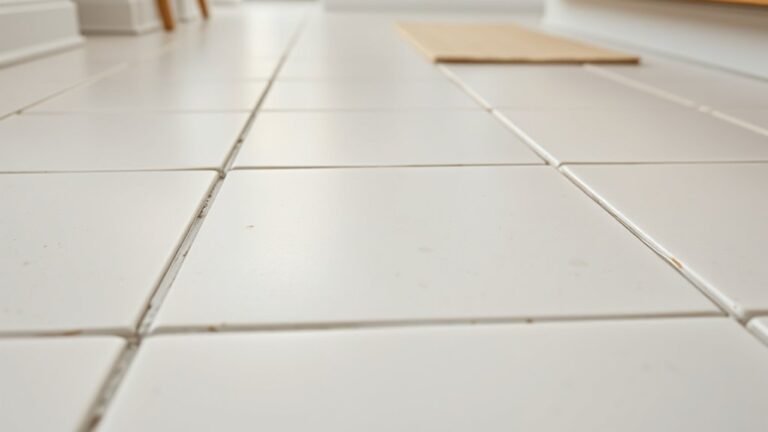
Types of concrete surfaces (unfinished, sealed, polished, painted, epoxy)
Five common surface types—unfinished, sealed, polished, painted, and epoxy—cover most concrete floors you’ll encounter, and each demands different care and cleaning approaches.
You’ll choose cleaners and tools based on finish: porous unfinished soaks liquids, sealed repels stains, polished needs gentle maintenance, painted and epoxy require scratch-avoidance.
Consider:
- Unfinished: absorbent, needs degreaser
- Sealed: mild cleaner
- Polished: pH-neutral
- Epoxy/paint: nonabrasive cleaners
Assessing Your Floor Before You Start
Before you start cleaning, you should do basic safety checks and put on PPE like gloves, eye protection, and a respirator if needed.
Inspect the slab to identify the concrete type, existing coatings, and common issues—oil, rust, efflorescence, paint, or mold—so you can pick the right cleaners and tools.
If the damage is extensive, structural, or you’re unsure about coatings or hazardous stains, call a professional instead of attempting a risky DIY.
Safety checks and PPE required
When you’re about to tackle a concrete floor, do a quick safety sweep: look for loose debris, exposed wires, uneven sections, chemical stains, and any signs of structural damage.
Note areas that need barricading or warning signs.
Wear proper PPE and prepare controls:
- Gloves resistant to solvents and abrasives
- Eye protection and face shield for splashes
- Knee pads and slip-resistant boots
- Respirator for dust and fumes
How to identify floor type and current coatings
Wondering what kind of concrete you’re dealing with and whether it’s already coated?
Inspect finish (polished, broom, troweled) and tap for hollow sounds.
Look for sheen, color uniformity, or peeling that indicates paint, epoxy, or sealer.
Scratch a hidden spot with a coin to test hardness and adhesion.
Note joints, overlays, or stains that suggest prior treatments before choosing cleaners or removal methods.
Common stains and damage to look for (oil, rust, efflorescence, paint, mold)
After you’ve identified the slab type and any existing coatings, scan the surface for common stains and damage so you can pick the right cleaners or repair steps.
Look for dark oil spots, orange-brown rust, white powdery efflorescence, paint splatters or peeling, and mold or mildew in damp areas.
Note cracks, spalling, and pitting for targeted repair.
When to call a professional vs. DIY
How do you know whether to tackle a concrete-floor job yourself or call a pro?
Inspect damage: small stains, mild efflorescence, and surface dirt you can handle with cleaners and a stiff brush.
Call a professional for deep oil saturation, structural cracks, contaminated slabs, large mold infestations, or when polishing and sealing require specialized equipment.
Consider time, safety, and warranty implications before deciding.
Tools, Materials, and Cleaners You’ll Need
Before you start scrubbing, gather basic tools like brooms, stiff brushes, a mop, bucket, shop vacuum, and a floor scrubber if you’ve got one.
Choose cleaners carefully—alkaline degreasers work best on oil and grease, acids handle mineral stains, and specialty products (masonry cleaner, rust remover, etcher) or equipment (grinder, polisher) may be needed for tougher jobs.
Don’t forget personal protective gear and plan for proper disposal of used chemicals and contaminated rinse water.
Basic tools and equipment checklist
You’ll need a few essential tools and cleaners to get concrete floors truly clean and protected:
- Stiff-bristle push broom and deck brush for sweeping and scrubbing
- Wet/dry vacuum or mop and bucket for rinsing and extraction
- Floor buffer or orbital scrubber for deep cleaning and polish
- Protective gear: gloves, goggles, knee pads, and a respirator if dusty or using strong products
Cleaning agents and degreasers (alkaline vs acidic)
Because concrete reacts differently to oils, grime, and mineral stains, choosing the right cleaner matters—you’ll pick alkaline degreasers for oil and grease and acidic cleaners for rust, mineral deposits, and mortar residue.
Use alkaline detergents or caustic-based degreasers for heavy oil, agitate and rinse thoroughly.
Reserve mild acids like diluted muriatic or phosphoric for mineral stains, neutralize after use, and ventilate.
Specialty supplies (masonry cleaner, rust remover, etcher, concrete grinder, polisher)
When tackling tougher stains or preparing concrete for a new finish, you’ll need specialty supplies that go beyond basic cleaners—masonry cleaners, rust removers, etchers, and mechanical tools like concrete grinders and polishers target specific problems and deliver professional results.
Choose products formulated for concrete, follow label instructions, test a small area, and use the right grit and speed on grinders and polishers to avoid damage.
Protective materials and disposal considerations
Before you start, gather the right protective gear and plan for proper disposal so you stay safe and stay legal.
Wear chemical-resistant gloves, eye protection, a respirator rated for dust and vapors, knee pads, and steel-toe boots.
Use spill trays and absorbents for cleaners, label waste containers, and follow local hazardous-waste guidelines.
Dispose solvents, acids, and contaminated media at approved facilities.
Step-by-Step Cleaning and Restoration Process
Before you start, clear the area, sweep thoroughly, and protect nearby surfaces to prevent damage.
Then follow a step-by-step process: deep clean and degrease with proper dwell times and rinsing, tackle specific stains, and repair cracks or spalls using appropriate products.
Finish by restoring the surface profile with etching or mechanical grinding so coatings or sealers will adhere properly.
Step 1 Preparing the area: clear, sweep, and protect adjacent surfaces
- You’ll prep the work area so cleaning’s efficient and surfaces stay protected. Clear furniture and debris, then sweep thoroughly. Cover walls and trim before wet work.
- Remove movable items and store safely
- Sweep and vacuum loose grit
- Tape plastic sheeting to baseboards
- Lay down drop cloths or rosin paper to protect adjacent surfaces
Step 2 Deep cleaning and degreasing (procedure, dwell times, rinse)
Start by applying a concrete-safe degreaser to targeted areas, letting it penetrate stubborn oil and grease for the manufacturer’s recommended dwell time (usually 5–15 minutes) while you agitate with a stiff brush or floor scrubber to break up deposits.
Then thoroughly rinse with clean water and a wet vacuum or pressure washer to remove residue.
Repeat for large surfaces, working in sections and drying fully before inspection.
Step 3 Removing specific stains
Now you’ll tackle common concrete stains with targeted methods for each problem.
You’ll use degreasers and poultices for oil and grease, rust removers for iron stains, solvents or scrapers for paint and adhesive, and mild acids or cleaners for efflorescence and mineral buildup.
Follow product instructions and test a small area first to protect the surface.
Oil and grease removal
Tackle oil and grease stains with targeted cleaners and the right tools to prevent long-term discoloration and slipping hazards.
Blot fresh spills, apply a concrete degreaser or poultice, scrub with a stiff brush, then rinse thoroughly.
For stubborn spots, repeat or let the degreaser dwell per instructions.
Finish by drying and sealing the area to deter future penetration and simplify maintenance.
Rust removal
After dealing with oil and grease, rust requires a different approach because it chemically bonds with concrete and can etch the surface if left untreated.
You’ll neutralize stains using a commercial rust remover or a poultice of oxalic acid, apply, let dwell, then scrub with a stiff brush.
Rinse thoroughly, repeat if needed, and protect the area with a sealer.
Paint and adhesive removal
Scrape and soften old paint and adhesives before trying to lift them, because they bond tightly to concrete and can resist simple washing.
Use a putty knife or floor scraper, then apply a concrete-safe chemical stripper or a heat gun for stubborn spots.
After lift, scrub with a stiff brush and a degreasing cleaner, rinse thoroughly, and let fully dry before sealing or painting.
Efflorescence and mineral deposits
When white, powdery salts show up on your concrete, they’re usually efflorescence—minerals leaching from within the slab as water evaporates—and you should remove them before sealing or painting so they don’t reappear through the new coating.
Scrub with a stiff brush and a mild acid rinse (vinegar or diluted muriatic per instructions), rinse thoroughly, let dry, and address moisture sources to prevent recurrence.
Step 4 Repairing cracks, spalls, and surface damage (products and application)
Step 4 focuses on fixing visible damage—cracks, spalls, and surface defects—so your concrete’s structural integrity and appearance are restored before sealing.
Inspect and clean damaged areas, remove loose debris, and choose products: epoxy or polyurethane crack fillers, polymer-modified patching compounds for spalls, and bonding agents for thin repairs.
Follow manufacturer mixing, apply with trowel or caulking gun, cure fully before finishing.
Step 5 Etching or mechanical grinding for profile restoration
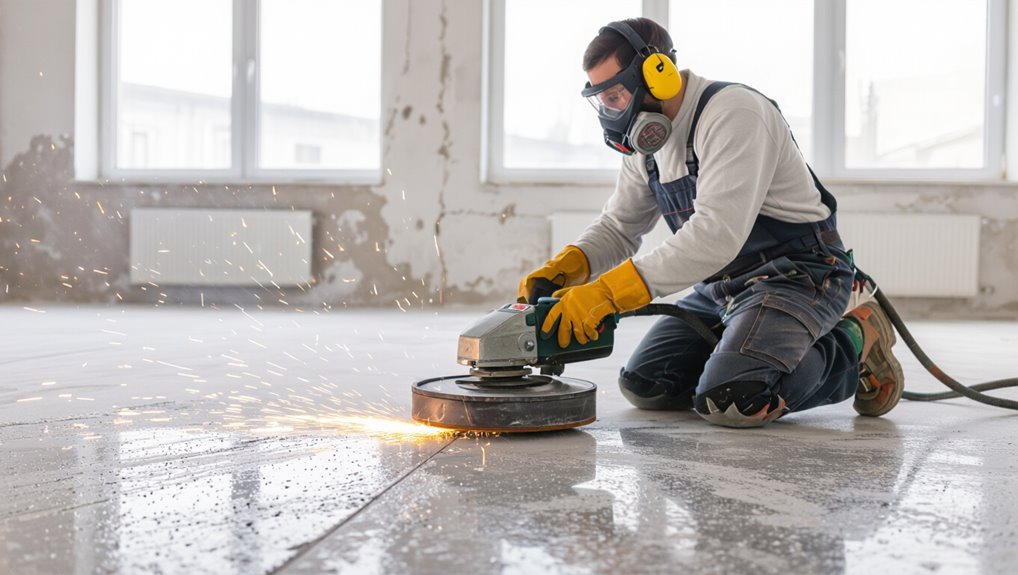
Restore the concrete’s surface profile by etching or mechanically grinding to guarantee coatings and sealers bond properly.
Choose etching for light profile adjustment using muriatic or citric acid, rinse thoroughly, neutralize, and dry.
Use a grinder with appropriate diamond or abrasive pads for heavier profiling, control dust with a shrouded vacuum, and inspect surface uniformity before proceeding to coating application.
Step 6 Polishing concrete (grit progression and results)
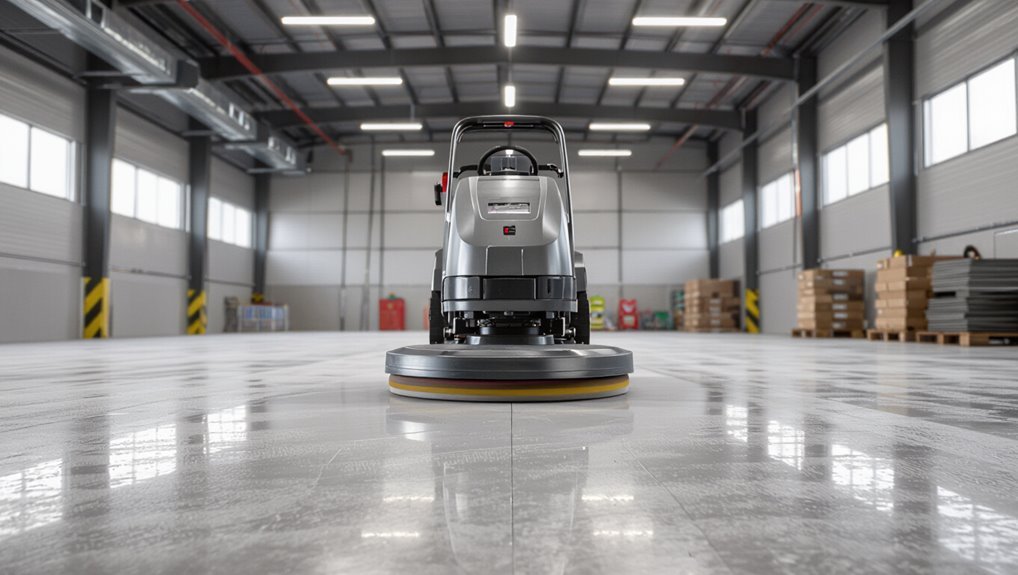
After etching or grinding has produced a consistent surface profile, you’ll move into polishing to refine the concrete and achieve the desired sheen.
Start with coarse diamonds (30–50 grit) to remove scratches, then progress through 100, 200, 400, and up to 800–3000 grit for high gloss.
Keep consistent passes, control speed and overlap, and inspect frequently for uniformity.
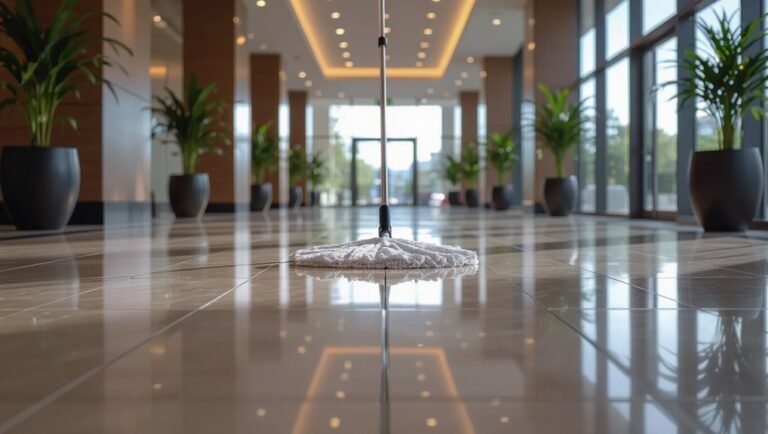
Step 7 Neutralizing, rinsing, and drying procedures
Once polishing’s done and the surface’s even, you’ll neutralize any remaining chemicals, thoroughly rinse to remove residues, and then dry the floor completely to prevent staining or uneven curing.
Use manufacturer-recommended neutralizer, apply evenly, agitate with a mop, then rinse with clean water until pH is neutral.
Remove standing water with a wet vacuum and allow full airflow or use fans to guarantee complete drying before next steps.
Step 8 Sealing or coating options to restore and protect (penetrating sealer, acrylic, epoxy, polyurethane)
With the concrete clean and fully dry, it’s time to choose a sealer or coating that matches the floor’s use and appearance goals.
Pick a penetrating silane/siloxane for invisible water protection, acrylic for affordable gloss, epoxy for chemical resistance and durability, or polyurethane for UV-stable high gloss.
Follow manufacturer instructions, apply evenly, allow proper cure times, and recoat if needed for lasting protection.
Choosing the Best Finish for Restored Concrete
Now that your concrete is clean and repaired, you’ll need to weigh sealers and coatings — each has pros and cons for durability, appearance, and cost.
Consider polishing when you want low maintenance and a natural look, or choose coatings for stronger chemical or impact resistance.
Think about long-term upkeep too, since maintenance needs and reapplication schedules vary by finish.
Pros and cons of sealers and coatings
Because the finish you choose affects durability, appearance, and maintenance, it’s important to weigh the pros and cons of sealers and coatings before you commit. You’ll pick based on traffic, look, and upkeep: sealers penetrate, keep natural texture, need reapplication; coatings add gloss, protect heavily, can chip.
| Sealer | Coating |
|---|---|
| Natural look | High protection |
| Easier repair | Longer lasting |
When to choose polishing vs. coating
Having weighed sealers versus coatings, you’ll next decide whether polishing or coating best suits your restored concrete.
Choose polishing if you want a durable, low-maintenance, glossy finish that highlights aggregate and resists abrasion without adding film.
Opt for coating when you need thicker protection, color options, or chemical resistance.
Consider traffic level, appearance goals, and budget to match function with finish.
Maintenance differences by finish type
1 major factor in choosing a finish is how you’ll maintain it: polished concrete needs regular dry dust mopping and occasional damp mopping with pH-neutral cleaners to keep its shine, while coated surfaces usually tolerate more aggressive cleaners but require watching for scratches, chips, and wear in high-traffic zones.
You’ll also schedule resealing for coatings and periodic repolishing or burnishing for polished floors to preserve appearance.
Common Mistakes and How to Avoid Them
Don’t skip the basics: using the wrong pH cleaner or failing to neutralize and rinse can ruin your finish.
Avoid sealing over damp concrete or before fixing cracks and chips, and don’t rush grinding or polishing—technique matters.
I’ll walk you through each common mistake and how to prevent it.
Using the wrong cleaner or pH for the floor
If you pick a cleaner with the wrong pH for your concrete, you can strip sealers, etch the surface, or leave residues that attract dirt.
Test cleaners on a small, hidden area first. Match cleaner pH to your finish—neutral for sealed, mild acid for heavy mineral stains on unsealed concrete.
Follow manufacturer dilution and use soft tools to avoid damage.
Overlooking proper neutralization and rinsing
When you skip proper neutralization and rinsing after cleaning, alkaline or acidic residues can stay trapped in the concrete and continue reacting with the surface, causing discoloration, sticky films, or premature sealer failure.
You should neutralize cleaners per instructions, rinse thoroughly with clean water, and blot or squeegee away residue.
Test pH before proceeding to confirm the surface’s ready for the next step.
Sealing too soon or on a damp surface
Although it’s tempting to seal right after cleaning, applying sealer to a damp or still-setting surface traps moisture and prevents proper adhesion, leading to cloudiness, peeling, or blisters;
always confirm the concrete is fully dry and cured per the sealer’s instructions before you coat it.
Test moisture with a hygrometer or plastic sheet, wait the recommended cure time, and only seal when readings are acceptable.
Improper grinding/polishing technique
Mastering grinding and polishing takes patience and technique, and doing it wrong can ruin hours of work and your floor’s appearance.
Don’t rush grit progression, skip dust control, or apply uneven pressure. You’ll create swirl marks, chatter, and inconsistent shine.
Follow manufacturer grit sequences, keep tools flat, change pads when worn, and vacuum between steps to guarantee an even, durable finish.
Ignoring substrate repairs before finishing
If you skip repairing cracks, spalls, or delaminated areas before finishing, you’ll trap problems under sealers or polishes and they’ll worsen over time.
Inspect the slab, clean damaged areas, and use appropriate patching compounds or epoxy injections. Allow cures fully, then grind or polish.
Proper substrate repair prevents future delamination, staining, and costly rework, keeping the restored floor durable and attractive.
Prevention and Best Practices for Long-Term Appearance
To keep your concrete looking its best, set a simple routine—daily sweeping, monthly mopping, and an annual deep clean and inspection.
Respond to spills immediately, use absorbent cleaners for stains, and place entry mats, pads, and furniture glides to prevent wear.
Plan to reseal or repolish based on traffic—typically every 1–5 years—and note that high-traffic areas may need attention more often.
Routine maintenance schedule (daily, monthly, annual)
Because regular care prevents small issues from becoming big ones, set a simple routine for daily, monthly, and annual maintenance that keeps concrete looking its best and extends its life.
- Daily: sweep and spot-dry spills quickly.
- Monthly: mop with pH-neutral cleaner; inspect for wear.
- Quarterly: reseal high-traffic zones as needed.
- Annual: deep-clean, assess cracks, plan repairs or professional care.
Spill response and stain prevention tips
Daily and scheduled cleaning will only do so much if spills and stains sit and soak in; act fast to keep concrete looking its best.
Blot liquids immediately, avoid scrubbing greasy spots that spread stains, and use pH-neutral cleaners for routine removal.
For oil, use absorbent powders, then degrease.
Seal exposed concrete and address discoloration quickly to prevent permanent damage.
Recommended mats, pads, and protective furniture glides
When you place quality mats, pads, and furniture glides under traffic areas and heavy items, you’ll dramatically reduce abrasion, staining, and surface wear on concrete floors.
Use dense rubber or microfiber entry mats, felt or neoprene pads under furniture legs, and reinforced caster cups for chairs.
Choose nonstaining materials, clean mats regularly, and replace worn pads to maintain even protection and prevent indentations.
When and how often to reseal or repolish
1 simple rule will keep your concrete looking its best: reseal high-traffic areas every 1–3 years and repolish as needed based on wear.
Check finish annually: water should bead, not soak in. Recoat when dull spots or staining return.
For polished concrete, refresh with a burnishing pad or professional repolish every 3–7 years depending on foot traffic and maintenance.
Cost, Time, and When to Hire a Pro
For a small garage you can expect a DIY cleaning to cost under $50 and take a few hours, while larger or heavily stained floors may need a full day and several hundred dollars in rental gear and supplies.
If you’re facing deep oil stains, structural cracks, or need concrete resurfacing, that’s when professional equipment and expertise become necessary.
A pro will usually assess the floor, use industrial grinders or pressure washers, provide options (repairs, sealing), offer a warranty or guarantee, and handle thorough cleanup.
Typical DIY cost and time estimates by floor size
Estimating DIY cost and time depends largely on the square footage and the job’s condition. For small areas (under 200 sq ft) expect $20–$60 and 1–3 hours; medium (200–800) $60–$200 and a day; large (800+) $200–$600 and a weekend. If stains persist or work drags, consider consulting a pro.
| Size | Cost | Time |
|---|---|---|
| Small | $20–$60 | 1–3 hrs |
| Medium | $60–$200 | 1 day |
| Large | $200–$600 | Weekend |
Signs the job requires professional equipment or expertise
Those DIY time and cost ranges work for routine cleaning, but some jobs need more than household tools and elbow grease.
Hire pros if stains penetrate deep, large surface area or heavy oil/chemical contamination exists, structural cracks or uneven slabs need repair, or you lack time and protective gear.
Professionals also make sense when strict deadlines or commercial standards demand reliable, efficient results.
What to expect from a professional service (process, warranty, cleanup)
When you hire a professional to clean concrete, expect a clear, staged process: an initial site assessment, surface preparation (sweeping, degreasing, repairs), targeted cleaning with pressure washing, shot blasting, or chemical treatments as needed, and a finishing step like sealing or coating.
They’ll quote cost and timeline upfront, provide warranties for work or materials, contain mess with proper cleanup, and advise when follow-up is needed.
Frequently Asked Questions
You probably have a few quick questions about cleaning and caring for concrete — like whether bleach or vinegar are safe, if sealing will restore shine, or how long sealers last.
You might also wonder whether you can strip paint or epoxy yourself and whether polishing is safe on concrete with hairline cracks.
Below are clear answers to those common concerns.
Can I use household cleaners like bleach or vinegar on concrete?
Curious whether common household cleaners like bleach or vinegar are safe for concrete?
You can use mild vinegar solutions for light cleaning, but avoid concentrated acids—overuse can etch or dull the surface.
Bleach removes stains and disinfects, yet it can damage sealers and discolor some concrete if left too long.
Always test a small area, rinse thoroughly, and ventilate when using strong cleaners.
Will sealing make my concrete look shiny and new?
If you’re worried about how cleaners affect appearance, note that sealing offers a more reliable way to refresh concrete’s look than repeated chemical scrubbing.
A sealer enhances color, evens sheen, and reduces staining by blocking liquids. Gloss levels vary—matte to high gloss—so you can choose subtle richness or a bright, wet look.
Proper prep and application guarantee consistent results.
How long does a concrete sealer last and how do I know when to reapply?
How long a concrete sealer lasts depends on the type of sealer, the amount of foot or vehicle traffic it gets, and exposure to sun and chemicals.
Typically, films last 1–5 years, penetrating sealers 3–7 years. Reapply when water no longer beads, surfaces look dull, or stains penetrate.
Do a simple water test yearly and plan touch-ups sooner in high-traffic or sun-exposed areas.
Can I remove paint or epoxy from concrete myself?
Wondering whether you can strip paint or epoxy from concrete yourself? You can for small areas using chemical strippers, heat guns, or grinders, but choose methods carefully.
Test a patch, wear PPE, and guarantee ventilation.
Epoxy often needs mechanical removal and more effort.
For large surfaces or thick coatings, consider a pro to avoid damage, uneven removal, or health risks.
Is it safe to polish old concrete with hairline cracks?
Can you safely polish old concrete that has hairline cracks? Yes—usually.
You’ll need to assess stability, clean and fill cracks with a compatible epoxy or polymer-modified mortar, then grind and polish carefully.
Small hairline cracks won’t stop polishing but should be stabilized to prevent spreading and to guarantee a uniform finish.
For structural concerns, consult a professional before proceeding.